
Home>Create & Decorate>DIY & Crafts>How To Build A Pizza Oven
DIY & Crafts
How To Build A Pizza Oven
Published: February 23, 2024

Content Creator specializing in woodworking and interior transformations. Caegan's guides motivate readers to undertake their own projects, while his custom furniture adds a personal touch.
Learn how to build a pizza oven with our step-by-step DIY guide. Get creative with our DIY & Crafts tips and create your own backyard pizza paradise!
(Many of the links in this article redirect to a specific reviewed product. Your purchase of these products through affiliate links helps to generate commission for Twigandthistle.com, at no extra cost. Learn more)
Introduction
Building your own pizza oven is a rewarding and enjoyable DIY project that can elevate your outdoor cooking experience to a whole new level. Whether you're a culinary enthusiast, a lover of outdoor entertaining, or simply someone who appreciates the satisfaction of creating something with your own hands, constructing a pizza oven can be a fulfilling endeavor. Not only does it provide a unique focal point for your outdoor space, but it also allows you to savor the authentic flavors of wood-fired pizza right in your backyard.
The process of building a pizza oven involves a blend of craftsmanship, creativity, and practicality. From selecting the ideal location for your oven to crafting the perfect dome shape, each step requires attention to detail and a passion for the art of traditional pizza making. By embarking on this DIY journey, you'll not only gain a deeper understanding of the construction process but also develop a profound appreciation for the time-honored tradition of wood-fired cooking.
In this comprehensive guide, we will walk you through the step-by-step process of building your very own pizza oven. You'll learn about the essential materials and tools needed, the considerations for choosing the right location, and the intricacies of constructing the oven base and dome. Additionally, we'll delve into the crucial aspects of installing the chimney, adding the finishing touches, and firing up the oven for that eagerly anticipated first batch of mouthwatering pizzas.
Whether you're a seasoned DIY enthusiast or a newcomer to the world of outdoor construction, this guide is designed to equip you with the knowledge and confidence to embark on this exciting project. By the end of this journey, you'll not only have a stunning pizza oven to call your own but also a newfound sense of accomplishment and pride in creating a centerpiece that will bring joy to family and friends for years to come. So, roll up your sleeves, ignite your passion for craftsmanship, and let's dive into the art of building a pizza oven from the ground up.
Materials and Tools Needed
Building a pizza oven requires a specific set of materials and tools to ensure the construction process runs smoothly and efficiently. Here's a comprehensive list of everything you'll need to embark on this exciting DIY project:
Materials:
- Firebricks: These specialized bricks are designed to withstand high temperatures and form the interior of the oven.
- Refractory Mortar: A heat-resistant mortar that binds the firebricks together, creating a durable and robust structure.
- Concrete: Used for constructing the oven base and providing a stable foundation for the entire structure.
- Insulating Materials: Vermiculite or perlite are commonly used to insulate the oven, helping to retain heat for efficient cooking.
- Metal Rebar: Provides reinforcement for the concrete base, ensuring its strength and longevity.
- Sheet Metal: Required for fabricating the oven door and chimney cap.
- Wood Planks: Used for creating formwork during the base construction phase.
- Sand: Essential for mixing mortar and leveling the base foundation.
Tools:
- Masonry Trowel: Used for applying mortar when laying the firebricks and constructing the oven dome.
- Spirit Level: Ensures the base and oven structure are perfectly level and plumb during construction.
- Concrete Mixer: Facilitates the mixing of concrete for the base and hearth slab.
- Brick Saw or Angle Grinder with Diamond Blade: Essential for cutting firebricks to the required dimensions.
- Measuring Tape and Carpenter's Square: Ensures precise measurements and accurate angles during construction.
- Rubber Mallet: Used for tapping bricks into place without damaging them.
- Wire Brush: Helps clean and prepare surfaces before applying mortar.
- Protective Gear: Including gloves, safety goggles, and a dust mask for personal safety during construction.
By gathering these materials and tools, you'll be well-equipped to commence the construction of your pizza oven. Each item plays a crucial role in ensuring the structural integrity, durability, and functionality of the oven, allowing you to create a long-lasting centerpiece for outdoor cooking and entertainment.
Choosing the Right Location
Selecting the optimal location for your pizza oven is a critical decision that can significantly impact its performance and overall enjoyment. When determining the placement of your oven, several key factors should be taken into consideration to ensure a successful and functional installation.
Considerations for Location:
-
Accessibility: Choose a location that is easily accessible from your kitchen or outdoor dining area. This convenience will streamline the process of preparing and transferring pizzas to and from the oven, enhancing the overall cooking experience.
-
Ventilation: Adequate ventilation is essential to ensure that smoke and heat from the oven can disperse effectively. Position the oven in an area where smoke will not be a nuisance to you or your neighbors.
-
Wind Direction: Take note of prevailing wind patterns in your outdoor space. Position the oven so that the prevailing wind does not blow smoke or heat directly toward your home or seating areas.
-
Sun Exposure: Consider the sun's path throughout the day and how it will affect the use of your pizza oven. Aim to position the oven in an area that offers a balance of shade and sunlight, allowing for comfortable cooking experiences at various times of the day.
-
Aesthetic Appeal: The location of your pizza oven should complement the overall aesthetics of your outdoor space. Whether integrated into a patio, garden, or outdoor kitchen, the oven should enhance the visual appeal of the area.
-
Safety: Ensure that the chosen location provides a safe distance from flammable materials such as trees, shrubs, or wooden structures. This precautionary measure minimizes the risk of accidental fires and ensures the safety of your outdoor cooking environment.
-
Ground Stability: Select a level and stable area for the oven's base to ensure a solid foundation. Uneven ground may lead to structural issues and compromise the oven's long-term stability.
By carefully evaluating these considerations, you can identify the most suitable location for your pizza oven. Once the ideal spot has been determined, you can proceed with confidence to the next phase of the construction process, knowing that your oven's placement has been thoughtfully planned to optimize functionality, safety, and visual appeal.
Building the Base
The foundation of a pizza oven is crucial to its stability, durability, and overall performance. Building a solid base sets the stage for the rest of the construction process, providing a sturdy platform on which the oven structure will be erected. Here's a detailed overview of the steps involved in constructing the base for your pizza oven:
1. Site Preparation
Before commencing the base construction, it's essential to prepare the chosen location. Clear the area of any debris, rocks, or vegetation, ensuring a clean and level surface for the base. Use a spirit level to confirm that the ground is even, making any necessary adjustments to achieve a flat foundation.
2. Formwork Assembly
Once the site is prepared, assemble the formwork using wood planks to create a mold for the concrete base. The formwork should be designed to the dimensions of the desired base, providing a framework for pouring and shaping the concrete. Carefully measure and align the formwork to ensure the base will be uniform and level.
3. Reinforcement Installation
To enhance the strength and stability of the base, insert metal rebar within the formwork. The rebar serves as reinforcement, preventing the concrete from cracking and providing structural integrity to the base. Position the rebar in a grid pattern within the formwork, securing it in place to prepare for the concrete pour.
4. Concrete Mixing and Pouring
With the formwork and reinforcement in place, mix the concrete according to the manufacturer's instructions. Once the concrete is thoroughly mixed, pour it into the formwork, ensuring an even distribution across the entire base area. Use a trowel to level the concrete, smoothing the surface to achieve a uniform finish.
5. Curing and Drying
Allow the concrete base to cure and dry for the recommended period, typically several days. During this time, protect the base from excessive moisture and temperature fluctuations to facilitate proper curing. This crucial step ensures that the concrete achieves its maximum strength and durability before further construction.
By meticulously following these steps, you'll establish a robust and reliable base for your pizza oven, laying the groundwork for the subsequent phases of the construction process. With the base in place, you're ready to progress to the next stage of crafting the oven dome, bringing you one step closer to enjoying the delights of homemade, wood-fired pizzas in your outdoor oasis.
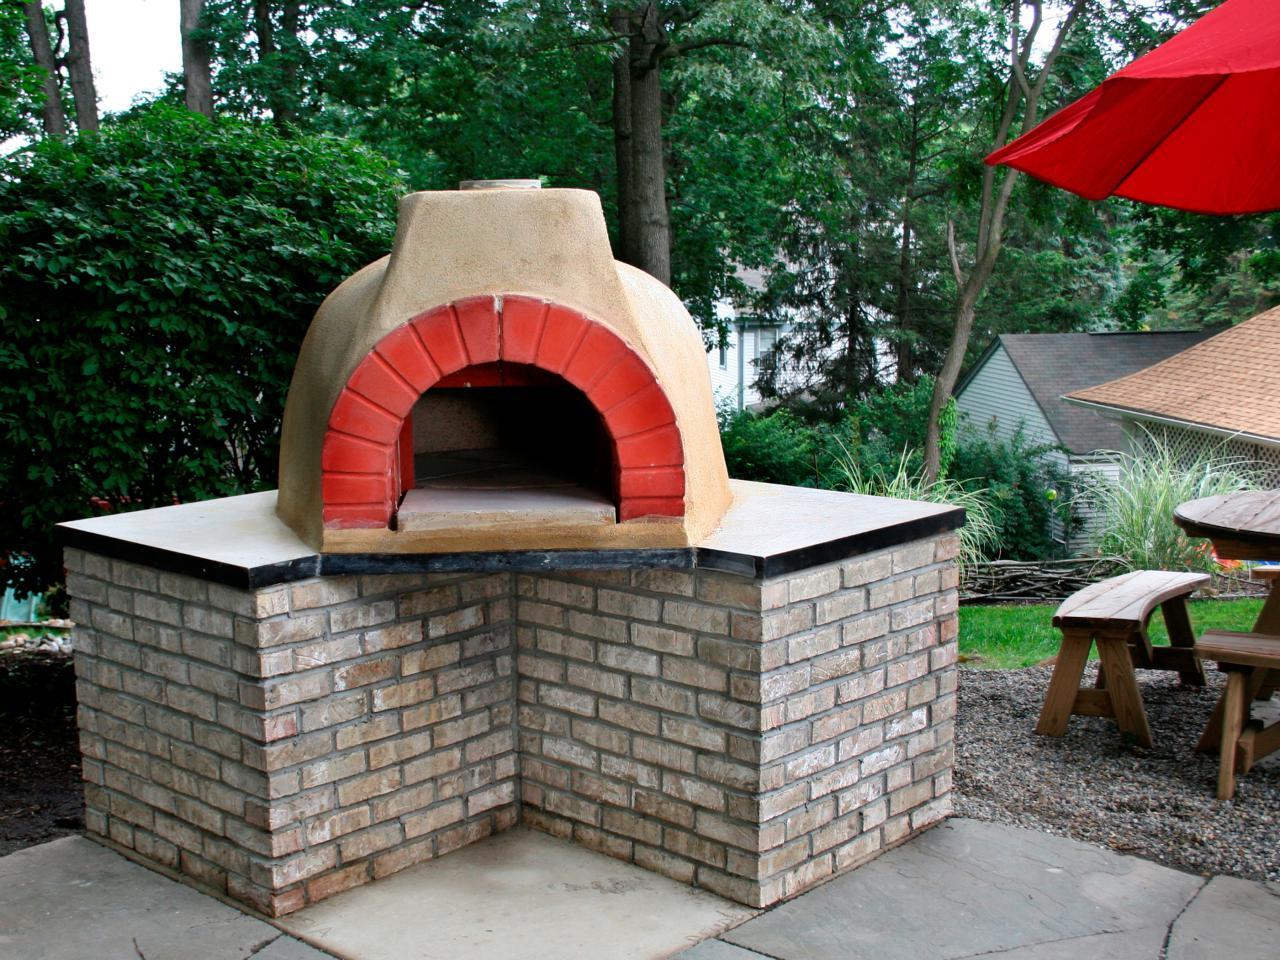
Constructing the Oven Dome
The oven dome is the defining feature of a pizza oven, responsible for trapping and radiating heat evenly to create the ideal cooking environment for delicious, wood-fired pizzas. Constructing the dome requires precision, attention to detail, and an understanding of the structural dynamics that contribute to its functionality. Here's a comprehensive guide to the step-by-step process of crafting the oven dome, transforming your pizza oven project into a true culinary centerpiece.
1. Layout and Design
Before commencing the dome construction, it's essential to plan the layout and design of the oven's interior. The dome shape plays a critical role in ensuring efficient heat distribution and retention, directly impacting the quality of the pizzas produced. Using a combination of firebricks and refractory mortar, carefully lay out the initial courses of bricks to form the dome's curvature, ensuring a smooth and uniform shape that tapers towards the top opening.
2. Brick Placement
As you progress with the dome construction, meticulously position each firebrick, applying refractory mortar to securely bond the bricks together. The interlocking pattern of the bricks creates a self-supporting structure, gradually forming the characteristic dome shape. Pay close attention to the alignment and spacing of the bricks, maintaining consistency to achieve a stable and aesthetically pleasing dome structure.
3. Gradual Elevation
Building the dome involves a gradual elevation process, with each successive course of bricks contributing to the dome's height and curvature. As the dome rises, the carefully calculated design ensures that the internal space diminishes smoothly, ultimately converging at the apex of the dome. This meticulous progression is essential for achieving the desired internal volume and heat distribution characteristics necessary for optimal pizza baking.
4. Insulation Layer
Once the dome structure is complete, it's crucial to incorporate an insulation layer to enhance the oven's thermal efficiency. Vermiculite or perlite, mixed with refractory mortar, is applied over the dome's exterior, creating a thermally insulating barrier that helps retain heat within the oven. This insulation layer plays a pivotal role in ensuring consistent and sustained high temperatures, essential for achieving the signature crispiness and flavor of wood-fired pizzas.
5. Finishing Touches
With the dome structure and insulation in place, attention turns to the finishing touches that complete the construction process. Smooth out any rough edges, ensuring a seamless transition from the dome to the oven opening. Additionally, create the opening for the oven door, carefully shaping and reinforcing the surrounding bricks to accommodate the door assembly.
By meticulously following these steps, you'll master the art of constructing the oven dome, a pivotal phase that brings your pizza oven to life. The carefully crafted dome, with its precise curvature and insulating properties, sets the stage for the ultimate wood-fired pizza experience, marking a significant milestone in your journey towards culinary excellence.
Installing the Chimney
The installation of the chimney is a critical aspect of completing the pizza oven construction, as it plays a pivotal role in ensuring proper ventilation and smoke dispersion during the cooking process. By effectively channeling smoke and heat away from the cooking area, the chimney contributes to a comfortable and safe cooking environment, allowing you to fully enjoy the culinary delights emerging from your wood-fired oven.
1. Chimney Design and Placement
Before installing the chimney, careful consideration should be given to its design and placement. The chimney should extend vertically from the highest point of the oven dome, allowing for efficient smoke extraction. Additionally, the chimney's height and diameter should be in accordance with local building codes and regulations to ensure compliance and safe operation.
2. Cutting an Opening
To accommodate the chimney, a precise opening must be created in the oven dome. Using a suitable cutting tool, such as an angle grinder with a diamond blade, carefully cut through the refractory materials to form the designated chimney opening. Attention to detail is crucial at this stage to ensure the opening aligns with the intended chimney position and dimensions.
3. Chimney Assembly
Once the opening is prepared, assemble the chimney components, which typically include a metal flue and cap. The flue is inserted through the opening in the oven dome, extending upward to form the vertical chimney stack. Secure the flue in place using refractory mortar, ensuring a tight and stable connection between the chimney and the oven structure. The chimney cap, designed to prevent rain and debris from entering the flue, is then affixed to the top of the stack, completing the assembly.
4. Sealing and Insulation
After the chimney components are in position, it's essential to seal any gaps between the flue and the oven dome using refractory mortar. This sealing process not only enhances the chimney's structural integrity but also prevents smoke from escaping through unintended openings. Additionally, an insulation layer may be applied around the base of the chimney to minimize heat loss and further optimize the oven's thermal efficiency.
5. Safety Considerations
Throughout the chimney installation process, prioritizing safety is paramount. Ensure that the chimney is securely anchored to the oven structure, minimizing the risk of dislodgment or instability. Additionally, verify that the chimney complies with safety standards and regulations, providing a secure and effective means of smoke evacuation without posing any hazards to the surrounding environment.
By meticulously executing the installation of the chimney, you'll establish a crucial component of your pizza oven, facilitating proper ventilation and enhancing the overall functionality of the cooking space. With the chimney in place, you're one step closer to savoring the aromatic flavors and crispy textures of authentic wood-fired pizzas, prepared with precision and passion in your very own outdoor oasis.
Adding the Finishing Touches
As the construction of the pizza oven nears completion, attention turns to the crucial phase of adding the finishing touches, where meticulous details and final enhancements elevate the oven from a structure to a culinary masterpiece. This stage encompasses a series of essential steps that contribute to the functionality, aesthetics, and overall appeal of the oven, culminating in a space that embodies the timeless charm of traditional wood-fired cooking.
1. Oven Door Installation
The installation of the oven door marks a significant milestone in the completion of the pizza oven. The door, typically crafted from sheet metal, is carefully fitted into the designated opening in the oven dome. Its purpose extends beyond mere access to the oven's interior; it serves as a vital component in regulating heat retention and controlling airflow during the cooking process. With precise alignment and a secure seal, the door ensures optimal cooking conditions, allowing the oven to achieve and maintain the high temperatures essential for perfecting wood-fired pizzas.
2. Decorative Finishes
Incorporating decorative elements into the oven's exterior adds a personalized touch and enhances its visual appeal. From ornamental tiles to custom mosaics, the addition of decorative finishes transforms the oven into a striking focal point within the outdoor space. These embellishments not only reflect individual style and creativity but also contribute to the seamless integration of the oven into the surrounding environment, creating a harmonious and inviting ambiance for culinary gatherings and outdoor entertainment.
3. Weatherproofing Measures
To safeguard the oven against the elements and ensure its longevity, weatherproofing measures are implemented. Applying a protective sealant to the exterior surfaces shields the oven from moisture and environmental exposure, preserving its structural integrity and appearance. Additionally, addressing potential vulnerabilities, such as sealing gaps and reinforcing joints, fortifies the oven against the effects of weather, safeguarding its functionality and aesthetic appeal for years to come.
4. Personalized Touches
Incorporating personalized touches into the oven's design imparts a sense of individuality and character. Whether through engraved initials, a family crest, or a meaningful inscription, these personalizations infuse the oven with sentimental value and create a lasting connection to its creators. Such details serve as a testament to the craftsmanship and dedication invested in the construction process, transforming the oven into a cherished symbol of culinary passion and familial traditions.
5. Final Inspections
Before the inaugural firing of the pizza oven, conducting thorough inspections ensures that all components are in place and functioning optimally. From verifying the integrity of the chimney assembly to confirming the stability of the oven base, these final checks provide peace of mind and assurance that the oven is primed for its inaugural culinary endeavors.
By meticulously attending to these finishing touches, the pizza oven undergoes a remarkable transformation, evolving from a construction project into a functional and captivating culinary centerpiece. With each detail carefully considered and executed, the oven stands as a testament to craftsmanship, creativity, and the enduring allure of wood-fired cooking, ready to serve as the backdrop for countless memorable gatherings and delectable culinary creations.
Firing Up the Pizza Oven
Firing up the pizza oven marks a pivotal moment in the culmination of the construction process, heralding the transition from a meticulously crafted structure to a dynamic culinary space brimming with potential. This transformative phase not only signifies the readiness of the oven for its inaugural cooking endeavors but also embodies the essence of traditional wood-fired cooking, where the marriage of heat, flavor, and technique converges to create culinary masterpieces.
The first firing of the pizza oven serves multiple purposes, each contributing to the oven's functionality and long-term performance. As the fire ignites and gradually builds within the oven, several essential objectives are achieved, setting the stage for the oven's future culinary exploits.
1. Curing the Oven
The initial firing serves to cure the oven, a crucial process that involves gradually increasing the internal temperature to drive off residual moisture from the construction materials. This gradual heat exposure not only strengthens the oven's structure but also prepares it for sustained high temperatures during cooking. Curing the oven typically involves several incremental firing sessions, each progressively elevating the internal temperature until the oven reaches its optimal operating range.
2. Assessing Heat Distribution
The first firing provides an opportunity to assess the heat distribution within the oven, a fundamental aspect of wood-fired cooking. As the fire radiates heat throughout the oven's interior, observing the patterns of heat dispersion allows for adjustments to be made, ensuring that the cooking surface achieves uniform and consistent temperatures. This understanding of heat dynamics is essential for mastering the art of wood-fired cooking, enabling precise control over the cooking environment and the creation of flawlessly baked pizzas.
3. Establishing the Hearth
During the initial firing, the oven's hearth, or cooking surface, undergoes a crucial transformation as it absorbs and retains heat. This process conditions the hearth for optimal pizza baking, imparting it with the ability to impart the coveted charred crust and distinctive flavor that are hallmarks of wood-fired pizzas. As the hearth absorbs the radiant heat, it becomes primed for the culinary alchemy that takes place when dough, sauce, and toppings meet the intense heat of the oven.
4. Infusing Character
Beyond its functional implications, the first firing infuses the oven with character and vitality, marking the inception of its culinary journey. The crackling flames, the dance of heat, and the aromatic wood smoke intertwine to imbue the oven with a palpable sense of warmth and tradition. This immersive experience not only fosters a deep connection to the cooking process but also sets the stage for the creation of memorable culinary experiences that resonate with the timeless allure of wood-fired cooking.
As the flames flicker and the oven radiates with the promise of culinary adventures, the first firing of the pizza oven encapsulates the essence of craftsmanship, tradition, and the art of wood-fired cooking. It heralds the beginning of a culinary odyssey, where the alchemy of fire and flavor converges to create delectable pizzas and cherished memories, ensuring that the oven's flames will continue to illuminate gatherings and celebrations for years to come.
Maintenance and Care Tips
Maintaining and caring for your newly constructed pizza oven is essential to ensure its longevity, optimal performance, and continued enjoyment for years to come. By implementing regular maintenance practices and observing diligent care, you can preserve the structural integrity of the oven, safeguard its functionality, and uphold its aesthetic appeal. Here are comprehensive maintenance and care tips to guide you in nurturing your wood-fired culinary centerpiece:
-
Cleaning and Debris Removal: Regularly remove ash, soot, and debris from the oven's interior and cooking surface. Use a brush or scraper to clear out residual ash and ensure a clean cooking environment for future use.
-
Weather Protection: Shield the oven from adverse weather conditions by covering it with a weatherproof tarp or custom-fitted cover when not in use. This protective measure safeguards the oven from moisture, prolonging its lifespan and preventing weather-related damage.
-
Inspecting and Sealing: Periodically inspect the oven for any signs of wear, cracks, or deterioration. Address any issues promptly by resealing joints, repairing cracks with refractory mortar, and reinforcing the oven's structural integrity as needed.
-
Chimney Maintenance: Keep the chimney clear of obstructions and debris to maintain efficient smoke evacuation. Regularly inspect the chimney cap and flue for any blockages or buildup, ensuring unimpeded airflow during cooking sessions.
-
Refractory Material Care: Monitor the condition of the refractory materials, including firebricks and insulation. Replace any damaged or deteriorating components to uphold the oven's thermal efficiency and heat retention capabilities.
-
Seasoning the Hearth: Periodically re-season the oven's hearth by heating it to high temperatures to burn off residual food particles and maintain its non-stick surface. This process contributes to the development of a desirable patina and enhances the hearth's performance.
-
Firewood Selection: Use seasoned hardwoods for fuel, avoiding green or resinous woods that can produce excessive smoke and leave residue within the oven. Opt for high-quality firewood to maintain clean combustion and minimize creosote buildup.
-
Regular Firing: Conduct periodic firing sessions to maintain the oven's heat-curing properties and prevent moisture retention within the construction materials. This practice contributes to the oven's durability and resilience against environmental factors.
-
Educating Users: If the pizza oven is used by multiple individuals, provide clear instructions on its proper operation, maintenance, and care. Educating users on best practices ensures consistent care and responsible usage of the oven.
By adhering to these maintenance and care tips, you can uphold the integrity and functionality of your pizza oven, ensuring that it remains a cherished centerpiece for culinary exploration and outdoor gatherings. With attentive care and regular maintenance, your wood-fired oven will continue to serve as a source of culinary delight and communal enjoyment, embodying the timeless tradition of wood-fired cooking for generations to come.
Conclusion
In conclusion, the journey of building a pizza oven from the ground up is a testament to the fusion of craftsmanship, creativity, and culinary passion. From the initial selection of materials and tools to the meticulous construction of the oven base, dome, and chimney, each phase of the process embodies a profound dedication to the art of traditional wood-fired cooking. As the finishing touches are added and the first flames dance within the oven, a sense of accomplishment and anticipation permeates the air, heralding the beginning of a culinary odyssey.
The completion of the pizza oven represents more than the construction of a functional cooking space; it signifies the creation of a focal point that embodies the timeless allure of wood-fired cooking. It stands as a testament to the enduring traditions of culinary craftsmanship, offering a portal to a realm where heat, flavor, and technique converge to create delectable pizzas and cherished memories.
Beyond its functional attributes, the pizza oven becomes a gathering place, a source of warmth and conviviality where friends and family converge to savor the delights emerging from its fiery embrace. It embodies the spirit of communal dining, fostering connections and shared experiences that transcend the mere act of cooking. The oven becomes a conduit for storytelling, laughter, and the forging of enduring bonds, enriching the tapestry of culinary traditions and familial legacies.
As the seasons unfold and the oven becomes an integral part of outdoor gatherings and celebrations, it serves as a living testament to the art of craftsmanship and the enduring allure of wood-fired cooking. Its flames illuminate the path to culinary exploration, offering a canvas for culinary creativity and the realization of time-honored recipes. It becomes a symbol of tradition, a repository of cherished memories, and a conduit for the transmission of culinary heritage from one generation to the next.
In essence, the completion of the pizza oven marks the inception of a journey—a journey defined by the crackling of flames, the aroma of wood smoke, and the creation of culinary masterpieces. It embodies the spirit of tradition, craftsmanship, and the timeless allure of wood-fired cooking, ensuring that the oven's flames will continue to illuminate gatherings and celebrations for years to come.