
Home>Create & Decorate>DIY & Crafts>How To Build A Bocce Court
DIY & Crafts
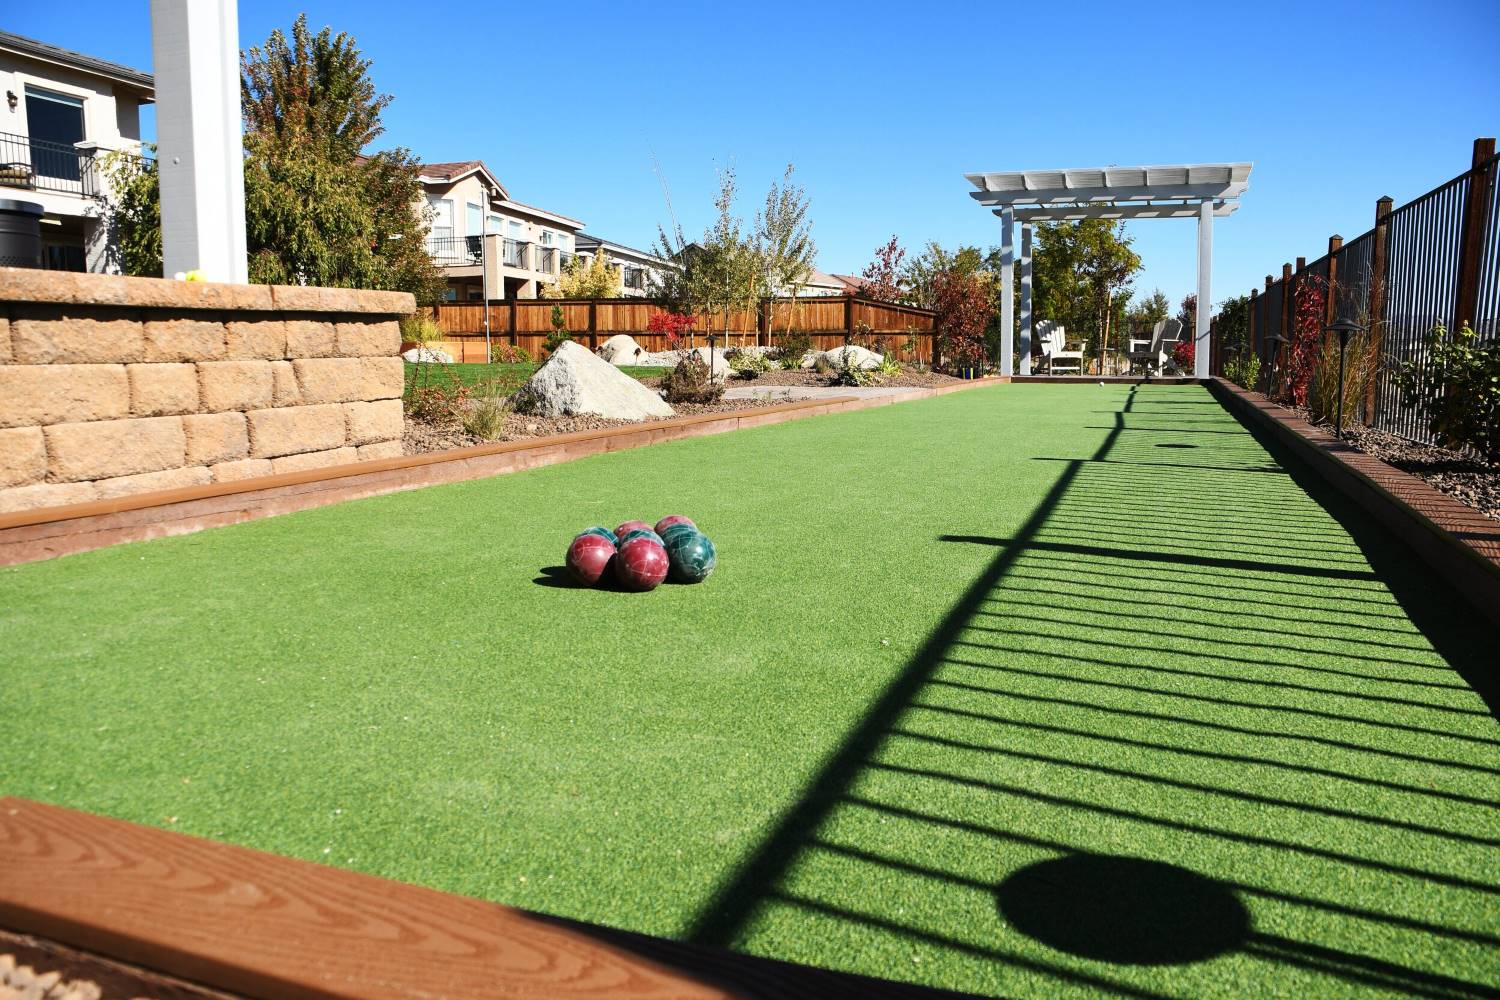
How To Build A Bocce Court
Published: May 28, 2024

Content Creator specializing in woodworking and interior transformations. Caegan's guides motivate readers to undertake their own projects, while his custom furniture adds a personal touch.
Learn how to build a bocce court with our step-by-step DIY guide. Get creative with your outdoor space and enjoy this fun DIY & Crafts project.
(Many of the links in this article redirect to a specific reviewed product. Your purchase of these products through affiliate links helps to generate commission for Twigandthistle.com, at no extra cost. Learn more)
Introduction
So, you've decided to build a bocce court in your backyard? That's fantastic! Whether you're a bocce enthusiast or just looking for a fun outdoor activity, having your own court can provide hours of entertainment for family and friends. In this guide, we'll walk you through the step-by-step process of creating your very own bocce court. From choosing the right location to adding the final touches, we've got you covered. Let's roll up our sleeves and get started on this exciting DIY project!
Choosing the Right Location
When it comes to building a bocce court, choosing the right location is crucial. Here are some key factors to consider when selecting the perfect spot for your court:
-
Space: Ensure that you have enough space to accommodate a regulation-size bocce court, which is typically 13-14 feet wide and 60-90 feet long. If space is limited, you can opt for a smaller court, but make sure it still allows for a challenging game.
-
Sunlight: Look for an area in your yard that receives ample sunlight throughout the day. Bocce is best played in good lighting conditions, so a sunny spot will ensure optimal gameplay.
-
Flat Surface: The ground where you plan to build the court should be relatively flat and free of any major obstructions such as large rocks or tree roots. This will make the construction process much easier and result in a smoother playing surface.
-
Accessibility: Consider the accessibility of the location. It should be easily reachable from your home and have enough space around it for players to move freely during games.
-
Privacy: If possible, choose a location that offers some privacy. This will allow you to enjoy your games without feeling too exposed to neighbors or passersby.
Once you've identified the ideal location, you can move on to the next steps in the bocce court construction process.
Gathering Materials and Tools
Before you can start building your bocce court, you'll need to gather the necessary materials and tools. Here's a comprehensive list of what you'll need:
Materials:
- Bocce Ball Set: This includes the bocce balls and a smaller target ball, known as the pallino.
- Wooden Boards or Plastic Edging: These will be used to create the boundary of the court.
- Crushed Stone or Oyster Shell: This will serve as the base for the playing surface.
- Fine Gravel or Decomposed Granite: This will be used to create the top layer of the court surface.
- Measuring Tape: Essential for ensuring accurate dimensions.
- String or Rope: Useful for marking out the court area.
- Shovel and Rake: For digging and leveling the ground.
- Wheelbarrow: To transport and distribute materials.
- Tamper: Used to compact the base materials.
- Level: To ensure a flat playing surface.
Tools:
- Power Saw or Hand Saw: For cutting the wooden boards to size.
- Drill and Screws: If you're using wooden boards for the boundary, you'll need these to secure them in place.
- Gloves: To protect your hands during construction.
- Safety Goggles: Important for eye protection, especially when cutting or drilling.
- Work Gloves: To protect your hands during heavy lifting and handling of materials.
- Broom: For sweeping the court surface once it's complete.
Once you have all the necessary materials and tools, you'll be well-prepared to move on to the next steps of building your bocce court.
Preparing the Ground
Preparing the ground for your bocce court is a crucial step that will ultimately determine the quality and durability of the playing surface. Here's a detailed guide on how to properly prepare the ground for your bocce court:
-
Clear the Area: Begin by clearing the selected area of any debris, rocks, or vegetation. Use a rake and shovel to remove any obstacles and create a clean, level surface.
-
Mark the Court Dimensions: Use a measuring tape, string, or rope to mark out the dimensions of the court. For a standard bocce court, the dimensions are typically 13-14 feet wide and 60-90 feet long. Ensure that the lines are straight and accurately represent the court boundaries.
-
Excavate the Area: Once the court dimensions are marked, it's time to excavate the area to a depth of about 4-6 inches. Use a shovel to remove the topsoil and create a uniform depth across the entire court area.
-
Compact the Soil: After excavating the area, use a tamper to compact the soil thoroughly. This will create a stable base for the subsequent layers of materials. Ensure that the compacted soil is level and free of any bumps or depressions.
-
Add Base Material: Once the soil is compacted, it's time to add the base material. This can be crushed stone or oyster shell, which should be spread evenly across the court area. Use a rake to distribute the base material and ensure a consistent depth of around 3-4 inches.
-
Compact the Base Material: After spreading the base material, use a tamper to compact it thoroughly. This step is essential for creating a solid and stable foundation for the court surface. Pay close attention to achieving uniform compaction across the entire court area.
-
Level the Surface: Once the base material is compacted, use a level to ensure that the surface is flat and even. Make any necessary adjustments to eliminate any uneven areas or high spots.
By following these steps, you'll have successfully prepared the ground for your bocce court, setting the stage for the next phase of construction.
Building the Court Surface
Now that the ground is prepared, it's time to focus on building the court surface. This is where the actual playing area will take shape, so attention to detail is key. Here's a step-by-step guide on how to create a smooth and professional-looking court surface for your bocce court:
-
Add the Top Layer: Once the base material is in place and properly compacted, it's time to add the top layer of the court surface. This layer is typically made of fine gravel or decomposed granite, providing a smooth and level playing area. Spread the top layer evenly across the court, ensuring a consistent depth of around 1-2 inches.
-
Rake and Level: Use a rake to spread the top layer of material evenly across the court surface. Pay close attention to achieving a uniform depth and smooth texture. Once the material is spread, use a level to ensure that the surface is flat and free of any irregularities. This step is crucial for creating an optimal playing surface.
-
Compact the Surface: After the top layer is spread and leveled, use a tamper to compact the surface thoroughly. This will help to settle the material and create a solid, stable playing surface. Pay special attention to achieving uniform compaction across the entire court area, ensuring consistent playing conditions.
-
Fine-Tune the Surface: Once the surface is compacted, take the time to fine-tune any areas that may require additional leveling or smoothing. Use a rake and a level to make any necessary adjustments, ensuring that the court surface is free of any bumps or depressions. This meticulous approach will result in a high-quality playing area.
-
Water the Surface: After the court surface is fully prepared, lightly water the area to help settle the materials and enhance stability. Be careful not to overwater, as this can lead to unevenness in the playing surface. The goal is to achieve a firm and stable court surface that is ready for gameplay.
By following these steps, you'll have successfully built a professional-grade court surface for your bocce court, setting the stage for the next phase of construction.
Installing the Boundary
Installing the boundary is a critical step in defining the playing area and ensuring that your bocce court meets regulation standards. Here's a detailed guide on how to install the boundary for your bocce court:
-
Select the Boundary Material: Choose the material for the boundary based on your preference and the overall aesthetic of your backyard. Common options include wooden boards, plastic edging, or even metal borders. Ensure that the material is durable and capable of withstanding outdoor conditions.
-
Cut the Boundary Material: If you're using wooden boards, measure and cut them to the appropriate lengths for the court's perimeter. Use a power saw or hand saw to achieve clean and precise cuts. For plastic edging or metal borders, follow the manufacturer's instructions for cutting and shaping the material.
-
Secure the Boundary: Once the boundary material is cut to size, position it along the edges of the court. If using wooden boards, use a drill and screws to secure them firmly in place. For plastic edging or metal borders, follow the specific installation guidelines provided with the product.
-
Ensure Straight Lines: As you install the boundary, use a measuring tape and level to ensure that the lines are straight and accurately represent the court's boundaries. This attention to detail will contribute to the professional appearance of the court.
-
Create Corners and Transitions: If your court has corners or transitions, take the time to carefully cut and fit the boundary material to create seamless connections. This will result in a polished and cohesive look for the court perimeter.
-
Check for Stability: Once the boundary is installed, check for stability and structural integrity. Ensure that the material is securely fastened and capable of withstanding the impact of bocce balls during gameplay.
-
Add Finishing Touches: After the boundary is securely in place, take a moment to inspect the overall appearance of the court. Make any final adjustments to ensure that the boundary is visually appealing and complements the court surface.
By following these steps, you'll have successfully installed a durable and visually appealing boundary for your bocce court, bringing you one step closer to enjoying countless games with family and friends.
Adding the Final Touches
As you approach the final stages of building your bocce court, it's time to add the finishing touches that will elevate the overall look and functionality of the playing area. Here's a detailed guide on how to add the final touches to your bocce court:
-
Line Markings: Use white spray paint or chalk to create the foul lines and center line on the court surface. The foul lines are typically located 10 feet from each end of the court, and the center line divides the court into two equal halves. Ensure that the lines are straight and clearly visible to players.
-
Scoreboard Installation: If you're aiming for a professional setup, consider installing a scoreboard near the court for keeping track of scores during games. This can be a simple DIY scoreboard made from wood or a more elaborate electronic scoreboard for added convenience.
-
Seating Area: Create a designated seating area near the bocce court to provide comfortable seating for players and spectators. This can be achieved with benches, outdoor chairs, or even a dedicated patio space where people can relax and enjoy the games.
-
Shade and Lighting: If your bocce court is located in an area with intense sunlight, consider adding a shade structure such as a pergola or umbrella to provide relief from the sun. Additionally, installing outdoor lighting will allow for evening games and extend the usability of the court into the night.
-
Landscaping and Greenery: Enhance the surroundings of the bocce court by incorporating landscaping elements such as potted plants, shrubs, or decorative rocks. This will add visual appeal to the area and create a more inviting atmosphere for players and guests.
-
Storage for Equipment: Create a designated storage area for bocce balls, the pallino, and other game-related equipment. This can be a simple storage box or a dedicated storage shed where all the bocce essentials can be neatly organized and easily accessible.
-
Personalized Touches: Consider adding personal touches to the court area, such as custom signage, decorative flags, or other elements that reflect your unique style and personality. These personalized touches can add character to the space and make it feel truly your own.
By incorporating these final touches, you'll not only enhance the functionality of your bocce court but also create a welcoming and enjoyable environment for everyone who gathers to play and socialize. With the completion of these finishing touches, your bocce court will be ready to provide endless hours of entertainment and camaraderie for years to come.
Conclusion
In conclusion, building a bocce court is a rewarding DIY project that can bring endless enjoyment to your outdoor space. By carefully selecting the right location, gathering the necessary materials and tools, preparing the ground, building the court surface, installing the boundary, and adding the final touches, you can create a professional-grade bocce court right in your backyard. Whether you're a seasoned bocce player or just looking for a fun and engaging outdoor activity, having your own court provides the perfect setting for friendly competitions and social gatherings. With attention to detail and a bit of creativity, you can transform your outdoor space into a bocce oasis that will be enjoyed by family and friends for years to come. So, roll those bocce balls and enjoy the game!