
Home>Create & Decorate>DIY & Crafts>How To Build A Door
DIY & Crafts
How To Build A Door
Published: February 24, 2024

Senior Editor in Create & Decorate, Kathryn combines traditional craftsmanship with contemporary trends. Her background in textile design and commitment to sustainable crafts inspire both content and community.
Learn how to build a door with our step-by-step DIY & Crafts guide. Create a custom door for your home with our easy-to-follow instructions.
(Many of the links in this article redirect to a specific reviewed product. Your purchase of these products through affiliate links helps to generate commission for Twigandthistle.com, at no extra cost. Learn more)
Introduction
Building a door from scratch can be a rewarding and fulfilling DIY project that adds a personal touch to your home. Whether you're looking to replace an old door or create a custom entryway, constructing your own door allows for creativity and customization. By following a few simple steps and using basic tools and materials, you can craft a sturdy and stylish door that complements your home's aesthetic.
Creating a door from raw materials provides a sense of accomplishment and allows you to tailor the design to your specific needs and preferences. From choosing the type of wood to selecting the hardware and finish, every aspect of the door can be customized to reflect your individual style and functional requirements.
In this comprehensive guide, we will walk you through the step-by-step process of building a door, from gathering the necessary materials and tools to assembling the frame, attaching the panels, and adding the finishing touches. Whether you're a seasoned DIY enthusiast or a novice woodworker, this guide will equip you with the knowledge and confidence to embark on this fulfilling project.
So, roll up your sleeves, gather your tools, and let's dive into the gratifying world of crafting your own door. With a bit of patience, attention to detail, and a sprinkle of creativity, you'll soon be admiring your handiwork as your new door becomes a standout feature of your home.
Step 1: Gather Materials and Tools
Before embarking on the journey of building a door, it's essential to gather all the necessary materials and tools. This step sets the foundation for a successful and efficient construction process. Here's a comprehensive list of items you'll need:
Materials:
- Wood: Select high-quality wood that suits your design preferences and climate conditions. Common options include oak, pine, cedar, or mahogany.
- Panels: Depending on the door design, you'll need panels to fill the frame. These can be solid wood, plywood, or glass inserts.
- Wood Glue: A strong wood adhesive is essential for securing joints and ensuring the door's durability.
- Wood Screws: Choose screws of appropriate length and thickness to assemble the door frame and attach the panels.
- Sandpaper: Different grits of sandpaper will be required for smoothing the wood surfaces and achieving a polished finish.
- Wood Stain or Paint: Decide whether you want to stain the wood to enhance its natural beauty or paint it to match your home's color scheme.
- Varnish or Sealant: To protect the door from moisture and environmental elements, a varnish or sealant is necessary.
Tools:
- Measuring Tape: Accurate measurements are crucial for ensuring the door fits perfectly within the door frame.
- Circular Saw or Table Saw: A saw will be needed to cut the wood to the required dimensions.
- Clamps: These are essential for holding the door frame together during assembly.
- Screwdriver or Drill: To drive in the screws for securing the components of the door.
- Chisel and Hammer: These tools are necessary for fine-tuning the joints and ensuring a precise fit.
- Paintbrushes or Stain Applicators: Depending on your finishing choice, you'll need brushes or applicators for an even coat.
- Safety Gear: Don't forget safety goggles, gloves, and a dust mask to protect yourself during the construction process.
By ensuring you have all the required materials and tools at the outset, you'll be well-prepared to move on to the next step of measuring and cutting the wood for your door. This careful preparation sets the stage for a smooth and enjoyable door-building experience.
Step 2: Measure and Cut the Wood
Accurate measurements and precise cuts are fundamental to the construction of a well-crafted door. Before diving into the cutting process, it's crucial to have a clear understanding of the door's dimensions and the specific pieces of wood required for the frame and panels.
Begin by measuring the door frame opening to determine the exact height and width of the door. It's essential to measure both the height and width at multiple points to account for any irregularities in the frame. Once the measurements are obtained, add a small margin to allow for a snug fit within the frame, typically around 1/8 to 1/4 inch.
With the door dimensions in hand, it's time to move on to cutting the wood. Using a circular saw or table saw, carefully cut the wood to the required dimensions, following the measurements obtained earlier. It's advisable to use a saw guide to ensure straight and precise cuts, especially when working with larger pieces of wood.
For the door frame, cut the pieces of wood according to the measured dimensions, ensuring that the corners will align perfectly when assembled. If the door design includes panels, cut the panels to fit within the frame, allowing for a slight gap to accommodate wood expansion due to changes in humidity.
Attention to detail is paramount during the cutting process, as any inaccuracies can affect the door's structural integrity and overall appearance. Double-check the measurements before making any cuts, and take your time to ensure precision at every step.
Once the wood is cut to size, it's beneficial to label each piece to indicate its position in the door assembly. This simple step can prevent confusion during the later stages of construction and streamline the assembly process.
By meticulously measuring and cutting the wood with precision, you set the stage for a seamless assembly process and a professionally finished door. With the frame and panels accurately sized and prepared, you're ready to move on to the next step of assembling the door frame.
Step 3: Assemble the Door Frame
With the wood pieces cut to the precise dimensions, it's time to embark on the pivotal stage of assembling the door frame. This process requires attention to detail and a methodical approach to ensure the components fit together seamlessly, resulting in a sturdy and well-constructed frame.
Begin by laying out the pieces of the door frame, including the vertical stiles and horizontal rails, in the designated assembly area. Prior to assembly, it's advisable to dry-fit the pieces to confirm that they align correctly and that the frame matches the intended dimensions. This step allows for any necessary adjustments before the assembly process begins.
Once satisfied with the fit, apply wood glue to the joints and carefully assemble the frame, ensuring that the corners are square and the joints are flush. Clamps can be used to hold the pieces together during the gluing process, providing stability and allowing the glue to set firmly.
To reinforce the joints and enhance the structural integrity of the frame, pre-drill holes for wood screws and drive the screws into place. This step secures the components together, creating a robust and durable frame that will withstand the rigors of everyday use.
As the frame comes together, it's essential to periodically check for squareness and alignment, making any necessary adjustments to maintain the desired dimensions and ensure a uniform appearance. Attention to detail during this stage is crucial, as it sets the foundation for the door's overall stability and functionality.
If the door design includes panels, the assembled frame provides the structure onto which the panels will be mounted. Ensure that the frame is level and flat, providing a solid base for attaching the panels securely. With the frame assembled and prepared, the next step involves attaching the panels to complete the door structure.
By methodically assembling the door frame with precision and care, you lay the groundwork for a well-constructed and visually appealing door. The attention to detail invested in this stage sets the stage for the subsequent steps of attaching the panels, installing the hinges and hardware, and adding the finishing touches to bring the door to completion.
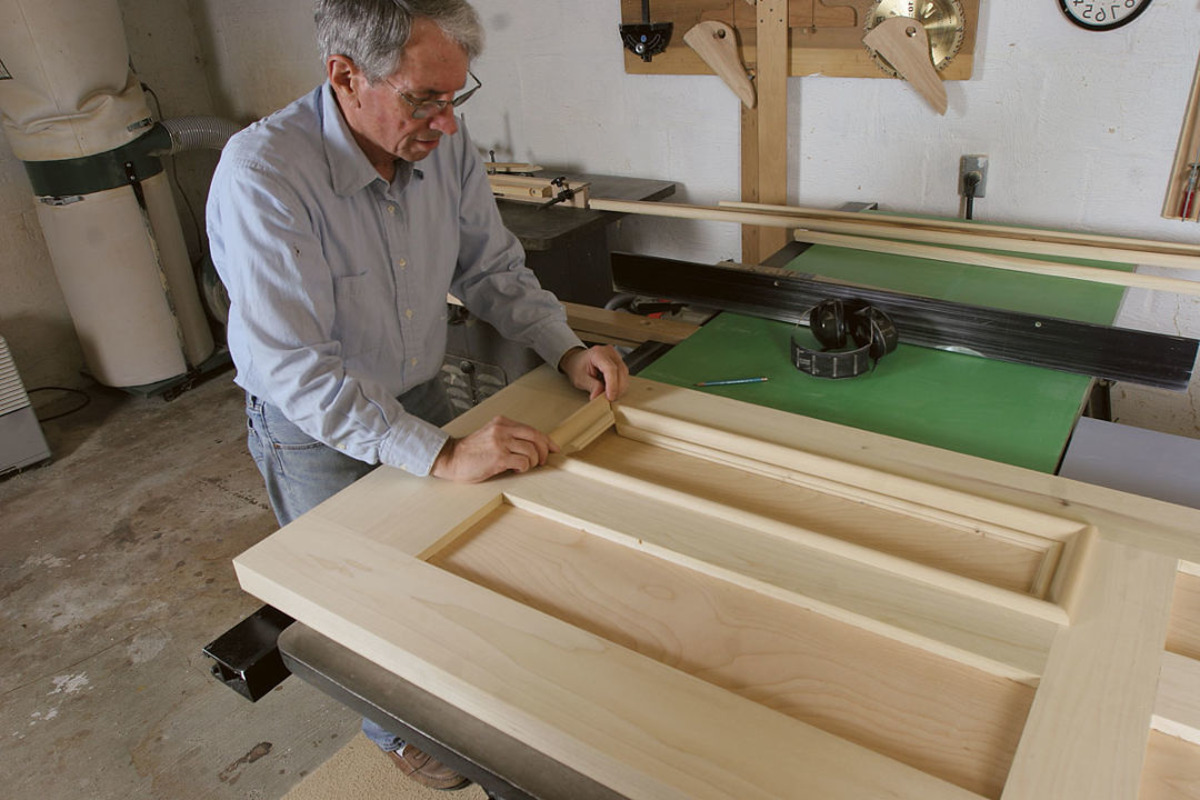
Step 4: Attach the Panels
With the door frame meticulously assembled, the next crucial step is to attach the panels that will complete the door structure. Whether you've opted for solid wood panels, plywood, or glass inserts, this stage adds the defining elements that contribute to the door's functionality and aesthetic appeal.
Begin by positioning the panels within the assembled frame, ensuring a proper fit and alignment. Depending on the design, the panels may be inserted into grooves within the frame or secured directly onto the frame using wood glue and screws. Carefully place the panels, verifying that they sit flush within the frame and align evenly with the surrounding components.
If the panels are designed to fit into grooves, ensure that they slide into place smoothly and snugly. This method provides a secure and visually seamless integration of the panels into the frame, creating a unified and polished appearance. For panels that are to be attached directly onto the frame, apply wood glue along the edges that will come into contact with the frame, and then affix the panels firmly in place.
Once the panels are positioned, secure them by driving screws into the frame at strategic points, ensuring a strong and stable attachment. It's important to space the screws evenly along the perimeter of each panel, maintaining a consistent and secure hold. This step not only reinforces the panels but also contributes to the overall structural integrity of the door.
If your door design incorporates multiple panels, repeat the process for each panel, taking care to maintain uniformity and precision throughout. Attention to detail during this stage is essential, as it ensures that the panels are securely attached and contribute to the door's cohesive and professional appearance.
With the panels securely in place, take a moment to inspect the door, verifying that the panels are level, flush, and free from any visible imperfections. This visual assessment allows for any necessary adjustments before proceeding to the next stage, ensuring that the door meets the desired standards of quality and craftsmanship.
By attaching the panels with precision and care, you bring the door one step closer to completion, setting the stage for the final phases of installing the hinges and hardware, as well as sanding and finishing the door. This pivotal stage adds substance and character to the door, transforming it from a frame into a functional and visually striking entryway feature.
Step 5: Install the Hinges and Hardware
With the door frame assembled and the panels securely attached, the next critical step is to install the hinges and hardware that will enable the door to function as a movable entryway. This stage marks the transition from a static door structure to a fully operational and functional component of your home. The installation of hinges and hardware requires precision and attention to detail to ensure smooth operation and long-term durability.
Installing Hinges:
Begin by positioning the door within the door frame, ensuring that it fits snugly and aligns properly. Depending on the design, you may opt for traditional butt hinges, concealed hinges, or decorative hinges to complement the overall aesthetic of the door. Carefully mark the locations for the hinges on both the door and the frame, ensuring that they align perfectly to facilitate smooth opening and closing.
Using a chisel and hammer, create recesses, or mortises, in the door and frame to accommodate the hinges. It's crucial to achieve a precise fit to ensure that the hinges sit flush with the surfaces, allowing the door to operate without any obstructions. Once the mortises are prepared, attach the hinges using screws, verifying that they are securely fastened and that the hinge knuckles operate smoothly.
Adding Hardware:
With the hinges in place, it's time to add the essential hardware that will enhance the door's functionality and security. Install a handle or knob, selecting a style that complements the door's design and aligns with your personal preferences. Position the handle at a comfortable height and mark the locations for the screws before attaching it securely to the door.
If the door requires a locking mechanism, such as a deadbolt or latch, carefully install the hardware according to the manufacturer's instructions, ensuring that it operates smoothly and securely. Take the time to test the functionality of the lock, verifying that it engages properly and provides the desired level of security.
Verifying Operation:
Once the hinges and hardware are installed, carefully test the door's operation, swinging it open and closed to ensure that it moves smoothly and aligns correctly within the frame. Check for any signs of friction or misalignment, making any necessary adjustments to the hinges or hardware to achieve optimal functionality.
By meticulously installing the hinges and hardware with precision and care, you transform the door into a fully operational and secure entryway feature. This stage brings the door one step closer to its final form, setting the stage for the last phase of sanding and finishing, which will elevate the door's appearance and ensure its long-term resilience.
Step 6: Sand and Finish the Door
After the meticulous assembly and installation of the essential components, the final step in crafting a custom door involves the transformative process of sanding and finishing. This stage is where the raw wood is refined, and the door's visual appeal is elevated to its full potential.
Sanding the Wood:
Begin by carefully sanding the entire surface of the door, starting with a coarse-grit sandpaper to remove any rough spots, imperfections, or uneven edges. This initial sanding stage sets the foundation for a smooth and polished finish, preparing the wood for the subsequent refinement.
As the sanding progresses, transition to finer-grit sandpaper to achieve a silky-smooth surface, paying particular attention to the edges and corners to ensure a uniform texture. The goal is to eliminate any visible blemishes and create a flawless canvas for the finishing touches.
Applying the Finish:
With the wood meticulously sanded, it's time to apply the chosen finish, whether it be a rich wood stain to enhance the natural grain or a vibrant paint color to complement the home's aesthetic. Using a brush or applicator, carefully coat the entire surface of the door with the chosen finish, ensuring even coverage and paying attention to detail.
If a wood stain is selected, the application process allows the natural beauty of the wood grain to shine through, adding warmth and character to the door. Alternatively, a coat of paint can infuse the door with a burst of color, creating a striking focal point that harmonizes with the surrounding decor.
Sealing and Protecting:
To safeguard the door from environmental elements and wear, it's essential to apply a protective sealant or varnish. This final layer not only enhances the door's durability but also enriches the finish, imparting a subtle sheen that accentuates the wood's natural allure.
As the sealant dries, inspect the door for any areas that may require additional attention, ensuring that the finish is uniform and flawless. This meticulous approach guarantees that the door's surface is not only visually appealing but also shielded from the effects of moisture and daily use.
Final Touches:
Once the finish has dried and the door exudes a lustrous sheen, take a moment to admire the transformation. Run your hand along the smooth surface, reveling in the tactile satisfaction of a well-crafted door that reflects your dedication and attention to detail.
With the sanding and finishing process complete, the door stands as a testament to your craftsmanship and creativity, ready to grace your home with its timeless elegance and functional charm. Whether it's a rustic wooden door or a vibrant painted entryway, the artistry and care invested in this final stage culminate in a door that is not only a functional element but also a captivating work of art.
Conclusion
In conclusion, the process of building a door from scratch is a deeply rewarding endeavor that combines craftsmanship, creativity, and practicality. From the initial gathering of materials and tools to the final touches of sanding and finishing, every step in the construction journey contributes to the creation of a unique and personalized entryway feature.
As the door takes shape, it becomes more than just a functional element; it evolves into a reflection of the builder's dedication and attention to detail. Each measurement, cut, and assembly decision plays a crucial role in shaping the door's form and functionality, while the choice of finish and hardware adds character and individuality.
The satisfaction derived from crafting a door extends beyond the tangible result. It encompasses the sense of accomplishment that comes from transforming raw materials into a functional and visually appealing component of the home. The process fosters a deeper connection to the living space, infusing it with a touch of personal artistry and ingenuity.
Moreover, the act of building a door fosters a deeper appreciation for the craftsmanship and artistry involved in woodworking. It provides an opportunity to hone skills, experiment with design concepts, and gain a profound understanding of the materials being used. This hands-on experience not only yields a beautiful door but also enriches the builder's knowledge and passion for woodworking.
As the completed door stands proudly in its designated space, it serves as a testament to the builder's creativity and dedication. Whether it's a rustic wooden door that exudes warmth and character or a sleek, modern entryway that makes a bold statement, each door tells a story of craftsmanship and individuality.
Ultimately, the journey of building a door transcends the mere act of construction; it embodies the spirit of creativity, craftsmanship, and the joy of bringing a vision to life. It stands as a tangible symbol of the builder's ability to transform raw materials into a functional and aesthetically pleasing feature that enhances the home environment.