
Home>Create & Decorate>DIY & Crafts>DIY Comfortable Seating Deck Bench Plans
DIY & Crafts
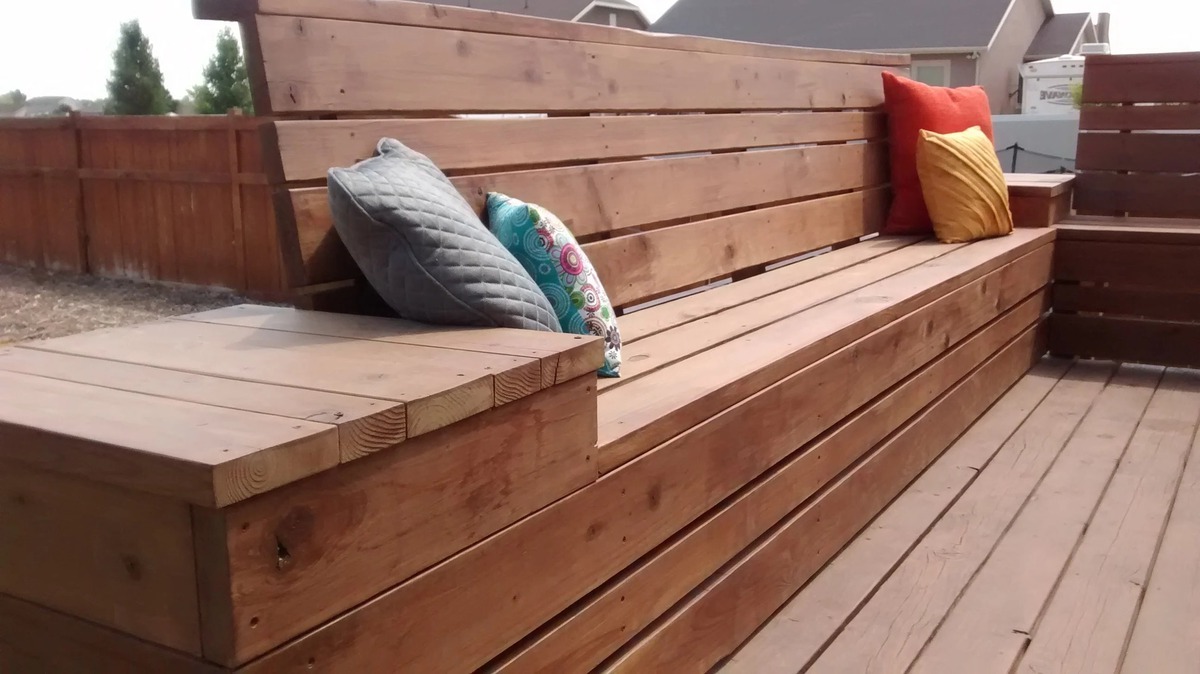
DIY Comfortable Seating Deck Bench Plans
Published: February 24, 2024

Senior Editor in Create & Decorate, Kathryn combines traditional craftsmanship with contemporary trends. Her background in textile design and commitment to sustainable crafts inspire both content and community.
Discover easy-to-follow DIY deck bench plans for creating comfortable seating. Perfect for your outdoor space. Get started with these DIY & Crafts projects today!
(Many of the links in this article redirect to a specific reviewed product. Your purchase of these products through affiliate links helps to generate commission for Twigandthistle.com, at no extra cost. Learn more)
Introduction
Creating a comfortable and inviting outdoor space is a wonderful way to enhance your home. One of the key elements of a cozy outdoor area is comfortable seating, and a deck bench can be the perfect addition. Not only does a deck bench provide a practical seating solution, but it also adds a touch of charm and warmth to your outdoor environment. Whether you're hosting a gathering with friends and family or simply seeking a tranquil spot to unwind, a well-crafted deck bench can elevate the ambiance of your outdoor space.
In this comprehensive guide, we will walk you through the process of building a sturdy and comfortable deck bench. With the right materials, tools, and a bit of DIY enthusiasm, you can create a custom bench that perfectly complements your deck or patio. This project is not only a rewarding endeavor but also a cost-effective way to add functional and stylish seating to your outdoor living area.
By following the step-by-step instructions and tips provided in this guide, you'll be able to construct a deck bench that meets your specific preferences and space requirements. Whether you're a seasoned DIY enthusiast or a novice looking to embark on your first woodworking project, this guide is designed to empower you with the knowledge and confidence needed to tackle this rewarding endeavor.
So, roll up your sleeves, gather your tools, and let's dive into the exciting world of DIY deck bench construction. With a little creativity and a can-do attitude, you'll soon be enjoying the fruits of your labor as you relax on your newly built deck bench, basking in the beauty of your outdoor sanctuary.
Materials and Tools Needed
To embark on the journey of building a comfortable and inviting deck bench, you will need a selection of materials and tools to bring your vision to life. Here's a comprehensive list of the essentials required for this rewarding DIY project:
Materials:
- Pressure-Treated Lumber: This will serve as the primary material for constructing the bench frame and seating. Opt for high-quality, durable lumber that can withstand outdoor elements.
- Deck Screws: Choose corrosion-resistant deck screws to ensure the longevity and stability of your bench.
- Wood Glue: A reliable wood glue will be essential for reinforcing joints and ensuring the structural integrity of the bench.
- Wood Stain or Sealant: To protect the wood from moisture, UV rays, and general wear, a high-quality wood stain or sealant is crucial for finishing the bench.
- Sandpaper: Various grits of sandpaper will be necessary for smoothing rough edges and achieving a polished finish.
- Wood Filler: This will come in handy for filling any gaps or imperfections in the wood, ensuring a flawless final appearance.
Tools:
- Measuring Tape: Accurate measurements are essential for precision in woodworking, making a measuring tape a fundamental tool for this project.
- Circular Saw or Miter Saw: A reliable saw will be indispensable for cutting the lumber to the required dimensions with precision and ease.
- Drill and Drill Bits: A power drill equipped with appropriate drill bits will be essential for creating pilot holes and driving screws during assembly.
- Screwdriver: While a power drill is essential, a screwdriver will be useful for certain tasks that require manual precision.
- Clamps: These will aid in securing wood pieces during assembly, ensuring stability and accuracy.
- Paintbrush or Applicator: A high-quality paintbrush or applicator will be necessary for applying the wood stain or sealant evenly and efficiently.
- Safety Gear: Safety should always be a priority, so be sure to have safety glasses, ear protection, and a dust mask on hand to protect yourself during the woodworking process.
By ensuring that you have these materials and tools at your disposal, you'll be well-prepared to embark on the construction of your deck bench with confidence and efficiency. With these essentials in place, you're ready to move on to the exciting phase of measuring and cutting the wood for your project.
Step 1: Measure and Cut the Wood
The initial step in constructing a sturdy and comfortable deck bench involves precise measurements and accurate wood cutting. This phase sets the foundation for the entire project, ensuring that the components fit together seamlessly and the final bench meets your desired dimensions.
Begin by carefully measuring the pressure-treated lumber according to the bench design and dimensions you've chosen. Use a measuring tape to mark the lengths and angles required for the bench frame, seat, and backrest. Accuracy is paramount at this stage, so take your time to double-check all measurements before proceeding to the cutting phase.
Once the measurements are confirmed, it's time to bring out the saw. Whether you opt for a circular saw or a miter saw, ensure that it is equipped with a sharp blade suitable for cutting pressure-treated lumber. With precision and caution, proceed to cut the lumber according to the marked measurements. Take care to maintain straight and accurate cuts, as these will directly impact the overall stability and aesthetics of the bench.
As you progress through the cutting process, organize the cut pieces based on their designated components, such as the frame, seat slats, and backrest slats. This organization will streamline the assembly phase and prevent confusion when it's time to put the bench together.
Remember, patience and attention to detail during the measurement and cutting phase will yield a solid foundation for the rest of the project. By ensuring that the wood is accurately measured and cut, you'll set the stage for a smooth and satisfying assembly process, bringing you one step closer to enjoying your custom-built deck bench.
With the wood pieces precisely measured and cut, you're now ready to move on to the next phase of the project: assembling the base frame. This pivotal step will bring the bench to life, laying the groundwork for the seating and backrest components. Get ready to witness your vision taking shape as you progress to the exciting assembly phase.
Step 2: Assemble the Base Frame
With the wood pieces precisely measured and cut, it's time to embark on the pivotal phase of assembling the base frame for your deck bench. This foundational structure will serve as the support for the seating and backrest, providing stability and durability to the overall design.
Begin by laying out the cut lumber pieces for the base frame according to the bench design and dimensions. Ensure that the pieces are arranged in the correct orientation, with the necessary support for the seat and backrest areas. This initial organization will streamline the assembly process and prevent confusion as you progress through the construction.
Next, it's time to bring out the drill and deck screws. Position the lumber pieces according to the bench design, and use a power drill equipped with appropriate drill bits to create pilot holes for the screws. This preparatory step is crucial for ensuring precise and secure attachment of the frame components, minimizing the risk of splitting the wood during assembly.
With the pilot holes in place, begin attaching the frame components using corrosion-resistant deck screws. Work methodically and ensure that the joints are aligned accurately before driving in the screws. The use of wood glue at the joints can further reinforce the frame, enhancing its stability and longevity.
As the base frame takes shape, periodically check for squareness and alignment to guarantee that the structure remains true to the intended design. Utilize clamps to hold the components in place during assembly, preventing any shifting or misalignment as you progress through this phase.
Once the base frame is fully assembled, take a moment to inspect the structure for any potential adjustments or refinements. Ensure that all joints are secure, and the frame is stable and level. This meticulous attention to detail during the assembly process will lay the groundwork for a robust and reliable base frame, setting the stage for the subsequent steps in building your deck bench.
With the base frame successfully assembled, you've achieved a significant milestone in the construction of your deck bench. This foundational structure forms the backbone of the bench, providing the necessary support for the seating and backrest components. As you move forward in this rewarding DIY endeavor, the next phase will involve attaching the legs to the base frame, bringing you closer to the realization of your custom-built deck bench.
Step 3: Attach the Legs
With the base frame successfully assembled, the next crucial step in building your deck bench involves attaching the legs. The legs play a pivotal role in providing stability and support to the bench, ensuring its resilience and longevity in outdoor settings. By meticulously securing the legs to the base frame, you'll fortify the structural integrity of the bench, setting the stage for the subsequent phases of construction.
Begin by positioning the legs at the designated corners of the base frame, ensuring that they are aligned precisely and flush with the edges of the frame. This initial placement is critical for maintaining the symmetry and balance of the bench, contributing to its overall aesthetic appeal and functionality.
Utilize clamps to secure the legs in place, preventing any shifting or misalignment during the attachment process. This precautionary measure will facilitate a seamless and accurate attachment of the legs to the base frame, minimizing the margin for error and ensuring a sturdy foundation for the bench.
Next, employ a power drill equipped with appropriate drill bits to create pilot holes for the screws that will secure the legs to the base frame. The strategic placement of these pilot holes is essential for facilitating the insertion of screws without compromising the integrity of the wood, minimizing the risk of splitting or damage during attachment.
With the pilot holes in place, proceed to drive corrosion-resistant deck screws through the legs and into the base frame, ensuring a secure and steadfast connection. Exercise caution and precision during this process, verifying that the legs are firmly anchored to the frame without any wobbling or instability.
As the legs are successfully attached to the base frame, take a moment to inspect the bench for stability and balance. Confirm that the legs are securely fastened and that the bench rests evenly on the ground, free from any wobbling or unevenness. This meticulous attention to detail during the attachment of the legs will contribute to the overall resilience and functionality of the bench.
By completing the process of attaching the legs, you've achieved a significant milestone in the construction of your deck bench. The secure attachment of the legs to the base frame reinforces the structural integrity of the bench, laying the groundwork for the subsequent phases of building the seat and backrest. As you progress through this rewarding DIY endeavor, the next phase will involve constructing the seat and backrest, bringing you closer to the realization of your custom-built deck bench.
Step 4: Build the Seat and Backrest
With the base frame and legs securely in place, the next pivotal phase in constructing your deck bench involves building the seat and backrest. These components are essential for providing comfort and support, transforming the bench into a welcoming and functional seating solution for your outdoor space. By meticulously crafting the seat and backrest, you'll enhance the aesthetic appeal and comfort of the bench, creating a cozy retreat for relaxation and enjoyment.
Begin by arranging the seat slats according to the predetermined dimensions, ensuring that they align evenly and seamlessly. Position the slats on the base frame, leaving a small gap between each piece to allow for water drainage and airflow. This careful arrangement will contribute to the longevity of the bench by minimizing the accumulation of moisture and debris.
Once the seat slats are positioned, utilize a power drill and appropriate drill bits to create pilot holes for the screws that will secure the slats to the base frame. This preparatory step is crucial for ensuring precise and secure attachment, minimizing the risk of splitting or damage to the wood during assembly.
With the pilot holes in place, proceed to drive corrosion-resistant deck screws through the seat slats and into the base frame, ensuring a secure and steadfast connection. Work methodically and attentively, verifying that each slat is uniformly attached and that the seat surface is level and stable.
As the seat takes shape, turn your attention to constructing the backrest. Position the backrest slats vertically against the back of the base frame, ensuring that they are evenly spaced and aligned. Use clamps to secure the slats in place, preventing any shifting or misalignment during the attachment process.
Similar to the seat assembly, create pilot holes for the screws that will secure the backrest slats to the base frame. This preparatory step will facilitate the precise and secure attachment of the backrest, ensuring its stability and resilience in supporting the seated individuals.
Proceed to drive corrosion-resistant deck screws through the backrest slats and into the base frame, ensuring a secure and steadfast connection. Exercise caution and precision during this process, verifying that the backrest is firmly anchored and aligned evenly.
As the seat and backrest components are successfully assembled, take a moment to inspect the bench for stability, balance, and overall aesthetic appeal. Confirm that the seat and backrest are securely fastened, and that the bench exudes a sense of craftsmanship and comfort.
By completing the construction of the seat and backrest, you've achieved a significant milestone in the creation of your deck bench. These components not only enhance the functionality and comfort of the bench but also contribute to its visual charm and inviting allure. As you progress through this rewarding DIY endeavor, the next phase will involve sanding and finishing the bench, bringing you closer to the realization of your custom-built outdoor retreat.
Step 5: Sand and Finish
With the seat and backrest components securely assembled, the final phase of crafting your deck bench involves the crucial steps of sanding and finishing. This transformative stage not only enhances the visual appeal of the bench but also contributes to its longevity and resilience in outdoor environments. By meticulously sanding and applying a protective finish, you'll elevate the aesthetic charm and durability of your custom-built bench, ensuring that it remains a welcoming and enduring feature of your outdoor sanctuary.
Begin by inspecting the entire bench for any rough edges, splinters, or imperfections resulting from the assembly process. Utilize various grits of sandpaper to meticulously sand the surfaces of the bench, smoothing out any rough areas and achieving a uniform texture. Pay particular attention to the seat and backrest, ensuring that these areas are comfortable and free from any potential discomfort caused by rough surfaces.
As you progress through the sanding process, take care to round off the edges and corners of the bench, creating a soft and inviting profile that enhances both the visual appeal and comfort of the seating. This attention to detail will contribute to the overall aesthetic and tactile experience of the bench, elevating it from a functional piece to a refined and inviting outdoor furnishing.
Following the completion of sanding, it's time to apply a protective finish to the bench. Whether you opt for a high-quality wood stain or a durable sealant, the chosen finish will safeguard the bench from the elements, including moisture, UV rays, and general wear. Utilize a paintbrush or applicator to evenly apply the finish to all exposed surfaces of the bench, ensuring comprehensive protection and a uniform appearance.
As the finish is applied, take a moment to appreciate the transformation taking place. The natural beauty of the wood will be accentuated, and the protective finish will impart a lustrous sheen, enhancing the visual allure of the bench while fortifying it against the rigors of outdoor exposure.
Once the finish is applied, allow adequate time for it to dry and cure according to the manufacturer's recommendations. This curing process is essential for the finish to bond with the wood, creating a resilient and long-lasting protective layer that will shield the bench from environmental factors.
Upon completion of the sanding and finishing process, step back and admire the remarkable evolution of your deck bench. The once raw and unassembled lumber has been transformed into a refined and inviting seating solution, ready to enrich your outdoor space with comfort and charm. With the sanding and finishing phase concluded, you've brought your custom-built deck bench to its full potential, ready to serve as a cherished feature of your outdoor oasis.
Conclusion
In conclusion, the journey of building a comfortable and inviting deck bench is a testament to the transformative power of DIY craftsmanship. From the initial measurements and wood cutting to the meticulous assembly of the base frame, attachment of the legs, construction of the seat and backrest, and the final stages of sanding and finishing, every step has been a testament to dedication, precision, and creativity.
As the sawdust settles and the protective finish cures, the result is more than just a functional piece of outdoor furniture. It's a tangible expression of creativity and a testament to the rewarding nature of hands-on construction. The deck bench stands as a symbol of the dedication and effort invested in creating a welcoming and comfortable space for relaxation and enjoyment.
Beyond its physical presence, the deck bench embodies the spirit of customization and personalization. Crafted to fit the specific dimensions and design preferences, it seamlessly integrates into the outdoor environment, enhancing the ambiance and providing a cozy retreat for moments of tranquility and connection with nature.
Moreover, the process of building the deck bench has fostered a deeper appreciation for the art of woodworking and the inherent beauty of natural materials. Each cut, screw, and stroke of the finish has been a testament to the timeless appeal of woodworking, showcasing the harmonious blend of functionality and aesthetics.
As the deck bench takes its place in the outdoor setting, it serves as a reminder of the fulfillment that comes from creating something with one's own hands. It stands as a testament to the joy of DIY endeavors and the sense of accomplishment that accompanies the completion of a meaningful project.
Ultimately, the deck bench is more than just a piece of furniture; it's a reflection of the dedication, creativity, and craftsmanship that went into its creation. It's a place where memories will be made, conversations will flow, and moments of relaxation will be savored. It's a tangible embodiment of the DIY spirit, inviting all who encounter it to appreciate the beauty of handmade creations and the joy of transforming raw materials into cherished pieces of functional art.