
Home>Create & Decorate>DIY & Crafts>Easy Adirondack Chair Plans: DIY Guide For Crafting Your Own Outdoor Seating
DIY & Crafts
Easy Adirondack Chair Plans: DIY Guide For Crafting Your Own Outdoor Seating
Published: February 24, 2024

Senior Editor in Create & Decorate, Kathryn combines traditional craftsmanship with contemporary trends. Her background in textile design and commitment to sustainable crafts inspire both content and community.
Discover easy Adirondack chair plans and craft your own outdoor seating with this DIY guide. Perfect for DIY & Crafts enthusiasts!
(Many of the links in this article redirect to a specific reviewed product. Your purchase of these products through affiliate links helps to generate commission for Twigandthistle.com, at no extra cost. Learn more)
Introduction
Crafting your own Adirondack chair is a rewarding and fulfilling DIY project that allows you to create a comfortable and stylish piece of outdoor furniture. Whether you're an experienced woodworker or a novice looking for a new challenge, building an Adirondack chair can be an enjoyable and satisfying endeavor. With the right materials, tools, and a step-by-step guide, you can bring your vision of a perfect outdoor seating to life.
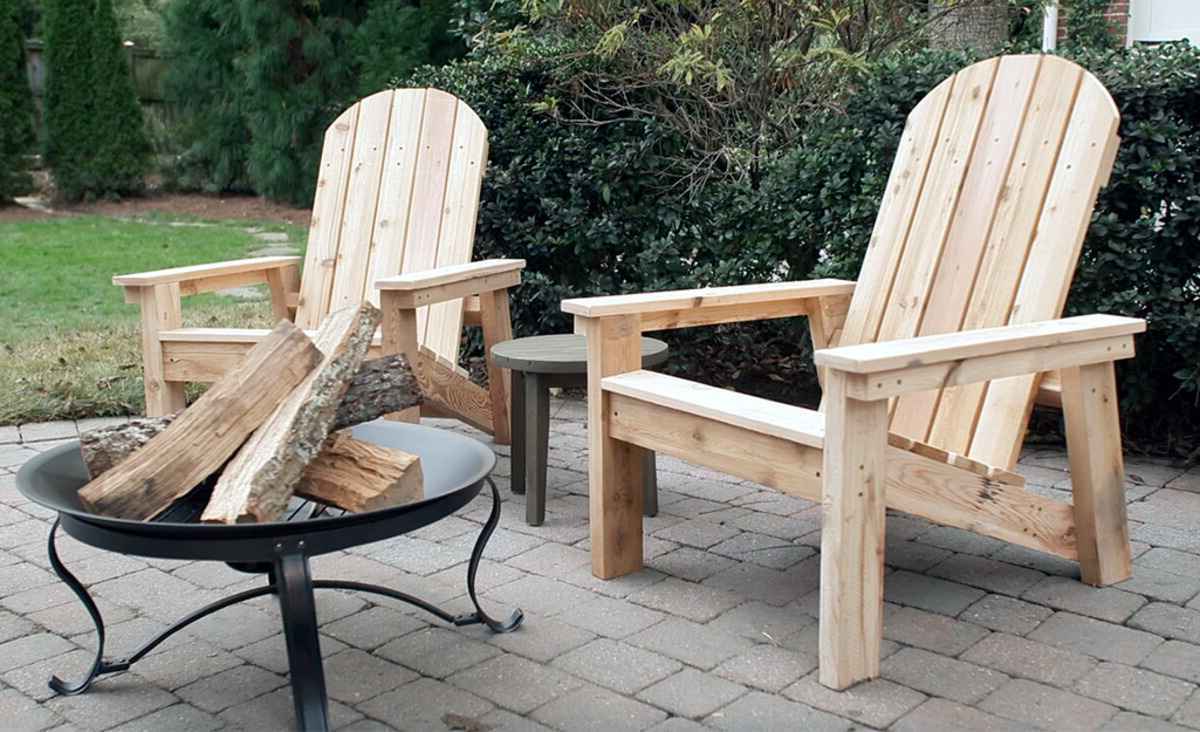
The Adirondack chair, also known as a Muskoka chair, is a classic symbol of relaxation and comfort. Its distinctive slanted seat, wide armrests, and reclined backrest make it an ideal choice for lounging on a lazy afternoon or enjoying a sunset in your backyard. By crafting your own Adirondack chair, you have the opportunity to customize it to your preferences, whether it's the wood type, color, or size, ensuring that it perfectly complements your outdoor space.
This DIY guide will walk you through the process of building an Adirondack chair, from selecting the right materials and tools to cutting the wood, assembling the seat, building the backrest, attaching the armrests, and adding the finishing touches. Whether you're a seasoned woodworker or a first-time DIY enthusiast, this comprehensive guide will provide you with the knowledge and confidence to embark on this fulfilling project.
So, roll up your sleeves, gather your tools, and let's dive into the world of DIY woodworking to create a timeless and inviting piece of outdoor furniture that you can proudly say you crafted with your own hands. Let's get started on this exciting journey of building your very own Adirondack chair!
Materials and Tools Needed
Before embarking on the journey of crafting your own Adirondack chair, it's essential to gather all the necessary materials and tools to ensure a smooth and efficient building process. Here's a comprehensive list of what you'll need to bring your DIY project to life:
Materials:
-
Wood: Opt for a durable and weather-resistant wood species such as cedar, teak, or redwood. These woods are known for their ability to withstand outdoor elements, making them ideal choices for outdoor furniture. Ensure that the wood is of high quality and free from defects to guarantee the longevity of your Adirondack chair.
-
Wood Screws: Select corrosion-resistant wood screws to assemble the chair securely. Stainless steel or coated screws are recommended to prevent rust and corrosion, which can compromise the structural integrity of the chair over time.
-
Wood Glue: A reliable outdoor wood glue will reinforce the joints and connections, adding strength and stability to your Adirondack chair.
-
Finishing Materials: Choose a suitable outdoor finish such as exterior-grade varnish or polyurethane to protect the wood from moisture, UV rays, and general wear and tear. This will help maintain the chair's appearance and structural integrity over the years.
-
Sandpaper: Invest in a variety of sandpaper grits to smooth the wood surfaces and edges, ensuring a professional and polished finish for your Adirondack chair.
-
Optional Accessories: Depending on your preferences, you may want to include accessories such as stainless steel screws, decorative hardware, or cushions to enhance the comfort and aesthetic appeal of your chair.
Tools:
-
Measuring Tape: Accurate measurements are crucial for precise cuts and assembly, so a reliable measuring tape is essential for this project.
-
Circular Saw or Miter Saw: A high-quality saw will be needed for cutting the wood to the required dimensions. A circular saw or miter saw is recommended for making straight and angled cuts with precision.
-
Drill and Bits: A power drill with a set of drill bits is necessary for creating pilot holes and driving screws into the wood.
-
Clamps: Clamps are indispensable for holding the wood pieces together during assembly, ensuring that the joints are tight and secure.
-
Screwdriver: A screwdriver, whether manual or powered, will be used for driving screws into the wood and attaching various components of the chair.
-
Paintbrushes or Applicators: If you're applying a finish to your Adirondack chair, high-quality paintbrushes or applicators will be required for an even and smooth application.
By gathering these materials and tools, you'll be well-equipped to begin the process of crafting your own Adirondack chair. With careful planning and attention to detail, you can create a stunning and functional piece of outdoor furniture that will be cherished for years to come.
Step 1: Cutting the Wood
The first step in crafting your own Adirondack chair is to prepare the wood by making precise cuts according to the chair's design. This crucial phase sets the foundation for the structural integrity and visual appeal of the final product. Here's a detailed guide to cutting the wood for your Adirondack chair:
1.1 Selecting the Right Wood
Begin by carefully selecting the wood for your Adirondack chair. Opt for a durable and weather-resistant wood species such as cedar, teak, or redwood. These woods are known for their ability to withstand outdoor elements, ensuring the longevity of your chair. Once you have chosen the wood, ensure that it is of high quality and free from defects to guarantee a sturdy and visually appealing final product.
1.2 Taking Accurate Measurements
Using a measuring tape, carefully measure and mark the wood according to the dimensions specified in the chair plans. Accurate measurements are crucial for ensuring that the chair components fit together seamlessly. Double-check the measurements to avoid errors before making any cuts.
1.3 Making Straight Cuts
Utilize a circular saw or miter saw to make straight cuts on the wood according to the marked measurements. It's essential to maintain precision and accuracy during this process to achieve clean and uniform pieces for the chair components. Take your time to ensure that the cuts are straight and smooth, as they will significantly impact the overall appearance of the chair.
1.4 Angled Cuts for the Backrest and Armrests
For the backrest and armrest components, you will need to make angled cuts to achieve the classic Adirondack chair design. Refer to the chair plans for the specific angles required and adjust the saw accordingly. Pay close attention to the angles to ensure that the backrest and armrests align perfectly with the seat, providing both comfort and aesthetic appeal.
1.5 Sanding the Edges
After making the cuts, use sandpaper to smooth the edges of the wood pieces. This step is essential for creating a professional and polished finish, as well as ensuring that the edges are safe and comfortable to touch. Be thorough in your sanding process to achieve a refined look for your Adirondack chair components.
By meticulously following these steps and paying attention to detail, you will successfully complete the wood cutting phase of building your Adirondack chair. With the wood pieces prepared, you are now ready to move on to the next stage of assembling the seat, bringing you one step closer to enjoying your handcrafted outdoor seating.
Step 2: Assembling the Seat
With the wood components cut to the required dimensions, the next pivotal phase in crafting your Adirondack chair is assembling the seat. This step forms the foundation of the chair's structure, setting the stage for the subsequent assembly of the backrest and armrests. Here's a comprehensive guide to assembling the seat of your Adirondack chair:
2.1 Preparing the Seat Slats
Begin by arranging the seat slats in the designated order, ensuring that they align correctly according to the chair plans. Lay the slats on a flat and stable surface, with their edges flush against each other. This meticulous arrangement is crucial for achieving a uniform and visually appealing seat for your Adirondack chair.
2.2 Creating Pilot Holes
Using a power drill and the appropriate drill bit, create pilot holes in the seat slats where they will be joined together. Pilot holes prevent the wood from splitting when screws are driven in, ensuring the structural integrity of the seat. Be precise and consistent in creating the pilot holes to facilitate seamless assembly.
2.3 Applying Wood Glue
Apply a thin, even layer of outdoor wood glue along the edges of the seat slats that will be joined together. The wood glue enhances the strength and stability of the seat, creating a solid bond between the slats. Ensure that the glue is evenly distributed to maximize its effectiveness in reinforcing the seat assembly.
2.4 Securing the Seat Slats
Carefully align the seat slats according to the designated arrangement, taking care to match the pilot holes. With the slats in position, use corrosion-resistant wood screws to secure them together. Drive the screws through the pilot holes, ensuring that the slats are tightly and securely fastened. This step forms the foundation of the seat, creating a robust and reliable base for your Adirondack chair.
2.5 Verifying Stability
Once the seat slats are assembled and secured, verify the stability and evenness of the seat. Check for any protruding screws or uneven surfaces that may affect the comfort and functionality of the seat. Make any necessary adjustments to ensure that the seat is level, stable, and free from any potential discomfort.
By meticulously following these steps and paying attention to detail, you will successfully assemble the seat of your Adirondack chair. With the seat securely in place, you are now prepared to progress to the next phase of building the backrest, bringing you one step closer to completing your handcrafted outdoor seating.
Step 3: Building the Backrest
The backrest of an Adirondack chair plays a pivotal role in providing comfort and support, making it a crucial component of the overall design. Building the backrest requires precision and attention to detail to ensure that it complements the seat and enhances the ergonomic appeal of the chair. Here's a comprehensive guide to building the backrest of your Adirondack chair:
3.1 Preparing the Backrest Slats
Begin by arranging the backrest slats in the specified order, ensuring that they align seamlessly according to the chair plans. Lay the slats on a flat surface, with their edges flush against each other. This meticulous arrangement is essential for creating a visually appealing and structurally sound backrest for your Adirondack chair.
3.2 Creating Angled Cuts
For the classic Adirondack chair design, the backrest slats require angled cuts to achieve the desired reclined position. Refer to the chair plans for the specific angles required and adjust the saw accordingly. Precision in making these angled cuts is crucial to ensure that the backrest provides optimal comfort and support.
3.3 Assembling the Backrest
Once the backrest slats are cut to the required dimensions, it's time to assemble them. Lay the slats in the designated order, ensuring that the angled cuts align to create the desired reclined shape of the backrest. Create pilot holes and apply wood glue as you did for the seat assembly, reinforcing the joints and ensuring the stability of the backrest.
3.4 Securing the Backrest Slats
With the backrest slats aligned and prepared, use corrosion-resistant wood screws to secure them together. Drive the screws through the pilot holes, ensuring that the slats are tightly and securely fastened. This step is crucial in creating a robust and reliable backrest that will withstand regular use and provide enduring comfort.
3.5 Verifying Ergonomic Design
Once the backrest slats are assembled and secured, verify the ergonomic design and stability of the backrest. Check for any protruding screws or uneven surfaces that may affect the comfort and functionality of the backrest. Make any necessary adjustments to ensure that the backrest provides the desired reclined position and optimal support.
By meticulously following these steps and paying attention to detail, you will successfully build the backrest of your Adirondack chair. With the backrest in place, you are now ready to progress to the next phase of attaching the armrests, bringing you one step closer to completing your handcrafted outdoor seating.
Step 4: Attaching the Armrests
Attaching the armrests is a pivotal stage in the construction of an Adirondack chair, as it not only contributes to the chair's structural stability but also enhances its functionality and aesthetic appeal. The armrests serve as essential components that provide support and comfort, making the attachment process a critical aspect of the overall assembly. Here's a detailed guide to attaching the armrests to your Adirondack chair:
4.1 Positioning the Armrests
Begin by positioning the armrests on each side of the chair, ensuring that they align perfectly with the seat and backrest. The armrests should be placed at a comfortable height and distance from the seat, allowing for natural arm positioning and relaxation. Take precise measurements to guarantee uniform placement on both sides of the chair, contributing to its balanced and symmetrical design.
4.2 Creating Attachment Points
Using a measuring tape and pencil, mark the points where the armrests will be attached to the seat and backrest. These points will serve as guides for creating pilot holes to accommodate the screws that will secure the armrests in place. Accuracy in marking the attachment points is crucial for ensuring that the armrests are securely and evenly positioned, contributing to the chair's overall stability.
4.3 Drilling Pilot Holes
With the attachment points marked, use a power drill and the appropriate drill bit to create pilot holes in the seat and backrest where the armrests will be attached. Pilot holes prevent the wood from splitting and facilitate the insertion of screws, ensuring a secure and durable connection between the armrests and the rest of the chair. Take care to drill the pilot holes to the appropriate depth, aligning them accurately with the attachment points.
4.4 Applying Wood Glue
Prior to attaching the armrests, apply a thin layer of outdoor wood glue to the areas where the armrests will make contact with the seat and backrest. The wood glue enhances the bond between the components, adding strength and stability to the attachment points. Even distribution of the wood glue is essential for ensuring a reliable and enduring connection between the armrests and the rest of the chair.
4.5 Securing the Armrests
Carefully position the armrests according to the marked attachment points, ensuring a snug fit against the seat and backrest. With the armrests in place, use corrosion-resistant wood screws to secure them to the seat and backrest. Drive the screws through the pilot holes, ensuring that the armrests are firmly and securely attached. This step is crucial in creating a robust and dependable connection that will withstand regular use and provide enduring support.
By meticulously following these steps and paying attention to detail, you will successfully attach the armrests to your Adirondack chair. With the armrests securely in place, you are now prepared to progress to the final phase of adding the finishing touches, bringing you one step closer to completing your handcrafted outdoor seating.
Step 5: Finishing Touches
The final phase of crafting your own Adirondack chair involves adding the finishing touches that will elevate its visual appeal, durability, and overall charm. This stage allows you to personalize the chair to your preferences, ensuring that it seamlessly integrates into your outdoor space while withstanding the elements. Here's a detailed guide to the essential finishing touches for your Adirondack chair:
5.1 Sanding and Smoothing
Before applying any finish, thoroughly sand the entire surface of the chair to achieve a smooth and polished texture. Start with a coarse-grit sandpaper to remove any rough spots or imperfections, then progress to finer grits for a silky-smooth finish. Pay special attention to the edges and corners, ensuring that they are rounded and comfortable to the touch. This meticulous sanding process sets the stage for a professional and refined final appearance.
5.2 Applying a Protective Finish
Select a high-quality outdoor finish such as exterior-grade varnish or polyurethane to protect the wood from moisture, UV rays, and general wear and tear. Using a paintbrush or applicator, evenly apply the chosen finish to all exposed surfaces of the chair, including the seat, backrest, armrests, and legs. Multiple coats may be necessary to achieve optimal protection, so follow the manufacturer's instructions for drying times and reapplication. The protective finish not only enhances the chair's resilience but also enriches the natural beauty of the wood, creating a lustrous and enduring appeal.
5.3 Adding Decorative Hardware (Optional)
For those seeking to embellish their Adirondack chair with a touch of personal flair, consider adding decorative hardware such as stainless steel screws, bolts, or ornamental accents. These decorative elements can infuse character and individuality into the chair, elevating its aesthetic charm and complementing the outdoor setting. Whether it's a subtle touch of elegance or a bold statement, the addition of decorative hardware can transform the chair into a unique and eye-catching feature of your outdoor space.
5.4 Incorporating Comfort Accessories (Optional)
To enhance the comfort and relaxation offered by your Adirondack chair, consider incorporating accessories such as weather-resistant cushions or pillows. These accessories not only provide a cozy and inviting seating experience but also allow you to introduce color and texture to the chair, further personalizing it to suit your outdoor decor. Choose cushions that are specifically designed for outdoor use, ensuring that they can withstand exposure to sunlight and moisture without compromising their comfort and visual appeal.
By meticulously attending to these finishing touches, you will bring your Adirondack chair to its full potential, creating a stunning and enduring piece of outdoor furniture that reflects your craftsmanship and style. With the completion of these final details, your handcrafted Adirondack chair is ready to take its place as a cherished and inviting feature of your outdoor sanctuary.
Conclusion
In conclusion, embarking on the journey of crafting your own Adirondack chair is a fulfilling and rewarding endeavor that allows you to blend your woodworking skills with the creation of a timeless piece of outdoor furniture. Throughout the process, from selecting the finest materials to adding the finishing touches, you have been immersed in the art of woodworking, channeling your creativity and passion into every aspect of the chair's construction.
As you meticulously cut, assemble, and refine each component, you have not only honed your woodworking abilities but also infused the chair with your unique touch, ensuring that it harmonizes seamlessly with your outdoor space. The Adirondack chair, with its iconic design and ergonomic comfort, embodies the spirit of relaxation and leisure, inviting you to unwind and savor the beauty of nature from the comfort of your own backyard.
By investing your time and effort into this DIY project, you have not only created a functional and visually appealing piece of furniture but also cultivated a sense of pride and accomplishment. Your handcrafted Adirondack chair stands as a testament to your craftsmanship and dedication, embodying the artistry and care that went into its making.
As you envision the countless moments of relaxation and enjoyment that await you in the company of your Adirondack chair, take pride in the fact that you have brought this vision to life through your own ingenuity and skill. Whether it's basking in the warmth of the sun, sipping a refreshing beverage, or simply unwinding with a good book, your Adirondack chair will be there to provide comfort and tranquility, a testament to the joy of creating something beautiful with your own hands.
So, as you take a moment to admire the seamless curves, the smooth finish, and the sturdy construction of your handcrafted Adirondack chair, remember that it is more than just a piece of furniture. It is a reflection of your passion for woodworking, your dedication to craftsmanship, and your desire to create a space where relaxation and serenity intertwine.
In the end, your Adirondack chair is not just an outdoor seating option; it is a symbol of your creativity, a source of pride, and a tangible expression of the joy that comes from bringing a vision to life through the art of DIY woodworking.