
Home>Knowledge & Skills>Wood & Metal Working>How To Build An Acoustic Guitar
Wood & Metal Working
How To Build An Acoustic Guitar
Published: March 6, 2024

Our Editor-in-Chief brings a fresh perspective with his expertise in modern home technologies and eco-friendly solutions. Philip bridges tradition with innovation across a wide range of DIY topics.
Learn the art of building an acoustic guitar with our comprehensive guide. Explore the intricate techniques of wood and metal working to create your own masterpiece. Unlock the secrets of crafting a beautiful instrument from scratch.
(Many of the links in this article redirect to a specific reviewed product. Your purchase of these products through affiliate links helps to generate commission for Twigandthistle.com, at no extra cost. Learn more)
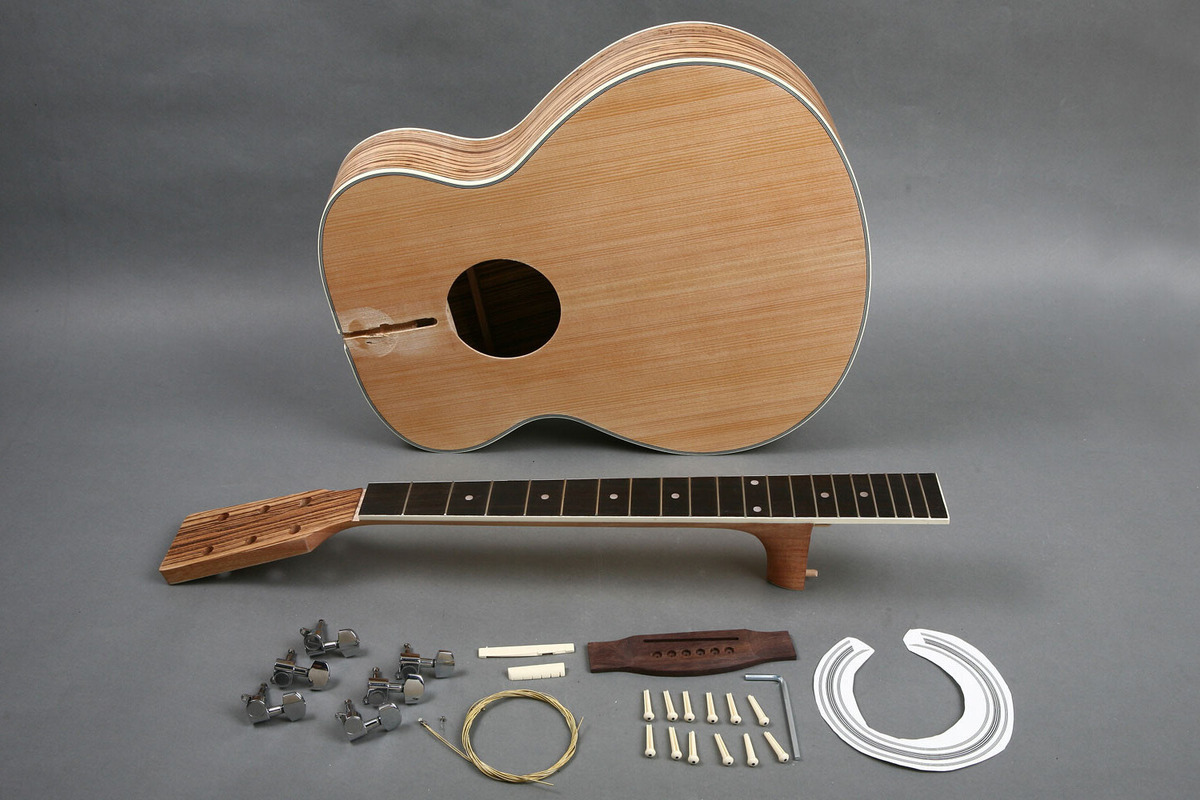
Introduction
So, you've decided to take on the challenge of building your own acoustic guitar. Congratulations! Building an acoustic guitar can be a rewarding and fulfilling experience for any DIY enthusiast. Not only will you have the satisfaction of creating a beautiful musical instrument with your own hands, but you'll also gain a deeper understanding of the craftsmanship and artistry that goes into making a guitar. Whether you're an experienced woodworker or a novice looking for a new project, this guide will take you through the step-by-step process of building your very own acoustic guitar. Let's dive in and explore the fascinating world of guitar making!
Selecting the Right Wood
When it comes to building an acoustic guitar, selecting the right wood is crucial to achieving the desired tone, resonance, and overall aesthetic appeal. Here are some key considerations when choosing wood for your guitar:
1. Soundboard (Top Wood)
The soundboard, or the top of the guitar, is one of the most critical components for producing the guitar's tone. Common choices for soundboard wood include spruce, cedar, and mahogany. Each wood type offers distinct tonal characteristics, with spruce known for its bright and articulate sound, cedar for its warmth and responsiveness, and mahogany for its balanced and mellow tone.
2. Back and Sides
The back and sides of the guitar contribute to its overall resonance and projection. Woods such as rosewood, mahogany, and maple are popular choices for back and side construction. Rosewood is prized for its rich, deep tones, while mahogany offers a warm and focused sound. Maple, on the other hand, provides a bright and clear tonal quality.
3. Neck and Fretboard
For the neck and fretboard, durability and stability are key factors. Mahogany and maple are commonly used for neck construction due to their strength and reliability. When it comes to fretboards, rosewood and ebony are popular choices, known for their smooth texture and excellent tonal properties.
4. Additional Considerations
In addition to the primary components, other factors such as bracing material, binding, and inlays also play a role in the overall sound and appearance of the guitar. Carefully considering these elements will help you create a well-balanced and visually appealing instrument.
By carefully selecting the right combination of woods, you can tailor the tonal characteristics and visual aesthetics of your acoustic guitar to suit your preferences and playing style. Keep in mind that the quality and characteristics of the wood will greatly influence the final outcome of your handmade instrument.
Designing the Guitar Body
Designing the body of an acoustic guitar involves shaping the soundboard, back, and sides to create a resonant and visually appealing instrument. Here's a detailed look at the process:
-
Body Shape: The first step in designing the guitar body is to select a body shape that suits your preferences and playing style. Common acoustic guitar body shapes include dreadnought, concert, and parlor. Each shape offers unique tonal characteristics and ergonomic features, so choose one that aligns with your musical preferences.
-
Bracing Pattern: The bracing pattern on the inside of the soundboard plays a crucial role in supporting the top wood and influencing the guitar's tonal qualities. Traditional bracing patterns such as X-bracing and fan bracing are widely used, each contributing to the guitar's resonance and structural integrity.
-
Soundhole Design: The design and placement of the soundhole can also impact the guitar's tone and aesthetics. Experimenting with different soundhole shapes and sizes can offer subtle variations in the instrument's sound projection and visual appeal.
-
Binding and Purfling: Adding decorative binding and purfling to the guitar body not only enhances its visual appeal but also provides structural reinforcement. Carefully selecting contrasting wood materials for binding and purfling can create striking visual accents on the guitar's body.
-
Cutaway Design (Optional): If you prefer easier access to the higher frets, incorporating a cutaway design into the body can be a practical and aesthetic choice. Cutaways are often found on acoustic-electric guitars and can be customized to complement the overall body shape.
-
Custom Inlays and Rosette: Personalizing the guitar body with custom inlays and rosette designs allows for creative expression and individuality. Whether it's intricate fretboard inlays or an ornate rosette around the soundhole, these details can make your guitar truly unique.
By carefully considering these design elements, you can create a guitar body that not only looks stunning but also resonates with the tonal qualities you desire. Whether you opt for a traditional design or incorporate custom features, the body of your acoustic guitar is a canvas for artistic expression and craftsmanship.
Constructing the Neck and Headstock
Constructing the neck and headstock of an acoustic guitar requires precision and attention to detail to ensure optimal playability and stability. Here's a detailed look at the process:
-
Neck Construction:
- Begin by selecting a suitable hardwood, such as mahogany or maple, for the neck.
- Cut the neck blank to the appropriate dimensions, taking into account the scale length and neck profile.
- Shape the neck using rasps, files, and sandpaper to achieve a comfortable and ergonomic profile.
- Install the truss rod to provide adjustable reinforcement and counteract string tension.
-
Headstock Design:
- Choose a headstock design that complements the overall aesthetic of the guitar.
- Mark and drill holes for the tuning machine posts, ensuring precise alignment for smooth string action.
- Create a volute or scarf joint to enhance headstock strength and prevent potential breakage.
-
Fretboard Installation:
- Select a high-quality hardwood for the fretboard, such as rosewood or ebony, known for their durability and tonal properties.
- Cut the fret slots and install the fret wire using a fret press or hammering technique.
- Ensure proper fret leveling, crowning, and polishing for smooth playability and intonation.
-
Headstock Veneer and Logo:
- Apply a decorative veneer to the headstock, adding visual appeal and protecting the wood from potential damage.
- Incorporate a custom logo or inlay to personalize the headstock, showcasing your craftsmanship and attention to detail.
-
Neck Joint:
- Carefully fit the neck to the guitar body, ensuring a secure and stable joint for optimal tone transfer and structural integrity.
- Choose a traditional dovetail joint or a modern bolt-on design, each offering unique benefits in terms of tone and adjustability.
-
Binding and Inlays:
- Add binding along the fretboard edges and headstock perimeter for a polished and professional look.
- Consider incorporating custom inlays or fret markers to enhance the fretboard's visual appeal and aid in navigation.
By meticulously executing the construction of the neck and headstock, you can create a well-crafted and visually striking component that contributes to the overall playability and character of your handmade acoustic guitar. Paying attention to details such as neck profile, headstock design, and fretboard installation will result in a guitar that not only sounds exceptional but also feels comfortable and inspiring to play.
Attaching the Fretboard and Frets
Attaching the fretboard and frets is a critical step in the construction of an acoustic guitar, as it directly impacts the playability and intonation of the instrument. Here's a detailed guide to this essential process:
-
Preparing the Fretboard:
- Begin by selecting a high-quality hardwood for the fretboard, such as rosewood or ebony, known for their durability and tonal properties.
- Ensure that the fretboard is flat and free of any imperfections that could affect the placement of the frets.
-
Measuring and Marking Fret Positions:
- Use precise measurements and calculations based on the scale length of the guitar to determine the exact placement of each fret.
- Mark the fret positions on the fretboard using a fretting template or specialized fret positioning tool to ensure accuracy.
-
Slotting the Fretboard:
- Carefully cut fret slots into the fretboard using a fret saw or specialized fret slotting tool.
- Ensure that the depth and width of the fret slots are consistent to accommodate the fret wire securely.
-
Installing the Frets:
- Select high-quality fret wire in the appropriate size for the guitar's scale length and neck radius.
- Press the fret wire into the fret slots using a fret press or carefully hammer them in, taking care to avoid damaging the fretboard.
- Trim the excess fret wire and file the edges flush with the fretboard to ensure a smooth and comfortable playing surface.
-
Fret End Dressing:
- File and bevel the edges of the fret ends to eliminate any sharp edges and ensure a seamless transition along the fretboard.
- Use a fret crowning file to shape the frets into a rounded profile, allowing for consistent string contact and intonation.
-
Fretboard Binding and Inlays:
- If desired, add decorative binding along the edges of the fretboard to enhance its visual appeal and provide additional protection.
- Consider incorporating custom fretboard inlays or position markers to personalize the fretboard and aid in navigation for the player.
-
Fret Leveling and Dressing:
- Use a straightedge and specialized leveling tools to ensure the frets are level across the entire fretboard.
- Perform fret dressing to refine the shape and height of the frets, optimizing playability and intonation.
By meticulously executing the process of attaching the fretboard and frets, you can ensure that your acoustic guitar not only looks professional but also delivers exceptional playability and intonation. Attention to detail in fret placement, installation, and finishing will result in a fretboard that enhances the overall performance and aesthetic appeal of your handmade instrument.
Installing the Bridge and Saddle
Installing the bridge and saddle is a crucial step in the construction of an acoustic guitar, as it directly affects the instrument's intonation, action, and overall sound. Here's a detailed guide to this essential process:
-
Bridge Placement:
- Begin by carefully measuring and marking the precise location for the bridge on the guitar's soundboard.
- Ensure that the placement aligns with the scale length and intonation requirements of the instrument.
- Use a straightedge and masking tape to guide the placement and ensure accuracy.
-
Bridge Installation:
- Carefully remove any finish or lacquer from the area where the bridge will be attached to ensure a strong and secure bond.
- Apply a thin, even layer of high-quality wood glue to the underside of the bridge, ensuring full coverage.
- Carefully position the bridge on the designated spot, aligning it with the centerline and the pre-marked location.
- Use clamps or a bridge clamp to secure the bridge in place and allow the glue to dry thoroughly.
-
Saddle Slot:
- Once the bridge is securely attached, carefully mark and cut a slot for the saddle in the bridge.
- Use specialized tools such as a saddle routing jig or precision chisels to create a clean and accurate slot for the saddle.
-
Saddle Installation:
- Select a high-quality saddle material, such as bone or synthetic materials known for their excellent tonal properties.
- Shape the saddle to the required height and profile, ensuring proper string action and intonation.
- Carefully fit the saddle into the slot, making precise adjustments to achieve the desired string height and intonation.
-
Bridge Pins:
- If your guitar design includes bridge pins to secure the strings, carefully drill and install the bridge pin holes.
- Use a bridge pin reamer to ensure a precise and snug fit for the bridge pins, allowing for secure string anchoring.
-
Intonation and Action:
- Once the bridge and saddle are in place, carefully check the intonation and action of the guitar.
- Make any necessary adjustments to the saddle height and position to ensure accurate intonation and comfortable string action.
-
Final Setup:
- With the bridge and saddle installed, perform a final setup of the guitar, including adjusting the truss rod, nut, and tuning machines.
- String the guitar and carefully check the playability, intonation, and overall sound to ensure optimal performance.
By meticulously executing the installation of the bridge and saddle, you can ensure that your acoustic guitar not only looks professional but also delivers exceptional playability, intonation, and tonal characteristics. Attention to detail in bridge placement, saddle installation, and final setup will result in a well-crafted instrument that is a joy to play and listen to.
Applying the Finish
Applying the finish to an acoustic guitar is a crucial step that not only enhances the visual appeal of the instrument but also protects the wood and influences its tonal characteristics. Here's a detailed guide to the process of applying the finish to your handmade acoustic guitar:
-
Surface Preparation:
- Begin by meticulously sanding the entire guitar body, neck, and headstock to ensure a smooth and even surface.
- Use progressively finer grit sandpaper to remove any imperfections and achieve a flawless surface for the finish.
-
Choosing the Finish:
- Select a suitable finish for your acoustic guitar, such as nitrocellulose lacquer, polyurethane, or shellac, based on your desired aesthetic and tonal preferences.
- Consider the application method and drying time of each finish to determine the most suitable option for your project.
-
Sealing the Wood:
- Apply a sealer or wood conditioner to the guitar body to enhance the wood's natural grain and promote even absorption of the finish.
- Ensure that the sealer is evenly applied and allowed to dry thoroughly before proceeding to the next steps.
-
Applying the Finish:
- Use a high-quality brush, spray gun, or pad to apply the chosen finish to the guitar, ensuring even coverage and minimal drips or runs.
- Apply multiple thin coats of the finish, allowing sufficient drying time between each coat to build up a durable and lustrous finish.
-
Leveling and Sanding:
- Once the finish has been applied, carefully level the surface using fine-grit sandpaper and polishing compounds to achieve a mirror-like sheen.
- Take care to maintain the contours and curves of the guitar body while achieving a smooth and flawless finish.
-
Buffing and Polishing:
- Use a buffing wheel or polishing pad to buff the finish to a high gloss, enhancing the depth and clarity of the wood's natural beauty.
- Work methodically to ensure uniform shine and eliminate any imperfections in the finish.
-
Curing and Drying:
- Allow the guitar to cure and dry in a well-ventilated area, following the manufacturer's recommendations for the specific finish used.
- Take precautions to protect the guitar from dust and debris during the drying process to maintain the integrity of the finish.
-
Final Inspection:
- Carefully inspect the guitar for any blemishes, uneven spots, or imperfections in the finish.
- Make any necessary touch-ups or corrections to achieve a flawless and professional-looking finish.
By meticulously executing the process of applying the finish to your acoustic guitar, you can enhance its visual appeal and protect the wood while allowing its natural beauty to shine through. Attention to detail in surface preparation, finish application, and final polishing will result in a stunning and durable finish that complements the craftsmanship of your handmade instrument.
Setting Up and Stringing the Guitar
Setting up and stringing an acoustic guitar is a crucial final step that ensures the instrument's playability, intonation, and overall performance. Here's a detailed guide to the process of setting up and stringing your handmade acoustic guitar:
-
Adjusting the Truss Rod:
- Begin by assessing the neck relief and making any necessary adjustments to the truss rod to achieve the ideal amount of curvature in the neck.
- Use a specialized truss rod wrench to carefully turn the truss rod nut, ensuring gradual and controlled adjustments to the neck relief.
-
Nut and Saddle Adjustment:
- Check the nut slots to ensure they are the correct depth and spacing for the strings, allowing for smooth and consistent string action.
- File the nut slots as needed to achieve the proper string height and spacing, promoting comfortable playability and accurate intonation.
- Adjust the saddle height to fine-tune the string action and intonation, ensuring that the strings are at the optimal height above the frets.
-
Tuning Machines and String Installation:
- Install high-quality tuning machines onto the headstock, ensuring that they are securely fastened and aligned for smooth and precise tuning adjustments.
- Begin stringing the guitar by attaching the ball end of each string to the bridge, carefully threading them through the bridge pins or securing them to the bridge, depending on the design.
- Wind the strings onto the tuning machines, ensuring even tension and proper winding technique to promote tuning stability and string longevity.
-
Tuning and Stretching:
- Tune the guitar to the desired pitch, carefully adjusting each string to the correct note using a reliable tuner.
- Stretch the strings by gently pulling and tugging on each one to remove excess slack and promote stability in tuning.
-
Intonation and Action Adjustment:
- Use a reliable electronic tuner to check the intonation of each string, making any necessary saddle adjustments to ensure accurate pitch across the fretboard.
- Verify the string action and make any final adjustments to the nut and saddle to achieve the desired playability and comfort for the player.
-
Final Inspection and Testing:
- Carefully inspect the guitar for any buzzing, rattling, or irregularities in playability, making any necessary adjustments to ensure a smooth and consistent playing experience.
- Test the guitar's playability, tuning stability, and overall performance to ensure that it meets the desired standards for playability and tonal quality.
By meticulously executing the process of setting up and stringing your acoustic guitar, you can ensure that your handmade instrument not only looks professional but also delivers exceptional playability, intonation, and overall performance. Attention to detail in truss rod adjustment, nut and saddle setup, and string installation will result in a well-crafted instrument that is a joy to play and listen to.