
Home>Create & Decorate>DIY & Crafts>How To Make A Guitar Pedal
DIY & Crafts
How To Make A Guitar Pedal
Published: May 11, 2024

Content Creator specializing in woodworking and interior transformations. Caegan's guides motivate readers to undertake their own projects, while his custom furniture adds a personal touch.
Learn how to make a guitar pedal with our step-by-step DIY guide. Explore creative DIY & crafts projects for music enthusiasts. Start building your own guitar pedal today!
(Many of the links in this article redirect to a specific reviewed product. Your purchase of these products through affiliate links helps to generate commission for Twigandthistle.com, at no extra cost. Learn more)
Introduction
So, you've got a passion for music and a knack for electronics, and you've decided to take on the challenge of building your own guitar pedal. Congratulations! Building your own guitar pedal can be a rewarding and cost-effective way to customize your sound and unleash your creativity. Whether you're a seasoned DIY enthusiast or a beginner looking for a fun project, making your own guitar pedal can be a fulfilling experience. In this guide, we'll walk you through the step-by-step process of creating your very own custom guitar pedal from scratch. Let's dive in and get started!
Materials Needed
Before you embark on this exciting DIY project, it's essential to gather all the necessary materials and tools. Here's a comprehensive list of what you'll need to build your own guitar pedal:
-
Electronic Components:
- Resistors
- Capacitors
- Diodes
- Integrated circuits (ICs)
- Potentiometers
- Transistors
- LED
- Wires
- Printed circuit board (PCB)
-
Soldering Equipment:
- Soldering iron
- Solder
- Helping hands tool
- Wire cutters/strippers
- Desoldering pump or wick
-
Enclosure and Hardware:
- Guitar pedal enclosure
- Drill and drill bits
- Labels for controls
- Knobs
- Input and output jacks
- Power jack
-
Testing and Troubleshooting:
- Multimeter
- Audio probe
- Guitar and amplifier for testing
Make sure to gather all these materials before you begin, as having everything on hand will make the process smoother and more enjoyable. Now that you have your materials ready, let's move on to the next step in creating your custom guitar pedal.
Step 1: Designing the Circuit
Designing the circuit is the foundational step in creating your own guitar pedal. This is where you'll bring your creative vision to life by choosing the specific sound and functionality you want to achieve. Here's a breakdown of the process:
-
Select the Circuit Type: Decide on the type of effect you want your pedal to produce, whether it's distortion, overdrive, delay, chorus, or any other desired effect. Each effect requires a different circuit configuration, so it's crucial to choose the right one for your pedal.
-
Choose the Components: Once you've determined the type of effect, select the appropriate electronic components such as resistors, capacitors, diodes, and ICs that are specific to the chosen circuit. Each component plays a vital role in shaping the sound of your pedal.
-
Create the Schematic: Using a software tool or pen and paper, create a schematic diagram of the circuit. This diagram will illustrate how the components are connected and the flow of the signal within the circuit. It's like creating a blueprint for your pedal's electronic design.
-
Test the Schematic: Before moving on to the physical assembly, it's a good idea to simulate the circuit using software like SPICE (Simulation Program with Integrated Circuit Emphasis) to ensure that the design functions as intended. This step can help identify and rectify any potential issues before you start building.
By carefully designing the circuit, you'll lay the groundwork for the unique sound and functionality of your custom guitar pedal. Once you've completed this step, you're ready to move on to the next phase of bringing your pedal to life.
Step 2: Soldering the Components
Soldering the components is a critical phase in the construction of your guitar pedal. This process involves joining the electronic components to the printed circuit board (PCB) using solder, creating the electrical connections necessary for the pedal to function. Here's a detailed breakdown of how to effectively solder the components:
-
Prepare the Work Area: Set up a clean and well-ventilated workspace with a stable surface to work on. Ensure that you have sufficient lighting to clearly see the components and the PCB.
-
Organize the Components: Lay out all the electronic components and the PCB on your work surface. Organize the components according to the schematic diagram to make the soldering process more efficient.
-
Heat the Soldering Iron: Turn on the soldering iron and allow it to reach the appropriate temperature. A temperature-controlled soldering iron set to around 600°F (315°C) is suitable for most electronic soldering.
-
Tinning the Iron: Before soldering the components, "tin" the soldering iron tip by coating it with a small amount of solder. This helps improve heat transfer during the soldering process.
-
Soldering the Components: Place the component lead through the corresponding hole on the PCB and hold it in position. Then, touch the tip of the soldering iron to the junction of the component lead and the PCB pad. Apply a small amount of solder to the junction, allowing it to flow and create a secure connection. Be mindful not to overheat the components during this process.
-
Inspect the Joints: After soldering each component, visually inspect the solder joints to ensure they are shiny, smooth, and free from any solder bridges or cold joints. Properly soldered joints should have a concave, volcano-like appearance.
-
Trim Excess Leads: Once all the components are soldered, use wire cutters to trim the excess leads of the components, leaving a neat and tidy finish.
By following these steps and practicing good soldering techniques, you'll effectively secure the components to the PCB, setting the stage for the next phase of assembling your custom guitar pedal.
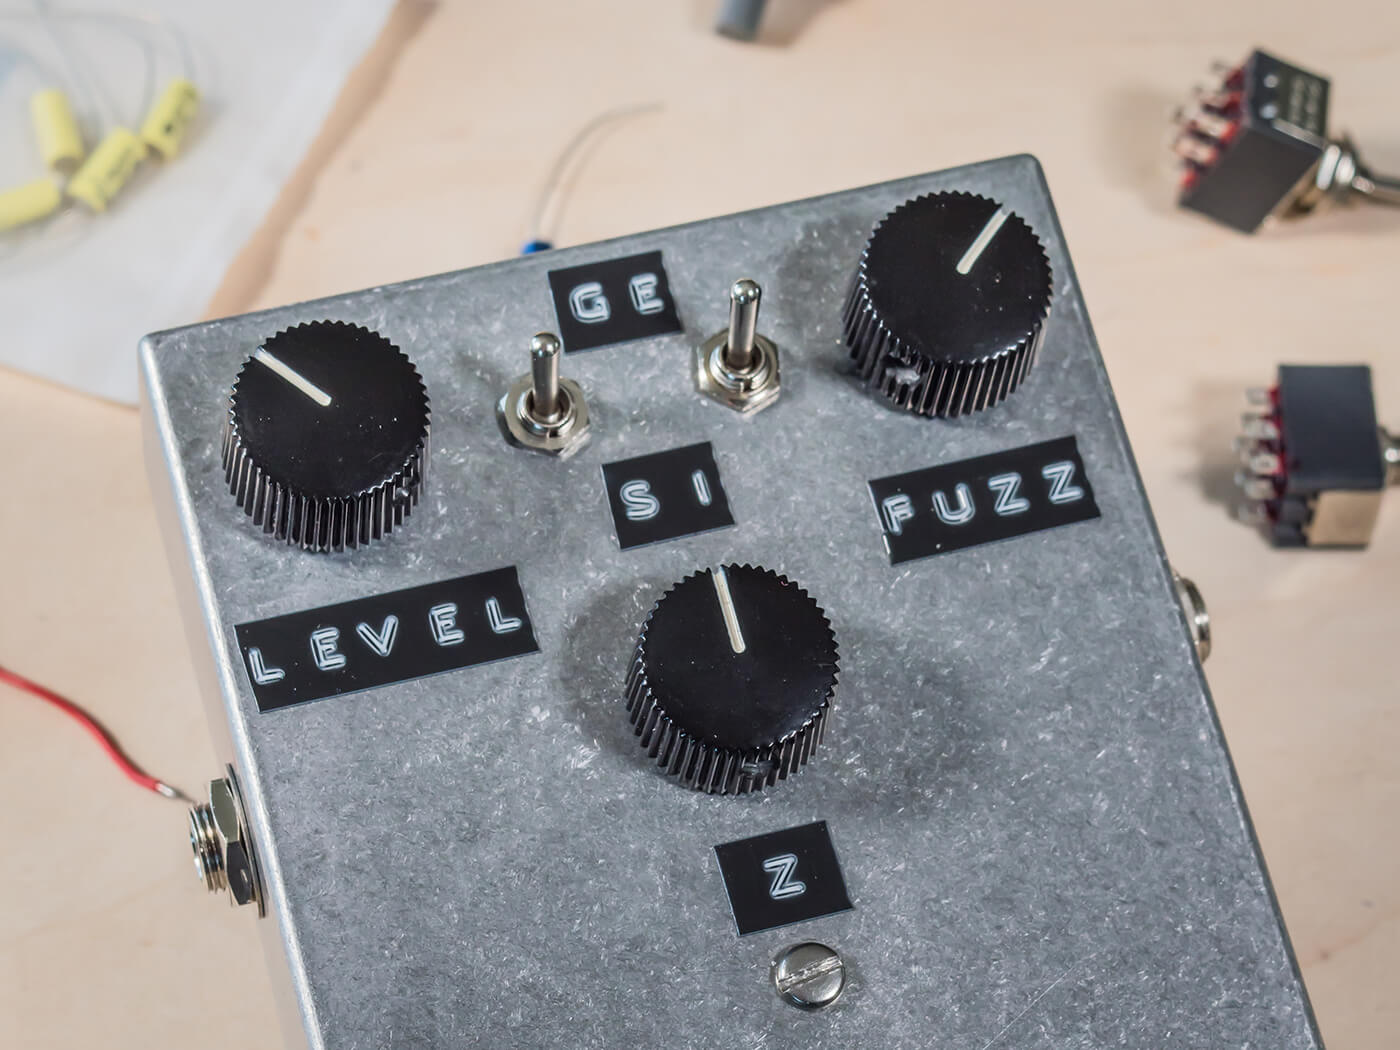
Step 3: Assembling the Enclosure
Assembling the enclosure is a crucial step in the process of creating your custom guitar pedal. This is where you'll house the electronic components and ensure that the pedal is durable and visually appealing. Here's a detailed breakdown of how to effectively assemble the enclosure:
-
Prepare the Enclosure: Begin by preparing the guitar pedal enclosure. This involves drilling holes for the input and output jacks, LED, potentiometers, and any other controls or switches. Ensure that the placement of these components aligns with your design and allows for easy operation of the pedal.
-
Labeling and Marking: Once the holes are drilled, label the controls and switches on the enclosure using a marker or labels. This step is essential for providing a clear indication of the pedal's functions and settings.
-
Mounting the Components: Carefully mount the potentiometers, switches, and LED into their respective positions on the enclosure. Secure them in place using the appropriate hardware, such as nuts and washers, to ensure they are firmly attached.
-
Wiring the Components: With the components mounted, begin wiring them together according to the schematic diagram. Use insulated hookup wire to create the necessary connections between the components, ensuring that the wiring is neat and organized within the enclosure.
-
Securing the PCB: Once the wiring is complete, secure the PCB with the soldered components into the enclosure. Use standoffs or mounting hardware to affix the PCB in a stable position, preventing it from moving or coming into contact with the enclosure walls.
-
Input and Output Jacks: Connect the input and output jacks to the circuit, ensuring that they are securely fastened to the enclosure. These jacks serve as the connection points for the guitar and amplifier, so it's essential to create reliable and sturdy connections.
-
Power Jack Installation: If your pedal requires external power, install the power jack on the enclosure. This allows for easy connection to a power supply, such as a 9V adapter or battery, to power the pedal.
By following these steps, you'll effectively assemble the enclosure for your custom guitar pedal, bringing together the electronic components in a functional and visually appealing housing. Once the enclosure is assembled, you're ready to move on to the next phase of the process.
Step 4: Wiring the Input and Output Jacks
Wiring the input and output jacks is a pivotal step in the construction of your custom guitar pedal. These jacks serve as the interface between the pedal, the guitar, and the amplifier, allowing the signal to flow in and out of the pedal. Here's a detailed breakdown of how to effectively wire the input and output jacks:
-
Identify the Jacks: Begin by identifying the input and output jacks on the enclosure. The input jack is where the guitar's cable will be connected, while the output jack is where the cable leading to the amplifier will be plugged in.
-
Prepare the Wires: Cut two lengths of insulated hookup wire, one for the input jack and one for the output jack. Strip a small portion of the insulation from each end of the wires to expose the conductive metal.
-
Connect the Ground: Locate the ground lug on each jack, which is typically indicated by a symbol or label. Connect one end of each wire to the ground lug of its respective jack. The ground connection helps to reduce noise and interference in the signal.
-
Connect the Signal: Identify the signal lug on each jack, which is where the actual audio signal will be transmitted. Connect the other end of each wire to the signal lug of its respective jack.
-
Secure the Connections: Once the wires are connected to the jacks, ensure that the connections are secure and free from any loose strands or exposed wire. Properly tightening the lugs will help maintain a reliable connection.
-
Insulate the Connections: To prevent any short circuits or unintended contact between the wired connections, insulate the exposed portions of the wires with heat-shrink tubing or electrical tape. This will help protect the connections and ensure the integrity of the wiring.
-
Test the Connections: Before proceeding further, it's advisable to perform a continuity test using a multimeter to ensure that the connections are properly established and that there are no unintended shorts or open circuits.
By following these steps, you'll effectively wire the input and output jacks of your custom guitar pedal, establishing the essential connections that allow the pedal to interact with the guitar and amplifier. Once the input and output jacks are wired, you're ready to move on to the next phase of the pedal construction.
Step 5: Testing and Troubleshooting
Testing and troubleshooting your custom guitar pedal is the final phase in the construction process, ensuring that the pedal functions as intended and delivers the desired sound. Here's a detailed breakdown of how to effectively test and troubleshoot your newly built guitar pedal:
-
Initial Power-Up: Before connecting the pedal to your guitar and amplifier, power it up using a 9V battery or an appropriate power supply. Verify that the LED indicator lights up, indicating that the pedal is receiving power.
-
Signal Flow Check: Connect your guitar to the input jack of the pedal and the output jack to the amplifier. Strum the guitar strings and listen for the effect produced by the pedal. Verify that the signal flows through the pedal and that the desired effect is audible.
-
Control Functionality: Test each control knob and switch on the pedal to ensure that they adjust the parameters of the effect as intended. Verify that the potentiometers and switches effectively alter the sound and behavior of the pedal.
-
Signal Integrity: Use a multimeter to measure the output signal level of the pedal, ensuring that it matches the expected output. This step helps verify that the pedal is producing the desired signal strength without any distortion or loss of fidelity.
-
Troubleshooting: If you encounter any issues during testing, such as no output signal, excessive noise, or erratic behavior, it's time to troubleshoot the pedal. Begin by visually inspecting the solder joints, components, and wiring for any loose connections, cold solder joints, or shorts. Use a multimeter to check for continuity and proper voltage levels at critical points in the circuit.
-
Audio Probe Testing: An audio probe can be a valuable tool for troubleshooting. By injecting an audio signal into different points of the circuit and listening to the output, you can identify where the signal flow is interrupted or distorted, helping pinpoint the source of the issue.
-
Iterative Testing and Adjustment: As you troubleshoot and identify potential issues, make incremental adjustments to the circuit, components, or wiring to address the problems. Test the pedal after each adjustment to verify if the issue has been resolved.
-
Final Testing: Once you've addressed any issues and verified that the pedal functions as intended, perform a final comprehensive test to ensure that all aspects of the pedal, including the effect, controls, and signal integrity, meet your expectations.
By following these testing and troubleshooting steps, you'll ensure that your custom guitar pedal is fully functional and ready to unleash its unique sound. Once you've completed this phase, you can proudly integrate your handmade pedal into your musical setup and enjoy the satisfaction of creating your own musical masterpiece.
Conclusion
In conclusion, building your own guitar pedal is a gratifying journey that combines creativity, electronics, and music into a single DIY project. By following the step-by-step process outlined in this guide, you've gained the knowledge and skills to design, solder, assemble, wire, and test your custom guitar pedal. The experience of crafting a pedal tailored to your unique preferences and musical style is not only rewarding but also empowers you to explore new sonic possibilities. As you plug in your guitar and stomp on the pedal you've meticulously created, take pride in the fact that you've not only built a functional piece of musical gear but also unleashed your creativity in the world of DIY and home improvement. So, rock on and let the music flow through the pedal you've brought to life with your own hands!