
Home>Home & Furniture>Kitchen>DIY Chuck Box Plans: How to Build Your Own
Kitchen
DIY Chuck Box Plans: How to Build Your Own
Published: July 24, 2024
Learn how to build your own DIY chuck box with our step-by-step plans. Perfect for camping and outdoor adventures, this guide ensures you have all your kitchen essentials organized.
(Many of the links in this article redirect to a specific reviewed product. Your purchase of these products through affiliate links helps to generate commission for Twigandthistle.com, at no extra cost. Learn more)
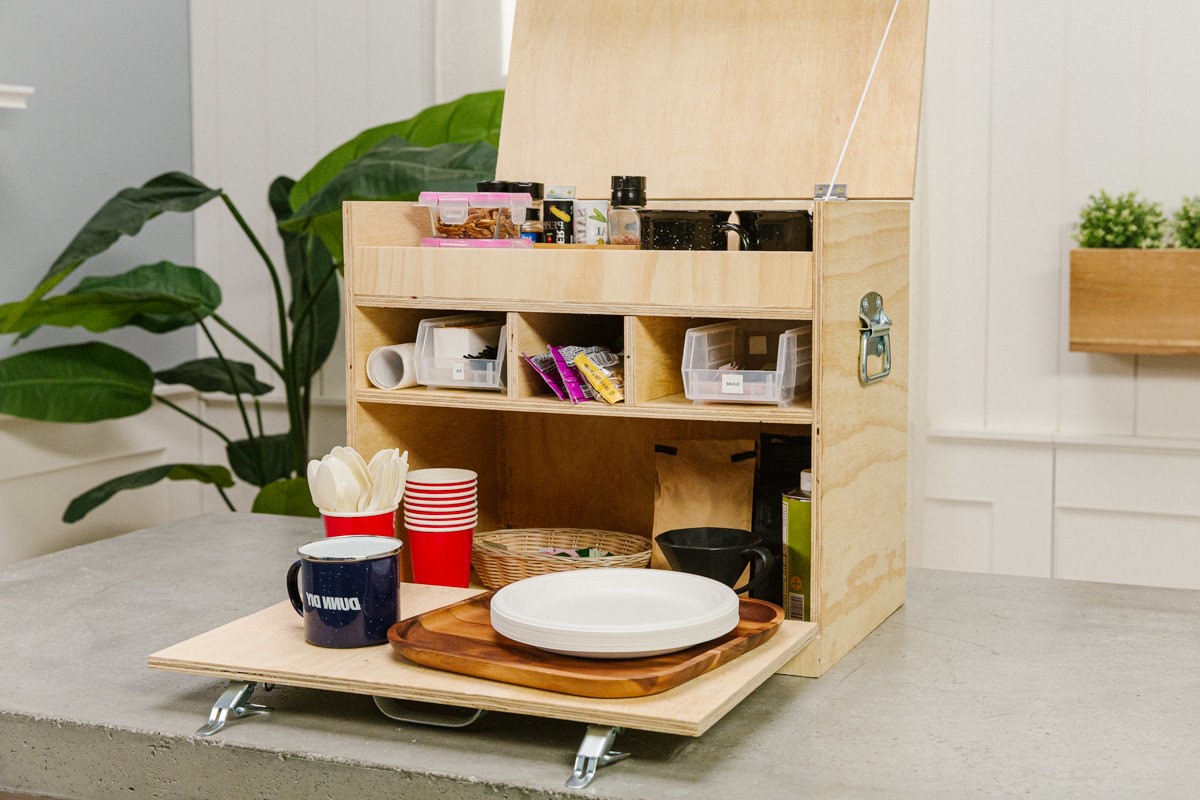
Building your own chuck box can make camping trips more organized and fun. A chuck box, also known as a camp kitchen box, holds all your cooking gear in one place. Instead of rummaging through bags for utensils, pots, and spices, everything you need fits inside a sturdy, portable box. Plus, making one yourself allows for customization to fit your specific needs. With some basic tools, materials, and a bit of time, you can create a chuck box that suits your style and cooking habits. In this guide, we'll walk you through the steps to build your very own chuck box.
Getting Ready for Your Project
Gather Materials: Collect all necessary materials like plywood, screws, hinges, handles, and paint. Make sure you have the right tools such as a saw, drill, measuring tape, and sandpaper.
Safety Gear: Wear safety goggles, gloves, and a dust mask to protect yourself from wood dust and sharp tools.
Workspace Setup: Clear a spacious area to work in. Ensure good lighting and ventilation. Lay down a drop cloth or old sheet to catch sawdust and debris.
Measure and Cut: Measure the dimensions for your chuck box carefully. Mark the wood with a pencil before cutting to ensure accuracy.
Pre-Drill Holes: Pre-drill holes for screws to prevent the wood from splitting. This makes assembly easier and more precise.
Sand Edges: Sand all edges and surfaces to remove splinters and rough spots. This ensures a smooth finish and safer handling.
Dry Fit: Assemble the pieces without screws to check if everything fits correctly. Make adjustments if needed before final assembly.
Organize Tools and Parts: Keep screws, hinges, and other small parts in separate containers to avoid losing them. Have all tools within reach to save time.
Plan Storage: Think about what you’ll store in the chuck box. Plan compartments and shelves accordingly to maximize space and functionality.
Check Instructions: Follow your plans or instructions step-by-step. Double-check each step to avoid mistakes and ensure a sturdy build.
Materials and Tools Needed
Materials:
- Plywood: Strong and lightweight, plywood forms the main structure of the chuck box.
- Wood Screws: These hold the plywood pieces together securely.
- Hinges: Allow the box to open and close smoothly.
- Handles: Make it easier to carry the chuck box.
- Latches: Keep the box closed during transport.
- Sandpaper: Smooths the edges and surfaces of the wood.
- Wood Glue: Provides extra strength to the joints.
- Paint or Stain: Protects the wood and gives it a finished look.
- Drawer Slides: Enable drawers to open and close easily.
- Corner Braces: Add extra support to the box's corners.
Tools:
- Tape Measure: Ensures accurate measurements.
- Pencil: Marks cutting lines on the wood.
- Circular Saw: Cuts the plywood into the required pieces.
- Drill: Makes holes for screws and hinges.
- Screwdriver: Tightens screws and attaches hardware.
- Clamps: Hold pieces together while the glue dries.
- Sanding Block: Helps smooth out rough edges.
- Paintbrush: Applies paint or stain evenly.
- Level: Ensures everything is straight and even.
- Safety Gear: Includes goggles and gloves to protect yourself while working.
Skill Level and Time Required
Skill Level: Intermediate
Time Required: 10-12 hours
- Gather Materials: 1 hour
- Cut Wood Pieces: 2 hours
- Assemble Frame: 3 hours
- Install Shelves and Compartments: 2 hours
- Sand and Finish: 2 hours
Step-by-Step Instructions
Gather Materials and Tools
- Plywood (3/4 inch thick)
- Wood screws
- Hinges
- Handles
- Latches
- Measuring tape
- Saw
- Drill
- Screwdriver
- Sandpaper
- Wood glue
- Paint or stain (optional)
Cut the Plywood
- Measure and mark the plywood for the following pieces:
- Base: 24" x 18"
- Back: 24" x 18"
- Sides: 18" x 18" (2 pieces)
- Top: 24" x 18"
- Front: 24" x 18"
- Shelves: 22.5" x 17" (2 pieces)
- Use the saw to cut the plywood along the marked lines.
- Measure and mark the plywood for the following pieces:
Assemble the Box Frame
- Attach the sides to the base using wood screws and wood glue.
- Secure the back piece to the base and sides.
- Attach the top piece to the sides and back.
Install Shelves
- Measure and mark the desired height for the shelves inside the box.
- Attach the shelves using wood screws and wood glue.
Attach the Front Door
- Secure the hinges to one side of the front piece.
- Attach the other side of the hinges to the front edge of one side piece.
Add Handles and Latches
- Attach handles to the top and sides of the box for easy carrying.
- Install latches to keep the front door securely closed.
Sand and Finish
- Sand all edges and surfaces to remove splinters and rough spots.
- Apply paint or stain if desired for a finished look.
Organize and Pack
- Place cooking supplies, utensils, and other camping gear inside the chuck box.
- Ensure everything fits snugly and securely.
Tips and Tricks for Success
Measure twice, cut once. Always double-check measurements before cutting wood. This saves time and materials.
Use plywood for the main structure. It's sturdy and lightweight.
Pre-drill holes before screwing pieces together. This prevents wood from splitting.
Sand edges after cutting. Smooth edges make assembly easier and safer.
Label parts as you cut them. This helps keep track of pieces and speeds up assembly.
Use corner clamps when assembling. They hold pieces at right angles, making it easier to screw them together.
Seal the wood with a waterproof finish. This protects the chuck box from moisture and extends its life.
Install handles on the sides. This makes the box easier to carry.
Add adjustable shelves inside. They provide flexibility for storing different items.
Use lightweight materials for dividers and shelves. This keeps the overall weight manageable.
Common mistakes to avoid:
Skipping the planning stage. Always draw a detailed plan before starting.
Using nails instead of screws. Screws hold better and make the box sturdier.
Not checking for square corners. Use a carpenter's square to ensure corners are 90 degrees.
Overloading the box. Keep weight in mind to avoid making it too heavy to carry.
Ignoring ventilation. Drill small holes for airflow to prevent mold and mildew.
Alternatives for materials or methods:
Instead of plywood, use MDF for a smoother finish, though it's heavier.
For a lighter option, use plastic or aluminum for some parts.
Replace screws with bolts for a more secure assembly.
Use a jigsaw instead of a circular saw for more intricate cuts.
Consider modular designs. Make sections that can be assembled and disassembled easily.
Estimating the Cost
Plywood: $50 for a 4x8 sheet of 3/4-inch plywood. You might need two sheets, so $100.
Screws: $10 for a box of wood screws.
Hinges: $15 for a set of three sturdy hinges.
Handles: $10 for two handles.
Latches: $10 for two latches.
Sandpaper: $5 for a pack.
Wood Glue: $5 for a bottle.
Paint or Stain: $20 for a quart.
Brushes: $5 for a set.
Tools: If you don't have them, a drill ($50), saw ($60), and measuring tape ($10) are essential.
Total Cost: Around $290.
Budget-Friendly Alternatives:
Plywood: Use OSB (Oriented Strand Board) instead, costing $25 per sheet. Total: $50.
Handles and Latches: Repurpose old ones or buy cheaper versions for $5 each. Total: $10.
Paint or Stain: Use leftover paint or buy a smaller amount for $10.
Tools: Borrow from friends or rent. Renting a drill and saw for a day might cost $20.
Total Cost with Alternatives: Around $150.
Different Ways to Customize
Materials: Instead of using plywood, try aluminum for a lighter box or reclaimed wood for a rustic look. Plastic can be another option for a waterproof and lightweight alternative.
Colors: Paint the box in bright colors like red or yellow for easy visibility. Use stain to highlight the natural wood grain or go for a camouflage pattern if you plan to use it in the wilderness.
Styles: Add decorative hardware like vintage handles or hinges for a unique touch. Install LED lights inside for better visibility at night. Use chalkboard paint on one side to create a writable surface for notes or menus.
Compartments: Customize the interior with adjustable shelves to fit different-sized items. Add removable bins or drawers for better organization. Install a fold-out table on one side for extra workspace.
Accessories: Attach a magnetic strip for holding knives and metal utensils. Add hooks on the sides for hanging towels or cooking tools. Include a built-in cutting board that slides out for convenience.
Portability: Add wheels to make it easier to move around. Use collapsible legs to elevate the box to a comfortable working height. Install handles on the sides for easier carrying.
Weatherproofing: Apply a waterproof sealant to protect the wood. Use weather-resistant hardware to prevent rust. Add a rubber gasket around the lid to keep out moisture.
Eco-Friendly Building Tips
Reclaimed wood is a fantastic choice for building a chuck box. It’s sturdy, often free, and gives your project a rustic look. Check local construction sites or old barns for discarded wood.
Use bamboo plywood. Bamboo grows quickly, making it a sustainable option. It’s also strong and lightweight, perfect for a portable chuck box.
Recycled plastic lumber is another option. Made from recycled plastics, it’s durable and weather-resistant. This material helps reduce plastic waste.
For hardware, opt for recycled metal hinges and handles. Many hardware stores offer these eco-friendly options.
Instead of chemical-laden paints, use natural wood stains or milk paint. These are non-toxic and better for the environment.
Consider using solar-powered lights inside the chuck box. They’re energy-efficient and eliminate the need for batteries.
Upcycling old furniture can provide useful parts. Old drawers, shelves, or cabinets can be repurposed into sections of your chuck box.
Finally, use biodegradable sealants to protect your chuck box from the elements. These sealants are eco-friendly and effective.
Your Chuck Box Awaits
Building your own chuck box isn't just about having a handy storage solution; it's about creating something unique and functional with your own hands. You've got the plans, the tools, and the know-how. Now, it's time to put it all together. Remember, the key is to take your time and enjoy the process. Each cut, screw, and coat of paint brings you closer to a finished product you'll be proud of. Whether you're using it for camping trips, tailgating, or backyard BBQs, your chuck box will be a testament to your DIY skills. So, gather your materials, clear your workspace, and get building. Before you know it, you'll have a custom chuck box ready for your next adventure. Happy building!
What materials do I need to build a chuck box?
You'll need plywood, screws, hinges, handles, and paint or varnish. A saw, drill, and measuring tape are also essential.
How long does it take to build a chuck box?
It usually takes a weekend if you have all the materials and tools ready. Plan for about 10-12 hours of work.
Can I customize the size of my chuck box?
Absolutely! You can adjust the dimensions to fit your camping gear and storage space. Just make sure to measure everything beforehand.
Do I need advanced woodworking skills?
Not really. Basic DIY skills are enough. If you can measure, cut, and screw, you're good to go.
How do I make my chuck box weather-resistant?
Use exterior-grade plywood and apply a waterproof sealant or outdoor paint. This helps protect against rain and moisture.
What should I include inside my chuck box?
Include shelves, dividers, and compartments for pots, pans, utensils, and food supplies. Customize it based on your camping needs.
Can I add wheels to my chuck box?
Yes, adding casters or wheels makes it easier to move around. Just ensure they're sturdy enough to handle the weight.