
Featured
How To Build A Pole Barn
Published: February 20, 2024
Editor-in-Chief with a decade in home renovation and a passion for vintage furniture. Diane is known for her weekend treasure hunts at flea markets, enriching our content with unique style insights.
Learn how to build a pole barn for your garage and basement with our comprehensive guide. Get expert tips and advice for a successful construction project.
(Many of the links in this article redirect to a specific reviewed product. Your purchase of these products through affiliate links helps to generate commission for Twigandthistle.com, at no extra cost. Learn more)
Introduction
Building a pole barn is an exciting and rewarding endeavor that offers a versatile space for storage, workshops, or even as a living area. Whether you're a seasoned DIY enthusiast or a first-time builder, constructing a pole barn can be a fulfilling project that adds value to your property.
In this comprehensive guide, we will walk you through the step-by-step process of building a pole barn, from planning and permits to the finishing touches. By the end of this journey, you will have the knowledge and confidence to embark on your own pole barn construction project.
Pole barns, also known as post-frame buildings, are characterized by their simple construction method, utilizing large poles or posts buried in the ground to provide structural support. This cost-effective and efficient building technique makes pole barns a popular choice for a wide range of applications, from agricultural buildings to residential garages and storage facilities.
Whether you're looking to shelter farm equipment, create a spacious garage for your vehicles, or establish a functional workshop, a pole barn offers the flexibility to accommodate your specific needs. With careful planning and attention to detail, you can customize your pole barn to suit your requirements, creating a space that is both functional and aesthetically pleasing.
Throughout this guide, we will delve into the essential steps required to bring your pole barn vision to life. From obtaining the necessary permits to laying the foundation, framing the structure, and adding the finishing touches, each stage of the construction process will be explored in detail. Additionally, we will provide valuable insights and tips to help you navigate potential challenges and make informed decisions along the way.
Whether you're a DIY enthusiast eager to roll up your sleeves or a property owner seeking to expand your space, building a pole barn offers a wealth of possibilities. So, let's embark on this journey together and unlock the potential of creating a functional, durable, and versatile pole barn that meets your unique needs.
Step 1: Planning and Permits
The first crucial step in building a pole barn is meticulous planning and obtaining the necessary permits. This phase sets the foundation for a successful construction process and ensures compliance with local building codes and regulations. Here's a detailed overview of the key aspects involved in the planning and permit acquisition process:
-
Design and Layout: Begin by envisioning the purpose of your pole barn. Will it serve as a storage space, a workshop, or a garage? Consider the dimensions required to accommodate your needs, including the height, width, and length of the structure. Create a detailed layout that outlines the placement of doors, windows, and any additional features you envision for your pole barn.
-
Site Selection: Carefully select the location for your pole barn, taking into account factors such as accessibility, drainage, and proximity to existing structures. Evaluate the terrain to ensure it can support the weight of the pole barn and consider the orientation to maximize natural light and ventilation.
-
Permit Research: Contact your local building department to understand the specific permits and approvals required for constructing a pole barn on your property. Different regions have varying regulations, and it's essential to familiarize yourself with the permit application process, including any documentation or site plans needed for approval.
-
Code Compliance: Familiarize yourself with the building codes and zoning regulations applicable to your area. These guidelines dictate aspects such as setback requirements, maximum building height, and structural specifications. Adhering to these regulations is crucial to ensure the safety and legality of your pole barn construction.
-
Professional Consultation: If you're unsure about any aspect of the planning or permit process, consider consulting with a local architect, engineer, or contractor specializing in pole barn construction. Their expertise can provide valuable insights and ensure that your project aligns with industry best practices and regulatory standards.
-
Documentation and Submission: Prepare the necessary documentation, including your pole barn design plans, site layout, and any other requested materials, and submit them to the relevant authorities for permit approval. Be proactive in addressing any feedback or modifications required to obtain the necessary permits for your construction project.
By diligently addressing the planning and permit acquisition phase, you set the stage for a smooth and compliant pole barn construction process. Taking the time to thoroughly plan and secure the required permits demonstrates a commitment to quality and adherence to regulatory standards, laying a solid foundation for the subsequent stages of your pole barn project.
Step 2: Site Preparation
Site preparation is a critical phase that sets the groundwork for the successful construction of a pole barn. This stage involves a series of essential tasks aimed at ensuring the site is properly configured to support the structural integrity of the pole barn. From clearing the land to evaluating soil conditions, each aspect of site preparation plays a pivotal role in laying the groundwork for a durable and stable pole barn.
The following tasks are integral to the site preparation process:
-
Land Clearing: Begin by clearing the designated area where the pole barn will be constructed. Remove any vegetation, debris, or obstructions that could impede the construction process. This step may involve the use of heavy equipment such as bulldozers or excavators to level the ground and create a clean slate for the upcoming construction activities.
-
Grading and Leveling: Once the land is cleared, the next step is to grade and level the site to ensure a uniform and stable foundation for the pole barn. Proper grading helps to address any uneven terrain and facilitates effective water drainage, preventing potential issues such as standing water or soil erosion around the structure.
-
Soil Testing: Conduct a thorough assessment of the soil conditions at the construction site. Soil testing provides valuable insights into the load-bearing capacity of the ground, which is crucial for determining the type of foundation and footings required to support the pole barn. Understanding the soil composition enables informed decision-making regarding the structural design and stability of the building.
-
Utility Considerations: Evaluate the proximity of utilities such as water, electricity, and gas lines to the construction site. Identify any necessary utility connections or modifications required to accommodate the needs of the pole barn, ensuring that essential services are readily accessible once the construction is complete.
-
Access and Logistics: Assess the accessibility of the site for construction equipment, material delivery, and future use of the pole barn. Clear pathways and designated access points to facilitate the movement of construction vehicles and materials, optimizing efficiency and safety throughout the building process.
By meticulously addressing the site preparation phase, you establish a solid foundation for the subsequent stages of pole barn construction. This proactive approach not only ensures the structural integrity and stability of the building but also sets the stage for a seamless and efficient construction process. With the site properly prepared, you are well-positioned to progress to the next crucial stage of laying the foundation and footings for your pole barn.
Step 3: Foundation and Footings
The foundation and footings of a pole barn are fundamental elements that provide stability, support, and structural integrity to the entire building. This phase of construction involves meticulous planning, precise measurements, and the implementation of robust foundation systems to ensure the long-term durability and resilience of the pole barn. Let's delve into the essential components and processes involved in establishing a solid foundation and footings for your pole barn.
Foundation Design:
The first step in the foundation and footings phase is to determine the appropriate foundation design based on the soil conditions, building load, and local building codes. Common foundation options for pole barns include concrete piers, sonotubes, and treated wood posts. The choice of foundation design is influenced by factors such as soil bearing capacity, frost depth, and the specific requirements of the pole barn structure.
Footing Installation:
Once the foundation design is established, the next step is to install the footings that will support the vertical posts of the pole barn. This process involves excavating holes at designated intervals and pouring concrete footings to anchor the structural posts securely. Careful attention is given to the depth and diameter of the footings, ensuring they meet the structural requirements and provide a stable base for the vertical load-bearing elements of the pole barn.
Post Placement and Alignment:
With the footings in place, the vertical posts are positioned and aligned according to the predetermined layout of the pole barn. Precision is key during this stage, as the accurate placement of the posts sets the framework for the entire structure. Leveling the posts and ensuring uniform alignment are essential to guarantee the stability and structural integrity of the pole barn.
Anchoring and Bracing:
To further reinforce the foundation and enhance the stability of the pole barn, anchoring and bracing systems are implemented. Anchors, such as steel rods or cables, are secured to the footings and attached to the posts to resist lateral forces and uplift. Additionally, diagonal bracing is installed to mitigate sway and enhance the overall rigidity of the structure, contributing to its resilience against external forces.
Moisture Protection:
Incorporating measures to protect the foundation and footings from moisture is crucial for preserving their longevity. Applying appropriate sealants, moisture barriers, or utilizing pressure-treated wood helps safeguard the foundation components against water infiltration, soil erosion, and potential decay, ensuring the structural integrity of the pole barn over time.
By meticulously executing the foundation and footings phase, you establish a robust and reliable base for the construction of your pole barn. The careful consideration of soil conditions, precise installation of footings, and implementation of anchoring and bracing systems collectively contribute to the structural resilience and longevity of the pole barn, setting the stage for the subsequent stages of framing, roofing, and completing your envisioned pole barn structure.
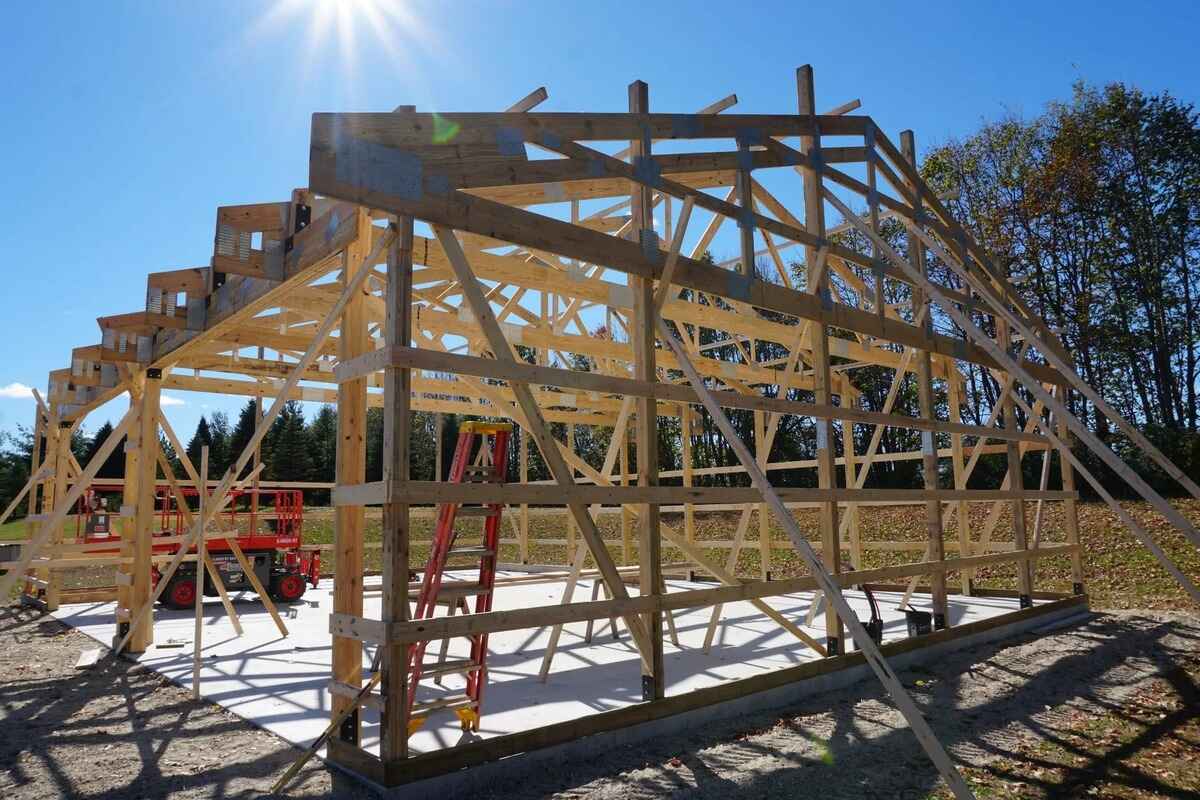
Step 4: Framing and Roofing
The framing and roofing phase marks a significant milestone in the construction of a pole barn, where the skeletal framework of the structure takes shape, and the protective roofing system is installed. This crucial stage involves precision, attention to detail, and the integration of structural components to create a sturdy and weather-resistant enclosure. Let's explore the key elements and processes involved in framing and roofing a pole barn.
Framing:
Post Placement and Bracing:
The framing process commences with the placement of horizontal girts and vertical purlins between the structural posts, forming the framework for the walls and roof. These components are meticulously positioned and secured, providing the structural support necessary to accommodate the cladding and roofing materials. Additionally, diagonal bracing is installed to enhance the rigidity and stability of the frame, ensuring it can withstand external forces and maintain its structural integrity.
Truss Installation:
Trusses, the load-bearing structures that form the roof framework, are carefully positioned and secured atop the vertical posts. These pre-fabricated components are engineered to distribute the weight of the roof evenly, providing essential support and stability. The precise installation of trusses is crucial to ensuring the structural integrity and load-bearing capacity of the roof system.
Roofing:
Roof Sheathing:
Once the trusses are in place, the next step involves installing the roof sheathing, which serves as the base for the roofing materials. Oriented strand board (OSB) or plywood panels are commonly used for this purpose, providing a solid substrate for the roof covering. Proper installation of the roof sheathing is essential to create a uniform and stable surface that can withstand the elements and support the roofing materials.
Roofing Material Application:
The selection and application of roofing materials play a pivotal role in determining the durability and weather resistance of the pole barn. Options such as metal roofing panels, asphalt shingles, or corrugated fiberglass sheets are commonly utilized, each offering distinct advantages in terms of longevity, aesthetics, and weather protection. The careful application of roofing materials ensures a watertight and durable roof, safeguarding the interior space from moisture and external elements.
Flashing and Trim:
To further enhance the weatherproofing of the roof, flashing and trim components are installed at critical junctions and edges. These elements serve to prevent water infiltration, reinforce vulnerable areas, and create a seamless transition between the roof and other structural elements. Properly installed flashing and trim contribute to the overall resilience of the roofing system, mitigating potential water damage and enhancing the longevity of the pole barn.
By meticulously executing the framing and roofing phase, you establish a robust and weather-resistant enclosure for your pole barn. The precise placement of structural components, careful installation of roofing materials, and attention to weatherproofing details collectively contribute to the creation of a durable and protective shelter. With the framing and roofing in place, your pole barn takes on its distinctive form and gains the essential attributes to withstand the elements and serve its intended purpose effectively.
Step 5: Siding and Trim
The siding and trim phase of pole barn construction plays a pivotal role in enhancing the structural integrity, weather resistance, and visual appeal of the building. This stage involves the installation of exterior cladding, trim components, and finishing details that collectively contribute to the functionality and aesthetics of the pole barn. Let's delve into the essential elements and processes involved in the siding and trim phase, highlighting the key considerations and techniques employed to achieve a durable and visually appealing exterior for the pole barn.
Siding Installation:
The selection of siding materials is a critical decision that influences the durability, maintenance requirements, and overall appearance of the pole barn. Common siding options include metal panels, vinyl siding, wood cladding, or composite materials, each offering distinct advantages in terms of longevity, weather resistance, and aesthetic versatility. The installation process involves securing the siding panels to the framework of the pole barn, ensuring a secure and uniform application that protects the structure from external elements such as wind, moisture, and UV exposure.
Trim Components:
Trim elements, including corner boards, fascia, and soffits, play a crucial role in providing a polished and cohesive finish to the exterior of the pole barn. These components not only contribute to the visual appeal of the building but also serve practical functions such as concealing joints, protecting edges, and promoting proper ventilation. The precise installation of trim components adds a level of detail and refinement to the exterior, creating a seamless transition between different siding materials and enhancing the overall aesthetics of the pole barn.
Weatherproofing and Sealing:
Ensuring the weatherproofing and sealing of the siding and trim components is essential to safeguard the pole barn against moisture infiltration, air leakage, and potential structural damage. Properly installed flashing, caulking, and sealants are employed at critical junctions, seams, and penetrations to create a watertight and resilient exterior envelope. Attention to detail in weatherproofing measures enhances the longevity and performance of the siding and trim, contributing to the overall durability of the pole barn.
Aesthetic Considerations:
Beyond functionality, the siding and trim phase offers opportunities to enhance the visual appeal of the pole barn. Considerations such as color selection, texture, and architectural details can be leveraged to create a customized and visually striking exterior. By harmonizing the siding materials, trim elements, and color schemes, the pole barn can be transformed into a distinctive and aesthetically pleasing structure that complements its surroundings and reflects the owner's personal style.
By meticulously addressing the siding and trim phase, you elevate the exterior of the pole barn, creating a durable, weather-resistant, and visually appealing structure. The careful selection and installation of siding materials, precise incorporation of trim components, and attention to weatherproofing details collectively contribute to the creation of a pole barn exterior that embodies both functionality and aesthetic charm. With the siding and trim in place, the pole barn takes on its distinctive character and stands as a testament to meticulous craftsmanship and attention to detail.
Step 6: Doors and Windows
The installation of doors and windows marks a significant phase in the construction of a pole barn, as it introduces elements that enhance functionality, accessibility, and natural light within the structure. This stage involves the careful selection, placement, and installation of doors and windows to create a versatile and inviting interior space while ensuring optimal security and weather protection.
Door Selection and Installation:
Selecting the appropriate doors for the pole barn is essential to accommodate the intended use of the space and facilitate seamless entry and exit. Common door options include overhead doors, sliding doors, and personnel doors, each offering unique benefits in terms of accessibility, security, and durability. The installation process involves precise fitting, alignment, and secure anchoring to ensure smooth operation and weather resistance. Additionally, considerations such as insulation, weather-stripping, and locking mechanisms are integrated to enhance energy efficiency and security, providing a functional and secure access point to the pole barn.
Window Placement and Functionality:
Strategic placement of windows contributes to the interior ambiance of the pole barn by introducing natural light, ventilation, and visual connectivity with the surrounding environment. Careful consideration is given to the size, orientation, and quantity of windows to optimize daylighting and airflow within the space. The installation process involves framing, sealing, and securing the windows to create a weather-tight and visually appealing integration with the exterior cladding. Additionally, options such as operable windows, insulated glass, and window treatments are explored to customize the functionality and comfort of the interior environment.
Weatherproofing and Insulation:
Ensuring the weatherproofing and insulation of doors and windows is crucial to mitigate heat loss, air infiltration, and moisture penetration. Properly installed flashing, caulking, and weather-stripping are employed to create a tight seal around door and window openings, preventing drafts and water intrusion. Additionally, the incorporation of insulated doors and windows enhances energy efficiency, thermal comfort, and sound insulation within the pole barn, creating a conducive and comfortable interior environment for various activities and purposes.
Aesthetic Integration:
Beyond functionality, the selection and placement of doors and windows offer opportunities to enhance the aesthetic appeal of the pole barn. Harmonizing the design, material finishes, and architectural details of doors and windows with the overall exterior creates a cohesive and visually pleasing facade. The careful integration of doors and windows contributes to the character and charm of the pole barn, adding a personalized touch that complements the structural design and reflects the owner's preferences.
By meticulously addressing the installation of doors and windows, the pole barn evolves into a functional, inviting, and well-integrated space that accommodates diverse needs while embodying a harmonious blend of functionality and aesthetics. The careful selection, precise installation, and attention to weatherproofing details collectively contribute to the creation of a pole barn interior that is both practical and visually appealing, enhancing its overall utility and appeal.
Step 7: Electrical and Plumbing
The integration of electrical and plumbing systems in a pole barn is a pivotal phase that enhances the functionality, convenience, and versatility of the structure. This stage involves the strategic installation of electrical wiring, lighting fixtures, outlets, as well as plumbing components such as sinks, drains, and potentially even bathrooms. By incorporating these essential utilities, the pole barn transforms into a fully equipped space capable of supporting a wide range of activities, from workshops and storage to living quarters and recreational areas.
Electrical Installation:
The installation of electrical systems begins with careful planning and layout design to determine the placement of outlets, switches, and lighting fixtures. A licensed electrician is typically engaged to ensure compliance with local building codes and safety standards. The wiring is meticulously routed through the walls and ceiling, with a focus on creating a well-lit and functional interior environment. Considerations such as energy-efficient lighting, dedicated circuits for heavy machinery, and the integration of smart technology may be incorporated to enhance the efficiency and adaptability of the electrical system.
Lighting and Fixtures:
Strategically positioned lighting fixtures play a crucial role in illuminating the interior space, enhancing visibility, and creating a conducive environment for various activities. Options such as LED overhead lights, task lighting for work areas, and exterior security lighting are carefully selected to meet specific needs. The installation of lighting fixtures is complemented by switches and controls that offer flexibility in adjusting illumination levels, contributing to energy conservation and user comfort within the pole barn.
Plumbing Integration:
For pole barns intended for more extensive use, the inclusion of plumbing facilities can significantly expand their functionality. This may involve the installation of sinks for cleaning and washing, as well as the incorporation of drainage systems to manage wastewater. Additionally, the inclusion of a bathroom with toilet and shower facilities can transform the pole barn into a fully functional living space. Plumbing installation is executed with precision to ensure proper water supply, drainage, and adherence to plumbing codes, enhancing the convenience and usability of the pole barn.
Utility Accessibility:
The integration of electrical and plumbing systems also involves ensuring accessibility for future maintenance and potential expansions. Thoughtful placement of electrical panels, shutoff valves, and service access points facilitates ease of maintenance and repairs. Additionally, the incorporation of energy-efficient fixtures and water-saving plumbing components contributes to sustainability and resource conservation within the pole barn.
By meticulously addressing the electrical and plumbing integration phase, the pole barn evolves into a versatile and fully equipped space capable of accommodating diverse needs. The seamless integration of electrical and plumbing systems enhances the functionality, comfort, and convenience of the pole barn, transforming it into a dynamic and adaptable environment that aligns with the specific requirements and aspirations of the owner.
Step 8: Finishing Touches
As the construction of the pole barn nears completion, attention turns to the finishing touches that elevate the functionality, aesthetics, and overall appeal of the structure. This phase encompasses a range of essential tasks and enhancements that add the final polish to the pole barn, transforming it into a fully realized and inviting space.
Interior Finishes:
The interior of the pole barn receives meticulous attention during the finishing touches phase. Wall and ceiling treatments, such as paint or paneling, are applied to create a clean and visually appealing backdrop. Flooring options, including concrete, epoxy coatings, or durable floor coverings, are installed to provide a resilient and easy-to-maintain surface. These interior finishes contribute to a welcoming and well-appointed environment that is conducive to various activities, whether it be storage, workshops, or living quarters.
Trim and Detailing:
Refinement and precision are evident in the installation of trim elements, such as baseboards, crown molding, and decorative accents. These details not only add a touch of elegance but also conceal joints and transitions, creating a seamless and polished interior. Additionally, attention is given to the integration of hardware, such as door handles, hinges, and cabinetry fixtures, to ensure functionality and visual coherence throughout the space.
Exterior Enhancements:
The exterior of the pole barn receives careful attention to enhance its curb appeal and functionality. Landscaping, including the addition of pathways, planting of greenery, and installation of exterior lighting, contributes to a welcoming and well-integrated exterior environment. Additionally, the incorporation of gutters and downspouts facilitates proper water drainage and protects the exterior surfaces from moisture-related issues, ensuring the longevity of the pole barn.
Customization and Personalization:
The finishing touches phase offers opportunities for customization and personalization to reflect the owner's preferences and intended use of the pole barn. Custom storage solutions, workbenches, and shelving are installed to optimize the functionality of the space. Furthermore, the addition of personalized signage, decorative elements, and architectural details infuses the pole barn with character and individuality, creating a space that resonates with the owner's vision.
Final Inspections and Quality Assurance:
Before the completion of the finishing touches phase, thorough inspections are conducted to ensure that all elements meet quality standards and regulatory requirements. This includes assessments of electrical and plumbing systems, structural integrity, and compliance with building codes. Any necessary adjustments or refinements are made to guarantee that the pole barn is not only visually appealing but also safe, efficient, and built to last.
By meticulously addressing the finishing touches phase, the pole barn is transformed into a refined, functional, and personalized space that embodies the vision and aspirations of the owner. The careful attention to interior and exterior details, customization, and quality assurance culminates in the creation of a pole barn that is not only structurally sound but also a source of pride and satisfaction for its owner.
Conclusion
As we conclude this comprehensive guide to building a pole barn, it's evident that the journey from planning and permits to the finishing touches is a testament to the meticulous craftsmanship, thoughtful planning, and unwavering dedication required to bring a vision to life. The construction of a pole barn is not merely a structural endeavor; it is a reflection of creativity, practicality, and the pursuit of a space that seamlessly integrates functionality with aesthetics.
Throughout the construction process, each phase has presented unique challenges and opportunities, from the careful site preparation to the integration of essential utilities and the meticulous attention to detail in the finishing touches. The pole barn, once a vision on paper, has evolved into a tangible and versatile structure that holds the promise of fulfilling diverse needs, whether as a storage facility, workshop, or living space.
The significance of each phase, from the foundational elements to the final aesthetic enhancements, underscores the holistic approach required to create a pole barn that not only meets practical requirements but also resonates with the individuality and aspirations of its owner. The integration of electrical and plumbing systems, the selection of siding materials, and the placement of doors and windows are not merely functional considerations; they are expressions of the owner's lifestyle, preferences, and the intended use of the space.
As the finishing touches are meticulously applied, the pole barn emerges as a harmonious blend of structural integrity, visual appeal, and personalized functionality. It stands as a testament to the dedication and attention to detail invested in its creation, embodying both the practicality of a functional structure and the allure of a space that reflects the unique identity of its owner.
In essence, the construction of a pole barn transcends the physical act of building; it is a narrative of vision, craftsmanship, and the realization of a space that holds the potential to enrich lives and fulfill diverse purposes. As we reflect on the journey from inception to completion, it becomes evident that the pole barn is not merely a structure; it is a canvas upon which aspirations, creativity, and practicality converge to create a space that is both enduring and inspiring.