
Home>Create & Decorate>DIY & Crafts>How To Build A Barn
DIY & Crafts
How To Build A Barn
Published: June 5, 2024

Senior Editor in Create & Decorate, Kathryn combines traditional craftsmanship with contemporary trends. Her background in textile design and commitment to sustainable crafts inspire both content and community.
Learn how to build a barn with our DIY & Crafts guide. Get step-by-step instructions and expert tips for your barn-building project.
(Many of the links in this article redirect to a specific reviewed product. Your purchase of these products through affiliate links helps to generate commission for Twigandthistle.com, at no extra cost. Learn more)
Introduction
So, you've decided to take on the challenge of building a barn. Whether you're looking to create a space for livestock, storage, or a workshop, constructing a barn can be a rewarding and practical DIY project. In this guide, we'll walk you through the essential steps to help you build a sturdy and functional barn on your property. From choosing the right location to adding the finishing touches, we've got you covered. Let's roll up our sleeves and get started on this exciting journey of barn building!
Choosing the Right Location
When it comes to building a barn, selecting the right location is crucial for its functionality and longevity. Here are some key factors to consider when choosing the perfect spot for your barn:
-
Accessibility: Ensure that the location of your barn allows for easy access. This is important for transporting materials during construction and for future use of the barn.
-
Terrain: Look for a level area with good drainage to prevent water from pooling around the barn. Avoid low-lying areas that are prone to flooding.
-
Sunlight: Position the barn in a way that maximizes natural light. This not only creates a more pleasant environment for both animals and humans but also helps with energy efficiency.
-
Wind Direction: Consider the prevailing wind direction in your area. Placing the barn to take advantage of natural windbreaks can help improve ventilation and comfort for animals.
-
Zoning Regulations: Check local zoning regulations and obtain any necessary permits before finalizing the location. Compliance with these regulations is essential to avoid legal issues in the future.
By carefully evaluating these factors, you can select a location that sets the stage for a well-designed and functional barn.
Designing Your Barn
Designing your barn is a crucial step that sets the foundation for the entire construction process. Here are some key aspects to consider when planning the design of your barn:
-
Purpose: Determine the primary purpose of your barn. Whether it's for housing livestock, storing equipment, or serving as a workshop, understanding the intended use will guide the design and layout.
-
Size and Layout: Assess the space needed for your specific requirements. Consider the number of stalls, storage areas, or workspace needed. A well-thought-out layout can enhance efficiency and functionality.
-
Materials: Choose durable and suitable materials for the construction of your barn. Factors such as climate, intended use, and budget will influence the selection of materials for the frame, siding, roofing, and flooring.
-
Ventilation and Lighting: Proper ventilation and natural lighting are essential for the well-being of animals and the comfort of occupants. Incorporate windows, vents, and skylights into the design to ensure adequate airflow and illumination.
-
Safety and Security: Implement safety features such as sturdy doors, secure latches, and proper fencing if the barn will house animals. Additionally, consider security measures to protect valuable equipment and supplies.
-
Future Expansion: Anticipate future needs and potential expansion. Design the barn with flexibility in mind, allowing for possible additions or modifications as your requirements evolve.
By carefully considering these aspects during the design phase, you can create a barn that not only meets your current needs but also provides a solid foundation for future growth and functionality.
Gathering Materials and Tools
Gathering the necessary materials and tools is a critical step in preparing for the construction of your barn. Here's a detailed breakdown of the essential items you'll need to acquire:
Materials
- Lumber: Purchase high-quality lumber for the frame, trusses, and other structural components. Consider the dimensions and strength requirements based on your barn design.
- Roofing Materials: Depending on your preference and budget, choose from options such as metal roofing, shingles, or other durable roofing materials suitable for your climate.
- Siding: Select siding materials that offer both aesthetic appeal and protection from the elements. Common choices include wood, metal, or vinyl siding.
- Foundation Materials: If your barn requires a concrete foundation, gather the necessary concrete mix, reinforcement bars, and formwork materials.
- Fasteners and Hardware: Stock up on nails, screws, bolts, and other fasteners required for assembling the structural elements and attaching various components.
- Doors and Windows: If not building your own, purchase pre-made doors and windows suitable for barn use, ensuring they are durable and provide adequate security and ventilation.
Tools
- Power Tools: Invest in essential power tools such as a circular saw, drill, and nail gun to expedite the construction process and ensure precision.
- Hand Tools: Acquire a comprehensive set of hand tools including hammers, screwdrivers, wrenches, levels, and tape measures for various construction tasks.
- Lifting Equipment: Depending on the scale of your project, consider renting or purchasing lifting equipment such as a forklift or crane for handling heavy materials and components.
- Safety Gear: Prioritize safety by obtaining personal protective equipment including hard hats, gloves, safety glasses, and sturdy work boots to minimize the risk of injuries.
By carefully procuring the required materials and tools, you can streamline the construction process and ensure that you have everything needed to bring your barn to life.
Preparing the Site
Before commencing the construction of your barn, thorough site preparation is essential to ensure a stable and durable foundation. Here's a detailed guide on preparing the site for your barn construction:
-
Clearing the Area: Begin by clearing the designated site of any vegetation, debris, or obstacles. This includes removing rocks, tree stumps, and any other obstructions that could interfere with the construction process.
-
Leveling the Ground: Use a tractor, bulldozer, or grading equipment to level the ground where the barn will be situated. A flat and even surface is crucial for the stability of the foundation and the overall structural integrity of the barn.
-
Marking the Perimeter: Once the ground is leveled, mark the perimeter of the barn's foundation using stakes and string. This will provide a clear outline for excavation and ensure that the foundation is accurately positioned.
-
Excavation: Excavate the marked area to the required depth for the foundation. The depth will depend on the type of foundation being used, such as a concrete slab or pier foundation. Use a backhoe or excavator to dig the trenches or holes according to the foundation design.
-
Drainage Considerations: Assess the site's drainage patterns and make provisions for proper water runoff. Install drainage pipes or gravel trenches if necessary to prevent water from pooling around the foundation, which could lead to structural issues over time.
-
Compaction and Grading: After excavation, compact the soil within the foundation area to achieve the required density. Proper compaction is essential for preventing settling or shifting of the foundation in the future. Additionally, grade the surrounding soil away from the foundation to direct water away from the barn.
-
Utility Planning: If the barn will require utilities such as electricity, water, or plumbing, plan for their installation during the site preparation phase. This may involve digging trenches for utility lines and coordinating with relevant service providers.
By meticulously preparing the site according to these steps, you can establish a solid and stable foundation for your barn, setting the stage for the subsequent phases of construction.
Building the Foundation
The foundation serves as the backbone of your barn, providing stability and support for the entire structure. Proper construction of the foundation is essential to ensure the longevity and structural integrity of the barn. Here's a detailed guide on building the foundation for your barn:
-
Selecting the Foundation Type: Depending on the soil conditions, climate, and the specific requirements of your barn, you'll need to choose the most suitable foundation type. Common options include concrete slab, pier, or post-and-beam foundations. Each type has its advantages and is chosen based on factors such as soil stability, local building codes, and the intended use of the barn.
-
Excavation and Footings: If you opt for a concrete slab foundation, the next step involves excavating the area to the required depth and dimensions. The perimeter of the slab will require footings to support the weight of the walls and roof. The footings are typically wider than the slab itself and are reinforced with steel rebar to enhance strength and stability.
-
Formwork and Reinforcement: Once the excavation is complete, formwork is erected to create a mold for the concrete. The formwork outlines the shape and dimensions of the foundation and holds the concrete in place during pouring. Additionally, steel reinforcement bars, or rebar, are placed within the formwork to provide tensile strength and prevent cracking.
-
Concrete Pouring: With the formwork and reinforcement in place, it's time to pour the concrete. Ensure that the concrete mix is of the appropriate strength and consistency for the foundation. The concrete is poured into the formwork, leveled, and smoothed to achieve a uniform surface. Proper curing of the concrete is crucial to attain the desired strength and durability.
-
Pier or Post Installation: For pier or post-and-beam foundations, the process involves setting the piers or posts at designated locations according to the barn's design. These vertical supports are anchored into the ground and provide the structural support for the framing of the barn. Careful measurement and alignment are essential to ensure the uniformity and stability of the foundation.
-
Inspection and Compliance: Once the foundation is constructed, it's important to have it inspected to ensure compliance with local building codes and regulations. An inspector will assess the foundation for structural integrity, proper dimensions, reinforcement, and adherence to safety standards. Address any issues identified during the inspection before proceeding to the next phase of construction.
By meticulously following these steps and paying attention to detail, you can establish a solid and reliable foundation that forms the basis for the rest of the barn construction process.
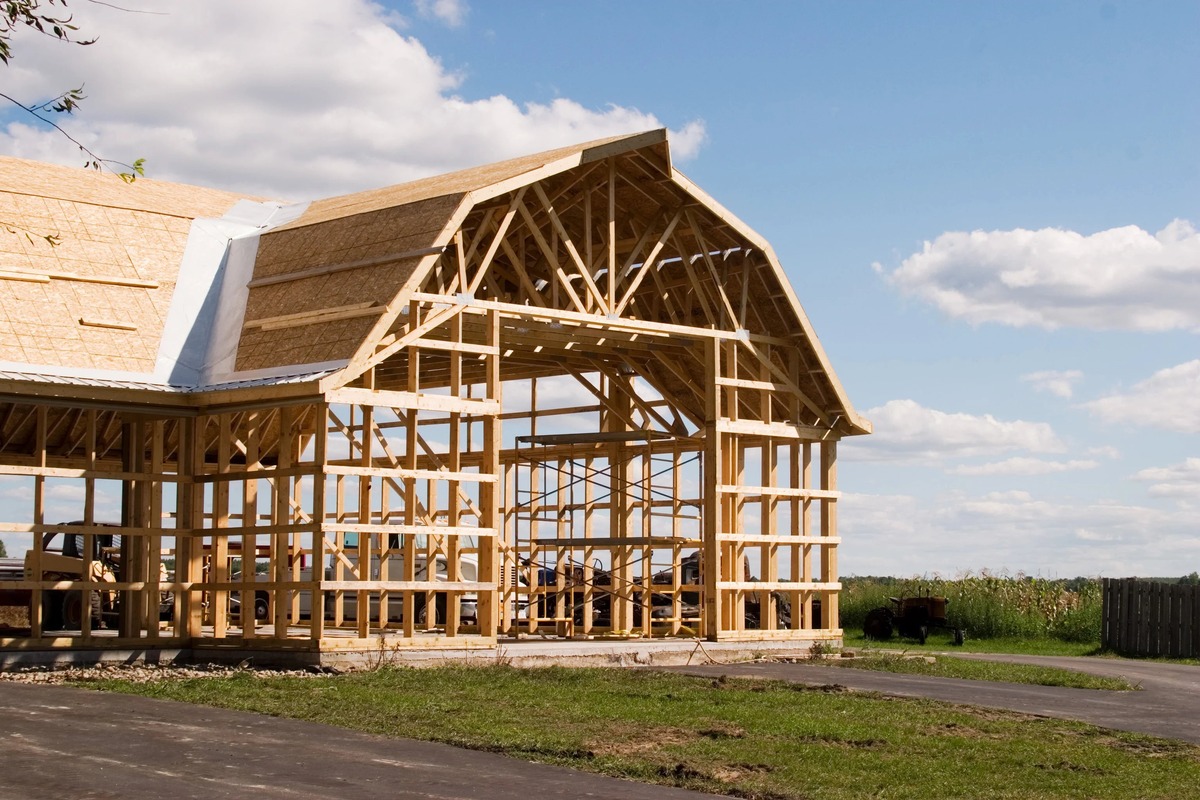
Constructing the Frame
Constructing the frame of your barn is a pivotal stage that lays the groundwork for the overall structure. Here's a comprehensive guide to the process of framing your barn:
-
Laying Out the Frame: Begin by laying out the dimensions of the barn frame on the foundation. Use chalk lines, measuring tapes, and right-angle tools to ensure accurate placement of the frame components.
-
Preparing the Lumber: Cut the lumber to the required lengths and angles based on the design and layout of the frame. Utilize a combination of dimensional lumber, trusses, and bracing to create the framework for the walls, roof, and supports.
-
Assembling Wall Frames: Construct the wall frames on the ground before raising them into position. Secure the vertical studs, horizontal plates, and bracing using nails or screws. Ensure that the wall frames are square and plumb to facilitate seamless assembly.
-
Erecting the Wall Frames: With the help of a team, lift and position the assembled wall frames onto the foundation. Use temporary bracing to hold the walls in place while securing them to the foundation. Connect the wall frames to each other and ensure proper alignment.
-
Installing Roof Trusses: If your barn design incorporates roof trusses, carefully lift and position them onto the wall frames. Secure the trusses in place and brace them to maintain structural integrity. Ensure that the trusses are evenly spaced and aligned to support the roof load.
-
Adding Structural Bracing: Install diagonal bracing and sheathing to reinforce the stability of the frame. This includes adding plywood or oriented strand board (OSB) to the walls and roof to enhance rigidity and resistance to lateral forces.
-
Securing the Frame Components: Use appropriate fasteners such as nails, screws, and metal connectors to secure the frame components. Pay special attention to connections at critical points such as wall-to-wall, wall-to-truss, and truss-to-truss junctions to ensure structural strength.
-
Window and Door Openings: Frame out the openings for windows and doors according to the design specifications. Install headers and additional framing to support these openings and accommodate the installation of windows and doors.
By meticulously following these steps and paying attention to detail, you can successfully construct a sturdy and well-engineered frame for your barn, setting the stage for the next phases of the construction process.
Adding Roofing and Siding
The process of adding roofing and siding to your barn is a critical phase that not only enhances the aesthetics but also provides essential protection from the elements. Here's a detailed guide to the installation of roofing and siding for your barn:
Roofing Installation
-
Selecting the Roofing Material: Choose a roofing material that suits your climate, budget, and aesthetic preferences. Options include metal roofing, asphalt shingles, or other durable materials. Consider factors such as longevity, maintenance requirements, and energy efficiency.
-
Preparing the Roof Surface: Ensure that the roof surface is clean, dry, and free of debris. Install an appropriate underlayment to provide an additional layer of protection against moisture and to enhance the weatherproofing of the roof.
-
Laying the Roofing Material: Start laying the roofing material from the bottom edge of the roof, working your way upwards. Follow the manufacturer's guidelines for the specific installation process of the chosen roofing material. Secure the roofing material using nails, screws, or other recommended fasteners.
-
Flashing and Sealing: Install flashing around roof penetrations, such as vents, chimneys, and skylights, to prevent water infiltration. Seal the seams and edges of the roofing material using appropriate sealants to ensure a watertight roof.
-
Ridge Cap Installation: Finish the roof installation by adding ridge caps along the peak of the roof. The ridge caps provide a protective and visually appealing cover for the roof's highest point.
Siding Installation
-
Choosing Siding Material: Select a siding material that complements the overall design of your barn and offers durability and weather resistance. Common options include wood, metal, vinyl, or composite siding.
-
Measuring and Cutting: Measure the dimensions of the walls and cut the siding panels to fit accurately. Use a saw or specialized cutting tools to achieve clean and precise cuts.
-
Installing the Siding Panels: Begin installing the siding panels from the bottom of the wall, ensuring that each panel overlaps the one below it to prevent water infiltration. Secure the panels to the wall frame using nails, screws, or other recommended fasteners.
-
Corner and Trim Installation: Install corner trims and other decorative trims to provide a finished look and protect the edges of the siding. Ensure that the trims are securely attached and aligned for a professional appearance.
-
Weatherproofing and Sealing: Pay attention to sealing joints, corners, and edges of the siding to prevent moisture intrusion. Apply caulking or specialized sealants as needed to maintain the weatherproofing of the siding.
By following these detailed steps for roofing and siding installation, you can effectively protect your barn from the elements while enhancing its visual appeal and structural integrity.
Installing Doors and Windows
Installing doors and windows is a crucial step in completing the construction of your barn, as it enhances functionality, ventilation, and accessibility. Here's a detailed guide to the installation of doors and windows for your barn:
Preparing Openings
-
Measurement and Framing: Begin by measuring the dimensions for the doors and windows accurately. Ensure that the openings in the wall frames are sized to accommodate the selected doors and windows. Frame out the openings using appropriate dimensional lumber, headers, and studs to provide structural support.
-
Header Installation: Install headers above the door and window openings to distribute the weight of the structure above. The headers provide crucial support and help maintain the integrity of the wall frames.
Door Installation
-
Selecting the Doors: Choose doors that are suitable for the intended use of the barn. Options include hinged doors, sliding doors, or overhead doors, depending on the size and purpose of the entry points.
-
Hanging the Doors: Position the doors within the framed openings and secure them in place using hinges or tracks, depending on the type of door. Ensure that the doors open and close smoothly and align properly within the openings.
-
Adding Hardware: Install appropriate hardware such as handles, locks, and latches to the doors. Ensure that the hardware is securely attached and provides the necessary security and functionality.
Window Installation
-
Selecting the Windows: Choose windows that offer adequate ventilation, natural light, and durability. Consider the size, style, and material of the windows based on the design and requirements of the barn.
-
Mounting the Windows: Position the windows within the framed openings and secure them in place using appropriate fasteners. Ensure that the windows are level, plumb, and properly sealed to prevent air and water infiltration.
-
Weatherproofing: Apply weatherproofing measures around the windows, including caulking and sealing to create a tight seal against the elements. Proper weatherproofing helps enhance energy efficiency and protects the interior of the barn.
Finishing Touches
-
Trim Installation: Install trim around the doors and windows to provide a finished appearance and protect the edges of the openings. Ensure that the trim is securely attached and complements the overall design of the barn.
-
Sealing and Insulation: Apply insulation around the doors and windows to enhance energy efficiency and maintain a comfortable interior environment. Seal any gaps or joints to prevent drafts and moisture infiltration.
By following these detailed steps for installing doors and windows, you can complete the functional and aesthetic aspects of your barn, creating a well-equipped and inviting space for its intended use.
Finishing Touches and Maintenance
As you near the completion of your barn construction, attention to finishing touches and ongoing maintenance is essential to ensure the longevity and functionality of the structure. Here's a detailed guide to the final steps and maintenance considerations for your barn:
Exterior Finishing
-
Trim and Detailing: Install decorative trims, moldings, and other exterior details to enhance the visual appeal of the barn. Pay attention to the finishing touches around corners, eaves, and other architectural features to create a polished and cohesive exterior.
-
Painting or Staining: Apply a protective coat of paint or stain to the exterior surfaces of the barn. Choose high-quality exterior paint or stain that offers durability and weather resistance. Properly sealing the exterior surfaces helps safeguard the wood from moisture, UV exposure, and other environmental factors.
-
Gutters and Downspouts: Install gutters and downspouts to manage rainwater runoff from the roof. Proper drainage is crucial for preventing water damage to the foundation and maintaining the integrity of the exterior walls.
Interior Finishing
-
Interior Walls and Ceilings: Finish the interior walls and ceilings with appropriate materials such as drywall, paneling, or other suitable options. Ensure that the interior surfaces are sealed and insulated for comfort and protection.
-
Flooring: Install durable and easy-to-clean flooring materials such as concrete, rubber mats, or other suitable options based on the intended use of the barn. Proper flooring enhances safety and facilitates maintenance.
-
Electrical and Lighting: If the barn requires electrical wiring, plan and install lighting fixtures, outlets, and other electrical components as per safety standards and local building codes. Proper lighting enhances usability and safety within the barn.
Maintenance Considerations
-
Regular Inspections: Schedule periodic inspections of the barn to identify any signs of wear, damage, or structural issues. Addressing minor issues promptly can prevent them from escalating into costly repairs.
-
Weatherproofing Maintenance: Check and maintain the integrity of the roofing, siding, and sealants to ensure they remain effective in protecting the barn from the elements. Replace damaged or worn components as needed.
-
Pest Control: Implement measures to prevent and control pests that may affect the barn, such as rodents, insects, or other unwanted critters. Regularly inspect and seal potential entry points to deter pests.
-
Structural Integrity: Monitor the structural components of the barn, including the foundation, frame, and roofing, to ensure they remain stable and secure. Address any signs of settlement, shifting, or damage promptly.
-
Cleaning and Organization: Establish a regular cleaning and organization routine to maintain a tidy and functional barn space. Proper organization and cleanliness contribute to the efficiency and usability of the barn.
By attending to these finishing touches and implementing a proactive maintenance plan, you can ensure that your barn remains in optimal condition for years to come, serving its intended purpose effectively and enhancing the value of your property.