
Home>Home & Furniture>Doors & Windows>How to Make a DIY Planter Liner
Doors & Windows
How to Make a DIY Planter Liner
Published: August 16, 2024
Learn how to make a DIY planter liner with our step-by-step guide. Protect your plants and extend the life of your planters with these easy, budget-friendly tips!
(Many of the links in this article redirect to a specific reviewed product. Your purchase of these products through affiliate links helps to generate commission for Twigandthistle.com, at no extra cost. Learn more)
Ever tried planting in a pot only to have water leak everywhere? Planter liners can help solve that problem. They keep soil in place, manage water drainage, and extend the life of your pots. Making your own planter liner is simple and cost-effective. Plus, you can customize it to fit any size or shape. Using a few basic materials, you can protect both your plants and planters. This guide will walk you through the easy steps to create your own DIY planter liner. Ready to get started? Let’s dig in!
Getting Ready for Your DIY Planter Liner
Gather Materials: Collect plastic sheeting, scissors, measuring tape, stapler, and marker.
Measure the Planter: Use the measuring tape to find the length, width, and depth of the planter.
Cut the Plastic Sheeting: Mark the dimensions on the plastic sheeting with the marker. Cut the plastic to size using scissors.
Safety First: Wear gloves to protect your hands from sharp edges. Ensure the workspace is well-lit and free of clutter to avoid accidents.
Line the Planter: Place the plastic sheeting inside the planter, ensuring it covers all sides and the bottom.
Secure the Liner: Use a stapler to attach the plastic sheeting to the planter's edges. Make sure it is tight and smooth.
Check for Leaks: Pour a small amount of water into the planter to ensure the liner is waterproof. Adjust if necessary.
Prepare the Workspace: Clear the area of any debris or tools. Keep a trash bag nearby for easy cleanup.
Ventilation: If working indoors, ensure the area is well-ventilated to avoid inhaling any fumes from materials.
Final Touches: Trim any excess plastic sticking out from the edges for a neat finish.
Gather Your Materials and Tools
Materials Needed:
- Landscape Fabric: This breathable material helps with drainage while keeping soil in place.
- Scissors: Used to cut the fabric to the desired size.
- Staple Gun: Secures the fabric to the planter.
- Staples: Works with the staple gun to hold the fabric in place.
- Measuring Tape: Ensures accurate measurements for cutting the fabric.
- Marker: Marks where to cut the fabric.
- Gloves: Protects hands while working with tools and materials.
Tools Explained:
- Landscape Fabric: Essential for creating a barrier that allows water to drain but keeps soil from escaping.
- Scissors: Necessary for cutting the fabric to fit the planter.
- Staple Gun: Fastens the fabric securely to the planter’s interior.
- Staples: Used with the staple gun to attach the fabric.
- Measuring Tape: Helps measure the planter’s dimensions to cut the fabric accurately.
- Marker: Marks the fabric for precise cutting.
- Gloves: Keeps hands safe from potential cuts or scrapes while handling tools and materials.
Skill Level and Time Commitment
Skill Level: Beginner
Time Required: 1-2 hours
Steps:
- Gather Materials: Plastic sheeting, scissors, measuring tape, and a marker.
- Measure: Use the tape to measure the inside dimensions of the planter.
- Cut Plastic: Cut the plastic sheeting to fit the measured dimensions.
- Fit Liner: Place the cut plastic inside the planter, ensuring it covers all sides.
- Trim Excess: Trim any extra plastic for a neat finish.
Tips:
- Use Thick Plastic: Prevents tearing.
- Secure Edges: Use clips or tape to hold the liner in place.
Estimated Cost: Low, around $10 for materials.
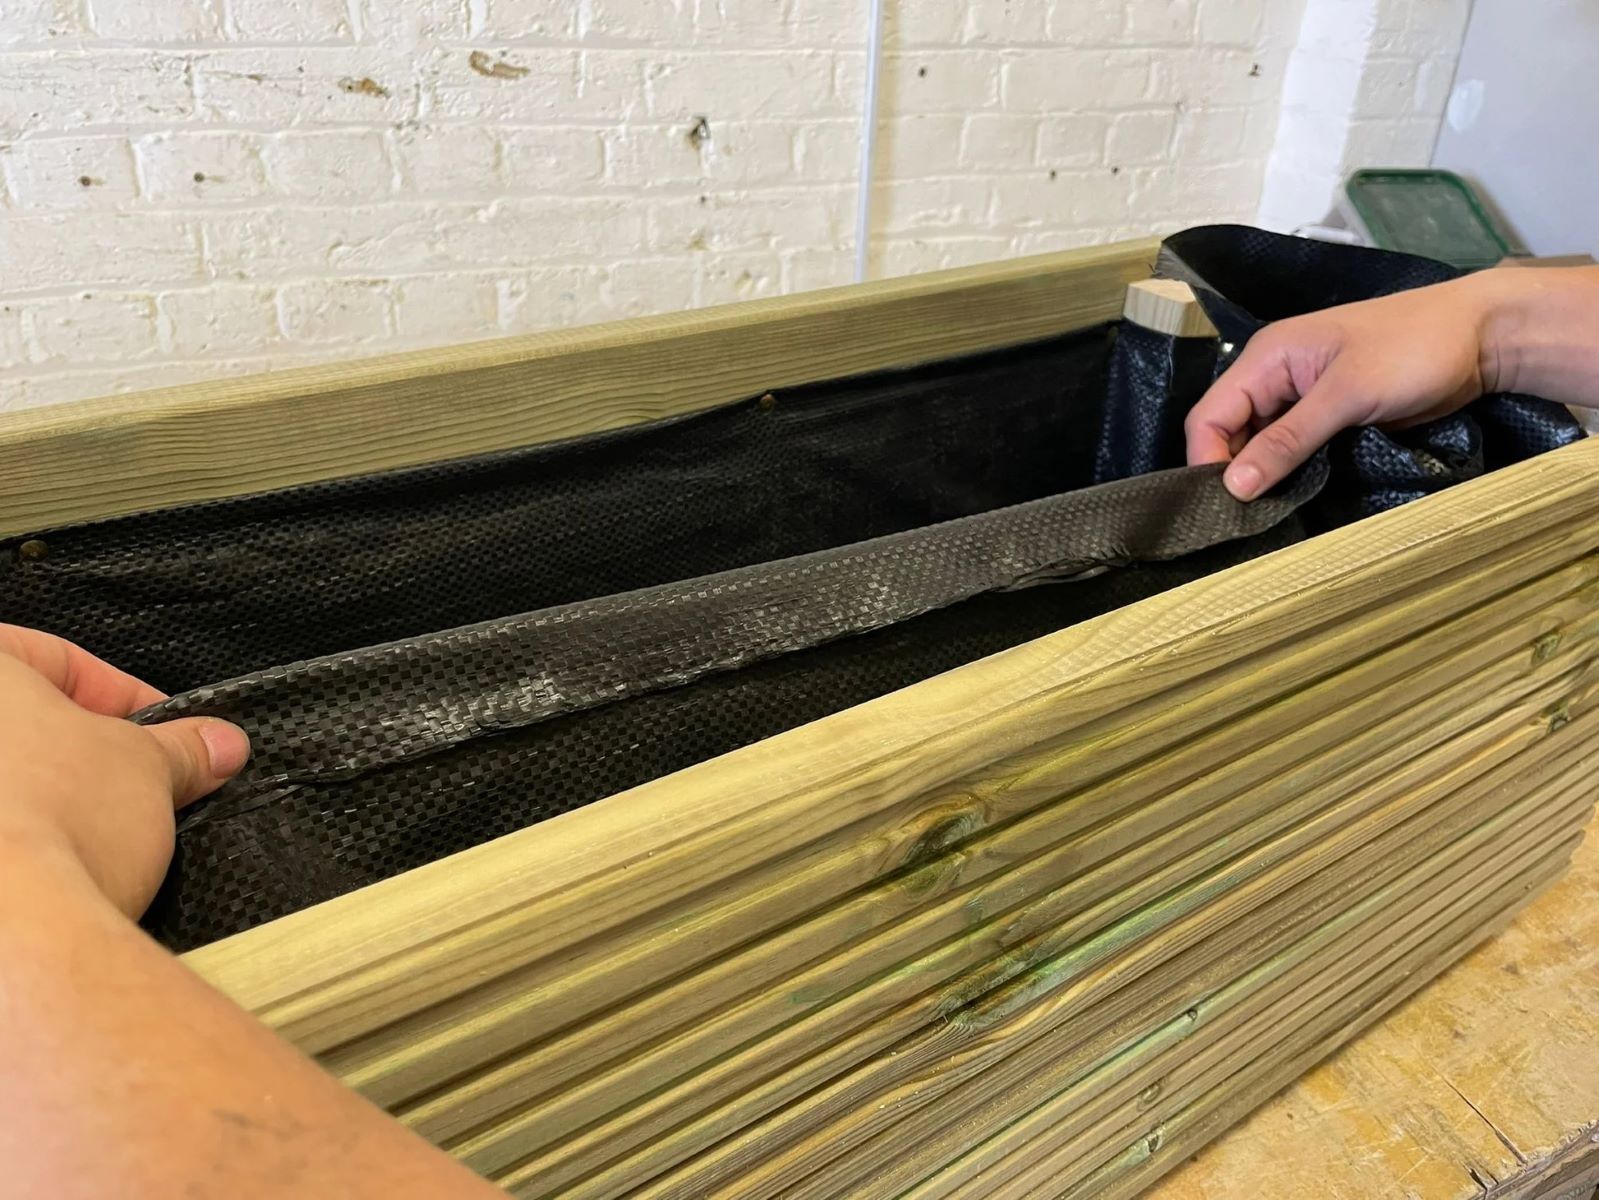
Instructions for Making a Planter Liner
Gather Materials:
- Plastic sheeting or heavy-duty garbage bags
- Scissors
- Stapler or strong adhesive
- Measuring tape
- Marker
Measure the Planter:
- Use the measuring tape to find the length, width, and depth of the planter.
- Write down these measurements.
Cut the Plastic Sheeting:
- Lay out the plastic sheeting on a flat surface.
- Use the marker to outline the dimensions of the planter, adding an extra 2 inches to each side for overlap.
- Cut along the marked lines with scissors.
Fit the Liner:
- Place the cut plastic inside the planter.
- Press it into the corners and along the sides, ensuring it fits snugly.
Secure the Liner:
- Fold the extra plastic over the edges of the planter.
- Use a stapler or strong adhesive to attach the plastic to the top edges of the planter.
- Make sure the liner is tight and secure.
Trim Excess Plastic:
- Use scissors to trim any excess plastic hanging over the edges.
- Ensure the liner is neat and tidy.
Add Drainage Holes:
- Use scissors or a knife to poke small holes in the bottom of the liner.
- Space the holes evenly to allow for proper drainage.
Fill with Soil:
- Add potting soil to the lined planter.
- Ensure the soil is evenly distributed.
Plant Your Flowers or Vegetables:
- Place your plants in the soil.
- Water them as needed.
Helpful Tips and Tricks
Use landscape fabric or burlap as a liner. Both materials allow water to drain while keeping soil in place. Cut the fabric to fit the planter, leaving extra to fold over the edges. Secure it with staples or hot glue.
Plastic bags can work too. Poke holes in the bottom for drainage. This method is cheap and easy but may not last as long.
Avoid using newspaper. It breaks down quickly and can cause mold. Also, don't use non-breathable plastic without holes. It traps water, leading to root rot.
For a natural look, try coconut coir liners. They hold moisture well and are biodegradable. Just make sure to replace them yearly.
If you want a more durable option, use pond liner. It's waterproof and long-lasting. Cut it to size and secure it like the fabric.
Always check for proper drainage. Too much water can harm plants.
Estimating the Cost
Materials:
- Landscape Fabric: $10 for a 50 ft roll
- Staples or Nails: $5 for a pack
- Plastic Sheeting: $8 for a 10 ft roll
- Scissors: $5
Tools:
- Staple Gun: $15
- Measuring Tape: $3
Total Cost: $46
Budget-Friendly Alternatives:
- Old Shower Curtain: Free if you have one at home
- Cardboard: Free from old boxes
- Duct Tape: $3 instead of a staple gun
Total Cost with Alternatives: $11
Different Ways to Customize
Alternative Materials:
- Burlap: Use burlap for a rustic look. It's breathable and allows water to drain.
- Plastic Sheeting: Line with plastic sheeting for better water retention. Ensure to poke holes for drainage.
- Coconut Fiber: Provides good drainage and a natural appearance.
- Landscape Fabric: Durable and prevents soil from washing out.
Colors:
- Natural: Keep the liner in its natural color for a simple, earthy feel.
- Painted: Use waterproof paint to add a splash of color. Match it with your garden theme.
- Dyed Fabric: Dye burlap or fabric liners in vibrant colors for a unique touch.
Styles:
- Quilted: Sew a quilted liner for added texture and insulation.
- Patterned: Use fabric with patterns like stripes, polka dots, or floral designs.
- Lace Trim: Add lace trim to the edges for a delicate, decorative look.
- Patchwork: Combine different fabric scraps for a patchwork style, adding a crafty, homemade vibe.
Eco-Friendly Tips
Burlap is a great option. It’s biodegradable and allows water to drain while keeping soil in place.
Old T-shirts or fabric scraps can be cut to fit the planter. They help retain moisture and prevent soil from escaping.
Newspaper layers work well too. They decompose over time, enriching the soil.
Coconut coir is another eco-friendly choice. It’s made from coconut husks and provides excellent drainage.
Reused plastic bags can be used as liners. Just poke some holes for drainage.
Cardboard can also be used. It will eventually break down and add organic matter to the soil.
Natural fiber mats like jute or hemp are durable and biodegradable.
Egg cartons can be cut and used to line small planters. They help with water retention and are compostable.
Old shower curtains or tablecloths can be repurposed. They are waterproof and can be easily cut to size.
Your DIY Planter Liner Awaits
You've got all the steps now. Gather your materials, cut your liner, and fit it snugly into your planter. Remember, using a liner helps keep your plants healthy by preventing root rot and ensuring proper drainage. Plus, it extends the life of your planter. If you run into any hiccups, don't sweat it. DIY projects often come with a bit of trial and error. Just keep tweaking until everything fits perfectly. Before you know it, you'll have a beautifully lined planter ready to showcase your favorite plants. So, roll up those sleeves, grab your tools, and get started. Happy planting!
What materials do I need to make a DIY planter liner?
You'll need plastic sheeting, scissors, stapler, measuring tape, and marker.
How do I measure for the liner?
Measure the length, width, and depth of your planter. Add a few extra inches to each measurement for overlap.
Can I use any type of plastic sheeting?
Most heavy-duty plastic sheeting works well. Avoid thin plastic, as it might tear easily.
How do I secure the liner inside the planter?
Use a stapler to attach the liner to the top edge of the planter. Make sure it's tight and smooth.
Do I need to make drainage holes in the liner?
Yes, use scissors to cut small holes at the bottom for drainage. This prevents waterlogging.
How often should I replace the liner?
Replace the liner if it shows signs of wear or damage. Typically, every 1-2 years.
Can I use fabric instead of plastic for the liner?
Fabric can work but may retain moisture. Plastic is generally more durable and water-resistant.