
Home>Home & Furniture>Doors & Windows>DIY Arched Doorway Ideas
Doors & Windows
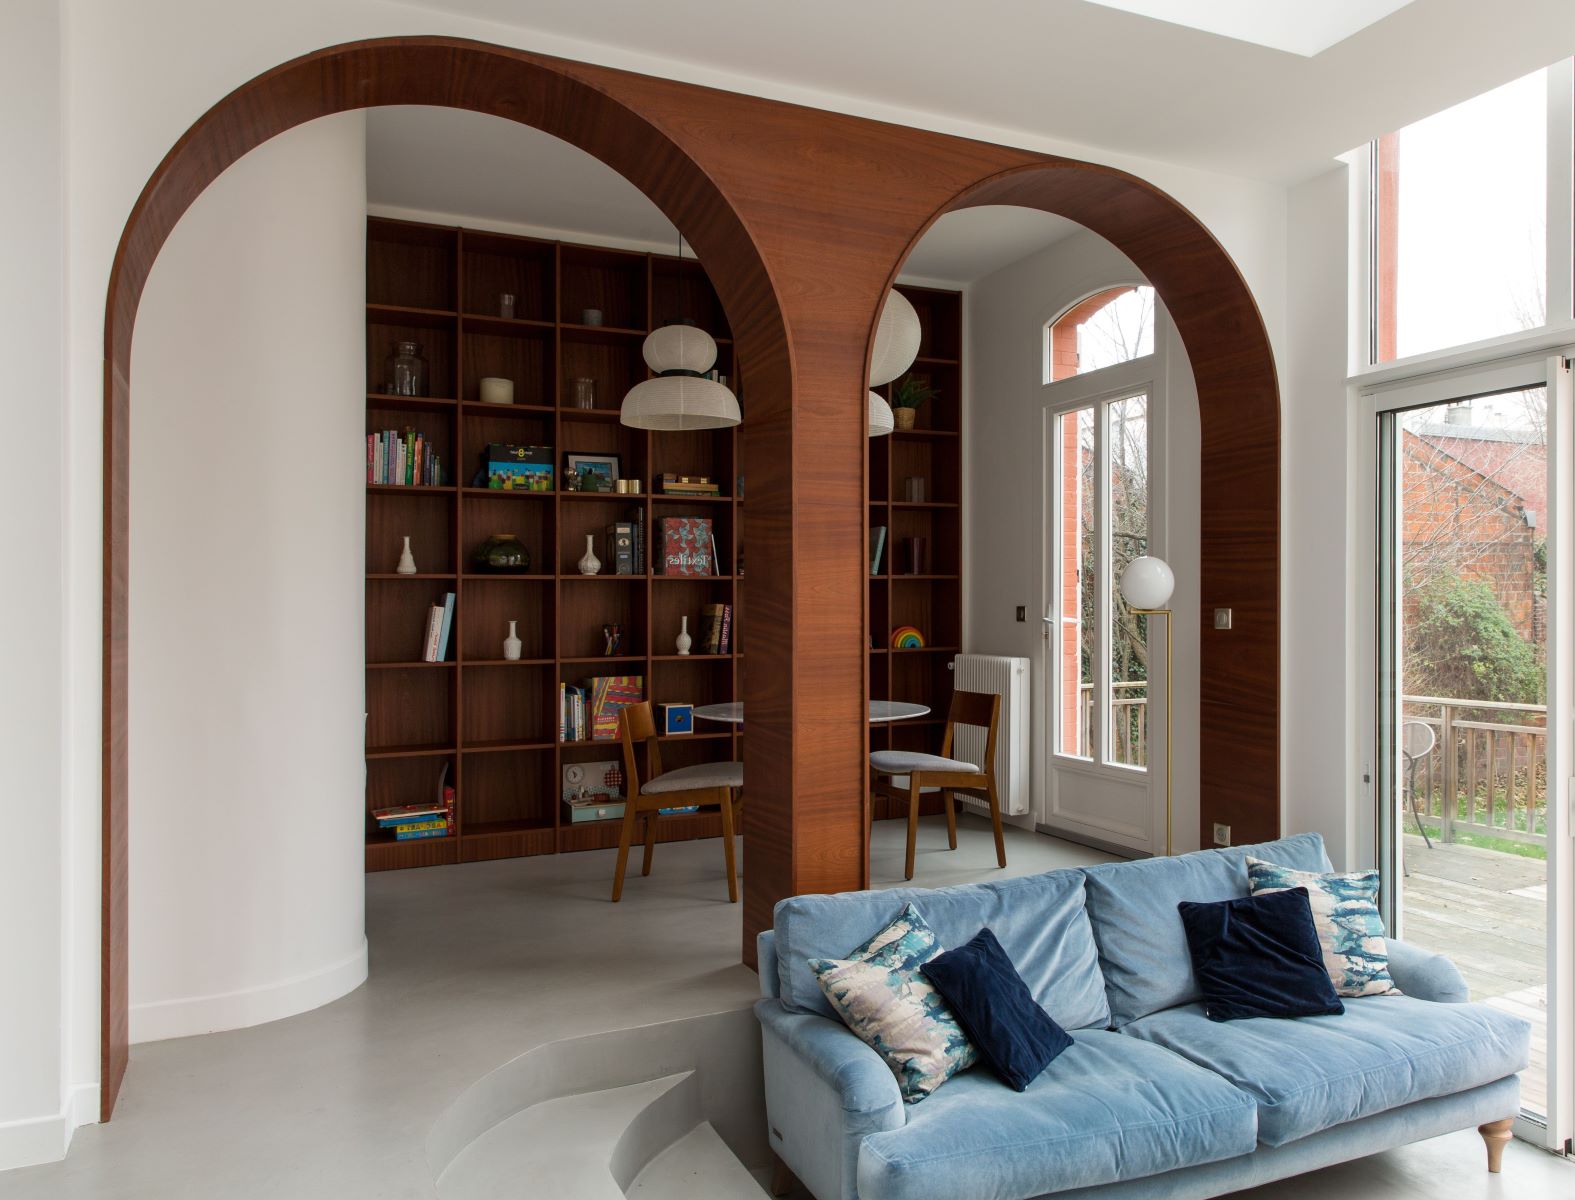
DIY Arched Doorway Ideas
Published: September 6, 2024
Discover creative and stylish DIY arched doorway ideas to transform your home. Learn step-by-step tips and tricks for adding elegance and charm to any room.
(Many of the links in this article redirect to a specific reviewed product. Your purchase of these products through affiliate links helps to generate commission for Twigandthistle.com, at no extra cost. Learn more)
Updating a home often means considering unique touches, and arched doorways can add both charm and elegance. With some basic tools, patience, and creativity, creating an arched doorway transforms a regular room into something special. Whether tackling a renovation or simply looking for a weekend project, understanding how to achieve this timeless design is key. This guide offers simple steps, tips, and ideas to get started. Get ready to enhance your home’s appeal with a classic, eye-catching feature that never goes out of style.
Getting Ready for Your Project
Measure the Space: Use a tape measure to get the exact dimensions of the doorway. Write down the width and height.
Gather Materials: Collect necessary items like drywall, plywood, screws, nails, a saw, a level, and a pencil. Don't forget safety gear like gloves and goggles.
Create a Template: Draw the arch shape on a piece of cardboard or plywood. Cut it out to use as a guide.
Cut the Drywall: Use the template to trace the arch on the drywall. Carefully cut along the lines with a drywall saw.
Prepare the Frame: Attach wooden studs to the existing doorway frame. Ensure they match the arch shape.
Install the Arch: Secure the cut drywall pieces to the wooden frame using screws. Make sure everything is level.
Apply Joint Compound: Spread joint compound over the seams and screw holes. Smooth it out with a putty knife.
Sand and Paint: Once the compound dries, sand it smooth. Paint the archway to match the rest of the room.
Safety Tips:
- Always wear gloves and goggles to protect your hands and eyes.
- Use a dust mask when sanding to avoid inhaling particles.
- Keep your workspace clean to prevent accidents.
- Make sure your tools are in good condition to avoid malfunctions.
Gathering Essential Materials and Tools
- Plywood: Used to create the arch form. Choose a flexible type for easy bending.
- Drywall: Covers the arch frame, giving it a smooth finish.
- 2x4 Lumber: Provides structural support for the arch.
- Joint Compound: Fills gaps and smooths out the drywall seams.
- Drywall Screws: Secures the drywall to the frame.
- Wood Screws: Attaches the plywood and lumber together.
- Corner Bead: Protects the edges of the arch and gives a clean line.
- Sandpaper: Smooths out any rough spots on the drywall and joint compound.
- Paint: Adds color and finishes the archway.
Tools:
- Measuring Tape: Ensures accurate measurements for cutting materials.
- Pencil: Marks measurements on materials.
- Jigsaw: Cuts the plywood into the arch shape.
- Circular Saw: Cuts the lumber to the required lengths.
- Drill: Drives screws into the materials.
- Utility Knife: Cuts drywall to size.
- Trowel: Applies joint compound smoothly.
- Sanding Block: Holds sandpaper for easier sanding.
- Paintbrush/Roller: Applies paint evenly on the archway.
These materials and tools will help you create a beautiful arched doorway in your home.
Assessing Skill Level and Time Commitment
Skill Level: Intermediate
Time Required: 2-3 days
- Planning and Measuring: 2-3 hours
- Cutting and Framing: 4-6 hours
- Drywall Installation: 3-4 hours
- Sanding and Finishing: 4-5 hours
- Painting and Touch-ups: 2-3 hours
Detailed Step-by-Step Guide
Measure the Doorway:
- Use a tape measure to find the width and height of the doorway.
- Write down these measurements.
Create the Arch Template:
- Get a large piece of cardboard.
- Draw half of the arch shape using a pencil and string as a compass.
- Cut out the template with scissors.
Cut the Drywall:
- Place the template on drywall.
- Trace the arch shape.
- Use a drywall saw to cut along the traced line.
Install the Arch:
- Attach the cut drywall piece to the top of the doorway using screws.
- Make sure it fits snugly.
Frame the Arch:
- Cut wooden studs to fit the curve of the arch.
- Attach these studs to the inside of the arch using screws.
Apply Corner Bead:
- Use a flexible corner bead for the curved edges.
- Attach it with drywall screws or adhesive.
Mud and Tape:
- Apply joint compound (mud) over the seams and corner bead.
- Place drywall tape over the mud.
- Smooth out the tape with a drywall knife.
Sand the Surface:
- Once the mud is dry, sand it smooth with sandpaper.
- Wipe away dust with a damp cloth.
Prime and Paint:
- Apply a coat of primer to the arch.
- Once dry, paint the arch with your chosen color.
Finish the Edges:
- Install trim around the base of the arch if desired.
- Use a nail gun to secure the trim.
Clean Up:
- Remove any debris.
- Clean your tools.
Helpful Tips and Tricks
Measure carefully before cutting anything. Precise measurements ensure a perfect fit.
Use a template for the arch. Cardboard works well. This helps visualize the shape and size.
Choose lightweight materials like drywall or plywood. Easier to handle and cut.
Pre-drill holes for screws. This prevents splitting the wood or drywall.
Use a jigsaw for cutting curves. It offers better control for smooth edges.
Sand edges after cutting. Smooth edges make finishing easier.
Apply joint compound to seams. This hides gaps and creates a seamless look.
Paint or stain the archway to match your decor. This adds a professional touch.
Common mistakes to avoid:
Skipping measurements. Always double-check to avoid errors.
Using heavy materials. They are harder to work with and install.
Not sanding edges. Rough edges make finishing difficult.
Alternatives for materials or methods:
Foam board instead of plywood. Easier to cut and shape.
Flexible molding for the arch. Bends easily around curves.
Pre-made arch kits. Simplifies the process, especially for beginners.
Estimating Project Costs
Materials:
- Plywood: $30-$50 per sheet
- Drywall: $10-$15 per sheet
- Wood Studs: $2-$3 each
- Joint Compound: $10-$15 per bucket
- Screws/Nails: $5-$10 per box
- Primer and Paint: $20-$40
Tools:
- Jigsaw: $30-$60
- Drywall Saw: $10-$20
- Screwdriver/Drill: $40-$100
- Tape Measure: $5-$10
- Level: $10-$20
- Sanding Block: $5-$10
Total Cost: $177-$353
Budget-Friendly Alternatives:
- Plywood: Use MDF instead, $20-$30 per sheet
- Drywall: Check for discounted or damaged sheets at hardware stores, $5-$10 each
- Tools: Borrow from friends or rent from a local tool library, reducing costs by up to 50%
Revised Total Cost: $122-$241
Creative Variations and Customizations
Materials: Use wood for a rustic look, metal for an industrial feel, or plaster for a classic finish. Reclaimed wood adds character, while plywood offers a budget-friendly option.
Colors: Paint the archway in bold colors like navy blue or forest green for a statement piece. Neutral tones like beige or gray blend seamlessly with most interiors. Two-tone designs can add depth and interest.
Styles: For a modern look, keep lines clean and simple. Traditional styles might include intricate moldings or carvings. Mediterranean designs often feature textured finishes and warm colors.
Lighting: Install recessed lighting within the arch to highlight its shape. String lights or LED strips can add a cozy ambiance.
Decorative Elements: Add tiles or mosaics around the arch for a unique touch. Stencils or wall decals can create patterns or designs without much effort.
Size and Shape: Customize the height and width to fit your space. A tall, narrow arch can make ceilings appear higher, while a wide, shallow arch can open up a room.
Trim and Molding: Use crown molding or baseboards to frame the arch. Decorative trim can add elegance and detail.
Texture: Apply textured paint or wallpaper to the archway for added dimension. Brick veneer or stone cladding can give a rustic or industrial feel.
Functional Additions: Incorporate shelves or niches within the arch for extra storage or display space. Sliding doors or curtains can provide privacy when needed.
Finishes: Choose from matte, glossy, or satin finishes to match your desired aesthetic. Distressed finishes can add a vintage or shabby-chic look.
Eco-Friendly Project Tips
Reclaimed wood can be a great choice. It adds character and reduces waste. Look for old barn wood or salvaged beams.
Recycled metal can be used for accents or structural support. It’s sturdy and eco-friendly.
Bamboo is another excellent option. It grows quickly and is very sustainable. Use it for trim or decorative elements.
Natural stone can create a beautiful arch. Try to source it locally to cut down on transportation emissions.
Eco-friendly paint is a must. Choose low-VOC or zero-VOC paints to keep indoor air quality high.
Recycled glass tiles can add a unique touch. They come in various colors and are made from post-consumer glass.
Straw bales can be used for insulation if you’re building a thicker wall. They’re highly sustainable and provide excellent insulation.
Cork is another sustainable material. Use it for flooring or even as a decorative element around the arch.
Salvaged bricks can give a rustic look. They’re durable and have a lower environmental impact than new bricks.
Natural plaster can be used to finish the arch. It’s breathable and made from natural materials like lime and sand.
Your DIY Arched Doorway Awaits
Creating a DIY arched doorway can transform your space, adding a touch of elegance and charm. With some basic tools, a bit of patience, and a clear plan, you can achieve a stunning result. Remember to measure carefully, cut precisely, and take your time with the finishing touches. Whether you're using plywood, drywall, or plaster, each material has its own quirks, so choose what suits your skill level best. Don't forget to sand and paint for a polished look. This project not only enhances your home's aesthetic but also gives you a sense of accomplishment. So, roll up your sleeves, gather your materials, and start building that beautiful arch. Happy building!
How do I create an arched doorway in my home?
First, measure the width and height of your doorway. Then, cut a piece of plywood to match the width. Bend it to form the arch, securing it with screws. Attach drywall to the arch, then mud and sand it smooth.
What tools will I need for this project?
You'll need a saw, drill, screws, plywood, drywall, mud, sandpaper, and a measuring tape. A level and a stud finder can also be helpful.
Can I convert a square doorway into an arched one?
Absolutely! Remove the existing trim, then follow the steps to create an arch with plywood and drywall. It’s a bit of work, but the results are worth it.
How long does it take to build an arched doorway?
It usually takes a weekend. Cutting and installing the arch frame might take a day, and mudding and sanding the drywall could take another day.
Is it expensive to make an arched doorway?
Not really. Most materials, like plywood and drywall, are affordable. You might spend more if you need to buy tools, but overall, it’s a budget-friendly project.
Do I need any special skills to create an arched doorway?
Basic carpentry skills are enough. If you can measure, cut, and screw things together, you can handle this project. Patience and attention to detail will help too.
Can I paint the arched doorway?
Definitely! Once the drywall is smooth, you can paint it any color you like. Just make sure to use a primer first for the best results.