
Home>Knowledge & Skills>Wood & Metal Working>How To Make A Wood Door
Wood & Metal Working
How To Make A Wood Door
Published: March 6, 2024

Our Editor-in-Chief brings a fresh perspective with his expertise in modern home technologies and eco-friendly solutions. Philip bridges tradition with innovation across a wide range of DIY topics.
Learn how to make a wood door with our expert wood and metal working tips. Create a beautiful and durable door for your home with our step-by-step guide.
(Many of the links in this article redirect to a specific reviewed product. Your purchase of these products through affiliate links helps to generate commission for Twigandthistle.com, at no extra cost. Learn more)
Introduction
So, you want to know how to make a wood door, huh? Well, you've come to the right place! Making your own wood door can be a rewarding and cost-effective DIY project. Whether you're replacing an old door or building a new one from scratch, creating a custom wood door can add a touch of craftsmanship and personality to your home. In this article, we'll walk you through the step-by-step process of making a wood door, from choosing the right wood to adding the finishing touches. Let's roll up our sleeves and get started!
Choosing the Right Wood
When it comes to making a wood door, selecting the right type of wood is crucial. You'll want to choose a wood species that is durable, weather-resistant, and aesthetically pleasing. Some popular choices for wood doors include oak, cedar, mahogany, and pine. Each type of wood has its own unique characteristics, so consider the look you want to achieve and the climate in which the door will be installed. For example, cedar is known for its natural resistance to rot and insects, making it an excellent choice for exterior doors. On the other hand, oak and mahogany are prized for their rich, luxurious appearance, making them ideal for interior doors. Take the time to research different wood species and select one that best suits your needs and preferences.
- Consider the durability and weather-resistance of the wood species.
- Think about the aesthetic qualities of the wood and how it will complement your home.
- Research the specific characteristics of different wood species to make an informed decision.
Measuring and Cutting the Wood
Before you start cutting into your precious wood, it's crucial to take accurate measurements. Begin by measuring the dimensions of the door frame to determine the exact size of the door you need. Remember to account for any flooring or carpeting that may affect the clearance at the bottom of the door. Once you have your measurements, it's time to transfer them to the wood. Use a pencil and a straight edge to mark the cut lines on the wood, ensuring precision and accuracy.
When it comes to cutting the wood, a reliable circular saw or table saw is your best friend. Make sure to use the appropriate safety gear, such as goggles and ear protection, and always follow the manufacturer's instructions for operating the saw. Take your time and make steady, controlled cuts along the marked lines. If your door requires any intricate designs or patterns, consider using a jigsaw for more detailed work. Remember, measure twice, cut once!
- Measure the door frame accurately, considering any flooring or carpeting.
- Transfer the measurements to the wood using a pencil and straight edge.
- Use a circular saw or table saw to make precise cuts, following all safety precautions.
- Consider using a jigsaw for intricate designs or patterns.
- Double-check your measurements before making any cuts to avoid costly mistakes.
Assembling the Door Frame
Now that you have the individual pieces of your door cut to size, it's time to assemble the door frame. The frame provides the structure and support for the door, so it's essential to ensure that it is sturdy and well-constructed.
-
Lay Out the Pieces: Begin by laying out the pieces of the door frame on a flat, level surface. This will allow you to visualize how the frame will come together and ensure that everything fits properly before you start assembling.
-
Glue and Clamp: Apply wood glue to the joints where the pieces of the frame will come together. Then, use clamps to hold the pieces in place while the glue dries. This will create a strong bond between the wood pieces and ensure that the frame is solid and secure.
-
Check for Square: Use a carpenter's square to check that the corners of the frame are perfectly square. This step is crucial for ensuring that the door will hang properly and open and close smoothly. Make any necessary adjustments to the frame to ensure that it is perfectly square.
-
Add Reinforcement: Depending on the size and design of your door, you may want to add reinforcement to the frame for added strength. This can be done by adding diagonal braces or additional support pieces as needed.
-
Allow for Drying: Once the frame is assembled, allow the wood glue to dry completely before moving on to the next step. This may take several hours, so be patient and resist the urge to rush the process.
By following these steps, you can ensure that your door frame is well-constructed and ready for the next phase of the door-making process.
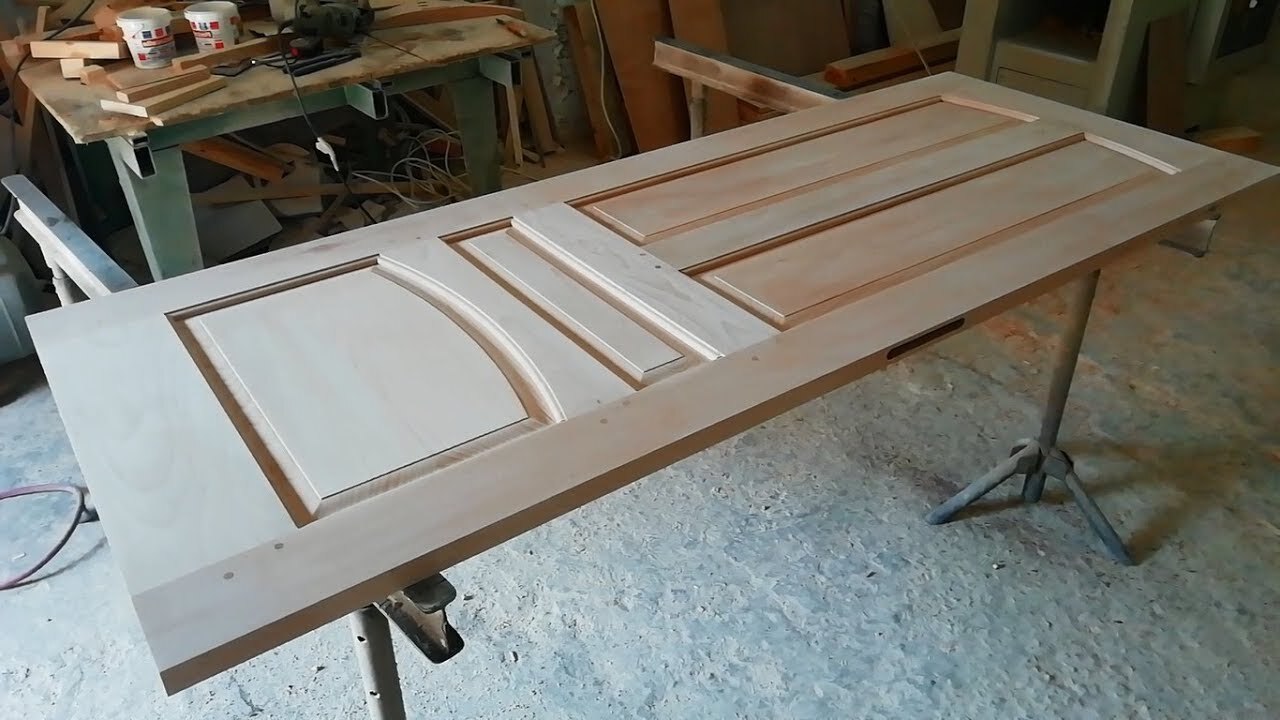
Attaching the Panels
With the door frame securely assembled, it's time to add the panels that will give your wood door its characteristic look and structure. The panels not only contribute to the aesthetics of the door but also provide additional strength and stability. Here's how to attach the panels to the door frame:
-
Measure and Cut the Panels: Begin by measuring the dimensions of the panels needed to fit within the door frame. Use these measurements to cut the panels from your chosen wood material. Ensure that the panels are cut precisely to fit within the frame without any gaps or uneven edges.
-
Create Panel Grooves: Depending on the design of your door, you may need to create grooves along the edges of the panels to fit into the door frame. A router or table saw can be used to create these grooves, ensuring a snug and secure fit.
-
Apply Wood Glue: Once the panels are cut and grooved, apply wood glue to the edges of the panels that will come into contact with the door frame. This will create a strong bond between the panels and the frame, adding to the overall stability of the door.
-
Secure the Panels: Carefully fit the panels into the grooves of the door frame, ensuring that they are aligned properly and sit flush within the frame. Use clamps to hold the panels in place while the wood glue dries, ensuring a tight and secure fit.
-
Add Decorative Molding (Optional): For a more decorative touch, consider adding molding around the panels to enhance the visual appeal of the door. This can be done by attaching the molding to the edges of the panels using wood glue and finishing nails.
By following these steps, you can effectively attach the panels to the door frame, creating a sturdy and visually appealing wood door that is ready for the next stages of the construction process.
Adding Hardware and Finishing Touches
Once the panels are securely attached to the door frame, it's time to add the hardware and finishing touches that will complete your wood door. The hardware you choose, such as hinges, doorknobs, and locks, not only serve functional purposes but also contribute to the overall aesthetic of the door. Here's how to add hardware and put the finishing touches on your custom wood door:
-
Install Hinges: Begin by installing the hinges on the door frame. Position the hinges at the desired locations, ensuring that they are evenly spaced and aligned. Use a screwdriver to attach the hinges securely to the frame, allowing the door to swing open and closed smoothly.
-
Attach the Doorknob and Lock: Next, attach the doorknob and lock mechanism to the door. Measure and mark the positions for the doorknob and lock, ensuring that they are at comfortable heights for operation. Use a drill to create the necessary holes for the doorknob and lock, then secure them in place according to the manufacturer's instructions.
-
Apply a Finish: To protect the wood and enhance its natural beauty, consider applying a finish to the door. Whether you prefer a clear varnish to showcase the wood's grain or a painted finish to match your home's decor, the right finish can add a polished look to your wood door. Apply the finish evenly, following the manufacturer's recommendations for drying times and additional coats if necessary.
-
Add Weather Stripping (Optional): If your wood door will be installed as an exterior door, consider adding weather stripping to improve energy efficiency and weather resistance. Weather stripping can help seal the gaps between the door and the frame, preventing drafts and moisture from entering your home.
-
Hang the Door: With the hardware and finishing touches in place, it's time to hang your custom wood door. Position the door within the frame, ensuring that it swings open and closed smoothly and aligns properly with the door frame. Use shims to make any necessary adjustments to ensure a snug fit, then secure the hinges to the door frame.
By following these steps, you can add the necessary hardware and finishing touches to your wood door, creating a functional and visually appealing entryway for your home. Now, stand back and admire your handiwork – you've just made a wood door from scratch!
Conclusion
Congratulations! You've successfully completed the process of making a wood door from scratch. By following the steps outlined in this guide, you've not only created a functional and durable door but also added a touch of craftsmanship and personalization to your home. Whether you've built an interior door to enhance the aesthetics of your living space or crafted an exterior door to improve the curb appeal of your home, the satisfaction of completing this DIY project is truly rewarding. Remember, the key to a successful wood door lies in choosing the right wood, precise measurements and cuts, sturdy assembly, secure panel attachment, and the addition of hardware and finishing touches. Now, step back and admire your custom wood door – a true testament to your DIY skills and creativity!