
Home>Create & Decorate>DIY & Crafts>DIY Rocket Stove: How To Build Your Own Efficient Cooking Device
DIY & Crafts
DIY Rocket Stove: How To Build Your Own Efficient Cooking Device
Published: February 29, 2024

Content Creator specializing in woodworking and interior transformations. Caegan's guides motivate readers to undertake their own projects, while his custom furniture adds a personal touch.
Learn how to build your own efficient DIY rocket stove for cooking with this step-by-step guide. Perfect for outdoor enthusiasts and crafty individuals.
(Many of the links in this article redirect to a specific reviewed product. Your purchase of these products through affiliate links helps to generate commission for Twigandthistle.com, at no extra cost. Learn more)
Introduction
Welcome to the world of DIY rocket stoves! If you're an outdoor enthusiast, a sustainable living advocate, or simply someone who enjoys hands-on projects, building your own rocket stove can be a rewarding and practical endeavor. Rocket stoves are highly efficient and environmentally friendly cooking devices that have gained popularity for their ability to minimize fuel usage and reduce smoke emissions.
In this comprehensive guide, we will walk you through the step-by-step process of constructing a simple yet effective rocket stove using common materials. Whether you're planning a camping trip, looking to reduce your carbon footprint, or seeking an alternative cooking solution for your backyard, this DIY project is both educational and empowering.
By harnessing the principles of clean combustion and heat transfer, a well-designed rocket stove can efficiently convert small amounts of biomass, such as twigs, branches, or wood pellets, into a steady source of heat for cooking. The ingenious design of the rocket stove ensures that the combustion process is optimized, resulting in minimal waste and maximum heat output.
Not only does building a rocket stove allow you to exercise your creativity and problem-solving skills, but it also promotes self-reliance and sustainability. As you embark on this DIY journey, you'll gain a deeper understanding of thermodynamics, airflow dynamics, and the transformative power of simple yet effective engineering.
So, roll up your sleeves, gather your materials, and get ready to embark on a hands-on adventure. By the end of this guide, you'll have a fully functional rocket stove ready to elevate your outdoor cooking experience and contribute to a greener, more sustainable lifestyle. Let's dive in and unleash your inner DIY spirit!
Materials and Tools Needed
Before diving into the construction process, it's essential to gather all the necessary materials and tools. Fortunately, many of these items can be found in your garage, local hardware store, or even repurposed from unused household items. Here's a comprehensive list to get you started:
Materials:
- Metal Cans: Look for two large metal cans of different sizes. The larger can will serve as the outer body of the rocket stove, while the smaller can will be used for the combustion chamber.
- Insulating Material: Vermiculite, perlite, or a similar insulating material will be used to fill the space between the inner and outer cans, enhancing the stove's efficiency.
- Gravel or Small Stones: These will be used as a base for the rocket stove, providing stability and heat resistance.
- High-Heat Paint: To protect the exterior of the rocket stove from corrosion and enhance its durability, a can of high-heat paint in your preferred color is recommended.
- Metal Grate or Wire Mesh: This will serve as the support for the cooking pot or pan, allowing airflow beneath the cooking vessel.
Tools:
- Marker or Pen: For marking and outlining cutting areas on the metal cans.
- Safety Gloves and Goggles: Essential for handling sharp metal edges and conducting the construction process safely.
- Tin Snips or Metal Saw: To cut the metal cans with precision.
- Drill with Metal Drill Bits: Needed for creating ventilation holes and assembling the rocket stove.
- Sandpaper or Metal File: For smoothing out any rough edges after cutting the metal cans.
- Measuring Tape or Ruler: To ensure accurate dimensions during the construction process.
- Pliers: Useful for bending and shaping metal components as needed.
- Fire Source: Matches or a lighter will be required for the initial test and use of the rocket stove.
By gathering these materials and tools, you'll be well-prepared to embark on the construction of your DIY rocket stove. Once everything is in place, you can proceed to the next steps with confidence, knowing that you have everything you need to bring your rocket stove to life.
Step 1: Preparing the Fuel Chamber
The first crucial step in building your DIY rocket stove is preparing the fuel chamber, which will house the biomass fuel and facilitate the combustion process. This component plays a pivotal role in ensuring efficient heat generation for cooking while minimizing fuel consumption.
To begin, select the larger of the two metal cans that will serve as the outer body of the rocket stove. Thoroughly clean and remove any labels or adhesive residue from the can to ensure a clean working surface. Next, using a marker or pen, mark a line around the circumference of the can, approximately 3 inches from the bottom. This line will serve as a guide for cutting the opening for the fuel chamber.
With safety gloves and goggles on, carefully use tin snips or a metal saw to cut along the marked line, creating a circular opening in the larger can. It's important to exercise caution during this step to prevent any sharp edges or metal burrs. Once the opening is cut, use sandpaper or a metal file to smooth out any rough edges, ensuring a safe and clean finish.
With the fuel chamber opening prepared, it's time to focus on creating the air inlets that will facilitate the combustion process. Using a drill fitted with a metal drill bit, carefully create a series of evenly spaced ventilation holes around the lower section of the can, just below the opening. These holes will allow air to enter the fuel chamber, promoting efficient combustion of the biomass fuel.
To further enhance the insulation and combustion efficiency of the rocket stove, fill the space between the inner and outer cans with insulating material such as vermiculite or perlite. This insulating layer helps retain heat within the stove, ensuring optimal combustion temperatures while minimizing heat loss.
By meticulously preparing the fuel chamber, you are laying the foundation for a well-functioning rocket stove that harnesses the power of clean combustion. With this step completed, you are now ready to move on to the next phase of constructing the combustion chamber, bringing you one step closer to enjoying the benefits of your homemade rocket stove.
Step 2: Creating the Combustion Chamber
With the fuel chamber prepared, the next critical step in building your DIY rocket stove is the creation of the combustion chamber. This component is where the actual combustion of biomass fuel takes place, generating intense heat that will be channeled for cooking purposes.
Begin by selecting the smaller metal can, which will serve as the inner combustion chamber of the rocket stove. Similar to the larger can, ensure that the chosen can is thoroughly cleaned and free of any residual labels or adhesive substances. This clean surface provides an ideal canvas for the construction process.
Using a marker or pen, mark a line around the circumference of the smaller can, approximately 2 inches from the bottom. This demarcation will serve as a guide for cutting the opening that will connect the combustion chamber to the fuel chamber. With safety gloves and goggles on, carefully use tin snips or a metal saw to cut along the marked line, creating a circular opening in the smaller can. As with the fuel chamber, it is essential to exercise caution during this step to avoid sharp edges or metal burrs. Once the opening is cut, use sandpaper or a metal file to smooth out any rough edges, ensuring a safe and clean finish.
After preparing the opening, it's time to create the exhaust port at the top of the smaller can. This port will connect the combustion chamber to the chimney, allowing the combustion gases to be efficiently directed upward. Using a drill fitted with a metal drill bit, carefully create a series of evenly spaced ventilation holes around the top section of the can, just below the rim. These holes will serve as the exhaust port, enabling the combustion gases to exit the combustion chamber and ascend into the chimney.
Once the exhaust port is established, place the smaller can inside the prepared fuel chamber, ensuring a snug fit. This arrangement forms the core of the rocket stove, with the combustion chamber nested within the fuel chamber. The synergy between these two chambers is essential for optimizing the combustion process and harnessing the generated heat effectively.
With the combustion chamber now in place, you have successfully reached a pivotal stage in the construction of your DIY rocket stove. The seamless integration of the fuel and combustion chambers sets the stage for the next phase: constructing the chimney, which will complete the core components of the rocket stove and pave the way for its functional assembly.
Step 3: Constructing the Chimney
The chimney is a fundamental component of the rocket stove, serving as the conduit for directing combustion gases and heat upward, away from the cooking area. Constructing a well-designed chimney is essential for ensuring efficient airflow and heat transfer within the rocket stove.
To begin, select a metal can that is slightly larger in diameter than the combustion chamber. This can will serve as the outer shell of the chimney. As with the previous components, ensure that the chosen can is clean and free of any contaminants. Using a marker or pen, mark a line around the circumference of the can, approximately 2 inches from the top. This line will guide the cutting process for creating the chimney opening.
With safety gloves and goggles on, carefully use tin snips or a metal saw to cut along the marked line, creating a circular opening at the top of the can. This opening will serve as the exhaust port for the chimney, allowing the combustion gases to exit the stove and ascend upward. As with previous cutting tasks, it is crucial to smooth out any rough edges using sandpaper or a metal file to ensure a safe and clean finish.
Once the chimney opening is prepared, it's time to create a series of ventilation holes around the lower section of the can, just above the base. These holes will facilitate the inflow of air, which is essential for sustaining the combustion process and promoting efficient heat generation. Using a drill fitted with a metal drill bit, carefully create evenly spaced ventilation holes to allow for optimal airflow within the chimney.
After preparing the chimney components, carefully place the outer shell of the chimney over the combustion chamber, ensuring a secure and aligned fit. This assembly completes the core structure of the rocket stove, with the chimney serving as the final piece that channels the combustion gases and heat upward, away from the cooking surface.
With the chimney constructed and integrated into the rocket stove, you have successfully completed the essential components of the stove's core structure. The seamless alignment of the fuel chamber, combustion chamber, and chimney sets the stage for the final phase: assembling the rocket stove and conducting the initial tests to gauge its functionality and efficiency.
Step 4: Assembling the Rocket Stove
With the core components of the rocket stove meticulously prepared, it's time to bring them together and assemble the stove into a functional unit. The assembly process involves carefully integrating the fuel chamber, combustion chamber, and chimney to create a cohesive and efficient cooking device.
Begin by placing the prepared fuel chamber on a stable, heat-resistant surface, ensuring that it is level and secure. Next, carefully position the combustion chamber within the fuel chamber, ensuring a snug and aligned fit. This nested configuration forms the heart of the rocket stove, with the combustion chamber housed within the larger fuel chamber.
Once the combustion chamber is securely in place, proceed to position the chimney over the combustion chamber, aligning it carefully to ensure a seamless connection. The chimney serves as the conduit for directing the combustion gases and heat upward, away from the cooking area. As the final piece of the puzzle, the chimney completes the core structure of the rocket stove, creating a clear pathway for the efficient transfer of heat.
To enhance the stability and heat resistance of the rocket stove, place a layer of gravel or small stones at the base of the fuel chamber. This not only provides a solid foundation for the stove but also helps to insulate the bottom of the stove, minimizing heat transfer to the underlying surface.
With the core components aligned and integrated, the next step is to secure the assembly by filling the space between the inner and outer cans with insulating material such as vermiculite or perlite. This insulating layer plays a crucial role in retaining heat within the stove, ensuring optimal combustion temperatures while minimizing heat loss. Carefully fill the space, taking care to achieve a uniform and compact insulation layer.
As the final touch, consider applying a coat of high-heat paint to the exterior of the rocket stove. This protective layer not only enhances the stove's durability and resistance to corrosion but also allows for personalization with your preferred color.
With the assembly process completed, you now have a fully functional rocket stove ready to harness the power of clean combustion for your outdoor cooking adventures. The seamless integration of the fuel chamber, combustion chamber, and chimney sets the stage for testing and using your DIY rocket stove, bringing you one step closer to enjoying the benefits of this sustainable and efficient cooking device.
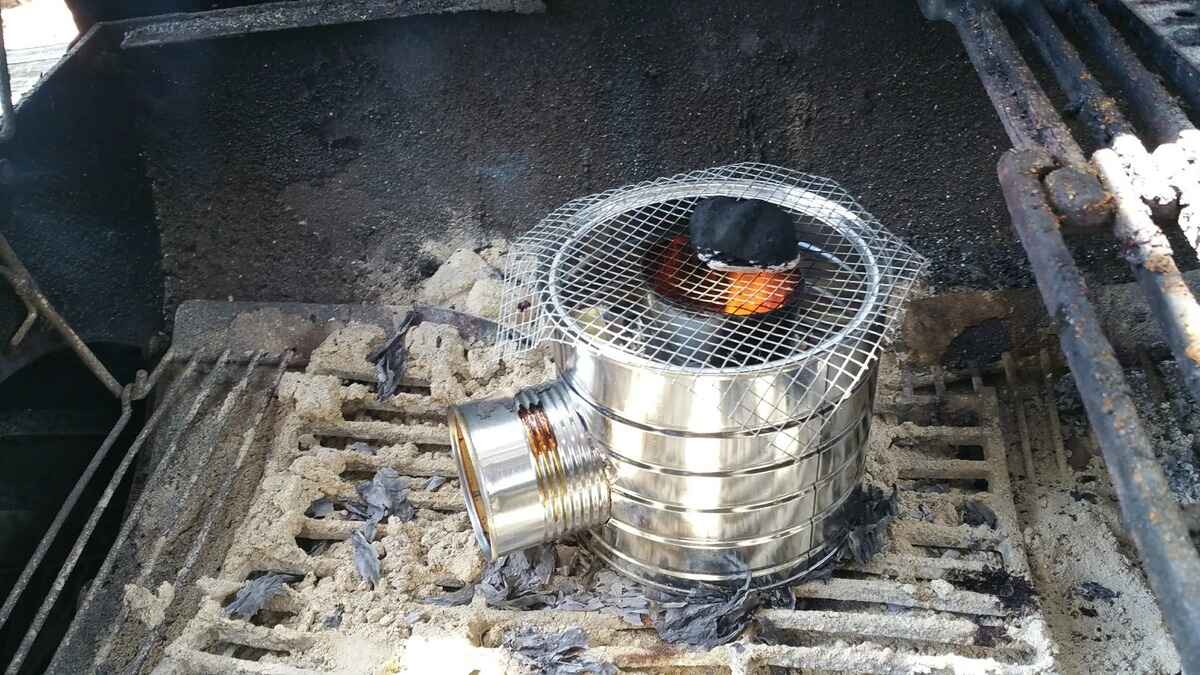
Step 5: Testing and Using Your DIY Rocket Stove
With your DIY rocket stove assembled and ready for action, it's time to put it to the test and experience the satisfaction of cooking with this efficient and sustainable device. Before firing it up for the first time, it's essential to conduct a few preliminary checks to ensure a safe and successful experience.
First, position the rocket stove on a stable, level surface, preferably outdoors or in a well-ventilated area. This ensures proper airflow and minimizes the risk of accidental fires. Double-check that the surrounding area is clear of any flammable materials and that the stove is a safe distance from any structures or combustible surfaces.
Next, gather a small amount of dry biomass fuel, such as twigs, wood pellets, or small branches. These materials are ideal for testing the rocket stove's combustion efficiency and heat output. Place the biomass fuel in the fuel chamber, ensuring that there is enough material to sustain a steady flame during the initial test.
With the fuel in place, carefully ignite the biomass using a match or lighter, taking care to avoid any sudden flare-ups. As the combustion process begins, observe the airflow dynamics and the development of the flame within the combustion chamber. The efficient design of the rocket stove should promote clean combustion, with minimal smoke and maximum heat transfer to the cooking surface.
As the flames stabilize, place a cooking pot or pan on the metal grate or wire mesh above the combustion chamber. The intense heat generated by the rocket stove should quickly begin to heat the cooking vessel, demonstrating the stove's ability to provide a reliable source of heat for outdoor cooking.
During the initial test, take note of the stove's performance, including the consistency of the flame, the heat distribution, and any adjustments that may be necessary to optimize its efficiency. The goal is to achieve a clean, steady flame that efficiently heats the cooking vessel while minimizing fuel consumption.
Once you are satisfied with the stove's performance during the test, you can proceed to use it for actual cooking. Whether you're preparing a simple outdoor meal, boiling water for hot beverages, or experimenting with new recipes, the DIY rocket stove offers a versatile and eco-friendly solution for outdoor culinary adventures.
By embracing the experience of testing and using your DIY rocket stove, you gain valuable insights into its functionality and efficiency, empowering you to make adjustments and optimizations as needed. As you savor the delicious meals prepared with the help of your homemade rocket stove, you'll appreciate the ingenuity and sustainability of this DIY project, knowing that you've unlocked a practical and environmentally conscious cooking solution.
Conclusion
Congratulations on successfully completing the construction of your DIY rocket stove! Through the meticulous process of preparing the fuel chamber, creating the combustion chamber, constructing the chimney, and assembling the core components, you have embarked on a journey of ingenuity and sustainability. As you tested and used your rocket stove for the first time, you experienced firsthand the transformative power of clean combustion and efficient heat transfer.
By embracing this hands-on project, you have not only gained practical skills in DIY craftsmanship but also contributed to a greener and more sustainable lifestyle. The rocket stove stands as a testament to the ingenuity of simple yet effective engineering, harnessing the power of biomass fuel to provide a reliable source of heat for outdoor cooking.
As you reflect on the process of building and using your rocket stove, consider the broader impact of this endeavor. By choosing to construct a DIY rocket stove, you have taken a proactive step towards reducing your carbon footprint and promoting self-reliance. The efficient combustion and minimal fuel consumption of the rocket stove align with principles of sustainability, offering a viable alternative to traditional cooking methods.
Furthermore, the knowledge and experience gained from this project empower you to inspire others and advocate for sustainable living practices. Whether it's sharing your journey with friends and family, demonstrating the functionality of the rocket stove, or encouraging others to embark on their own DIY projects, you have the opportunity to spark positive change within your community.
As you continue to explore the capabilities of your rocket stove and integrate it into your outdoor activities, consider the potential for further innovation and customization. From experimenting with different biomass fuels to optimizing the airflow dynamics, there are endless opportunities to refine and enhance the performance of your DIY rocket stove.
In conclusion, the construction and utilization of your DIY rocket stove represent more than just a practical cooking solution. It embodies a commitment to sustainability, a celebration of creativity, and a testament to the transformative power of hands-on projects. As you share the joys of outdoor cooking and the benefits of sustainable living with your rocket stove, you inspire others to embrace DIY ingenuity and contribute to a more environmentally conscious world.