
Home>Create & Decorate>DIY & Crafts>Easy Chicken Coop Plans: Build Your Own Coop With These Step-by-Step Instructions
DIY & Crafts
Easy Chicken Coop Plans: Build Your Own Coop With These Step-by-Step Instructions
Published: February 29, 2024

Content Creator specializing in woodworking and interior transformations. Caegan's guides motivate readers to undertake their own projects, while his custom furniture adds a personal touch.
Discover easy chicken coop plans and step-by-step instructions to build your own coop. Perfect for DIY & Crafts enthusiasts. Start your project today!
(Many of the links in this article redirect to a specific reviewed product. Your purchase of these products through affiliate links helps to generate commission for Twigandthistle.com, at no extra cost. Learn more)
Introduction
Are you ready to embark on a rewarding DIY project that will not only enhance your property but also provide a comfortable and secure home for your feathered friends? Building your own chicken coop is a fulfilling endeavor that allows you to create a safe and cozy space for your chickens while showcasing your craftsmanship. Whether you're a seasoned DIY enthusiast or a novice looking for a hands-on project, these easy chicken coop plans will guide you through the process, ensuring a successful and enjoyable construction experience.
By constructing your own chicken coop, you have the opportunity to customize the design to suit your specific needs and preferences. From the size and layout to the materials used, every aspect of the coop can be tailored to accommodate the number of chickens you plan to house and the available space in your backyard or homestead. Additionally, building a chicken coop from scratch allows you to prioritize the well-being and comfort of your chickens, ensuring that they have a safe and inviting environment to thrive in.
Not only does building a chicken coop offer practical benefits, but it also presents a fantastic opportunity to engage in a hands-on project that can be both educational and enjoyable. As you work through the construction process, you'll gain valuable skills and knowledge in carpentry, construction, and animal husbandry. Moreover, the sense of accomplishment that comes with completing a project of this nature is truly gratifying, and the end result—a sturdy and functional chicken coop—will stand as a testament to your dedication and hard work.
With these easy chicken coop plans, you'll be equipped with step-by-step instructions, helpful tips, and a list of essential materials, empowering you to create a durable and well-designed coop that meets the needs of your flock. So, roll up your sleeves, gather your tools, and get ready to embark on a fulfilling journey of building your very own chicken coop. Let's dive into the details and start constructing a cozy and secure haven for your feathered companions.
Materials Needed
To bring your chicken coop to life, you'll need a carefully curated selection of materials that will form the foundation of your project. Here's a comprehensive list of the essential items required to construct a sturdy and functional chicken coop:
Lumber
- 2x4s: These will be used for framing the coop and creating a durable structure.
- Plywood: Ideal for constructing the walls, floor, and roof of the coop, providing stability and protection from the elements.
- 1x4s: Perfect for creating trim and finishing touches, adding both aesthetic appeal and structural support.
Hardware
- Screws and Nails: Ensure you have a variety of sizes to accommodate different parts of the coop, securing the components together firmly.
- Hinges and Latches: Essential for the coop door, allowing for easy access while keeping your chickens safe and secure.
- Staples: Used to attach the chicken wire to the coop, providing ventilation and protection from predators.
Roofing Materials
- Corrugated Metal Sheets or Asphalt Shingles: These options offer durability and weather resistance, safeguarding the coop and its inhabitants from rain and harsh sunlight.
Chicken Wire
- Galvanized Hardware Cloth: An essential component for enclosing the coop, protecting your chickens from predators while allowing for adequate airflow.
Insulation
- Foam Board Insulation: Ideal for regulating the temperature inside the coop, ensuring that your chickens remain comfortable in various weather conditions.
Nesting Box Materials
- Wood for Nesting Boxes: Crafting cozy nesting boxes will provide your chickens with a comfortable and secure space to lay their eggs.
Tools
- Circular Saw: Essential for cutting lumber to the required dimensions, facilitating precise and efficient construction.
- Power Drill: A versatile tool that will be used for driving screws and creating pilot holes, expediting the assembly process.
- Hammer: An indispensable tool for securing nails and providing additional reinforcement to the coop's structure.
- Staple Gun: Essential for attaching the chicken wire securely to the coop, ensuring the safety of your chickens.
By gathering these materials and tools, you'll be well-prepared to commence the construction of your chicken coop, setting the stage for a successful and rewarding DIY project. With the right materials at your disposal, you can proceed to the next phase of the construction process, bringing your vision of a safe and comfortable home for your chickens to fruition.
Choosing the Right Location
Selecting the optimal location for your chicken coop is a crucial decision that can significantly impact the well-being and safety of your feathered companions. When identifying the perfect spot for your coop, several factors should be taken into consideration to ensure that the environment is conducive to the health and happiness of your chickens.
Factors to Consider
Sunlight and Shade
Adequate exposure to natural light is essential for the overall health and productivity of your chickens. When choosing a location for your coop, consider the path of the sun throughout the day. Opt for a spot that receives ample sunlight, as this not only promotes the well-being of your chickens but also helps to naturally disinfect the coop and deter pests. Additionally, ensure that there are shaded areas within the vicinity to provide relief from excessive heat during warmer months.
Drainage
Proper drainage is paramount to prevent waterlogging and maintain a dry and hygienic environment within the coop. Avoid low-lying areas that are prone to flooding, and instead, opt for a slightly elevated location that allows for efficient water runoff during heavy rainfall.
Proximity to Your Home
Striking a balance between convenience and practicality, consider locating the coop within a reasonable distance from your home. This proximity facilitates regular monitoring of your chickens, making it easier to tend to their needs and ensure their safety. Additionally, having the coop within close reach simplifies the process of collecting eggs and performing routine maintenance tasks.
Predators and Security
Assess the potential risks posed by local predators, such as foxes, raccoons, or birds of prey, and choose a location that minimizes the likelihood of encounters with these threats. Additionally, consider implementing security measures, such as installing motion-activated lights or audible deterrents, to further safeguard your chickens from potential predators.
Accessibility
When selecting a location for your chicken coop, consider the accessibility of the site for both construction and ongoing maintenance. Ensure that the chosen spot allows for easy transportation of materials and supplies during the construction phase, as well as convenient access for cleaning, feeding, and general care once the coop is operational.
By carefully evaluating these factors and selecting a location that aligns with the needs of your chickens and the practical requirements of the construction and maintenance process, you can establish an ideal setting for your chicken coop. With the right location secured, you can proceed to the next phase of the construction journey, bringing your vision of a safe and comfortable home for your chickens one step closer to reality.
Building the Frame
The construction of the frame forms the backbone of your chicken coop, providing structural support and stability for the entire structure. To begin this pivotal phase of the project, you'll need to gather the necessary lumber and tools, ensuring that you have everything at your disposal to commence the framing process.
Step 1: Cutting the Lumber
Using a circular saw, carefully cut the 2×4 lumber to the required dimensions based on the size of your coop. The precision of these cuts is crucial, as they will determine the overall stability and integrity of the frame. Take accurate measurements and make clean, straight cuts to ensure a seamless assembly process.
Step 2: Assembling the Base
Lay out the cut lumber to form the base of the frame, creating a rectangular outline that corresponds to the dimensions of your coop. Secure the corners by joining the pieces with screws, ensuring that the base is level and squared off. This foundational step sets the stage for the vertical components of the frame.
Step 3: Erecting the Vertical Supports
Position the vertical 2x4s at designated intervals along the perimeter of the base, securing them in place with screws. These vertical supports will serve as the framework for the walls and provide the necessary structure for the coop. Ensure that the supports are plumb and securely anchored to the base, maintaining uniformity and stability throughout.
Step 4: Adding Horizontal Bracing
To reinforce the frame and enhance its stability, add horizontal bracing between the vertical supports. This cross-bracing technique fortifies the frame, preventing swaying and ensuring its resilience against external forces. Secure the bracing in place with screws, creating a robust and durable framework for the coop.
Step 5: Creating Door and Window Openings
If your design includes doors and windows, carefully measure and mark the locations for these openings within the frame. Use a jigsaw or circular saw to cut out these sections, ensuring precision and accuracy to accommodate the installation of doors and windows at a later stage.
By meticulously following these steps and paying close attention to detail, you'll successfully construct a sturdy and well-defined frame for your chicken coop. With the frame in place, you're ready to progress to the next phase of the construction process, bringing your vision of a secure and comfortable haven for your chickens closer to realization.
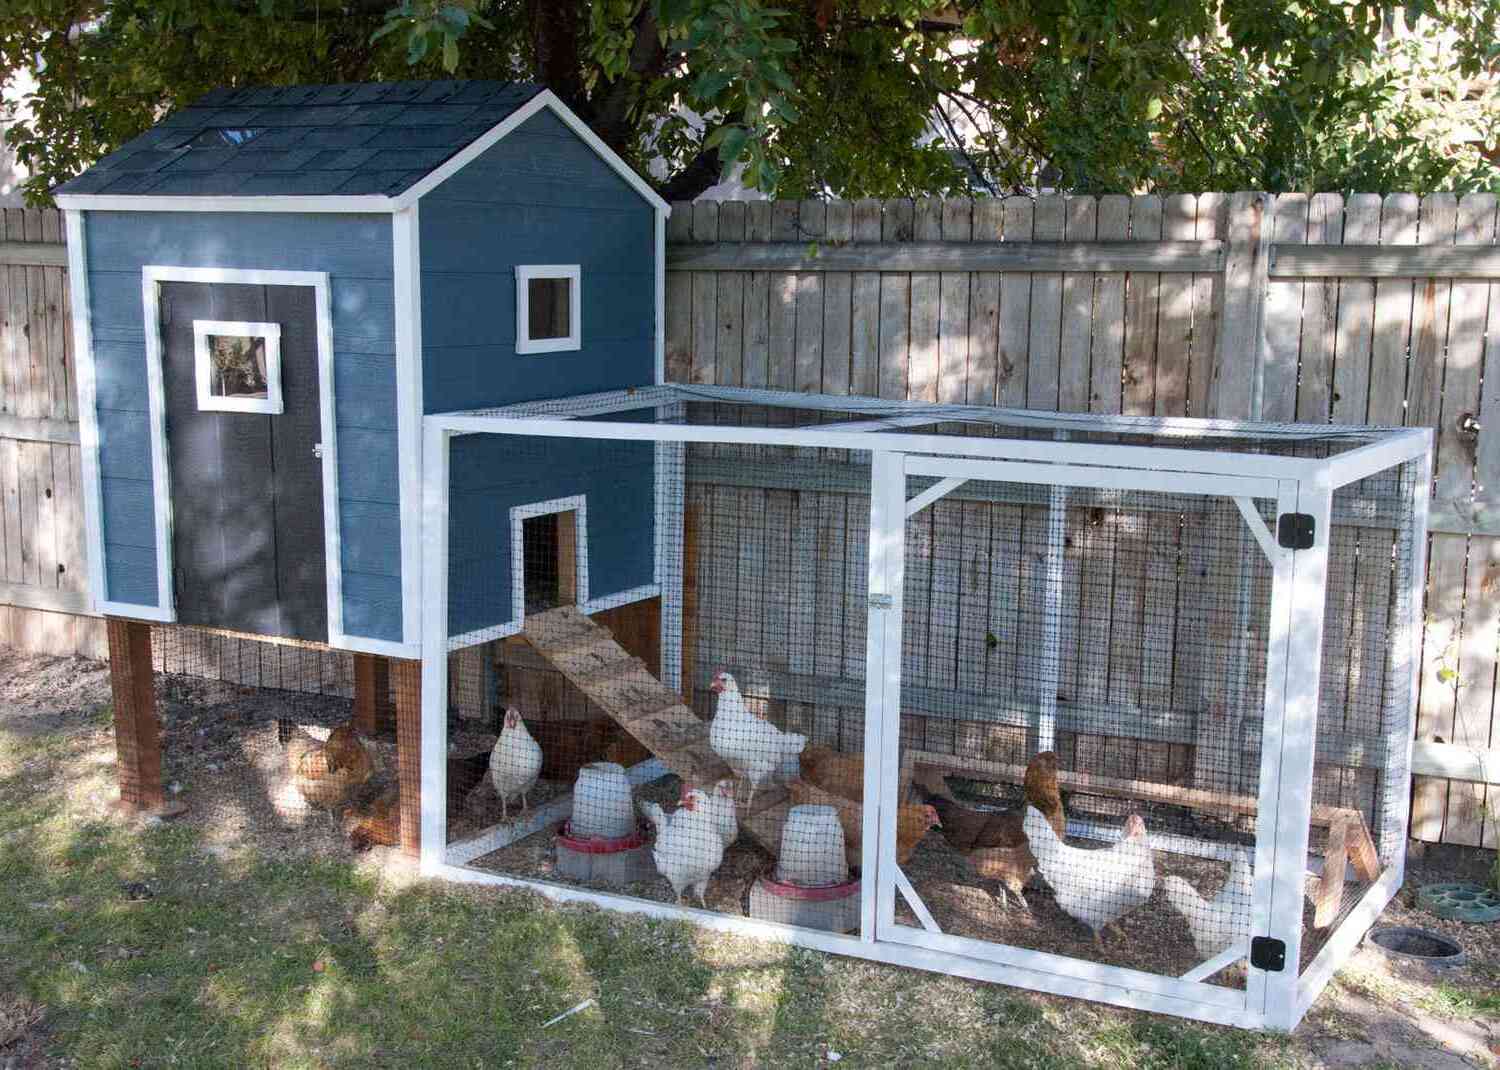
Adding the Siding and Roof
With the frame of the chicken coop securely in place, the next crucial step is to add the siding and roof, providing essential protection from the elements and ensuring a cozy and secure environment for your feathered companions. This phase of the construction process involves carefully selecting and installing the materials that will form the exterior shell of the coop, safeguarding it against adverse weather conditions and external threats.
Installing the Siding
Begin by selecting the appropriate siding material for your chicken coop. Plywood is a popular and cost-effective option, offering durability and ease of installation. Cut the plywood panels to the required dimensions, ensuring a precise fit around the frame of the coop. Secure the panels to the frame using screws, starting from the bottom and working your way up. Overlapping the panels slightly will provide added protection against moisture and drafts. Once the siding is in place, add trim along the edges to create a polished and finished look while reinforcing the structural integrity of the coop.
Adding the Roof
The selection of roofing material is crucial in providing adequate protection for your chickens and ensuring the longevity of the coop. Corrugated metal sheets and asphalt shingles are popular choices due to their durability and weather-resistant properties. Begin by measuring and cutting the roofing material to fit the dimensions of the coop, allowing for overhang to prevent water runoff directly onto the siding. Secure the roofing material in place, starting from the bottom and overlapping each subsequent row to create a watertight barrier. Pay careful attention to sealing the edges and any potential gaps to prevent water infiltration.
Insulating the Roof
To enhance the comfort and temperature regulation within the coop, consider adding insulation to the roof. Foam board insulation provides effective thermal control, keeping the interior of the coop comfortable for your chickens in varying weather conditions. Cut the insulation to fit between the roof joists and secure it in place before adding the roofing material. This additional layer of insulation will help maintain a stable and comfortable environment within the coop, promoting the well-being of your chickens.
By meticulously executing the installation of the siding and roof, you'll fortify the structure of the chicken coop, creating a resilient and weatherproof shelter for your chickens. With these essential components in place, your vision of a secure and inviting home for your feathered friends will continue to take shape, bringing you one step closer to completing this fulfilling DIY project.
Installing the Chicken Wire
The installation of chicken wire is a critical step in fortifying the security of your chicken coop, providing a protective barrier against potential predators while allowing for adequate ventilation. This phase of the construction process involves carefully selecting and affixing the chicken wire to the coop, ensuring that it effectively safeguards your feathered companions without compromising their comfort.
Selecting the Right Chicken Wire
Before commencing the installation, it's essential to choose the appropriate chicken wire that aligns with the specific needs of your coop. Opt for galvanized hardware cloth with a sturdy mesh design, as it offers durability and resilience against external threats. The mesh size should be small enough to prevent predators from gaining access to the coop while facilitating optimal airflow for the chickens. Additionally, ensure that the dimensions of the chicken wire correspond to the measurements of the coop, allowing for seamless installation without the need for excessive cutting or modifications.
Securing the Chicken Wire
Begin by unrolling the chicken wire and carefully positioning it around the exterior of the coop. Use a staple gun to secure the wire to the frame, starting from one corner and working your way around the perimeter. Ensure that the wire is taut and free from sagging, as this will prevent potential entry points for predators. As you progress, periodically check the alignment and tension of the wire to maintain a consistent and secure enclosure.
Reinforcing Vulnerable Areas
Pay special attention to vulnerable areas such as the base of the coop and any potential gaps or seams where the wire meets the siding. These areas are particularly susceptible to intrusion by predators and should be reinforced with additional staples or fasteners to fortify the integrity of the enclosure. By meticulously addressing these potential weak points, you can enhance the overall security of the coop and provide your chickens with a safe and protected environment.
Finishing Touches
Once the chicken wire is securely in place, trim any excess material and ensure that the edges are neatly secured to the frame. This not only provides a clean and polished appearance but also eliminates any protruding edges that could pose a hazard to both the chickens and individuals tending to the coop. Additionally, inspect the entire perimeter of the wire to confirm that it is uniformly installed and devoid of any loose or compromised sections.
By diligently executing the installation of the chicken wire, you'll establish a robust and impenetrable barrier that safeguards your chickens from potential threats while promoting optimal airflow within the coop. With this essential security measure in place, your vision of a secure and inviting home for your feathered friends will continue to take shape, bringing you one step closer to completing this fulfilling DIY project.
Building the Nesting Boxes
Creating comfortable and secure nesting boxes is essential for providing your chickens with a designated space to lay their eggs. This phase of the coop construction process focuses on crafting cozy and functional nesting boxes that cater to the natural instincts of your feathered companions while facilitating easy egg collection and maintenance.
Design Considerations
Before constructing the nesting boxes, consider the size and layout of your chicken coop to determine the optimal placement for the boxes. The dimensions of the nesting boxes should accommodate the size of your chicken breed, typically ranging from 12×12 inches to 14×14 inches per nesting box. Additionally, ensure that the boxes are positioned in a quiet and secluded area of the coop, providing a sense of privacy and security for your chickens during the egg-laying process.
Construction Process
Begin by selecting high-quality wood for the construction of the nesting boxes, ensuring durability and ease of maintenance. Cut the wood panels to the appropriate dimensions, taking into account the desired size and number of nesting boxes based on the size of your flock. Assemble the panels to form individual boxes, securing the corners with screws to create sturdy and well-defined compartments.
Comfort and Functionality
Line the interior of each nesting box with soft bedding material, such as straw or wood shavings, to create a cozy and inviting space for your chickens to lay their eggs. The bedding material not only provides comfort but also absorbs moisture and helps maintain a clean and hygienic environment within the nesting boxes.
Accessibility and Collection
Incorporate a hinged or removable panel at the front of each nesting box to facilitate easy access for egg collection. This feature simplifies the task of retrieving eggs while allowing for convenient cleaning and maintenance of the nesting boxes. Additionally, consider adding a slight tilt to the nesting boxes to prevent the eggs from rolling out, ensuring that they remain safely contained until they are collected.
Final Touches
Once the nesting boxes are securely in place within the coop, add a sloped or hinged roof to each box to provide additional protection and privacy for your chickens during the egg-laying process. This feature also helps prevent chickens from perching on top of the nesting boxes, preserving the cleanliness and integrity of the nesting areas.
By meticulously constructing and positioning the nesting boxes within your chicken coop, you'll provide your chickens with a comfortable and secure space to lay their eggs, fostering a sense of well-being and productivity among your flock. With these essential components in place, your vision of a safe and inviting home for your feathered friends will continue to take shape, bringing you one step closer to completing this fulfilling DIY project.
Adding the Perch
Incorporating a perch within the chicken coop is a vital element that caters to the natural behaviors and well-being of your feathered companions. The perch serves as a resting and roosting area for the chickens, offering them a comfortable and elevated space to perch on during the day and rest at night. Additionally, providing a designated perch within the coop contributes to the overall organization and functionality of the space, creating a more enriching environment for your chickens.
When adding the perch to your chicken coop, it's essential to consider several factors to ensure that it meets the needs of your flock. Begin by selecting a sturdy and appropriately sized wooden dowel or branch that can comfortably accommodate the feet of your chickens. The perch should be positioned at a suitable height within the coop, allowing ample space for the chickens to roost without feeling cramped or restricted.
To install the perch, securely affix it to the interior of the coop, ensuring that it is level and stable. Position the perch parallel to the wall, providing sufficient clearance to allow the chickens to perch and move about comfortably. Consider the placement of the perch in relation to other coop features, such as the nesting boxes and feeding areas, to create a well-organized and accessible layout for your chickens.
Furthermore, the perch should be positioned away from potential drafty areas and should not obstruct the functionality of the coop. By strategically placing the perch within the coop, you can create a harmonious and functional space that promotes the natural behaviors and comfort of your chickens.
Incorporating a perch within the chicken coop not only fulfills the roosting needs of your chickens but also contributes to the overall well-being and contentment of your flock. By providing a designated space for perching, you create a more enriching and comfortable environment for your chickens, fostering a sense of security and tranquility within the coop.
With the perch thoughtfully integrated into the coop, your feathered companions will have a designated space to roost and rest, further enhancing the functionality and comfort of their living quarters. This essential addition brings you one step closer to completing your DIY chicken coop project, ensuring that your chickens have a secure and inviting home to thrive in.
Adding the Door and Latch
The installation of a secure and functional door, equipped with a reliable latch, is a pivotal aspect of completing your chicken coop. The door serves as the primary entry and exit point for both you and your chickens, while the latch ensures the safety and security of the coop, providing peace of mind knowing that your feathered companions are protected from potential threats.
Selecting the Door
Begin by selecting a sturdy and appropriately sized door that aligns with the dimensions of the coop. Opt for a weather-resistant material, such as treated wood or composite panels, to ensure durability and longevity. The door should be designed to swing inward, allowing for easy access while preventing potential predators from forcing their way into the coop. Additionally, consider incorporating a small window or ventilation openings within the door to facilitate airflow and provide natural light within the coop.
Installing the Door
Position the door within the designated entryway of the coop, ensuring that it aligns seamlessly with the frame. Secure the hinges to the door frame, allowing for smooth and unhindered movement of the door. Test the functionality of the door to ensure that it opens and closes smoothly, making any necessary adjustments to achieve a proper fit. Once the door is securely in place, add weather-stripping along the edges to create a tight seal, preventing drafts and moisture from entering the coop.
Securing the Latch
Select a robust and reliable latch mechanism that effectively secures the door, preventing unauthorized entry and ensuring the safety of your chickens. Install the latch on the interior side of the door, positioning it at a height that is easily accessible for opening and closing. Test the latch to confirm that it securely fastens the door, providing a tight and impenetrable seal. Additionally, consider adding a padlock or additional security measures for added protection, especially if the coop is located in an area with a higher risk of potential threats.
Final Adjustments
Once the door and latch are securely installed, conduct a thorough inspection to confirm that the door operates smoothly and securely latches in place. Make any necessary adjustments to the alignment and functionality of the door to ensure that it provides a seamless and secure barrier for the coop. Additionally, consider adding a doorstop or support to prevent the door from swinging open unexpectedly, further enhancing the safety and functionality of the entryway.
By meticulously installing a secure door and reliable latch, you establish a robust and protective barrier for your chicken coop, ensuring the safety and well-being of your feathered companions. With this essential component in place, your vision of a secure and inviting home for your chickens continues to take shape, bringing you one step closer to completing this fulfilling DIY project.
Conclusion
As you reach the culmination of this enriching DIY journey, the completion of your very own chicken coop marks a significant achievement. Through meticulous planning, dedicated craftsmanship, and a deep understanding of your chickens' needs, you have created a secure and inviting haven for your feathered companions.
The process of building a chicken coop extends far beyond the physical construction; it embodies a commitment to the well-being and comfort of your chickens. By incorporating essential elements such as secure enclosures, cozy nesting boxes, and functional perches, you have tailored the coop to cater to the natural behaviors and instincts of your flock.
Furthermore, the attention to detail in selecting durable materials, positioning the coop in an optimal location, and implementing security measures reflects your dedication to providing a safe and nurturing environment for your chickens. The coop stands as a testament to your craftsmanship and commitment to animal welfare.
Beyond the practical benefits, the journey of constructing a chicken coop has provided valuable insights and skills in carpentry, animal husbandry, and project management. It has fostered a deeper connection with your chickens, allowing you to understand their needs and behaviors on a more profound level.
As you witness your chickens settling into their new home, perching comfortably, and laying eggs in the cozy nesting boxes, the fulfillment derived from this endeavor is truly gratifying. The sense of accomplishment and the knowledge that you have created a space where your chickens can thrive and flourish is immeasurable.
Moving forward, the coop will serve as a hub of activity, providing a source of fresh eggs, fostering a deeper connection with nature, and offering a sense of tranquility as you observe your chickens enjoying their secure and comfortable abode.
In conclusion, the completion of your DIY chicken coop is not just the end of a project; it marks the beginning of a rewarding and enduring relationship with your feathered companions. The coop stands as a testament to your dedication, creativity, and care for your chickens, enriching both your life and the lives of your cherished flock.