
Home>Home & Furniture>Roof>How to Build a DIY Hard Shell Roof Top Tent
Roof
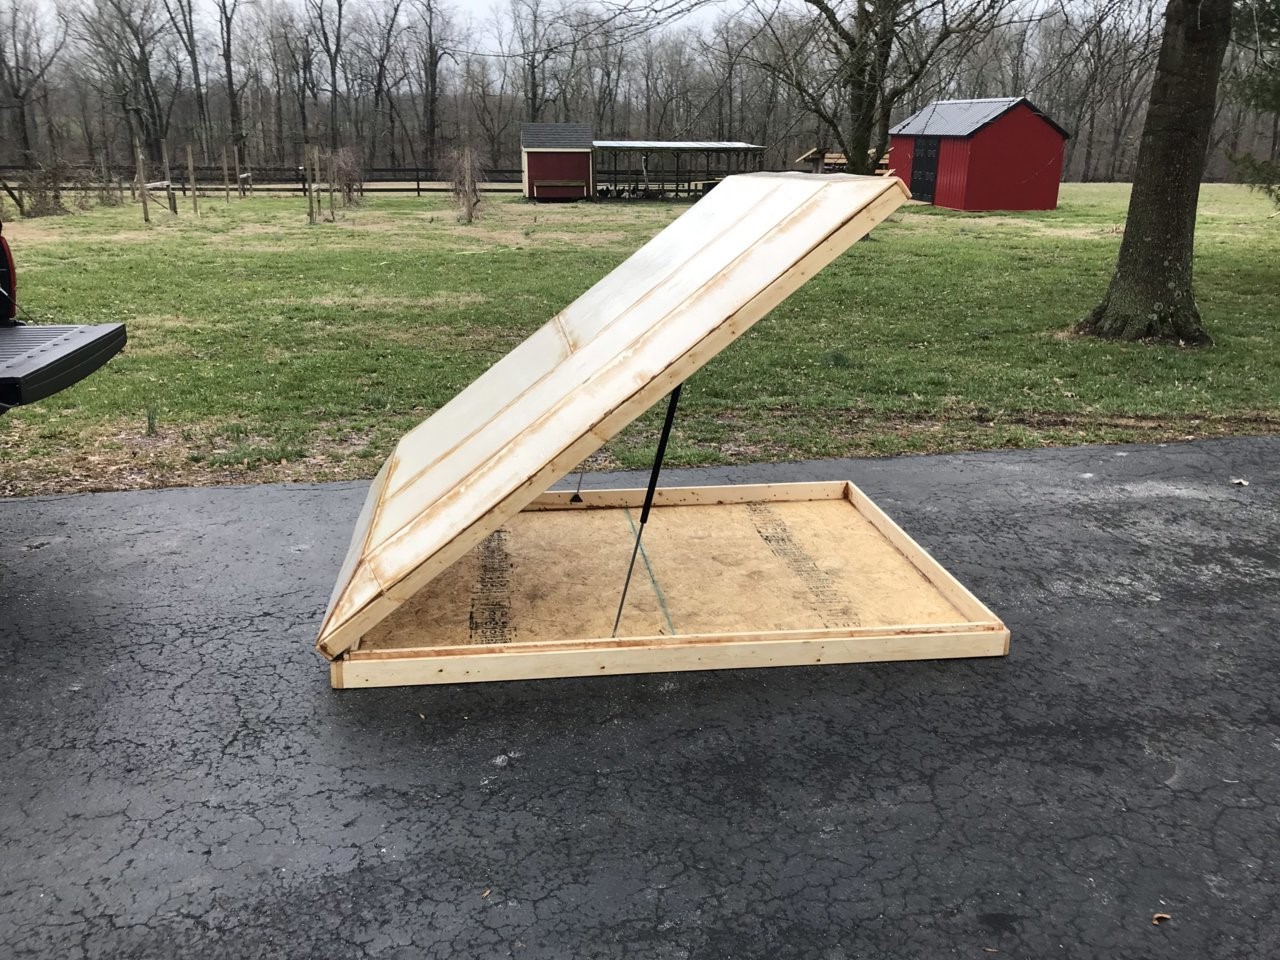
How to Build a DIY Hard Shell Roof Top Tent
Published: August 17, 2024
Learn how to build a DIY hard shell roof top tent with our step-by-step guide. Perfect for camping enthusiasts looking to create a durable and comfortable outdoor shelter.
(Many of the links in this article redirect to a specific reviewed product. Your purchase of these products through affiliate links helps to generate commission for Twigandthistle.com, at no extra cost. Learn more)
Camping is a great way to connect with nature, and having the right gear can make all the difference. Building your own hard shell roof top tent not only saves money but also offers a fun project. It's perfect for those who love customizing their camping experience. With some basic tools, materials, and a bit of patience, you can create a durable, comfortable tent that mounts right on top of your vehicle. Whether you're an experienced DIYer or just starting out, this guide will help you through the process step by step. Get ready to elevate your camping adventures!
Preparation Steps
Gather Materials: Collect plywood, aluminum sheets, hinges, gas struts, waterproof fabric, screws, and a mattress. Ensure all tools like a drill, saw, and measuring tape are ready.
Safety Gear: Wear safety goggles, gloves, and a dust mask. Keep a first aid kit nearby.
Workspace Setup: Choose a flat, spacious area. Lay down a tarp to catch debris. Ensure good lighting.
Measure Your Vehicle: Measure the roof rack dimensions. This ensures the tent fits securely.
Cut Plywood: Cut plywood to match the roof rack size. Sand edges to avoid splinters.
Assemble Frame: Use screws to attach aluminum sheets to the plywood. This forms the tent base.
Install Hinges: Attach hinges to one side of the base. This allows the tent to open and close.
Attach Gas Struts: Fix gas struts to help lift the tent. Follow the manufacturer’s instructions for placement.
Waterproof Fabric: Cut fabric to cover the tent. Use waterproof adhesive to secure it.
Test Fit: Place the tent on the roof rack. Ensure it fits snugly and securely.
Final Adjustments: Make any necessary tweaks. Ensure all parts move smoothly.
Clean Up: Dispose of scraps and clean tools. Store materials safely for future use.
Materials and Tools Needed
- Plywood Sheets: Strong and durable wood for the base and walls.
- Aluminum Extrusions: Lightweight metal for the frame.
- Hinges: Connects the top and bottom parts, allowing the tent to open and close.
- Gas Struts: Helps lift and hold the tent open.
- Weatherproof Sealant: Keeps water out, ensuring the tent stays dry.
- Marine Carpet: Soft lining for the interior, making it comfortable.
- Foam Mattress: Provides a comfortable sleeping surface.
- Tent Fabric: Waterproof and breathable material for the sides.
- Zippers: Allows easy entry and exit.
- Screws and Bolts: Holds everything together securely.
- Roof Rack Mounting Kit: Attaches the tent to your vehicle's roof rack.
Tools Needed:
- Drill: For making holes and driving screws.
- Saw: Cuts plywood and aluminum to size.
- Measuring Tape: Ensures accurate measurements.
- Screwdriver: Tightens screws and bolts.
- Wrench Set: Tightens nuts and bolts.
- Utility Knife: Cuts fabric and carpet.
- Clamps: Holds pieces in place while assembling.
- Paintbrush: Applies sealant evenly.
- Staple Gun: Attaches fabric to the frame.
- Level: Ensures everything is straight and even.
Skill Level and Time Required
Skill Level: Advanced
Time Required: 40-50 hours
Key Steps:
- Planning and Design: 5-7 hours
- Gathering Materials: 3-4 hours
- Cutting and Assembling the Frame: 10-12 hours
- Installing the Shell: 8-10 hours
- Adding the Tent Fabric: 6-8 hours
- Final Adjustments and Testing: 4-5 hours
Step-by-Step Instructions
Gather Materials
- Plywood sheets
- Aluminum or steel tubing
- Hinges
- Gas struts
- Waterproof fabric
- Foam mattress
- Screws, nuts, bolts
- Weather stripping
- Tools: Drill, saw, measuring tape, wrench
Build the Base
- Cut plywood to fit your vehicle's roof rack.
- Attach aluminum tubing around the edges for support.
- Secure the base to the roof rack using bolts.
Construct the Frame
- Cut aluminum tubing to form the tent's frame.
- Assemble the frame using screws and brackets.
- Attach the frame to the base with hinges.
Install Gas Struts
- Attach gas struts to the frame and base.
- Ensure they can lift the tent easily.
- Test the opening and closing mechanism.
Create the Shell
- Cut plywood for the top shell.
- Attach aluminum tubing for reinforcement.
- Secure the shell to the frame with hinges.
Add Waterproof Fabric
- Measure and cut fabric to cover the frame.
- Attach fabric using screws and washers.
- Ensure all seams are sealed to prevent leaks.
Install Weather Stripping
- Apply weather stripping around the edges of the shell.
- Ensure a tight seal when the tent is closed.
Add the Mattress
- Cut foam mattress to fit inside the tent.
- Place mattress inside for comfort.
Test the Tent
- Open and close the tent several times.
- Check for stability and any adjustments needed.
Final Touches
- Paint or seal the plywood for weather resistance.
- Add any additional features like windows or vents.
Helpful Tips and Tricks
Measure twice, cut once. Accurate measurements prevent wasted materials and frustration. Use lightweight materials like aluminum or fiberglass for the frame to keep the tent easy to lift. Waterproof your tent by sealing seams with silicone or waterproof tape. Install gas struts to make opening and closing the tent easier. Add ventilation with small windows or vents to prevent condensation inside.
Common mistakes to avoid: Skipping the waterproofing step can lead to leaks. Using heavy materials makes the tent difficult to handle. Not securing the tent properly to the roof rack can cause it to shift or fall off while driving.
Alternatives for materials or methods: Instead of plywood, consider using marine-grade plywood for better durability. For the tent fabric, canvas can be replaced with ripstop nylon for a lighter, more durable option. Instead of sewing, use heavy-duty adhesive to attach fabric to the frame.
Estimating the Cost
Plywood: $50-$100 for a 4x8 sheet of marine-grade plywood.
Aluminum Extrusions: $100-$150 for framing.
Hinges: $20-$40 for heavy-duty hinges.
Gas Struts: $30-$50 for a pair.
Weather Seals: $20-$30 for rubber seals.
Canvas or Fabric: $50-$100 for waterproof material.
Mattress: $50-$100 for a foam mattress.
Latches: $10-$20 for securing the tent.
Paint or Sealant: $20-$40 for waterproofing.
Screws and Bolts: $10-$20 for fasteners.
Tools: $50-$100 for basic tools like a drill, saw, and screwdriver.
Total Cost: $410-$750
Budget-Friendly Alternatives:
- Use standard plywood instead of marine-grade: Save $20-$50.
- Opt for used or recycled materials: Save up to $100.
- Choose basic fabric instead of high-end waterproof material: Save $20-$50.
- Borrow or rent tools: Save $50-$100.
Possible Variations and Customizations
Materials: Instead of using plywood for the base, consider aluminum for a lighter, more durable option. For the shell, fiberglass can be a great alternative to wood, offering better weather resistance.
Colors: Paint the exterior with camouflage patterns for a rugged, outdoor look. Alternatively, use bright colors like orange or yellow for better visibility and a modern touch.
Styles: Add solar panels on top for an eco-friendly power source. Install LED strip lights inside for better illumination. Use mesh windows for better ventilation and to keep bugs out.
Interior: Customize the interior with memory foam mattresses for added comfort. Install pockets and hooks for better organization. Use insulated fabric for the tent walls to keep warm in colder climates.
Access: Instead of a ladder, build a foldable staircase for easier access. Add handrails for extra safety.
Extras: Attach an awning to the side for additional shade. Include a detachable shower setup for camping convenience. Add storage compartments under the base for extra gear.
Eco-Friendly Tips
Reclaimed Wood: Use old pallets or scrap wood for the tent's base and frame. Sand and treat the wood to ensure durability.
Recycled Metal: Source metal brackets, hinges, and screws from old furniture or construction sites. This reduces waste and saves money.
Eco-Friendly Insulation: Opt for natural insulation materials like wool or recycled denim. These materials provide good insulation and are biodegradable.
Solar-Powered Lights: Install solar-powered LED lights inside the tent. They are energy-efficient and eliminate the need for batteries.
Waterproof Fabric: Choose organic cotton canvas treated with natural waterproofing agents like beeswax. This fabric is durable and environmentally friendly.
Recycled Plastic: Use recycled plastic sheets for the tent's hard shell. They are lightweight, durable, and reduce plastic waste.
Natural Paints: Paint the wooden parts with non-toxic, water-based paints. These paints are safer for the environment and your health.
Upcycled Accessories: Incorporate old belts, straps, and buckles from discarded items for securing the tent. This adds a unique touch and reduces waste.
Energy-Efficient Tools: Use hand tools or energy-efficient power tools to minimize energy consumption during construction.
Local Materials: Source materials locally to reduce the carbon footprint associated with transportation. This supports local businesses and reduces emissions.
Your Adventure Awaits
Building a DIY hard shell roof top tent isn't just about saving money. It's about creating something unique, tailored to your needs. You've learned how to select the right materials, measure accurately, and assemble the parts. Now, it's time to put those skills to the test. Remember, patience and precision are key. Don't rush the process. Take your time to ensure everything fits perfectly. Once completed, you'll have a sturdy, reliable tent ready for countless adventures. Imagine the satisfaction of camping under the stars in something you built with your own hands. So, gather your tools, follow the steps, and get started. Your next adventure is just around the corner. Happy building!
What materials do I need to build a hard shell roof top tent?
You'll need plywood, aluminum, hinges, gas struts, weatherproof fabric, seals, screws, and bolts. A drill, saw, and measuring tape will also come in handy.
How long does it take to build one?
Depending on your skill level, it can take a weekend or a few weeks. Planning and gathering materials might take a bit longer.
Is it cheaper to build my own than to buy one?
Yes, building your own can save you hundreds of dollars. Store-bought tents can be pricey, but DIY lets you control costs.
How do I make sure it’s waterproof?
Use weatherproof fabric and seals around all edges. Apply waterproof paint or sealant to the wood and joints.
Can I customize the size and design?
Absolutely! You can tailor the dimensions and features to fit your vehicle and needs. Just make sure it’s aerodynamic and secure.
What tools will I need?
Basic tools like a drill, saw, measuring tape, screwdriver, and wrench. A riveter might also be useful for attaching aluminum parts.
How do I attach it to my vehicle?
Use roof racks or crossbars. Secure the tent with U-bolts or brackets to ensure it stays put while driving.
Is it safe to sleep in?
Yes, if built correctly. Ensure sturdy construction and secure attachment to your vehicle. Always test stability before use.