
Home>Home & Furniture>Garage & Basement>How to Epoxy Your Basement Floor
Garage & Basement
How to Epoxy Your Basement Floor
Published: August 29, 2024
Transform your basement with our step-by-step guide on how to epoxy your basement floor. Learn tips, tools, and techniques for a durable and stunning finish.
(Many of the links in this article redirect to a specific reviewed product. Your purchase of these products through affiliate links helps to generate commission for Twigandthistle.com, at no extra cost. Learn more)
Transforming your basement floor with epoxy can seem like a big job, but with the right steps, anyone can do it. Epoxy not only makes your floor look amazing but also protects it from moisture, stains, and wear and tear. This guide will walk you through the basics of how to epoxy your basement floor yourself. You’ll learn about the tools you need, how to prepare the surface, and tips for applying the epoxy. By the end, you’ll have a basement floor that’s durable, shiny, and easy to clean. Let’s get started and make this project a success!
Getting Ready for the Project
Clear the Area: Remove all furniture, boxes, and items from the basement. Sweep and vacuum to get rid of dust and debris.
Check for Moisture: Tape a piece of plastic to the floor and leave it for 24 hours. If moisture appears under the plastic, address the issue before proceeding.
Repair Cracks: Fill any cracks or holes with concrete patching compound. Let it dry completely.
Clean the Floor: Use a degreaser to clean the floor thoroughly. Rinse with water and let it dry.
Etch the Concrete: Apply a concrete etching solution to open up the pores of the concrete. This helps the epoxy adhere better. Rinse and let it dry.
Ventilate the Area: Open windows and use fans to ensure proper ventilation. Epoxy fumes can be strong.
Gather Supplies: Have all necessary tools and materials ready, including epoxy kits, rollers, brushes, and protective gear.
Wear Safety Gear: Put on gloves, safety glasses, and a mask to protect yourself from chemicals and dust.
Mix Epoxy: Follow the manufacturer's instructions to mix the epoxy. Only mix what you can use within the working time.
Test a Small Area: Apply epoxy to a small section first to ensure it adheres well and looks good.
Plan Your Exit: Start applying epoxy from the farthest corner and work your way towards the exit to avoid stepping on the wet floor.
What You Need: Materials and Tools
- Epoxy Kit: Contains the epoxy resin and hardener. These two components mix together to form a durable coating.
- Concrete Cleaner: Used to clean the floor thoroughly before applying the epoxy. Ensures the epoxy adheres properly.
- Etching Solution: Prepares the concrete surface by making it rougher. This helps the epoxy bond better.
- Paint Roller and Extension Pole: Applies the epoxy evenly across the floor. The extension pole helps reach far areas without bending.
- Paint Brushes: Useful for applying epoxy in corners and edges where the roller can't reach.
- Painter's Tape: Protects walls and other areas from getting epoxy on them.
- Plastic Sheeting: Covers items in the basement to protect them from epoxy splatters.
- Mixing Bucket: Mixes the epoxy resin and hardener together.
- Stir Sticks: Used to mix the epoxy components thoroughly.
- Protective Gear: Includes gloves, safety glasses, and a mask. Protects you from fumes and skin contact.
- Dehumidifier: Reduces moisture in the basement. Ensures the epoxy cures properly.
- Sandpaper or Grinder: Smooths out any rough spots on the concrete before applying the epoxy.
- Vacuum Cleaner: Removes dust and debris after sanding or grinding the floor.
- Measuring Tape: Measures the area to ensure you have enough epoxy for the entire floor.
- Plastic Spikes Shoes: Allows you to walk on the wet epoxy without leaving marks.
Skill Level and Time Commitment
Skill Level: Intermediate
Time Required:
Preparation: 4-6 hours
- Cleaning the floor
- Repairing cracks
- Etching the surface
Application: 2-3 hours
- Mixing epoxy
- Rolling on the first coat
- Waiting for it to dry (usually 12-24 hours)
Second Coat: 1-2 hours
- Applying the second coat
- Drying time (another 12-24 hours)
Total Time: Approximately 2-3 days including drying time
Step-by-Step Guide
Prepare the Area
- Clear the Basement: Remove all furniture, boxes, and other items.
- Clean the Floor: Sweep and mop to remove dirt and debris.
- Repair Cracks: Use concrete filler to fix any cracks or holes. Let it dry completely.
Etch the Concrete
- Mix Etching Solution: Follow the instructions on the etching product.
- Apply the Solution: Spread it evenly across the floor using a stiff broom.
- Rinse Thoroughly: Use a hose to rinse off the etching solution. Let the floor dry.
Prime the Floor
- Choose a Primer: Select a primer compatible with your epoxy.
- Apply the Primer: Use a roller to apply a thin, even coat. Allow it to dry as per the manufacturer's instructions.
Mix the Epoxy
- Read Instructions: Follow the mixing instructions on the epoxy kit.
- Combine Components: Mix the resin and hardener thoroughly in a bucket.
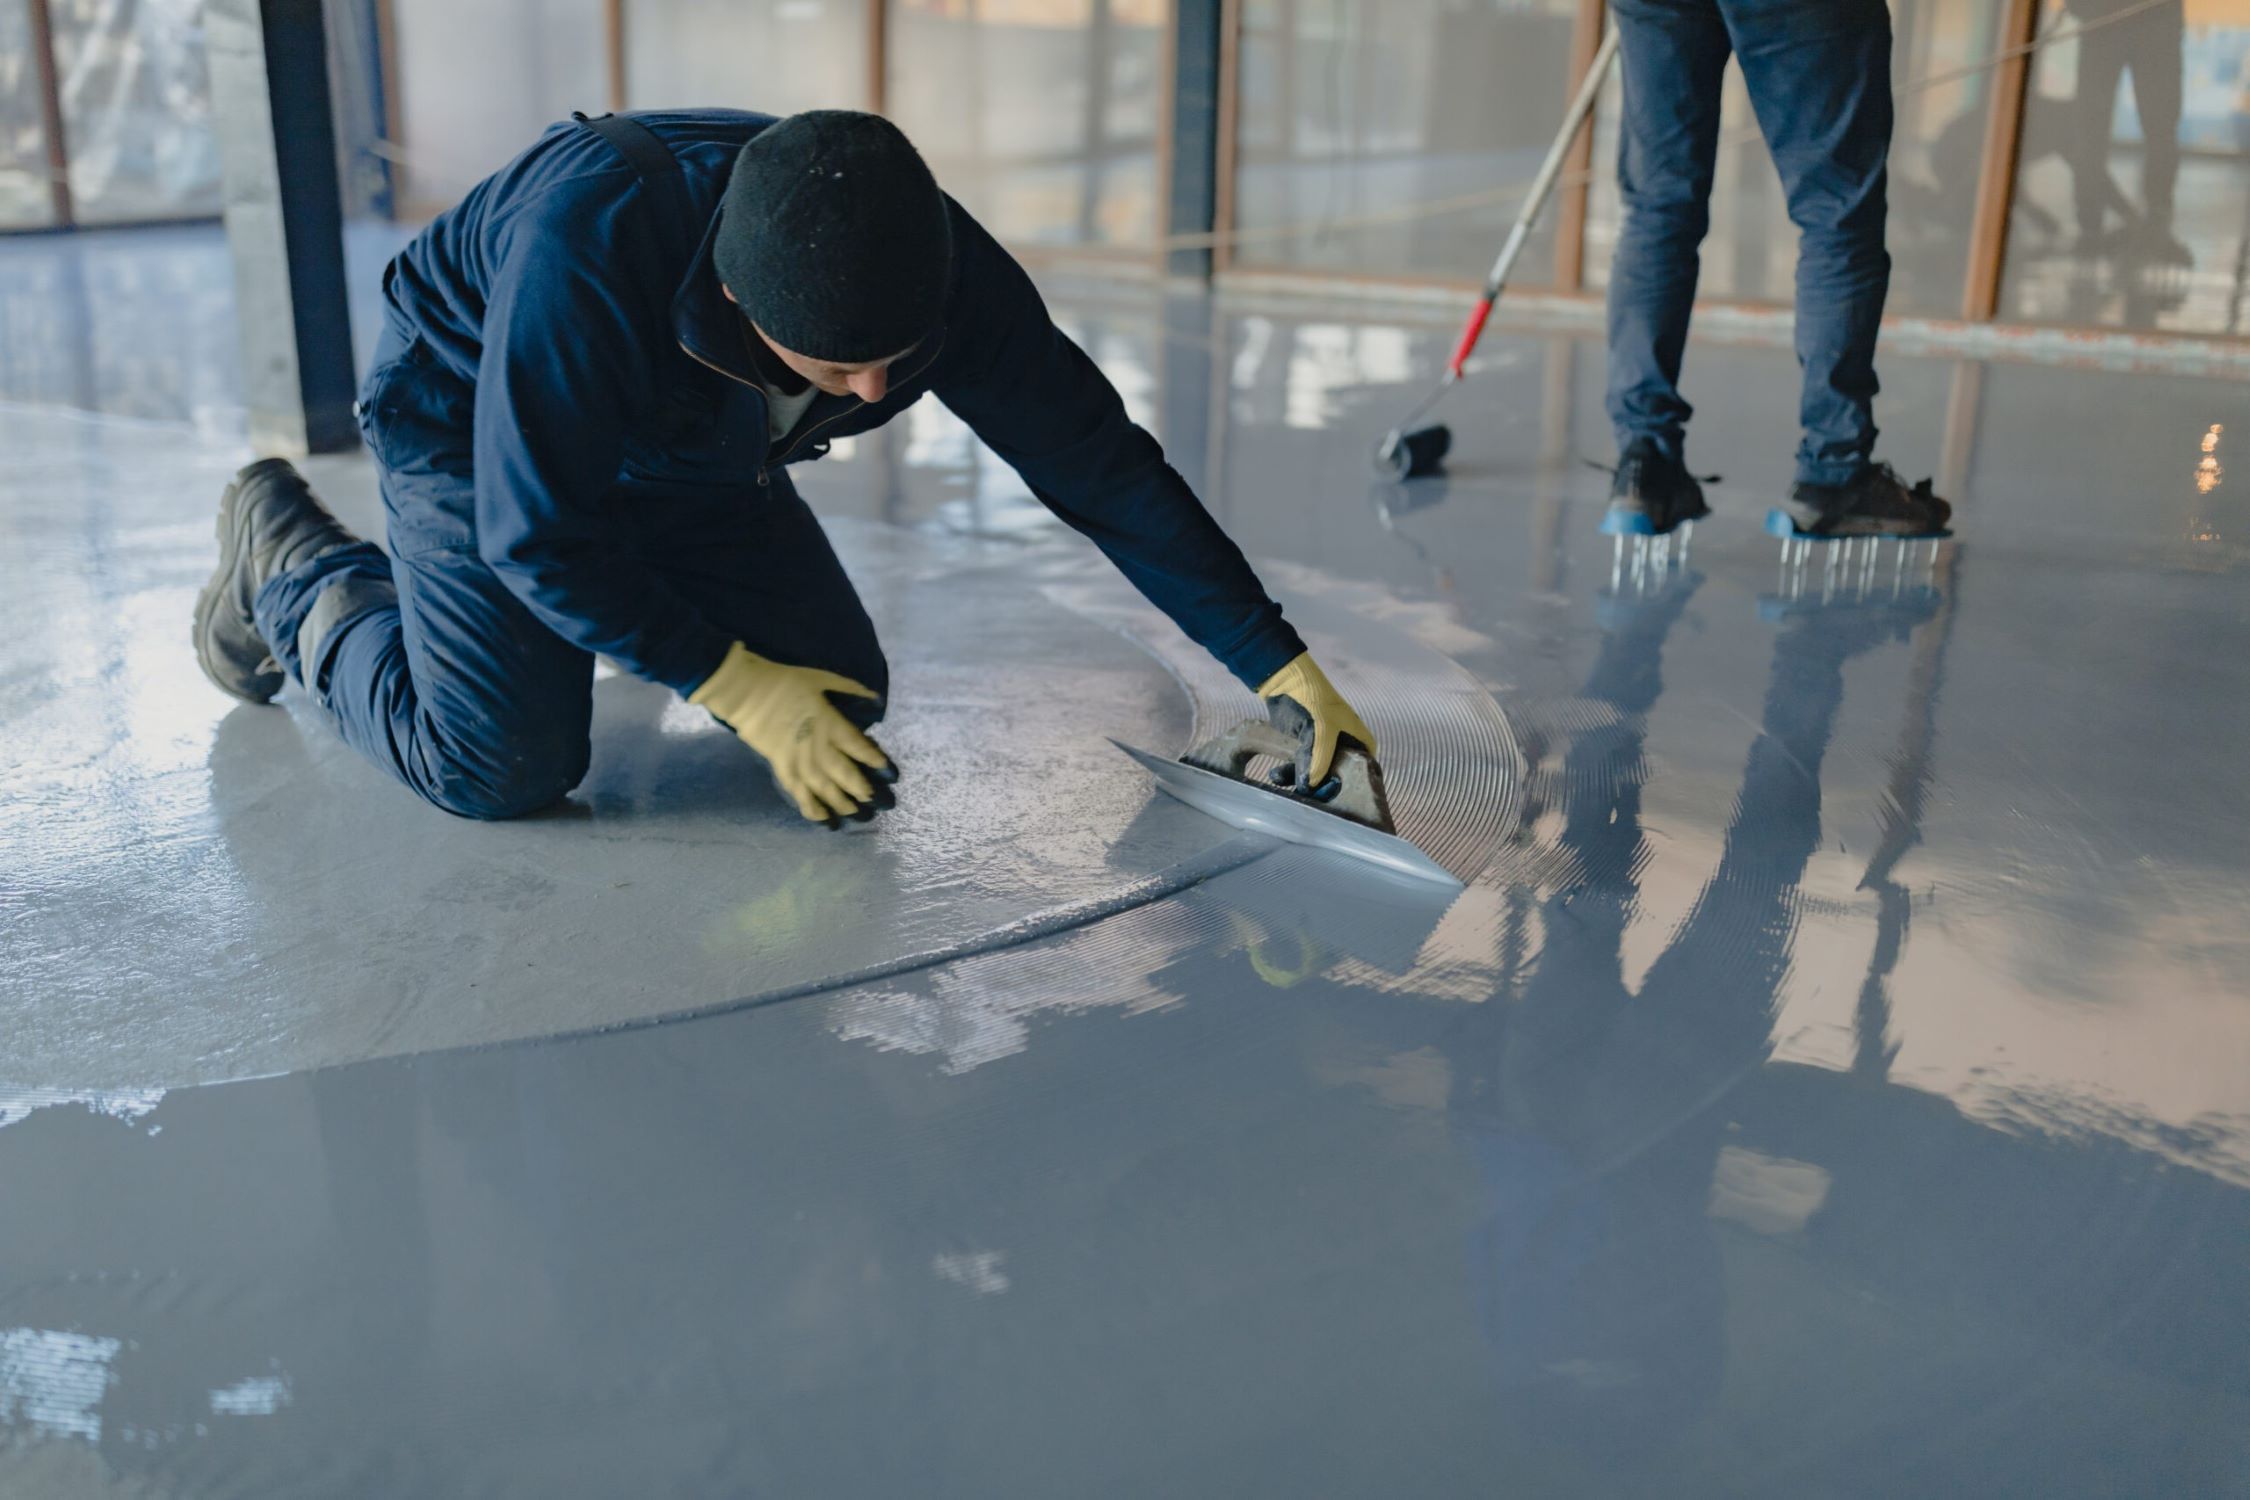
Apply the Epoxy
- Start with Edges: Use a paintbrush to apply epoxy along the edges of the floor.
- Roll the Epoxy: Use a roller to spread the epoxy across the rest of the floor. Work in small sections to ensure even coverage.
- Add Color Flakes: If desired, sprinkle color flakes onto the wet epoxy for a decorative touch.
Let it Cure
- Drying Time: Allow the epoxy to cure for the recommended time, usually 24-48 hours.
- Avoid Foot Traffic: Keep the area clear to prevent any damage during curing.
Apply a Topcoat (Optional)
- Choose a Topcoat: Select a clear topcoat for added durability.
- Apply Evenly: Use a roller to apply the topcoat over the cured epoxy.
- Let it Cure: Allow the topcoat to dry completely before using the basement.
Clean Up
- Dispose of Materials: Properly dispose of any leftover epoxy and cleaning materials.
- Store Tools: Clean and store your tools for future use.
Move Items Back
- Wait for Full Cure: Ensure the floor is fully cured before moving furniture and other items back into the basement.
Helpful Tips and Tricks
Preparation is key. Clean the floor thoroughly. Remove any dust, dirt, or grease. Use a degreaser if needed. Patch any cracks or holes with concrete filler. Sand the patches smooth once dry.
Choose the right epoxy. Water-based epoxy is easier to apply but less durable. Solvent-based epoxy is tougher but has strong fumes. 100% solid epoxy is the most durable but harder to work with.
Mixing epoxy correctly is crucial. Follow the manufacturer's instructions. Mix only what you can use within the working time. Use a drill with a mixing paddle for thorough blending.
Apply a primer coat. This helps the epoxy adhere better. Let it dry completely before moving on.
Work in sections. Start from the farthest corner and work your way out. Use a roller for large areas and a brush for edges. Apply the epoxy evenly.
Add a second coat for durability. Wait for the first coat to dry completely. Lightly sand the first coat before applying the second.
Ventilation is important. Open windows and use fans to keep air circulating. Wear a mask to avoid inhaling fumes.
Common mistakes to avoid: Skipping the primer, not mixing epoxy thoroughly, and applying too thick a coat. These can lead to peeling or uneven surfaces.
Alternatives: Consider using a concrete stain or paint if epoxy seems too challenging. They are easier to apply but less durable.
Estimating the Cost
Epoxy Kit: $100-$200. This includes the epoxy resin and hardener.
Concrete Cleaner: $10-$20. Needed to clean the floor before applying epoxy.
Etching Solution: $20-$30. Helps the epoxy bond to the concrete.
Paint Roller and Brushes: $15-$25. Used to apply the epoxy.
Painter's Tape: $5-$10. Keeps edges clean.
Protective Gear: $20-$30. Includes gloves, goggles, and a mask.
Mixing Bucket: $5-$10. Used to mix the epoxy.
Total Cost: $175-$325.
Budget-Friendly Alternatives:
- Use a vinegar and water solution instead of a commercial cleaner: $2.
- Borrow or rent tools like rollers and brushes from friends or neighbors: Free or minimal cost.
- Use old clothes as protective gear: Free.
Different Ways to Customize
Colors: Choose from a wide range of colors. Go for metallic shades for a modern look or earth tones for a natural feel. You can even mix colors to create a marbled effect.
Textures: Add anti-slip additives to the epoxy for safety. Use decorative flakes or quartz sand to give the floor a textured appearance.
Patterns: Create geometric designs using painter’s tape before applying the epoxy. Try a checkerboard pattern or stripes for a unique look.
Finishes: Opt for a high-gloss finish for a shiny, reflective surface. Choose a matte finish if you prefer a more subdued look.
Alternative Materials: Instead of traditional epoxy, consider using polyurethane for a more flexible finish. Polyaspartic coatings offer faster curing times and higher durability.
Stencils and Decals: Use stencils to add custom designs or logos. Apply decals for a personalized touch.
Borders: Create a border around the edges of the room using a contrasting color or material. This adds a framed look to the floor.
Glow-in-the-Dark: Add glow-in-the-dark pigments to the epoxy for a fun, luminous effect at night.
Embedded Objects: Embed small objects like coins, pebbles, or shells into the epoxy for a unique, textured surface.
Epoxy Art: Get creative with epoxy art by swirling different colors together to create a one-of-a-kind masterpiece on your floor.
Eco-Friendly Tips
Eco-friendly materials can make a big difference. Choose low-VOC epoxy to reduce harmful fumes. Look for brands that use recycled content in their products.
Prep the floor by cleaning with natural cleaners like vinegar and water instead of harsh chemicals. If your basement has old flooring, consider reusing or recycling it. For example, old tiles can be donated or repurposed for other projects.
When mixing the epoxy, use reusable containers instead of single-use plastic ones. Apply the epoxy with reusable tools like metal trowels and rollers. After finishing, clean these tools for future use instead of throwing them away.
For added sustainability, consider adding recycled glass or natural stone chips to the epoxy for a decorative touch. This not only looks great but also reduces waste.
Finally, ensure proper ventilation during the process to minimize indoor air pollution. Open windows and use fans to keep air circulating.
Your Basement Floor is Ready
You've done it! Your basement floor now shines with a smooth, durable epoxy coating. All that hard work, from cleaning to mixing to applying, has paid off. This new surface is not only aesthetically pleasing but also resistant to stains and easy to clean. Remember to let the epoxy cure properly before moving any heavy items back in. This ensures the longevity of your new floor. If you ever need to touch up or reapply, you now have the know-how to tackle it confidently. Enjoy your revamped space, whether it's for storage, a workshop, or a new hangout spot. Your DIY skills have truly transformed your basement into a more functional and attractive area. Happy DIY-ing!
What tools and materials do I need to epoxy my basement floor?
You'll need epoxy resin, hardener, a paint roller, paintbrush, mixing bucket, protective gloves, safety goggles, and a mask. Also, grab a concrete cleaner, patching compound, and sandpaper.
How do I prepare my basement floor for epoxy?
First, clean the floor thoroughly using a concrete cleaner. Patch any cracks or holes with a patching compound. Sand the surface to ensure the epoxy adheres well. Finally, vacuum up all dust and debris.
How long does it take for epoxy to dry?
Epoxy usually takes about 24 hours to dry to the touch. However, it can take up to 7 days to fully cure. Avoid heavy traffic until it's completely cured.
Can I apply epoxy over an existing floor coating?
Yes, but you must sand the existing coating to create a rough surface for the epoxy to adhere to. Make sure the old coating is in good condition and not peeling.
How do I mix the epoxy resin and hardener?
Follow the manufacturer's instructions for the correct ratio. Usually, it's a 1:1 or 2:1 ratio. Mix thoroughly in a bucket until the color is uniform.
What should I do if I make a mistake while applying epoxy?
If you notice a mistake while the epoxy is still wet, you can smooth it out with a roller or brush. For dried mistakes, you may need to sand the area and apply another coat.
How do I maintain my epoxy-coated basement floor?
Regularly sweep and mop the floor to keep it clean. Avoid using harsh chemicals. For stubborn stains, a mixture of water and mild detergent works well.