
Home>Home & Furniture>Garage & Basement>DIY Slatwall Garage Organization Guide
Garage & Basement
DIY Slatwall Garage Organization Guide
Published: September 30, 2024
Transform your garage with our DIY Slatwall Organization Guide. Learn step-by-step installation, tips, and tricks to maximize space and keep your garage clutter-free!
(Many of the links in this article redirect to a specific reviewed product. Your purchase of these products through affiliate links helps to generate commission for Twigandthistle.com, at no extra cost. Learn more)
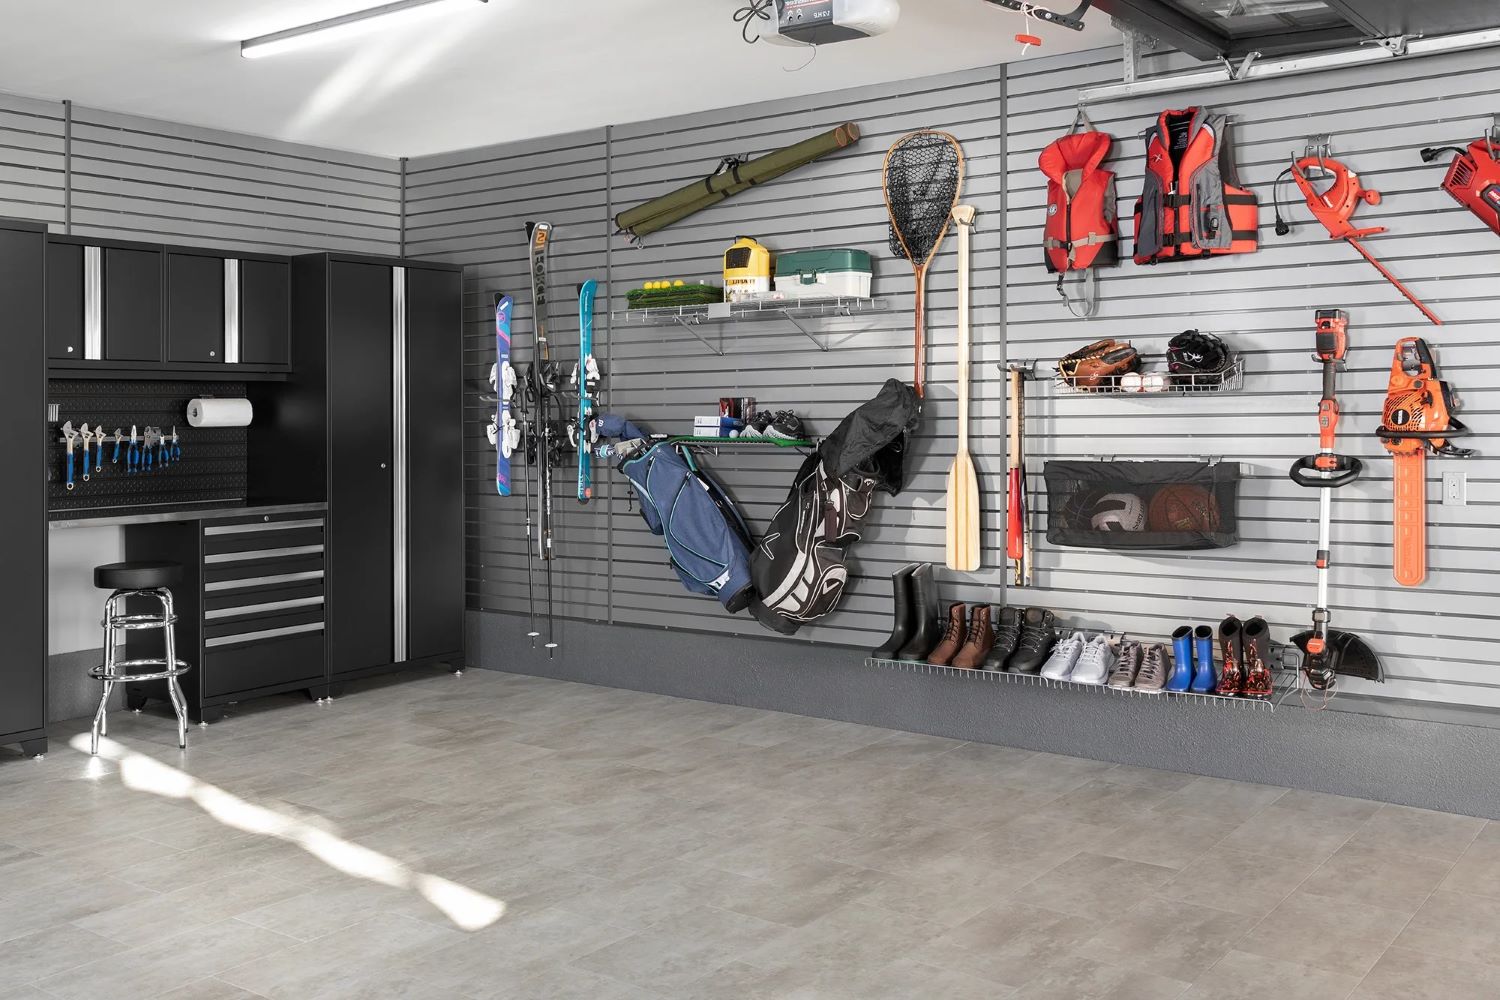
Organizing a garage can feel overwhelming, but a slatwall system makes it easy and tidy. Slatwalls are panels with grooves that hold hooks, shelves, and bins. These panels help maximize space and keep everything off the floor. Perfect for tools, bikes, and gardening gear, slatwalls offer a flexible solution. Plus, they’re simple to install and customize. Whether you're a DIY enthusiast or just need order, this guide breaks down everything, making the process straightforward and enjoyable. Ready to transform that chaotic garage into a well-organized haven? Let’s dive in!
Getting Ready for Your Project
Measure Your Space: Use a tape measure to find the height and width of the wall where the slatwall will go. Write down these numbers.
Gather Tools and Materials: Collect a drill, level, screws, anchors, stud finder, pencil, and safety gear like gloves and goggles. Get the slatwall panels and any accessories you plan to use.
Locate Wall Studs: Use a stud finder to find the studs in your wall. Mark their locations with a pencil. This ensures the slatwall is securely attached.
Clear the Area: Move any items or clutter away from the wall. Make sure you have enough space to work comfortably.
Wear Safety Gear: Put on gloves and goggles to protect your hands and eyes while working.
Prepare the Wall: Check the wall for any damage or uneven spots. Fix any issues to create a smooth surface for the slatwall.
Plan Layout: Lay out the slatwall panels on the floor to see how they will fit on the wall. This helps you visualize the final look and make adjustments if needed.
Mark Drill Points: Hold the first panel against the wall. Use a pencil to mark where you will drill holes for screws. Make sure these points align with the studs.
Drill Pilot Holes: Drill small holes at the marked points. This makes it easier to insert screws and prevents the wall from cracking.
Install Panels: Start at the bottom and work your way up. Attach the first panel to the wall using screws and a drill. Use a level to ensure it is straight. Continue with the next panels, making sure each one aligns properly.
Check Stability: Once all panels are installed, gently tug on them to ensure they are securely attached. Make any necessary adjustments.
Organize Accessories: Attach hooks, shelves, and other accessories to the slatwall. Arrange your tools and items in a way that makes them easy to access.
Materials and Tools Needed
- Slatwall Panels: These are the main components. They provide the structure for hanging items.
- Slatwall Hooks: Used to hang tools, bikes, and other items. They come in various shapes and sizes.
- Slatwall Bins: Perfect for storing smaller items like screws, nails, or gardening supplies.
- Slatwall Shelves: Great for holding larger items or bins. They can be adjusted to different heights.
- Drill: Needed to attach the slatwall panels to the wall. A cordless drill is often more convenient.
- Screws: Used to secure the slatwall panels. Make sure they are the right length to go through the panel and into the wall.
- Level: Ensures the panels are straight. A laser level can make this job easier.
- Measuring Tape: Helps measure the wall and panels accurately. Ensures a perfect fit.
- Stud Finder: Locates the studs in the wall. Important for securely attaching the panels.
- Pencil: For marking measurements and stud locations. Easy to erase if needed.
- Safety Gear: Includes gloves, safety glasses, and ear protection. Keeps you safe while working.
Skill Level and Time Required
Skill Level: Intermediate
Time Required: Approximately 4-6 hours
- Planning and Measuring: 1 hour
- Gathering Materials and Tools: 30 minutes
- Cutting and Preparing Slatwall Panels: 1 hour
- Mounting Panels on the Wall: 2-3 hours
- Organizing and Hanging Items: 1 hour
Step-by-Step Instructions
Gather Materials
- Slatwall panels
- Screws
- Drill
- Level
- Stud finder
- Measuring tape
- Pencil
Prepare the Wall
- Clear the area where panels will be installed.
- Use a stud finder to locate wall studs. Mark their positions with a pencil.
Measure and Mark
- Measure the height and width of the area for the slatwall.
- Mark the dimensions on the wall using a pencil and level.
Cut Panels (if needed)
- If panels are too large, cut them to fit the measured area using a saw.
Install the First Panel
- Position the first panel at the bottom of the marked area.
- Ensure it is level.
- Drill screws through the panel into the wall studs.
Install Additional Panels
- Place the next panel above the first, aligning the grooves.
- Ensure it is level.
- Drill screws through this panel into the studs.
- Repeat until the entire area is covered.
Add Accessories
- Attach hooks, shelves, or baskets to the slatwall.
- Arrange tools and items for easy access.
Final Check
- Ensure all panels are securely attached.
- Make sure accessories are properly installed and can hold the intended weight.
Helpful Tips and Tricks
Measure Twice, Cut Once: Always double-check measurements before cutting slatwall panels. Mistakes can be costly.
Use a Level: Ensure panels are straight. A crooked slatwall looks bad and may not hold items securely.
Pre-Drill Holes: This prevents wood from splitting and makes screwing easier.
Anchor Securely: Use wall anchors or find studs. Slatwalls need strong support for heavy items.
Plan Layout: Arrange tools and items on paper first. This helps visualize the best placement.
Mix Hooks and Shelves: Use a combination of hooks, baskets, and shelves for versatile storage.
Label Sections: Labeling helps keep things organized and easy to find.
Common Mistakes to Avoid:
Skipping Studs: Not securing panels to studs can cause them to fall.
Overloading: Don’t hang too much weight on one hook or section.
Ignoring Wall Condition: Check for moisture or damage before installation. Slatwalls need a solid, dry surface.
Alternatives for Materials or Methods:
Pegboard: Cheaper and easier to install but less sturdy.
Gridwall: Metal grids offer a modern look and strong support.
Magnetic Strips: Great for small tools, easy to install, but limited in capacity.
Estimating the Cost
Slatwall Panels: $100-$200 for a 4x8 foot panel. You might need 2-4 panels depending on your garage size.
Mounting Hardware: $20-$40 for screws, anchors, and brackets.
Hooks and Accessories: $50-$100 for a variety pack including hooks, shelves, and baskets.
Stud Finder: $10-$20 to locate wall studs.
Level: $10-$15 to ensure panels are straight.
Drill: $50-$100 if you don't already own one.
Screws: $5-$10 for a box of wood screws.
Tape Measure: $5-$10 for accurate measurements.
Total Cost: $250-$495
Budget-Friendly Alternatives:
Used Slatwall Panels: Check local classifieds or online marketplaces for cheaper options.
Basic Hooks: $20-$40 for a smaller set of hooks.
Borrow Tools: Ask friends or family to borrow a drill, level, or stud finder.
DIY Shelves: Use scrap wood to make your own shelves instead of buying new ones.
Personalize Your Slatwall
Materials: Instead of traditional MDF or plywood, consider using metal slatwall panels for a more industrial look. PVC slatwall is another option, offering durability and resistance to moisture.
Colors: Paint the slatwall panels in bold colors like red, blue, or green to match your garage theme. For a more subtle look, use neutral tones like gray, beige, or white.
Styles: Opt for a horizontal layout for a classic look, or go with a vertical arrangement for a modern twist. Mix and match different slat sizes to create a unique pattern.
Hooks and Accessories: Use custom hooks and shelves to fit specific tools or equipment. Magnetic strips can hold metal tools, while baskets can store smaller items.
Lighting: Add LED strip lights above or below the slatwall panels to illuminate your workspace. Choose color-changing LEDs for a fun touch.
Decorative Elements: Incorporate decorative hooks or shelves to display items like sports memorabilia or vintage tools. Add a chalkboard or whiteboard section for notes and reminders.
Storage Solutions: Install cabinets or drawers beneath the slatwall for additional storage. Use clear bins to keep items visible and organized.
Mobility: Consider modular slatwall panels that can be easily moved or reconfigured. This allows for flexibility as your storage needs change.
Eco-Friendly Options: Use reclaimed wood for a rustic look and an environmentally friendly choice. Bamboo slatwall panels are another sustainable option.
Eco-Friendly Tips
Reclaimed Wood: Use old pallets or leftover wood from other projects. Sand and treat them to make sturdy slats.
Recycled Metal: Look for scrap metal pieces to create hooks and brackets. Metal from old shelves or furniture works well.
Eco-Friendly Paint: Choose low-VOC or zero-VOC paints to reduce harmful emissions. These are better for indoor air quality.
Natural Finishes: Use beeswax or linseed oil instead of chemical sealants. They protect wood without toxic fumes.
Reused Fasteners: Collect screws, nails, and bolts from old projects. This reduces waste and saves money.
Upcycled Containers: Repurpose jars, cans, or plastic bottles for storage. Attach them to the slatwall for organizing small items.
Sustainable Plywood: Opt for FSC-certified plywood. It ensures the wood comes from responsibly managed forests.
Bamboo Panels: Bamboo grows quickly and is a renewable resource. Use it for a stylish and eco-friendly slatwall.
Natural Fiber Ropes: Use hemp or jute ropes for hanging tools. They are biodegradable and strong.
Solar Lighting: Install solar-powered lights in your garage. They save energy and reduce electricity bills.
Your Garage, Your Way
Transforming your garage with a slatwall system isn't just about organization; it's about creating a space that works for you. With a bit of effort, you can turn chaos into order, making everything from tools to sports gear easily accessible. Remember, the key is to plan your layout, choose the right accessories, and install everything securely. Once you see the difference, you'll wonder how you ever managed without it. Plus, a well-organized garage can even add value to your home. So grab those tools, get creative, and start building the garage of your dreams. Happy DIYing!
What materials do I need to install a slatwall in my garage?
You'll need slatwall panels, a drill, screws, a level, measuring tape, and stud finder. Optional items include hooks, shelves, and baskets for organizing.
How do I find the studs in my garage wall?
Use a stud finder to locate the studs. Move the stud finder horizontally across the wall until it beeps or lights up, indicating a stud's location. Mark these spots with a pencil.
Can I install slatwall over drywall?
Yes, you can install slatwall over drywall. Just make sure to screw the panels into the studs for a secure hold. If the drywall is thin, consider using wall anchors for extra support.
How much weight can slatwall hold?
The weight capacity depends on the quality of the slatwall and how well it's installed. Generally, a well-installed slatwall can hold up to 50 pounds per square foot. Always check the manufacturer's guidelines.
Do I need any special tools to cut slatwall panels?
A circular saw or table saw works best for cutting slatwall panels. Make sure to use a fine-tooth blade to get a clean cut. Always wear safety goggles and gloves when cutting.
How do I maintain and clean my slatwall?
Slatwall is pretty low-maintenance. Just wipe it down with a damp cloth and mild detergent. Avoid using abrasive cleaners that could scratch the surface.
Can I paint my slatwall to match my garage?
Yes, you can paint slatwall. Use a high-quality primer first, then apply latex paint. Make sure the paint is fully dry before adding any hooks or accessories.