
Home>Home & Furniture>Doors & Windows>How To Build A Crawl Space Door
Doors & Windows
How To Build A Crawl Space Door
Published: March 7, 2024
Editor-in-Chief with a decade in home renovation and a passion for vintage furniture. Diane is known for her weekend treasure hunts at flea markets, enriching our content with unique style insights.
Learn how to build a crawl space door for easy access and improved ventilation. Find step-by-step instructions and tips for doors and windows projects.
(Many of the links in this article redirect to a specific reviewed product. Your purchase of these products through affiliate links helps to generate commission for Twigandthistle.com, at no extra cost. Learn more)
Introduction
So, you've got a crawl space that needs a door, huh? Well, you've come to the right place! Building a crawl space door is a great way to improve the accessibility and security of your home. Whether you're a seasoned DIY enthusiast or just starting out, this project is totally doable with the right guidance. In this article, we'll walk you through the step-by-step process of building a crawl space door that's sturdy, functional, and blends seamlessly with your home's exterior. Let's roll up our sleeves and get to work!
Materials Needed
To get started on building your crawl space door, you'll need the following materials:
- Measuring tape: This will help you accurately measure the dimensions of your crawl space opening.
- Plywood: Opt for a sturdy, weather-resistant plywood that can withstand the elements.
- Hinges and screws: Choose heavy-duty hinges and screws to ensure the door is securely attached.
- Latch or lock: Depending on your preference, select a latch or lock to keep the door closed and secure.
- Circular saw: A reliable circular saw will be essential for cutting the plywood to the correct size.
- Drill and drill bits: You'll need these to attach the hinges, latch, and screws.
- Paint or stain: If you want to add a finishing touch to your crawl space door, grab some paint or stain to match your home's exterior.
- Weatherstripping: This will help seal any gaps around the door to keep out moisture and pests.
- Safety goggles and gloves: Always prioritize safety when working with tools and materials.
With these materials in hand, you'll be well-equipped to tackle the project and create a functional and visually appealing crawl space door.
Measuring and Cutting the Door Frame
The first step in building a crawl space door is to accurately measure the dimensions of the door frame. Use a measuring tape to determine the width and height of the opening. It's crucial to measure twice to ensure precision. Once you have the measurements, transfer them to the plywood, marking the cut lines with a pencil.
Next, using a circular saw, carefully cut the plywood according to the measurements. Double-check the dimensions before cutting to avoid any errors. It's essential to use a straight edge or a guide to ensure clean and straight cuts. Safety should always be a priority, so remember to wear safety goggles and gloves while operating the saw.
After cutting the plywood, test the fit of the door in the frame. It should fit snugly without being too tight. If adjustments are needed, carefully trim the edges until the door fits perfectly within the frame. This step is crucial for ensuring that the door functions properly once it's installed.
With the door properly cut to size, you're one step closer to completing your crawl space door. The precise measurements and clean cuts will set the foundation for a well-constructed and functional door that enhances the accessibility and security of your crawl space.
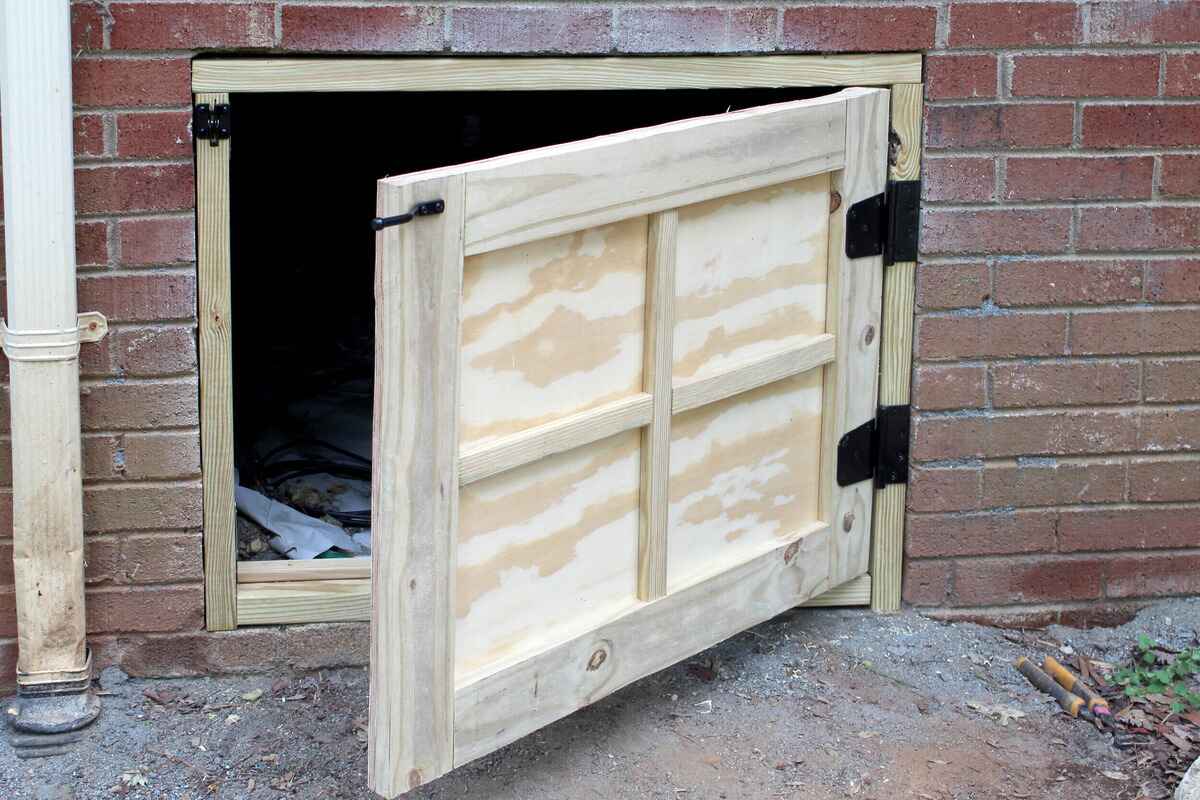
Attaching Hinges and Latch
Once the plywood door is cut to the correct size, it's time to attach the hinges and latch. Position the door in the frame and mark the placement of the hinges on the door and the frame. Ensure that the hinges are evenly spaced and aligned for smooth operation. Using a drill, attach the hinges to the door first, then to the frame, using sturdy screws that securely anchor the hinges in place.
Next, install the latch or lock according to the manufacturer's instructions. The latch should be positioned to align with the door frame, allowing the door to close securely. Whether you choose a latch or lock, make sure it provides the level of security you desire for your crawl space.
Test the functionality of the hinges and latch to ensure that the door opens and closes smoothly and securely. If adjustments are needed, such as tightening the screws or repositioning the latch, make them before proceeding to the next step.
Attaching the hinges and latch is a critical stage in the construction of your crawl space door. Proper installation of these components is essential for the door to operate effectively and provide the security and accessibility you need for your crawl space.
Installing the Door
With the hinges and latch securely in place, it's time to install the door in the crawl space opening. Enlist the help of a friend or family member to assist with this step, as the door may be heavy and require extra hands for proper positioning.
Carefully lift the door and place it within the frame, ensuring that it aligns perfectly and swings open and closed without obstruction. Use shims to make any necessary adjustments to ensure the door is level and plumb within the frame.
Once the door is positioned correctly, secure it in place by driving screws through the hinges and into the frame. Be sure to use screws that are long enough to anchor the hinges firmly, providing stability and durability to the door.
After the door is securely attached, test its functionality by opening and closing it several times. Ensure that it swings smoothly and latches securely, providing the accessibility and security needed for your crawl space.
Installing the door is a pivotal moment in the construction process, as it brings the project one step closer to completion. With the door in place, you'll soon be able to enjoy improved access to your crawl space, along with the peace of mind that comes with a securely enclosed area.
Finishing Touches
After the crawl space door is installed, it's time to add the finishing touches to enhance its functionality and visual appeal. One essential step is to apply weatherstripping around the edges of the door to create a tight seal. This will help prevent moisture, drafts, and pests from entering the crawl space, ensuring a more controlled environment.
Once the weatherstripping is in place, consider adding a coat of paint or stain to the door to match it with the exterior of your home. Choose a weather-resistant paint or stain that can withstand the elements and provide long-lasting protection for the door. This not only adds a polished look to the door but also helps protect the plywood from moisture and UV exposure.
Additionally, you may want to install a door handle or knob for easy opening and closing of the door. Select a handle that complements the overall design of your home and provides a comfortable grip for effortless operation.
Finally, take a moment to inspect the door for any remaining adjustments or touch-ups. Ensure that the hinges, latch, and any additional hardware are securely in place and functioning as intended. Make any necessary tweaks to guarantee that the door operates smoothly and provides the security and accessibility you need for your crawl space.
By adding these finishing touches, you'll not only elevate the functionality of the crawl space door but also contribute to the overall aesthetic of your home's exterior. With the door now complete, you can take pride in knowing that you've successfully built a sturdy and visually appealing access point to your crawl space.