
Home>Create & Decorate>DIY & Crafts>DIY Climbing Wall: How To Create Your Own Adventure At Home
DIY & Crafts
DIY Climbing Wall: How To Create Your Own Adventure At Home
Published: February 22, 2024

Content Creator specializing in woodworking and interior transformations. Caegan's guides motivate readers to undertake their own projects, while his custom furniture adds a personal touch.
Create your own DIY climbing wall at home with our step-by-step guide. Unleash your creativity and adventure with this fun DIY & Crafts project.
(Many of the links in this article redirect to a specific reviewed product. Your purchase of these products through affiliate links helps to generate commission for Twigandthistle.com, at no extra cost. Learn more)
Introduction
Are you ready to embark on an exhilarating journey of creating your very own DIY climbing wall? Whether you're an avid climber seeking to hone your skills or a parent looking to add an adventurous element to your home, building a climbing wall can be a rewarding and thrilling endeavor. Not only does it provide a fantastic physical workout, but it also fosters creativity and problem-solving skills.
In this comprehensive guide, we will walk you through the step-by-step process of designing, constructing, and enjoying your very own climbing wall. From selecting the perfect location to ensuring safety measures, we've got you covered. So, roll up your sleeves, gather your tools, and get ready to unleash your inner adventurer as we delve into the exciting world of DIY climbing walls.
Choosing the Right Location
Selecting the ideal location for your DIY climbing wall is crucial to ensure both safety and enjoyment. Here are some key factors to consider when choosing the right spot:
-
Space: Assess the available space in your home or backyard. A climbing wall typically requires a sturdy and spacious area, free from obstructions, to accommodate the structure and allow for safe movement while climbing.
-
Ceiling Height: If you're planning an indoor climbing wall, consider the ceiling height. The wall should be tall enough to provide a challenging climbing experience while allowing for safe landings. A minimum ceiling height of 8-10 feet is recommended for a satisfying climbing adventure.
-
Structural Integrity: Whether you're installing the climbing wall indoors or outdoors, ensure that the chosen surface is structurally sound and capable of supporting the weight and pressure exerted during climbing activities. If mounting the wall indoors, verify that the wall can be securely anchored to wall studs or support beams.
-
Accessibility: Opt for a location that allows easy access and sufficient clearance around the climbing wall. This facilitates movement and ensures that climbers can navigate around the wall without any hindrances.
-
Lighting and Ventilation: Adequate lighting and ventilation are essential for creating a comfortable and inviting climbing environment. If setting up an indoor climbing wall, ensure that the area receives ample natural light and has proper ventilation to maintain a pleasant atmosphere.
-
Weather Considerations: For outdoor climbing walls, consider the impact of weather conditions. Choose a location that provides adequate shelter from the elements, such as excessive sun exposure or precipitation, to prolong the lifespan of the climbing wall and ensure safe climbing experiences in various weather conditions.
By carefully evaluating these factors, you can pinpoint the perfect location for your DIY climbing wall, setting the stage for an exciting and fulfilling climbing experience right in the comfort of your own home.
Gathering Materials and Tools
To bring your DIY climbing wall to life, you'll need a carefully curated selection of materials and tools. Here's a comprehensive list to guide you through the gathering process:
Materials
-
Plywood Sheets: Select sturdy plywood sheets to serve as the primary surface for your climbing wall. Opt for high-quality plywood with a thickness of at least 3/4 inch to ensure durability and stability.
-
T-Nuts and Bolts: These essential components are used to secure climbing holds to the plywood surface. Ensure that the T-nuts are compatible with the climbing holds you plan to use, and choose high-strength bolts to fasten them securely.
-
Climbing Holds: Explore a variety of climbing holds to add diversity and challenge to your climbing wall. Look for holds with different shapes, textures, and grip styles to create an engaging and dynamic climbing experience.
-
Wooden Studs or Framework Material: Depending on the design of your climbing wall, you may need wooden studs or framework material to construct the support structure. Opt for sturdy, pressure-treated lumber that can withstand the demands of climbing activities.
-
Screws and Fasteners: Stock up on an assortment of screws and fasteners to assemble the framework, attach plywood sheets, and secure T-nuts. Choose screws designed for outdoor use if you're building an outdoor climbing wall to ensure resistance to weather elements.
-
Primer and Paint: If you wish to add a pop of color to your climbing wall, invest in primer and paint suitable for outdoor or indoor use, depending on the wall's location. Select vibrant colors to enhance the visual appeal and create an inviting climbing environment.
-
Safety Padding: Prioritize safety by acquiring suitable padding to cushion potential falls. Crash pads or thick foam mats can provide crucial protection and peace of mind during climbing sessions.
Tools
-
Power Drill and Drill Bits: A reliable power drill equipped with drill bits compatible with T-nuts is essential for creating holes in the plywood to accommodate the T-nuts.
-
Screwdriver Set: Ensure you have a versatile screwdriver set, including Phillips and flathead screwdrivers, to handle various fastening tasks during the construction process.
-
Saw: Depending on the size and shape of your climbing wall, a saw may be necessary for cutting plywood sheets and framework material to the desired dimensions.
-
Measuring Tape and Level: Precision is key when building a climbing wall, so equip yourself with a measuring tape and level to ensure accurate dimensions and proper alignment.
-
Painting Supplies: If you plan to paint the climbing wall, gather painting supplies such as brushes, rollers, and trays to achieve a professional finish.
By assembling these materials and tools, you'll be well-prepared to embark on the exciting journey of constructing your DIY climbing wall. With careful planning and attention to detail, you can create a captivating and safe climbing environment that promises endless thrills and adventure.
Designing Your Climbing Wall
Designing your climbing wall is a pivotal phase that sets the stage for an exhilarating and visually captivating climbing experience. Whether you're aiming for a challenging terrain reminiscent of outdoor rock formations or a whimsical and colorful climbing wall for young adventurers, the design process allows you to unleash your creativity and tailor the climbing wall to suit your preferences and skill levels.
Considerations for Design
When delving into the design phase, consider the following aspects to ensure a well-rounded and engaging climbing wall:
-
Climbing Wall Layout: Determine the layout of your climbing wall, taking into account the available space and the desired level of complexity. You can opt for a straightforward vertical wall, an overhang for added challenge, or even incorporate features such as protrusions and slabs to diversify the climbing experience.
-
Climbing Hold Placement: Strategically plan the placement of climbing holds to create varied routes and challenges. Consider the distribution of holds across the wall, ensuring a balance of handholds and footholds to accommodate climbers of different skill levels.
-
Theme and Aesthetics: Infuse your climbing wall with a theme or aesthetic that resonates with your personal style or complements the surrounding environment. Whether it's a rugged and natural rock-like appearance or a vibrant and playful design, the aesthetic appeal adds an extra layer of excitement to the climbing wall.
-
Safety Considerations: Prioritize safety in your design by incorporating ample landing space and ensuring that the climbing wall is free from sharp edges or protruding hardware. Additionally, consider the installation of safety padding or crash mats to cushion falls and minimize the risk of injuries.
Customization and Personalization
One of the most rewarding aspects of designing your climbing wall is the opportunity for customization and personalization. Embrace this creative freedom by experimenting with the following customization options:
-
Color Palette: Select a color palette that complements the overall theme of the climbing wall. Vibrant and contrasting colors can not only enhance the visual appeal but also serve as visual markers for different climbing routes.
-
Texture and Grip Variation: Explore climbing holds with diverse textures and grip styles to introduce a range of challenges. Incorporating holds with varying textures, such as crimps, slopers, and jugs, adds depth and complexity to the climbing routes.
-
Feature Additions: Consider incorporating additional features such as crack systems, pockets, or even a campus board to cater to specific climbing techniques and preferences. These features can elevate the climbing experience and provide opportunities for skill development.
Iterative Design Process
Approach the design process as an iterative journey, allowing for flexibility and refinement as you experiment with different layouts, hold placements, and aesthetic elements. Consider creating mock-ups or sketches to visualize the design and make adjustments before finalizing the plan.
By embracing creativity and thoughtful planning during the design phase, you can craft a bespoke climbing wall that not only meets your climbing aspirations but also serves as a captivating centerpiece in your home or outdoor space. The design phase sets the tone for an immersive and rewarding climbing experience, where every ascent becomes a unique and exhilarating adventure.
Building the Frame
The construction of a sturdy and reliable frame forms the backbone of your DIY climbing wall, providing essential support for the climbing surface and ensuring the overall structural integrity. Here's a detailed walkthrough of the crucial steps involved in building the frame for your climbing wall.
Step 1: Selecting the Framework Material
Begin by selecting high-quality framework material, such as pressure-treated wooden studs or structural lumber, capable of withstanding the demands of climbing activities. Opt for material with sufficient strength and durability to support the weight of the climbing wall and the climbers.
Step 2: Determining the Wall Dimensions
Carefully measure and mark the dimensions for the climbing wall on the chosen surface, ensuring precise alignment and adequate space for the frame. Consider the desired height and width of the climbing wall, taking into account the available space and the intended level of challenge.
Step 3: Cutting and Assembling the Framework
Using a saw, cut the framework material to the specified dimensions, including vertical supports and horizontal bracing. Assemble the framework components according to the planned layout, ensuring secure joints and proper alignment. Utilize screws and fasteners to reinforce the connections and enhance the stability of the frame.
Step 4: Attaching the Frame to the Surface
Position the assembled frame against the designated surface, whether it's an indoor wall or an outdoor structure. Secure the frame in place by anchoring it to wall studs, support beams, or other suitable mounting points using heavy-duty screws and appropriate mounting hardware. Verify that the frame is securely attached and level to provide a stable foundation for the climbing wall.
Step 5: Reinforcing the Frame
Prioritize the reinforcement of the frame to enhance its load-bearing capacity and resilience. Add diagonal bracing or cross supports as needed to fortify the frame and minimize any potential sway or movement during climbing activities. This reinforcement contributes to the overall safety and stability of the climbing wall.
Step 6: Inspecting and Testing
Thoroughly inspect the assembled frame to ensure that all connections are secure and the structure is robust. Conduct a series of gentle stress tests to evaluate the frame's stability and rigidity, making any necessary adjustments to address any potential weaknesses or instability.
By meticulously following these steps, you can construct a robust and dependable frame that forms the cornerstone of your DIY climbing wall. The well-built frame sets the stage for the subsequent phases of attaching climbing holds and ensuring safety measures, ultimately culminating in the realization of an engaging and secure climbing environment.
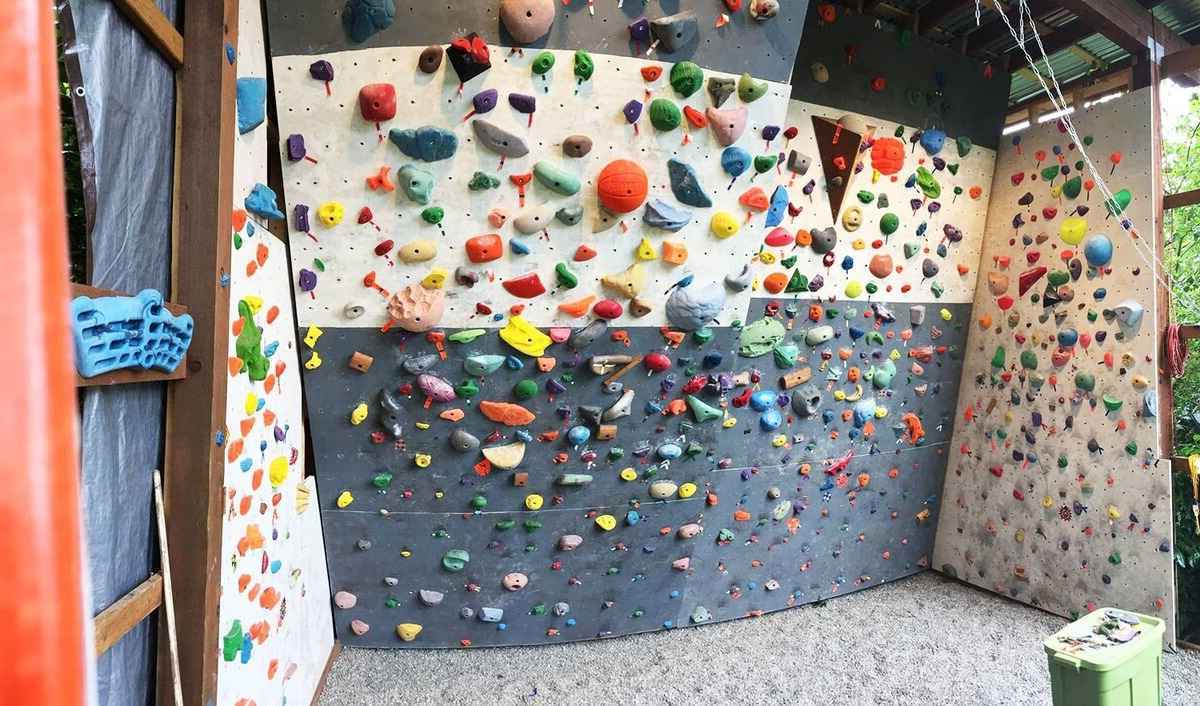
Attaching Climbing Holds
Attaching climbing holds is a pivotal phase in the construction of your DIY climbing wall, as it directly influences the climbing experience and the overall appeal of the wall. This process involves strategically positioning and securing climbing holds onto the plywood surface, creating a diverse and engaging array of gripping points for climbers. Here's a detailed guide to the essential steps and considerations for attaching climbing holds to your climbing wall.
Step 1: Planning Hold Placement
Before diving into the attachment process, take time to plan the placement of climbing holds on the plywood surface. Consider the layout of the climbing wall, the distribution of holds, and the intended difficulty levels of various routes. By envisioning different climbing paths and challenges, you can strategically position the holds to cater to climbers of varying skill levels and preferences.
Step 2: Preparing the Plywood Surface
Ensure that the plywood surface is clean and free from any debris or irregularities that may hinder the secure attachment of climbing holds. Wipe down the surface to create a smooth and uniform base for mounting the holds, allowing for optimal contact and stability.
Step 3: Installing T-Nuts
To facilitate the attachment of climbing holds, it's essential to install T-nuts into the plywood surface. Using a power drill and compatible drill bits, create holes in the plywood at designated locations for the T-nuts. Insert the T-nuts into the holes and secure them in place, ensuring a flush and stable fit. The T-nuts serve as anchor points for fastening the climbing holds securely to the plywood.
Step 4: Selecting and Positioning Climbing Holds
Choose a diverse selection of climbing holds, including various shapes, sizes, and grip styles, to introduce a range of challenges and climbing opportunities. With the planned hold placements in mind, strategically position the holds over the installed T-nuts, ensuring a balanced distribution of handholds and footholds across the climbing wall. Experiment with different configurations to create engaging and dynamic climbing routes.
Step 5: Securing the Climbing Holds
Using high-strength bolts and appropriate fastening tools, secure the climbing holds onto the T-nuts with precision and care. Ensure that each hold is firmly fastened to the plywood surface, minimizing any potential movement or instability during climbing activities. Verify the tightness of the bolts to guarantee the secure attachment of the holds, prioritizing safety and reliability.
Step 6: Testing and Adjustments
After attaching the climbing holds, conduct thorough testing to assess the stability and functionality of the holds. Climb the wall and evaluate the comfort, positioning, and overall feel of the holds. Make any necessary adjustments to the hold placements or tightening of bolts to optimize the climbing experience and address any potential issues.
By meticulously following these steps and considerations, you can expertly attach climbing holds to your DIY climbing wall, creating a diverse and captivating terrain for climbers to explore and conquer. The strategic placement and secure attachment of climbing holds contribute to the overall allure and challenge of the climbing wall, fostering a dynamic and rewarding climbing experience for enthusiasts of all levels.
Safety Precautions
Ensuring the safety of climbers is paramount when embarking on the creation of a DIY climbing wall. By implementing comprehensive safety precautions, you can cultivate a secure and enjoyable climbing environment for individuals of all ages and skill levels. Here's a detailed overview of the essential safety measures to integrate into your DIY climbing wall setup:
Crash Pads and Landing Zones
Prioritize the installation of crash pads or thick foam mats at the base of the climbing wall to cushion potential falls. Adequate padding helps mitigate the impact of falls and minimizes the risk of injuries, providing climbers with a reliable safety net as they navigate the climbing routes.
Inspection and Maintenance
Regularly inspect the climbing wall, including the frame, plywood surface, and climbing holds, to identify any signs of wear, damage, or loosening components. Conduct routine maintenance to address any issues promptly, ensuring that the climbing wall remains structurally sound and secure for climbing activities.
Proper Climbing Techniques
Encourage climbers to practice and adhere to proper climbing techniques, emphasizing the importance of maintaining three points of contact, controlled movements, and mindful foot placements. Educating climbers on safe climbing practices fosters a culture of responsibility and awareness, contributing to a safer climbing environment.
Supervision and Assistance
When the climbing wall is utilized by individuals, especially children or novice climbers, ensure that supervision is in place to oversee climbing activities and provide assistance as needed. Having a knowledgeable and attentive supervisor enhances safety by offering guidance and support during climbing sessions.
Clear Communication of Rules
Establish clear and concise rules for the use of the climbing wall, outlining safety guidelines, permissible climbing behaviors, and designated areas for climbing activities. Communicate these rules effectively to all climbers, promoting a shared understanding of safety protocols and fostering a culture of respect for the climbing environment.
First Aid Preparedness
Maintain a well-equipped first aid kit in close proximity to the climbing wall, stocked with essential supplies for addressing minor injuries or incidents. Being prepared to administer immediate first aid in the event of minor mishaps contributes to a swift and effective response to potential injuries.
Climbing Wall Orientation
Provide climbers, especially newcomers, with a comprehensive orientation to the climbing wall, highlighting key safety features, emergency procedures, and the location of safety equipment. Familiarizing climbers with the layout and safety protocols instills confidence and preparedness for safe climbing experiences.
By integrating these safety precautions into the design and utilization of your DIY climbing wall, you can establish a secure and welcoming environment that prioritizes the well-being of climbers. Emphasizing safety not only safeguards against potential risks but also fosters a culture of responsibility and enjoyment, allowing climbers to embark on thrilling ascents with confidence and peace of mind.
Enjoying Your DIY Climbing Wall
Now that your DIY climbing wall stands proudly, ready to be conquered, it's time to bask in the joy and fulfillment it brings. The culmination of your efforts is not just a physical structure but a gateway to exhilarating experiences and personal growth. Here's how you can fully embrace and relish the fruits of your labor:
Climbing Adventures
Unleash your adventurous spirit and embark on thrilling climbing expeditions right in the comfort of your home or outdoor space. Explore the diverse routes and challenges offered by your climbing wall, testing your agility, strength, and problem-solving skills with each ascent. Whether you prefer a leisurely climb or an intense workout, your DIY climbing wall provides endless opportunities for exciting adventures.
Family Bonding
Gather your family members for memorable bonding sessions centered around the climbing wall. Share laughter, encouragement, and support as you take turns navigating the climbing routes. The shared experiences and triumphs foster a sense of unity and create lasting memories that strengthen family ties.
Skill Development
Embrace the opportunity for skill development and progression as you hone your climbing abilities. From mastering new techniques to conquering increasingly difficult routes, your climbing wall serves as a dynamic platform for personal growth. Each successful climb signifies progress and resilience, nurturing a sense of accomplishment and self-improvement.
Creative Expression
Encourage creativity and innovation by experimenting with new climbing routes and hold configurations. Embrace the freedom to customize and evolve the climbing wall, infusing it with fresh challenges and artistic flair. The evolving landscape of the climbing wall reflects your creativity and adaptability, fostering a dynamic and engaging climbing environment.
Community Engagement
Extend the joy of climbing to friends and neighbors, inviting them to partake in the excitement of your DIY climbing wall. Organize climbing sessions or events that bring together fellow enthusiasts, fostering a sense of community and camaraderie. Sharing the thrill of climbing with others amplifies the joy and creates a vibrant social hub centered around your climbing wall.
Reflect and Appreciate
Take moments to reflect on the journey of creating and enjoying your DIY climbing wall. Appreciate the dedication, perseverance, and ingenuity that went into bringing your vision to life. Celebrate the sense of accomplishment and fulfillment that emanates from witnessing the impact of your creation on yourself and those around you.
Your DIY climbing wall transcends being a mere structure; it becomes a catalyst for joy, growth, and connection. Embrace the myriad ways in which your climbing wall enriches your life and the lives of others, savoring every moment of triumph and discovery it offers.