
Home>Home & Furniture>Kitchen>How to Build a DIY Van Kitchen
Kitchen
How to Build a DIY Van Kitchen
Published: August 5, 2024
Discover how to build a DIY van kitchen with our step-by-step guide. Learn essential tips, tools, and materials to create a functional and stylish mobile cooking space.
(Many of the links in this article redirect to a specific reviewed product. Your purchase of these products through affiliate links helps to generate commission for Twigandthistle.com, at no extra cost. Learn more)
Thinking about hitting the road with a cozy, homey feel in your van? A DIY van kitchen can make your travels more comfortable and convenient. You don’t need to be a master carpenter or professional chef to pull this off. With a bit of planning, some basic tools, and a can-do attitude, you can create a functional kitchen space that meets your needs. From choosing the right materials to figuring out the best layout, building a van kitchen is easier than you might think. Ready to cook up some adventure? Let's get started.
Getting Ready for Your Van Kitchen Project
Plan Your Layout: Sketch a simple design of where you want the sink, stove, and storage. Measure your van's interior to ensure everything fits.
Gather Materials: Collect wood, screws, a sink, a portable stove, and storage containers. Make sure you have all tools like a saw, drill, and measuring tape.
Safety Gear: Wear gloves, safety goggles, and a mask to protect yourself from dust and debris.
Clear the Workspace: Remove any unnecessary items from the van. Clean the area where you'll be working to avoid tripping or losing small parts.
Ventilation: Ensure proper ventilation when cutting wood or using adhesives. Open windows or use a fan to keep air circulating.
Pre-cut Wood: Cut all wood pieces according to your design. Sand the edges to avoid splinters.
Check Electrical: If your kitchen includes electrical appliances, plan where the wiring will go. Make sure you have a safe power source.
Dry Fit: Before screwing anything in, place all components in the van to ensure they fit as planned.
Secure Items: Use brackets and screws to secure heavy items like the sink and stove. This prevents them from moving while driving.
Test Everything: Once installed, test the sink for leaks and the stove for proper function. Make adjustments as needed.
Essential Materials and Tools
Materials:
- Plywood: Used for building cabinets and countertops. Choose sturdy, high-quality plywood for durability.
- Screws and Nails: Essential for assembling the wooden structures. Different sizes may be needed.
- Hinges: Required for cabinet doors to open and close smoothly.
- Drawer Slides: Allow drawers to slide in and out easily.
- Countertop Material: Can be laminate, wood, or another durable surface for food prep.
- Sink: A small, lightweight sink suitable for van spaces.
- Faucet: A compact faucet that fits the sink.
- Water Tanks: One for fresh water and one for grey water.
- Water Pump: Helps move water from the tank to the faucet.
- Plumbing Pipes and Fittings: Connect the water system.
- Butcher Block: Optional but great for a cutting surface.
- Sealant: Waterproofs and protects wood surfaces.
- Paint or Stain: Adds color and protects wood.
- Handles and Knobs: For opening cabinets and drawers.
- Butane Stove: A portable stove for cooking.
Tools:
- Tape Measure: For accurate measurements.
- Circular Saw: Cuts plywood and other materials.
- Jigsaw: Useful for cutting curves and shapes.
- Drill: Drills holes and drives screws.
- Screwdriver Set: Tightens screws.
- Hammer: Drives nails.
- Level: Ensures surfaces are even.
- Clamps: Holds pieces together while assembling.
- Sander: Smooths wood surfaces.
- Paintbrushes or Rollers: Applies paint or stain.
- Wrench Set: Tightens plumbing fittings.
- Utility Knife: Cuts various materials.
- Safety Gear: Includes gloves, goggles, and a dust mask for protection.
Required Skills and Time Commitment
Skill Level: Intermediate
Time Required: 3-5 days
- Planning and Design: 4-6 hours
- Gathering Materials: 2-4 hours
- Building the Frame: 1-2 days
- Installing Appliances: 1 day
- Finishing Touches: 4-8 hours
Detailed Step-by-Step Guide
Plan Your Layout
- Measure the space available in your van.
- Sketch a layout including the sink, stove, storage, and counter space.
Gather Materials
- Plywood for cabinets and countertops.
- Screws, nails, and brackets.
- Sink, faucet, and water containers.
- Portable stove or built-in cooktop.
- Tools: saw, drill, screwdriver, tape measure, and level.
Build the Frame
- Cut plywood to fit your design.
- Assemble the frame using screws and brackets.
- Ensure the frame is sturdy and level.
Install the Countertop
- Cut the countertop to fit the frame.
- Secure it with screws from underneath.
- Cut holes for the sink and stove.
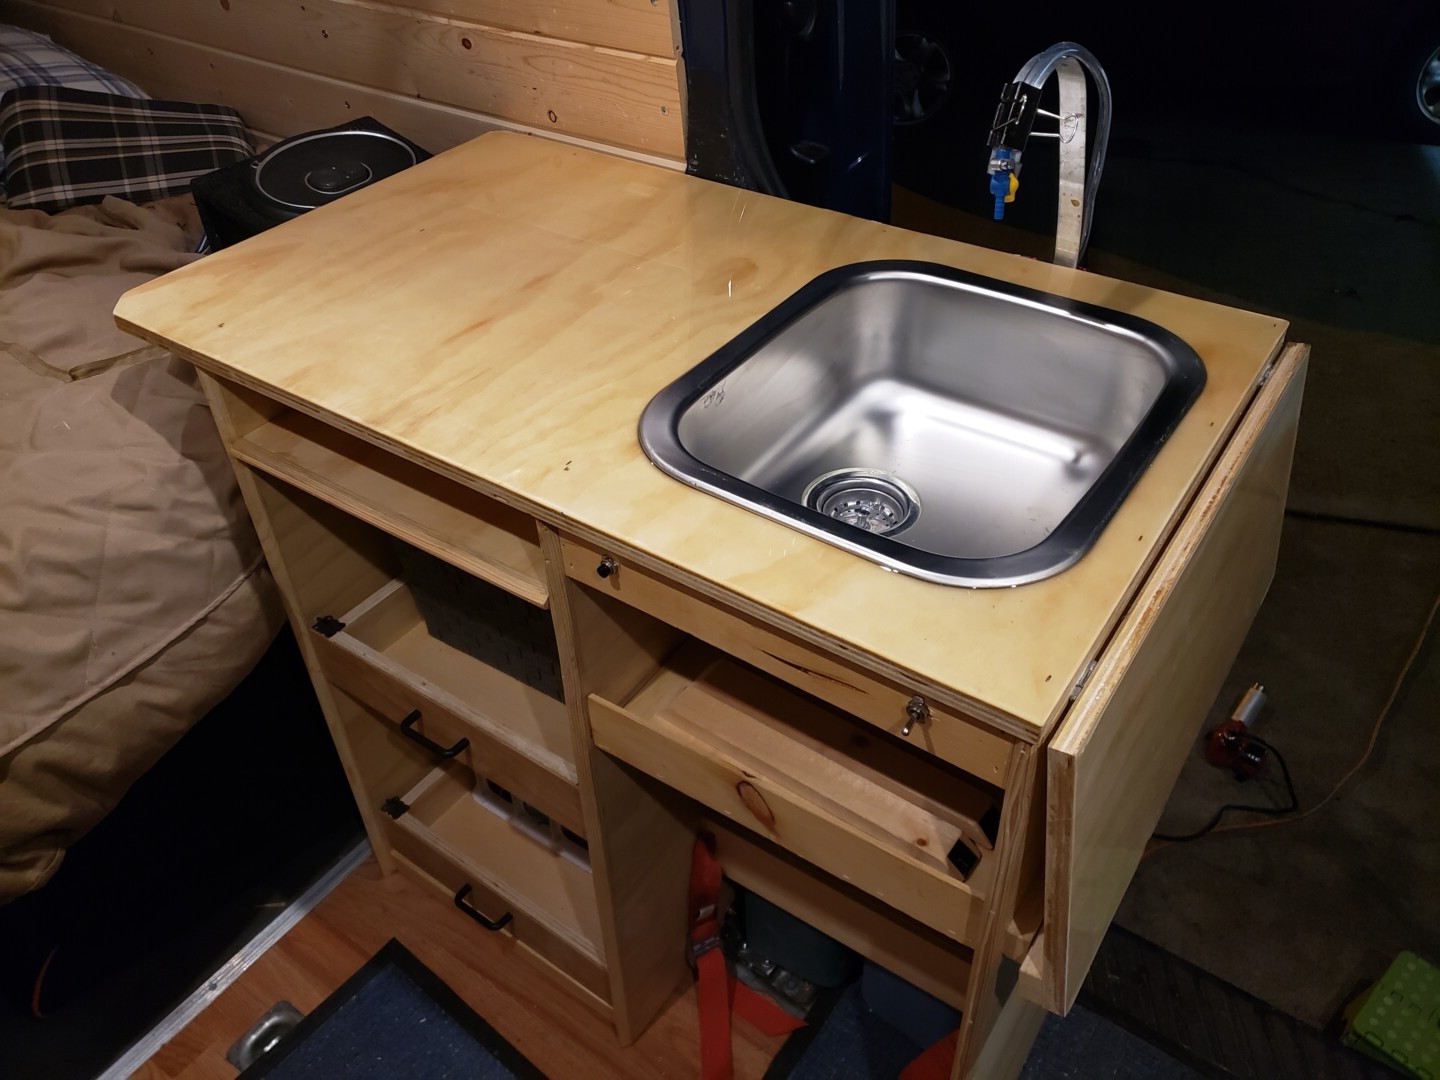
Install the Sink and Faucet
- Place the sink in the cut-out hole.
- Secure it with brackets or adhesive.
- Attach the faucet and connect to water containers.
Set Up the Stove
- Place the stove in its designated spot.
- Secure it if necessary to prevent movement.
Add Storage
- Build and install cabinets or shelves under the countertop.
- Use bins or baskets for organized storage.
Finish and Secure
- Sand any rough edges.
- Paint or stain the wood if desired.
- Secure all components to prevent shifting while driving.
Test Everything
- Check water flow from the faucet.
- Ensure the stove works properly.
- Make sure all parts are securely fastened.
Helpful Tips and Tricks
Plan your layout carefully. Measure your space and sketch a design. Use lightweight materials like plywood to keep the van's weight down. Install a water system with a small sink, water pump, and jerry cans for fresh and grey water. Choose a compact stove that fits your space, like a portable propane stove.
Common mistakes to avoid: Skipping insulation can lead to temperature issues. Not securing cabinets and appliances can cause them to shift while driving. Overloading the van with heavy materials can affect fuel efficiency and handling.
Alternative materials or methods: Instead of plywood, consider using aluminum framing for a lighter, more durable option. For countertops, laminate is a budget-friendly choice compared to solid wood or stone. If a built-in stove isn't feasible, a portable camping stove can be a flexible alternative.
Estimating the Cost
Wood: Plywood for cabinets and countertops costs around $100-$150.
Sink: A basic stainless steel sink costs about $50-$100.
Faucet: A simple faucet costs around $20-$40.
Water System: A 12V water pump costs about $30-$50. Water tanks (fresh and grey) cost around $20-$40 each.
Stove: A portable propane stove costs about $50-$100.
Refrigerator: A small 12V fridge costs around $200-$300.
Countertop: Laminate countertops cost about $50-$100.
Hardware: Hinges, handles, and screws cost around $20-$40.
Tools: Basic tools like a drill, saw, and measuring tape cost around $100-$150 if not already owned.
Insulation: Foam board insulation costs about $20-$40.
Electrical: Wiring, fuses, and connectors cost around $30-$50.
Total Cost: Approximately $690-$1,160.
Budget-Friendly Alternatives:
Sink: Use a plastic basin for $10-$20.
Stove: Use a camping stove for $20-$40.
Refrigerator: Use a cooler for $30-$50.
Countertop: Use plywood with a waterproof finish for $20-$40.
Total Cost with Alternatives: Approximately $450-$700.
Creative Variations and Customizations
Alternative Materials: Instead of plywood, use bamboo for a more eco-friendly option. For countertops, consider butcher block or stainless steel instead of laminate. Swap out plastic containers for glass jars or metal tins to store food.
Colors: Paint cabinets in bright colors like turquoise or yellow for a cheerful vibe. Use chalkboard paint on one cabinet door to create a writable surface. Opt for a stained wood finish for a rustic look.
Styles: Go for a minimalist design with sleek, handle-less cabinets. Choose a vintage style with retro handles and fixtures. Incorporate a bohemian theme using colorful tiles and patterned fabrics.
Storage Solutions: Install pull-out shelves for easier access. Use magnetic strips to hold knives and metal utensils. Add hanging baskets for fruits and vegetables.
Lighting: Install LED strip lights under cabinets for better visibility. Use solar-powered lights to save energy. Add a small skylight or window to bring in natural light.
Water System: Use a foot pump for the sink to save water. Install a collapsible sink to save space. Consider a portable water heater for hot water on demand.
Cooking Options: Use a portable induction cooktop instead of a gas stove. Consider a camping stove for outdoor cooking. Install a microwave if you have enough power supply.
Refrigeration: Opt for a 12V fridge to save energy. Use a cooler with ice packs for short trips. Consider a thermoelectric cooler for a compact option.
Ventilation: Install a roof vent for better air circulation. Use small fans to keep the area cool. Consider mesh screens for windows to keep bugs out while allowing fresh air in.
Decor: Add removable wallpaper for a quick style change. Use fabric curtains instead of blinds for a cozy feel. Incorporate plants to bring a touch of nature inside.
Eco-Friendly Tips
Reclaimed Wood: Use old pallets or salvaged wood for cabinets and countertops. Sand and treat them to make them look new.
Bamboo: This fast-growing plant is a great alternative to traditional wood. It's durable and eco-friendly.
Recycled Metal: Use old metal sheets or scraps for backsplashes or cabinet handles. They add a rustic look and reduce waste.
Natural Insulation: Use sheep's wool or recycled denim for insulation. These materials are effective and sustainable.
Low-VOC Paints: Choose paints with low volatile organic compounds. They are better for your health and the environment.
Solar Panels: Install solar panels on the van's roof. They provide renewable energy for your kitchen appliances.
LED Lighting: Use LED lights for your kitchen. They consume less energy and last longer than traditional bulbs.
Compostable Trash Bags: Opt for compostable bags to reduce plastic waste.
Water Filtration System: Install a water filter to reduce the need for bottled water. This helps cut down on plastic waste.
Recycled Countertops: Look for countertops made from recycled glass or paper. They are stylish and eco-friendly.
Second-Hand Appliances: Buy used appliances in good condition. This saves money and reduces waste.
Natural Cleaning Products: Use vinegar, baking soda, and lemon for cleaning. They are effective and non-toxic.
Eco-Friendly Flooring: Choose cork or linoleum flooring. Both are sustainable and durable options.
Your Van Kitchen Awaits
Building a DIY van kitchen isn't just about saving money; it's about creating something uniquely yours. You've learned how to plan, gather materials, and put everything together. Now, you can cook meals on the road, making your travels more enjoyable. Remember, the key to a successful project is patience and creativity. Don't rush the process; take your time to ensure everything fits perfectly. If you hit a snag, don't get discouraged. Every mistake is a learning opportunity. Soon, you'll have a fully functional kitchen that meets your needs. Enjoy the freedom of cooking wherever you go. Happy travels and happy cooking!
What materials do I need for a DIY van kitchen?
You'll need plywood, screws, hinges, a sink, a stove, and storage containers. Also, grab some paint or stain to finish it off.
How do I install a sink in my van?
First, cut a hole in the countertop to fit your sink. Then, drop the sink in, secure it with clips or brackets, and connect the plumbing.
What kind of stove should I use?
A portable propane stove works great. It's easy to use and doesn't take up much space. Just make sure to have proper ventilation.
How can I maximize storage in my van kitchen?
Use stackable containers, magnetic strips for utensils, and hanging racks. Every inch counts, so think vertical.
Do I need a fridge or cooler?
A 12V fridge is ideal, but a high-quality cooler can work too. It depends on your power setup and how long you'll be on the road.
How do I ensure proper ventilation?
Install a roof vent or a fan. Open windows while cooking to let out steam and odors. Safety first!
Can I add a water system?
Yes, you can! Use a foot pump or an electric pump connected to a water tank. This setup gives you running water without much hassle.