
Home>Home & Furniture>Kitchen>How to Build a DIY Corner Bench
Kitchen
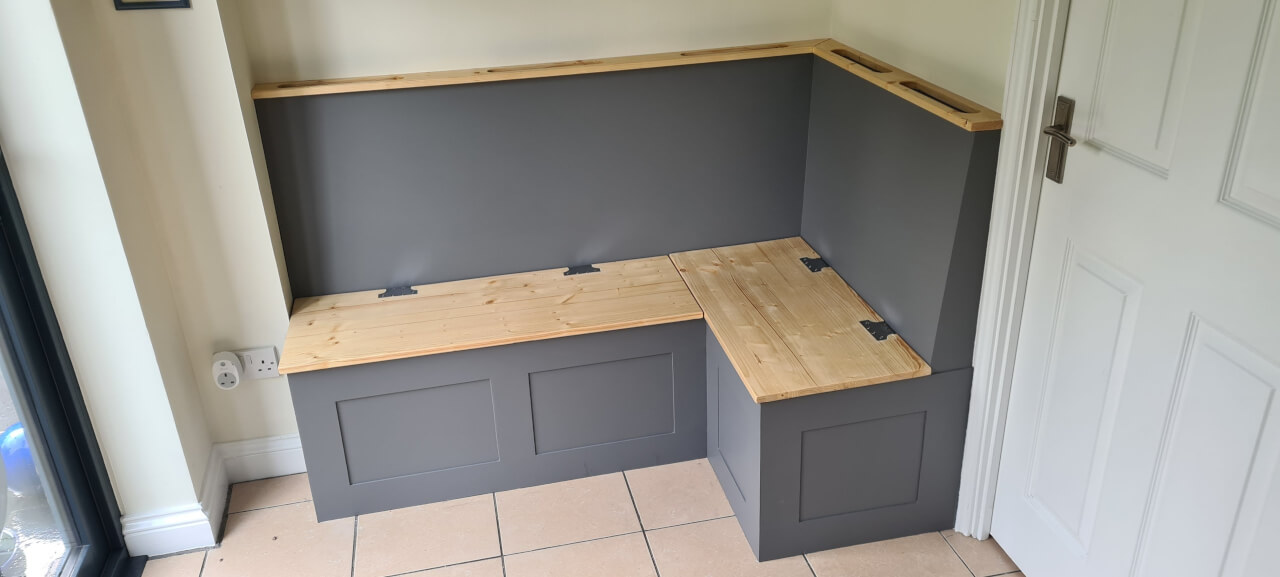
How to Build a DIY Corner Bench
Published: July 24, 2024
Learn how to build a DIY corner bench with our step-by-step guide. Perfect for maximizing space and adding style to your home. Get started on your project today!
(Many of the links in this article redirect to a specific reviewed product. Your purchase of these products through affiliate links helps to generate commission for Twigandthistle.com, at no extra cost. Learn more)
Building a DIY corner bench can add both style and functionality to your space. Whether it’s for a cozy reading nook or extra seating in your dining area, creating your own furniture offers a sense of accomplishment. This beginner-friendly project requires basic tools and materials, making it accessible for most DIY enthusiasts. With clear instructions and a bit of patience, you’ll have a custom bench that fits perfectly in your home. Ready to roll up your sleeves? Let’s get started on this rewarding project that combines creativity with practicality.
Getting Ready for Your Project
Gather Materials and Tools: Get wood, screws, a saw, a drill, a measuring tape, sandpaper, and paint or stain.
Measure the Space: Use a measuring tape to determine the dimensions of the corner where the bench will go. Write down the measurements.
Create a Plan: Sketch a simple design of the bench. Include measurements for each piece of wood.
Safety Gear: Wear safety goggles, gloves, and a dust mask to protect yourself while cutting and sanding wood.
Prepare the Workspace: Clear the area where you'll work. Make sure there's enough room to move around and lay out materials.
Cut the Wood: Use a saw to cut the wood according to your plan. Double-check measurements before cutting.
Sand the Edges: Smooth out rough edges with sandpaper to avoid splinters.
Pre-Drill Holes: Drill small holes where screws will go. This prevents the wood from splitting.
Assemble the Frame: Start putting together the frame of the bench using screws and a drill.
Attach the Seat and Backrest: Secure the seat and backrest pieces to the frame.
Paint or Stain: Apply paint or stain to protect the wood and give it a finished look. Let it dry completely.
Final Check: Ensure all screws are tight and the bench is stable before using it.
Gathering Materials and Tools
Wood: You'll need 2x4s and plywood. The 2x4s form the frame, while the plywood serves as the seat and backrest.
Screws: Use wood screws to secure the pieces together. Make sure they are long enough to hold the wood firmly.
Drill: A power drill is essential for making holes and driving screws into the wood.
Saw: A circular saw or hand saw will be needed to cut the wood to the required lengths.
Measuring Tape: Accurate measurements are crucial. A measuring tape ensures all pieces fit together perfectly.
Level: A spirit level helps keep everything straight and even.
Sandpaper: Smooth out rough edges with sandpaper to avoid splinters.
Wood Glue: Adds extra strength to the joints. Use wood glue along with screws.
Clamps: Wood clamps hold pieces in place while the glue dries.
Paint or Stain: Finish your bench with paint or wood stain to protect it and give it a polished look.
Paintbrushes: Use paintbrushes to apply paint or stain evenly.
Safety Gear: Always wear safety goggles and gloves to protect yourself while working.
Required Skills and Time
Skill Level: Intermediate
Time Required: 8-10 hours
- Gather Materials: 1 hour
- Cut Wood Pieces: 2 hours
- Assemble Frame: 2 hours
- Attach Seat and Backrest: 2 hours
- Sand and Finish: 1-2 hours
Instructions for Building Your Bench
Gather Materials:
- Wood: 2x4s, plywood sheets
- Screws: 3-inch wood screws
- Tools: Saw, drill, measuring tape, level, sandpaper
- Paint or Stain: Optional for finishing
Measure and Cut Wood:
- Measure the corner space where the bench will go.
- Cut 2x4s for the frame: four pieces for the legs, two long pieces for the front and back, and two shorter pieces for the sides.
- Cut plywood for the seat and backrest.
Assemble the Frame:
- Lay out the 2x4s on a flat surface.
- Attach the legs to the front and back pieces using screws.
- Connect the side pieces to form a rectangular frame.
Add Support Beams:
- Cut additional 2x4s to fit inside the frame for extra support.
- Screw these support beams into place.
Attach Plywood:
- Place the plywood on top of the frame for the seat.
- Secure it with screws.
- Attach the backrest plywood to the frame.
Sand and Finish:
- Sand all surfaces to remove rough edges.
- Paint or stain the bench if desired.
Install the Bench:
- Move the bench to the corner space.
- Use a level to ensure it sits evenly.
- Secure it to the wall if needed for extra stability.
Helpful Tips and Tricks
Measure twice, cut once. Always double-check measurements to avoid mistakes. Use a level to ensure the bench sits evenly. Pre-drill holes before screwing to prevent wood from splitting. Sand all edges for a smooth finish.
Common mistakes include not accounting for the thickness of materials, leading to misaligned pieces. Avoid using untreated wood outdoors; it will rot quickly. Skipping the sanding step can result in splinters.
For materials, consider using pressure-treated wood for outdoor benches. It lasts longer. If you want a more eco-friendly option, try reclaimed wood. Instead of screws, you can use wood glue for a cleaner look, but it may not be as strong.
Estimating the Cost
Lumber: Expect to spend around $50-$100 for 2x4s and plywood. Prices vary based on wood type and quality.
Screws and Nails: Budget about $10-$20 for a box of each.
Wood Glue: A bottle costs roughly $5-$10.
Sandpaper: A pack of assorted grits will be around $5-$10.
Paint or Stain: Depending on your choice, plan for $15-$30.
Paintbrushes or Rollers: These will cost around $5-$15.
Cushions and Fabric: If you want to add comfort, expect to spend $30-$60.
Tools: If you don't already own them, a drill ($50-$100), saw ($30-$100), and measuring tape ($5-$10) are essential.
Budget-Friendly Alternatives:
- Use reclaimed wood or pallets to save on lumber costs.
- Borrow tools from friends or rent them from a local hardware store.
- Look for discounted paint or stain at home improvement stores.
Customizing Your Corner Bench
Materials: Instead of using standard wood, try reclaimed wood for a rustic look. Composite decking boards offer durability and low maintenance. Metal or PVC can provide a modern twist.
Colors: Paint the bench in bright colors like teal or yellow for a pop of color. Use stain to highlight the natural wood grain. Two-tone designs, such as a white base with a dark top, add visual interest.
Styles: Add cushions or upholstery for extra comfort. Incorporate built-in storage under the seats for functionality. Use decorative trim or molding to give a more finished look.
Shapes: Experiment with different shapes, like a rounded corner instead of a sharp angle. Create a modular design with separate pieces that can be rearranged.
Backrests: Add a high backrest for more support, or keep it low for a minimalist feel. Use slats or panels for different visual effects.
Extras: Install LED lights under the bench for evening ambiance. Attach planter boxes on the sides for greenery. Add armrests for added comfort.
Eco-Friendly Building Tips
Reclaimed wood is a great choice. Old pallets, barn wood, or leftover planks from other projects can be repurposed. This reduces waste and gives the bench a rustic look.
Bamboo is another eco-friendly option. It grows quickly and is very strong. Using bamboo can help reduce deforestation.
For the cushions, consider using organic cotton or recycled fabric. These materials are better for the environment and often more durable.
Non-toxic paint or stain is important. Many paints contain harmful chemicals. Look for options labeled as low-VOC (volatile organic compounds).
Natural finishes like beeswax or linseed oil can protect the wood without harmful chemicals. They also give a nice, natural shine.
Solar-powered tools can be used to cut and assemble the bench. This reduces the carbon footprint of the project.
Recycled metal brackets or screws can be used for assembly. These are often just as strong as new ones but much better for the planet.
Composting any wood scraps or sawdust can help reduce waste. These materials can enrich garden soil.
Upcycling old furniture parts, like legs or armrests, can add unique touches to the bench. This also keeps more items out of landfills.
Local sourcing of materials reduces transportation emissions. Check local lumberyards or thrift stores for supplies.
Your New Favorite Spot
Building a DIY corner bench isn't just about creating a piece of furniture. It's about crafting a cozy nook where you can relax, read, or chat with friends. With some basic tools and a bit of patience, you've turned a simple idea into a functional masterpiece. Remember, the key is in the details—sanding the edges, choosing the right stain, and ensuring everything is level. Don't stress if things aren't perfect; those little quirks add character. Now, sit back and enjoy your new favorite spot. You've earned it!
How much time will it take to build a DIY corner bench?
Building a DIY corner bench usually takes about a weekend. If you’re experienced, you might finish faster.
What materials do I need?
You’ll need wood, screws, wood glue, sandpaper, paint or stain, and cushions. A saw, drill, and measuring tape are also essential.
Can I customize the size?
Absolutely! Measure your space first, then adjust the dimensions of your bench to fit perfectly.
Do I need any special skills?
Basic carpentry skills are helpful. If you can measure, cut, and drill, you’re good to go.
How much will it cost?
Costs vary based on materials and tools. On average, expect to spend around $100 to $200.
What type of wood should I use?
Pine is affordable and easy to work with. For outdoor benches, consider cedar or redwood for durability.
How do I make it comfortable?
Add cushions and pillows. You can buy them or make your own with fabric and foam.