
Home>Home & Furniture>Garage & Basement>How to Install a DIY Basement Drainage System
Garage & Basement
How to Install a DIY Basement Drainage System
Published: August 29, 2024
Learn how to install a DIY basement drainage system with our step-by-step guide. Prevent water damage and keep your basement dry with these expert tips and techniques.
(Many of the links in this article redirect to a specific reviewed product. Your purchase of these products through affiliate links helps to generate commission for Twigandthistle.com, at no extra cost. Learn more)
Got a wet basement? A DIY basement drainage system can help keep your space dry and prevent future water damage. Installing one might seem tricky, but with some basic tools and a bit of patience, it's doable. This guide will walk you through the necessary steps, from gathering materials to final installation. Whether you have some experience in home improvement or are completely new, this project is within reach. By handling it yourself, you can save money and gain the satisfaction of knowing you fixed the problem on your own. Ready to get started? Let's dive in!
Getting Ready for the Project
Inspect the Basement: Check for existing cracks or leaks. Identify areas where water collects.
Gather Materials: Get a sump pump, drainage pipes, gravel, a jackhammer, and a shovel. Don't forget safety gear like gloves, goggles, and ear protection.
Clear the Area: Move furniture, boxes, and other items out of the basement. Ensure you have enough space to work.
Plan the Layout: Mark where the drainage pipes will go. Plan the path from the walls to the sump pump.
Set Up Workspace: Lay down tarps to protect the floor. Keep tools and materials organized.
Safety First: Wear gloves to protect hands, goggles for eyes, and ear protection when using loud tools like a jackhammer.
Check for Utilities: Before digging, ensure no electrical wires or plumbing pipes are in the way. Use a utility locator if needed.
Ventilation: Ensure proper airflow in the basement. Use fans to keep the area ventilated, especially when using power tools.
Prepare for Dust: Use plastic sheeting to cover doorways and vents. This helps contain dust and debris.
Have a Helper: It's safer and easier with someone to assist. They can help with heavy lifting and keeping the workspace tidy.
Essential Materials and Tools
- PVC Pipes: These carry water away from your basement. Choose the right diameter for your system.
- Gravel: Helps with drainage around the pipes. Use clean, washed gravel.
- Perforated Drain Pipe: Allows water to enter the pipe from the surrounding soil.
- Drainage Fabric: Prevents soil from clogging the perforated pipe.
- Sump Pump: Pumps water out of your basement to a safe location.
- Sump Basin: Holds the sump pump and collects water before it’s pumped out.
- PVC Cement: Glues PVC pipes together securely.
- Shovel: Digs trenches for the pipes and sump basin.
- Wheelbarrow: Transports gravel and soil.
- Level: Ensures pipes are installed at the correct slope.
- Tape Measure: Measures lengths of pipe and distances for trenching.
- Hacksaw: Cuts PVC pipes to the required lengths.
- Drill: Creates holes for pipe connections and sump pump installation.
- Pipe Wrench: Tightens and loosens pipe fittings.
- Safety Gear: Includes gloves, safety glasses, and a dust mask for protection.
Each tool and material plays a crucial role in ensuring your basement drainage system works effectively.
Required Skills and Time Commitment
Skill Level: Advanced
Estimated Time Required: 2-3 days
- Planning and Preparation: 4-6 hours
- Excavation and Trenching: 8-10 hours
- Installing Drainage Pipes: 6-8 hours
- Backfilling and Finishing: 4-6 hours
Detailed Step-by-Step Guide
Gather Materials and Tools
- PVC pipes
- Gravel
- Drainage fabric
- Shovel
- Wheelbarrow
- Level
- Drill
- Concrete saw
- Pipe fittings
- Sump pump (if needed)
Plan the Drainage Layout
- Identify low spots where water collects.
- Plan a route for the drainage pipes to lead water away from the basement.
Mark the Trench Lines
- Use chalk or spray paint to mark where trenches will be dug.
- Ensure lines are straight and lead to an exit point.
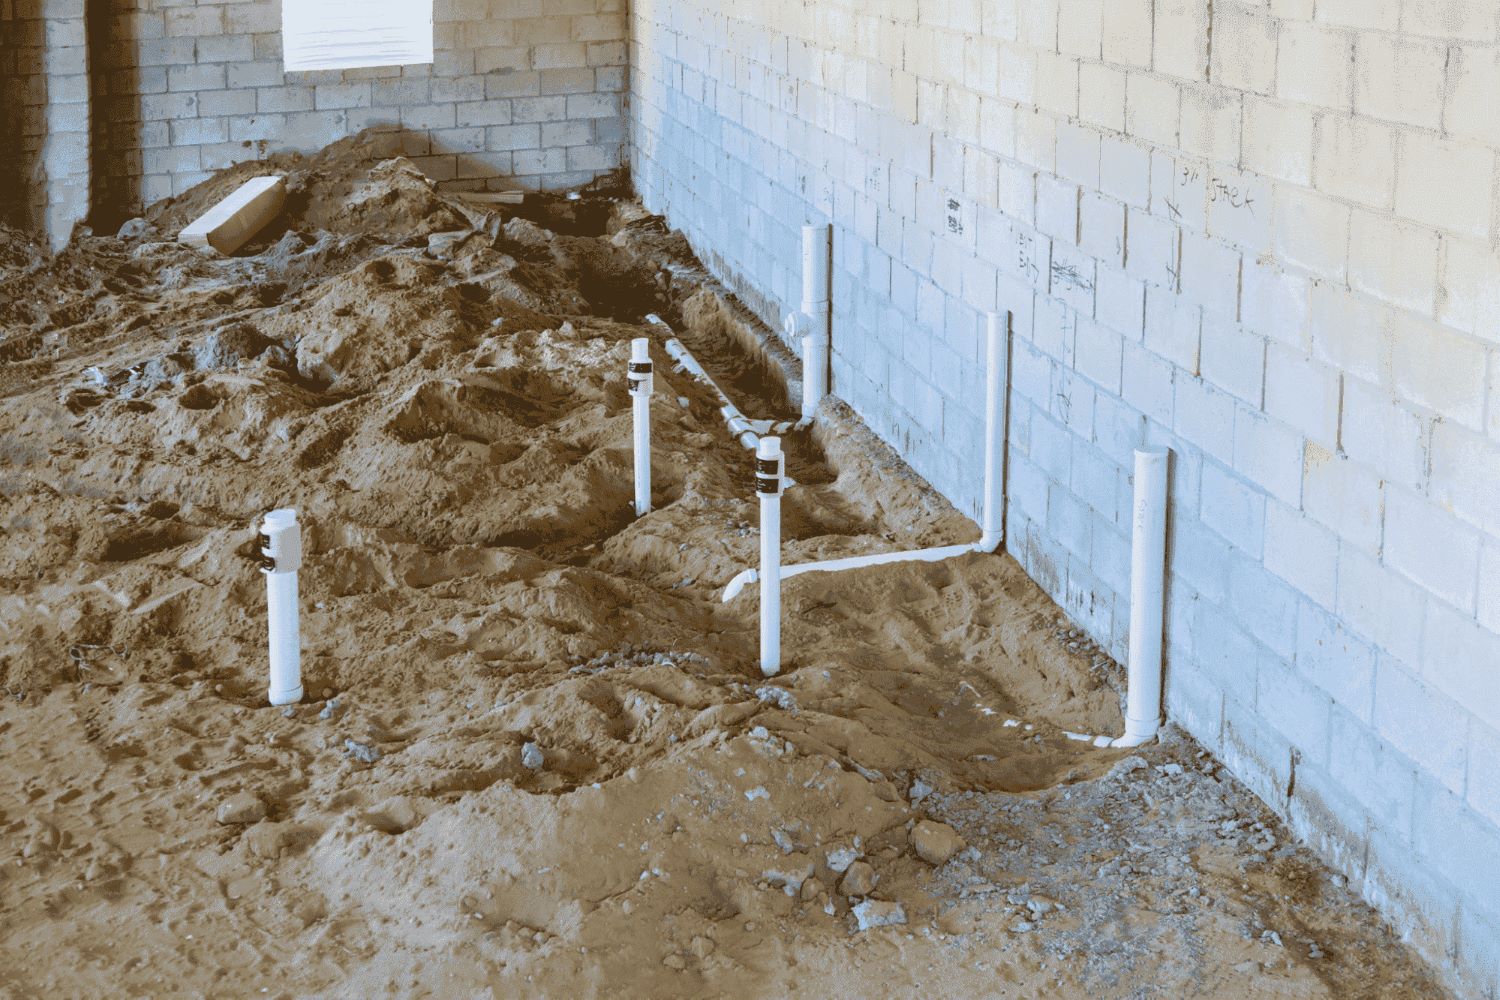
Dig the Trenches
- Use a shovel to dig trenches along marked lines.
- Trenches should be about 12 inches deep and 6 inches wide.
Prepare the Trenches
- Line trenches with drainage fabric to prevent soil from clogging pipes.
- Add a layer of gravel on top of the fabric.
Install the Drainage Pipes
- Lay PVC pipes in the trenches, ensuring they slope slightly downward.
- Connect pipes using fittings, making sure connections are secure.
Cover the Pipes
- Add another layer of gravel over the pipes.
- Fold excess drainage fabric over the gravel.
Backfill the Trenches
- Fill trenches with soil, compacting it as you go.
- Ensure the ground is level after backfilling.
Install a Sump Pump (if needed)
- Dig a hole at the lowest point of the basement.
- Place the sump pump in the hole and connect it to the drainage pipes.
- Ensure the pump is plugged in and functioning properly.
Test the System
- Pour water into the trenches to check for proper drainage.
- Ensure water flows away from the basement without pooling.
Clean Up
- Remove any excess materials and tools.
- Dispose of debris properly.
Helpful Tips and Tricks
Plan Your Layout: Before starting, sketch the drainage system layout. This helps avoid mistakes and ensures all areas needing drainage are covered.
Use a Sump Pump: Install a sump pump in the lowest part of the basement. It collects water and pumps it outside, preventing flooding.
Slope the Trenches: When digging trenches for pipes, ensure they have a slight slope. This allows water to flow naturally towards the sump pump.
Gravel Base: Place a layer of gravel at the bottom of the trench before laying pipes. Gravel improves drainage and prevents clogging.
Perforated Pipes: Use perforated pipes for better water flow. These pipes have small holes that allow water to enter and be directed to the sump pump.
Seal Joints: Use PVC cement to seal pipe joints. This prevents leaks and ensures a tight fit.
Install a Backup Battery: A backup battery for the sump pump ensures it works during power outages, keeping your basement dry.
Test the System: After installation, test the system by pouring water into the trenches. Ensure water flows smoothly to the sump pump.
Common Mistakes to Avoid:
Skipping the Slope: Not sloping the trenches can cause water to pool, leading to ineffective drainage.
Ignoring Permits: Some areas require permits for drainage system installation. Check local regulations before starting.
Using Incorrect Pipe Size: Using pipes that are too small can lead to clogs. Ensure pipes are appropriately sized for your drainage needs.
Alternatives for Materials or Methods:
French Drains: Instead of a full drainage system, consider French drains. These are simpler to install and can effectively manage water in smaller areas.
Drainage Mats: Use drainage mats on basement walls to direct water to the floor drainage system. They are easy to install and add an extra layer of protection.
Waterproof Paint: Apply waterproof paint on basement walls and floors. This can help reduce moisture and complement your drainage system.
Budgeting for Your Project
Materials:
- Perforated Drain Pipe: $50-$100 (50 feet)
- Gravel: $30-$50 (1 ton)
- Drainage Fabric: $20-$40 (100 feet)
- PVC Pipe: $10-$20 (10 feet)
- PVC Elbows and Connectors: $10-$15
- Sump Pump: $100-$200
- Sump Basin: $50-$100
- Concrete Mix: $10-$15 (80 lbs bag)
- Sealant: $10-$20
Tools:
- Shovel: $15-$30
- Pickaxe: $20-$40
- Wheelbarrow: $50-$100
- Level: $10-$20
- PVC Cutter: $10-$20
- Drill: $50-$100
- Concrete Trowel: $10-$20
Total Cost: $455-$890
Budget-Friendly Alternatives:
- Use Recycled Gravel: $0-$20
- Borrow Tools from Friends or Neighbors: $0
- Rent Tools from a Local Store: $10-$50 per day
- Buy Used Tools Online: Prices vary but can be significantly cheaper
Adjusted Total Cost: $345-$620
Creative Variations and Customizations
Materials: Instead of using traditional PVC pipes, consider corrugated plastic pipes. These are flexible and easier to install around corners. For a more eco-friendly option, use recycled plastic pipes.
Colors: While most drainage systems are hidden, you can still choose pipe colors that match your basement's theme. Black pipes can blend into dark corners, while white pipes can match lighter walls.
Styles: For a more industrial look, use metal pipes. They are durable and give a unique aesthetic. If you prefer a modern style, opt for sleek, smooth pipes with minimal joints.
Drain Covers: Customize your drain covers with different materials like stainless steel, brass, or even decorative grates. This can add a touch of style to an otherwise functional element.
Sump Pump: Choose a sump pump that fits your needs. For a quieter option, look for submersible pumps. If you want something more powerful, consider pedestal pumps.
Gravel: Instead of standard gravel, use decorative stones or colored gravel to line your drainage trench. This can add a visual appeal if parts of the system are exposed.
Waterproofing Membrane: Use a self-adhesive membrane for easier installation. For added protection, consider a double-layer membrane.
Drainage Channels: Install pre-fabricated drainage channels for a cleaner look. These come in various materials like plastic, metal, or concrete.
Inspection Ports: Add inspection ports at key points for easier maintenance. These can be hidden with decorative covers.
Backup Systems: Install a battery backup or water-powered backup for your sump pump to ensure it works during power outages.
Eco-Friendly Tips
Eco-friendly materials can make a big difference. Use recycled plastic pipes instead of new ones. They work just as well and reduce waste. For the drainage gravel, look for recycled concrete. It’s often cheaper and keeps old concrete out of landfills.
Permeable pavers are another great option. They allow water to pass through, reducing runoff and helping the environment. If you need to seal any joints, choose low-VOC sealants. These have fewer harmful chemicals.
When digging trenches, try to reuse the soil elsewhere in your yard. It can be used for gardening or landscaping projects. If you need to buy new materials, look for locally sourced options. This cuts down on transportation emissions.
Consider installing a rainwater harvesting system. This can collect water from your drainage system for use in your garden. It’s a great way to conserve water and reduce your utility bills.
Finally, always recycle any leftover materials. Many communities have recycling programs for construction waste. This helps keep your project green from start to finish.
Your Basement's New Best Friend
A DIY basement drainage system can save you money and protect your home from water damage. By following the steps, you can ensure your basement stays dry and safe. Remember to gather all necessary tools and materials before starting. Measure twice, cut once. Pay close attention to sealing and sloping to direct water away from your foundation. Regular maintenance will keep your system running smoothly. If you run into trouble, don't hesitate to consult a professional. With a bit of effort, you can transform your basement into a dry, usable space. Happy building!
What tools do I need to install a basement drainage system?
You'll need a shovel, drill, PVC pipes, gravel, sump pump, pipe cutter, and sealant.
How long does it take to install a basement drainage system?
It usually takes 2-3 days depending on the size of your basement and your experience level.
Can I install a basement drainage system by myself?
Yes, you can! With some basic DIY skills and the right tools, it's totally doable.
How much does it cost to install a basement drainage system?
Typically, it costs between $500-$1,500 for materials. Doing it yourself saves on labor costs.
Do I need a permit to install a basement drainage system?
Sometimes, yes. Check with your local building department to see if you need a permit.
What type of drainage system is best for a basement?
A French drain system is often recommended. It’s effective at redirecting water away from your basement.
How do I maintain my basement drainage system?
Regularly check for clogs, ensure the sump pump is working, and clean out any debris from the pipes.