
Home>Home & Furniture>Garage & Basement>How to Epoxy Your Garage Floor
Garage & Basement
How to Epoxy Your Garage Floor
Published: September 24, 2024
Transform your garage with a durable, glossy finish! Learn step-by-step how to epoxy your garage floor for a professional look that lasts. Perfect for DIY enthusiasts!
(Many of the links in this article redirect to a specific reviewed product. Your purchase of these products through affiliate links helps to generate commission for Twigandthistle.com, at no extra cost. Learn more)
Transforming your garage floor with epoxy can give it a fresh, clean look while making maintenance a breeze. Epoxy coating provides a durable, long-lasting surface that resists stains, chemicals, and damage. Whether you use your garage for parking, a workshop, or storage, an epoxy floor can improve functionality and appearance. Don't worry if you're new to DIY projects; you only need a few tools and materials, some preparation, and a bit of patience. This guide will walk you through the steps to get that professional-looking epoxy finish without hiring a pro. Ready to dive in? Let's get started!
Getting Ready for the Project
Clear the Garage: Remove all items from the garage. This includes cars, tools, and storage boxes.
Clean the Floor: Sweep and mop the floor to remove dirt, dust, and debris. Use a degreaser to clean oil stains.
Repair Cracks: Fill any cracks or holes with concrete patching compound. Allow it to dry completely.
Etch the Floor: Use an etching solution to open up the concrete pores. This helps the epoxy adhere better. Rinse thoroughly and let it dry.
Protect Yourself: Wear safety gear like gloves, goggles, and a mask. Epoxy fumes can be harmful.
Ventilate the Area: Open windows and doors to ensure good airflow. Use fans if necessary.
Tape Off Edges: Use painter's tape to protect walls and any areas you don't want epoxy on.
Mix the Epoxy: Follow the manufacturer's instructions for mixing the epoxy and hardener. Mix only what you can use within the working time.
Test a Small Area: Apply a small amount of epoxy in an inconspicuous area to ensure it adheres properly.
Set Up Your Workspace: Organize your tools and materials so they are easily accessible. This includes rollers, brushes, and mixing buckets.
What You’ll Need
- Epoxy Kit: Contains epoxy resin and hardener. Essential for creating a durable, glossy finish.
- Concrete Cleaner/Degreaser: Removes oil, grease, and dirt from the floor, ensuring epoxy adheres properly.
- Concrete Etcher: Prepares the surface by opening up pores in the concrete, allowing better epoxy penetration.
- Paint Roller and Extension Pole: Used to apply the epoxy evenly across the floor. The extension pole helps reach distant areas without bending.
- Paint Brushes: For cutting in edges and corners where the roller can't reach.
- Painter's Tape: Protects walls and other areas from accidental epoxy spills.
- Plastic Sheeting: Covers items in the garage to protect them from epoxy splatters.
- Mixing Bucket: Used to combine the epoxy resin and hardener.
- Stir Stick: Ensures thorough mixing of the epoxy components.
- Protective Gear: Includes gloves, safety glasses, and a respirator mask to protect from fumes and skin contact.
- Concrete Patch Compound: Fills in cracks or holes in the garage floor before applying epoxy.
- Squeegee: Helps spread the epoxy evenly and remove any excess.
- Non-Slip Additive: Mixed into the epoxy to provide a textured surface, reducing the risk of slipping.
- Shop Vacuum: Cleans up dust and debris from the floor before applying epoxy.
- Measuring Tape: Ensures accurate measurements for mixing epoxy components.
Skill Level and Time Commitment
Skill Level: Intermediate
Time Required: Approximately 2-3 days
- Preparation: 4-6 hours
- Cleaning and Etching: 4-6 hours
- Applying Primer: 2-3 hours (including drying time)
- Applying Epoxy: 2-3 hours (including drying time)
- Curing Time: 24-48 hours
Important Keywords: Skill Level, Time Required, Preparation, Cleaning, Etching, Applying Primer, Applying Epoxy, Curing Time
How to Do It: Step-by-Step Guide
Clean the Floor
- Sweep away all dirt and debris.
- Use a degreaser to remove oil stains.
- Rinse thoroughly with water and let it dry completely.
Repair Cracks and Holes
- Fill any cracks or holes with concrete patching compound.
- Smooth the surface with a trowel.
- Allow the compound to dry as per the instructions.
Etch the Concrete
- Mix the etching solution with water according to the package directions.
- Apply the solution to the floor using a watering can.
- Scrub the floor with a stiff-bristled brush.
- Rinse the floor thoroughly and let it dry.
Apply the Primer
- Stir the primer thoroughly.
- Use a paint roller to apply a thin, even coat of primer.
- Allow the primer to dry for the recommended time.
Mix the Epoxy
- Follow the manufacturer's instructions to mix the epoxy resin and hardener.
- Stir the mixture thoroughly until it is well-blended.
Apply the Epoxy
- Pour the mixed epoxy onto the floor in small sections.
- Use a paint roller to spread the epoxy evenly.
- Work in small areas to ensure even coverage.
Add Color Flakes (Optional)
- While the epoxy is still wet, sprinkle color flakes evenly over the surface.
- Use a hand-held spreader for even distribution.
Let the Epoxy Cure
- Allow the epoxy to cure for the time specified by the manufacturer.
- Avoid walking or driving on the floor until it is fully cured.
Apply the Topcoat
- Mix the topcoat according to the instructions.
- Use a clean paint roller to apply a thin, even layer.
- Let the topcoat dry completely before using the garage.
Clean Up
- Clean all tools and equipment immediately after use.
- Dispose of any leftover materials according to local regulations.
Helpful Tips and Tricks
Preparation is key. Clean the floor thoroughly. Remove oil stains with a degreaser. Use a concrete etcher to open up the surface. Make sure the floor is completely dry before starting.
Mixing epoxy. Follow the instructions on the package. Mix the resin and hardener well. Let it sit for a few minutes to allow bubbles to rise.
Apply in sections. Work in small areas to ensure even coverage. Use a roller with an extension handle. Start from the back of the garage and move towards the exit.
Add color flakes. Sprinkle them while the epoxy is still wet. This adds texture and hides imperfections.
Common mistakes. Avoid applying epoxy on a damp floor. Don't skip the etching process. Ensure proper ventilation to avoid inhaling fumes.
Alternative materials. Consider using polyurea coatings. They cure faster and are more flexible. Another option is a concrete stain for a more natural look.
Budgeting for the Job
Epoxy Kit: $100-$150. This includes the epoxy resin and hardener.
Concrete Cleaner: $10-$20. Needed to clean the floor before applying epoxy.
Etching Solution: $20-$30. Helps the epoxy bond to the concrete.
Paint Roller and Brushes: $15-$25. Used to apply the epoxy.
Painter's Tape: $5-$10. Keeps edges clean.
Protective Gear: $20-$30. Includes gloves, goggles, and masks.
Mixing Bucket: $5-$10. For mixing the epoxy.
Total Cost: $175-$275.
Budget-Friendly Alternatives:
- Use a vinegar-water solution instead of a commercial concrete cleaner. Cost: $2-$5.
- Borrow or rent tools like paint rollers and brushes. Cost: $0-$10.
- Use old clothes and basic masks instead of buying new protective gear. Cost: $0-$5.
Total Budget-Friendly Cost: $150-$200.
Personalizing Your Garage Floor
Colors: Choose from a wide range of colors. Classic gray or tan gives a clean look. For a bolder choice, try blue, red, or even black.
Flakes: Add decorative flakes for texture and design. These come in various colors and sizes. Mix and match to create a unique look.
Metallic Epoxy: Use metallic epoxy for a shiny, marble-like finish. This creates a high-end look with swirls and patterns.
Glow-in-the-Dark: Add glow-in-the-dark powder to the epoxy. This makes the floor glow at night, adding a fun and functional element.
Stencils: Use stencils to create patterns or logos on the floor. This can personalize the space, making it truly yours.
Alternative Materials: Instead of epoxy, consider polyurethane or polyaspartic coatings. These materials offer different levels of durability and finish.
Matte Finish: Opt for a matte finish instead of a glossy one. This reduces glare and gives a more subtle look.
Anti-Slip Additives: Mix in anti-slip additives for safety. This is especially useful if the garage floor gets wet often.
Borders: Create borders or sections with different colors or textures. This can help define areas within the garage.
Custom Mixes: Combine different epoxy colors to create a custom mix. This can result in a unique, one-of-a-kind floor.
Eco-Friendly Options: Use low-VOC or water-based epoxies for an eco-friendly choice. These are better for the environment and indoor air quality.
Eco-Friendly Options
Eco-friendly materials can make your garage floor project more sustainable. Choose low-VOC epoxy to reduce harmful emissions. Water-based epoxy is another good option, as it’s less toxic than solvent-based types.
Prep the floor using a citrus-based cleaner instead of harsh chemicals. This cleaner is biodegradable and safer for the environment. Mechanical grinding can also be used to prepare the surface without chemicals.
Reusing materials helps cut waste. If you have old paint trays, rollers, or brushes, clean and use them again. Recycled plastic flakes can add texture and color to the epoxy, giving a unique look while being eco-friendly.
Proper disposal of leftover materials is crucial. Take any unused epoxy to a local hazardous waste facility. Don’t pour it down the drain. Recycle empty containers if possible.
Energy-efficient tools like LED lights can be used during the project. They consume less power and last longer than traditional bulbs.
Ventilate the area well to reduce indoor air pollution. Open windows and use fans to keep the air moving. This helps the epoxy cure faster and reduces the need for additional heating or cooling.
Eco-friendly sealers can be applied over the epoxy. These sealers protect the floor and are made from sustainable materials. Look for products labeled as green or eco-friendly.
By following these tips, you can epoxy your garage floor in a way that’s better for the planet.
Your Garage Floor's New Look
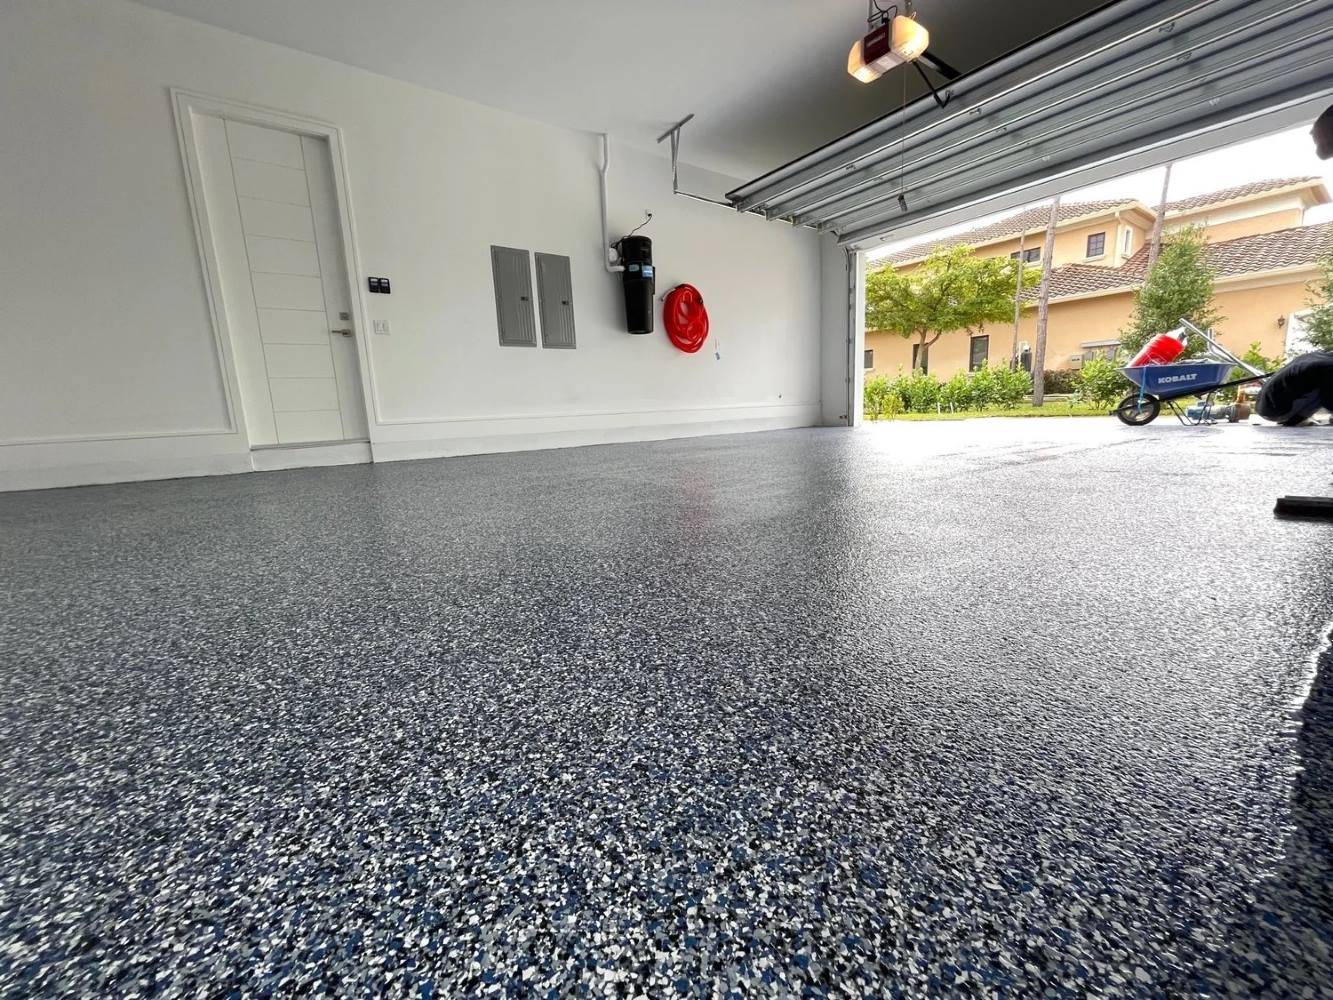
Epoxying your garage floor can be a game-changer. It transforms a dull, stained surface into a sleek, durable one. Start by cleaning the floor thoroughly. Any dirt or oil will affect the epoxy's adhesion. Next, repair any cracks or holes. A smooth surface is key. Once prepped, mix the epoxy according to the instructions. Apply it evenly with a roller. Work in sections to avoid uneven coats. Let it cure for the recommended time. Don't rush this step. Patience ensures a long-lasting finish. Finally, admire your handiwork. Your garage floor is now resistant to stains, chemicals, and wear. Plus, it looks fantastic. With a bit of effort, you've upgraded your space. Enjoy the fruits of your labor.
What tools and materials do I need to epoxy my garage floor?
You'll need epoxy kit, concrete cleaner, paint roller, paintbrush, mixing bucket, protective gear (gloves, goggles), and painter's tape.
How do I prepare my garage floor before applying epoxy?
First, clean the floor thoroughly using a concrete cleaner. Remove any oil stains and debris. Then, etch the concrete with an acid solution to open up the pores. Finally, rinse and let it dry completely.
How long does it take for epoxy to cure?
Epoxy typically takes 24 to 48 hours to dry to the touch. However, it can take up to 7 days to fully cure. Avoid heavy traffic during this period.
Can I apply epoxy over an existing coating?
Yes, but you need to sand the existing coating to create a rough surface for the new epoxy to adhere to. Make sure to clean the surface thoroughly before applying the new layer.
How do I mix the epoxy?
Follow the instructions on your epoxy kit. Usually, you'll need to mix the resin and hardener in a bucket, stirring thoroughly for a few minutes. Make sure to use it within the specified time as it can harden quickly.
What should I do if I see bubbles in the epoxy?
Bubbles can form if the epoxy is applied too thickly or if the surface wasn't properly prepared. Use a heat gun or torch to gently pass over the bubbles, which should help them pop and smooth out.
How do I maintain my epoxy garage floor?
Regularly sweep and mop the floor to keep it clean. Avoid using harsh chemicals or abrasive cleaners. For tough stains, a mixture of water and mild detergent usually does the trick.