
Home>Home & Furniture>Garage & Basement>DIY Basement Remodel Guide
Garage & Basement
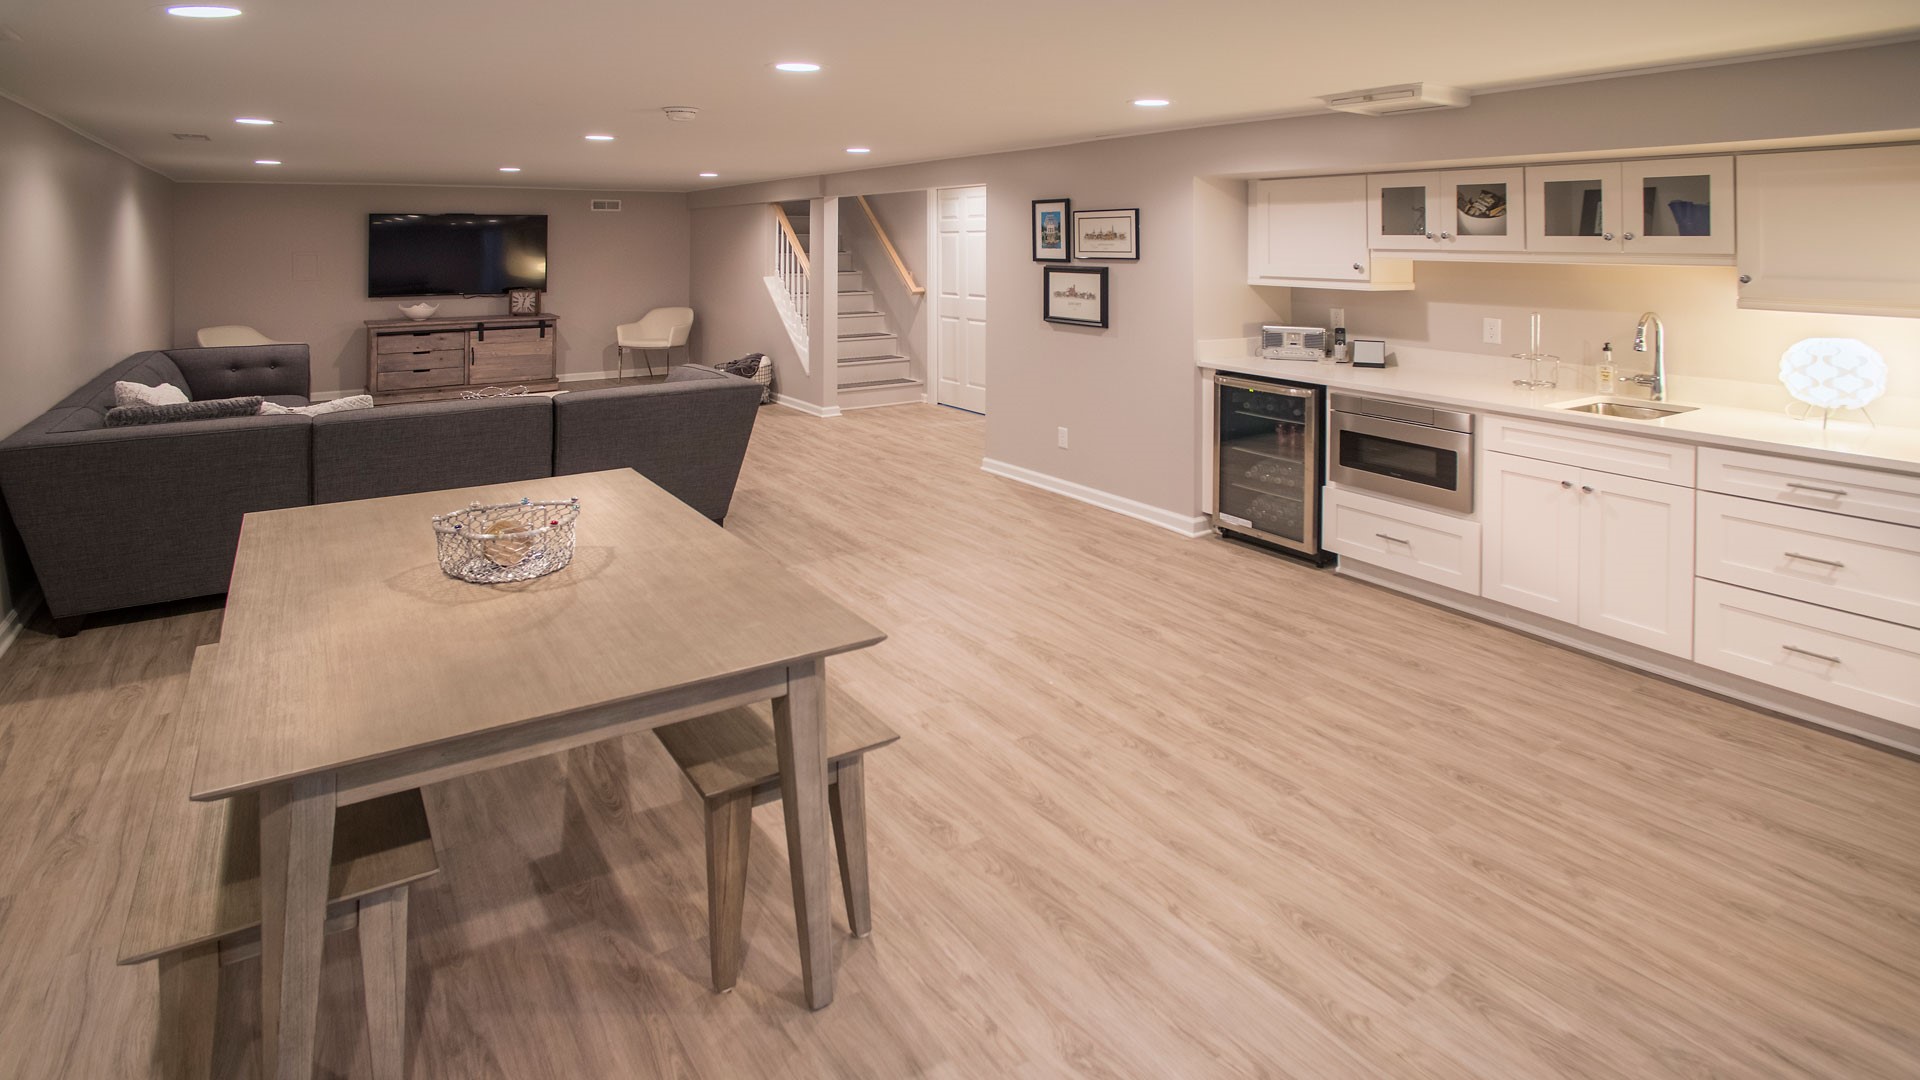
DIY Basement Remodel Guide
Published: August 30, 2024
Transform your basement into a functional space with our DIY Basement Remodel Guide. Step-by-step instructions, tips, and tricks for a successful renovation.
(Many of the links in this article redirect to a specific reviewed product. Your purchase of these products through affiliate links helps to generate commission for Twigandthistle.com, at no extra cost. Learn more)
Thinking of transforming that dark, unused basement into a cozy living space? A basement remodel can add value to your home while providing extra room for your family. Whether it's a new bedroom, game room, or home theater, doing it yourself can save money and give a sense of accomplishment. Worried about tackling this project alone? Don't be. With the right tools and a bit of elbow grease, anyone can turn their basement into a functional area. This guide will walk you through each step, from planning to finishing touches, ensuring your project goes smoothly. Ready to get started?
Getting Ready for Your Basement Remodel
Plan Your Layout: Sketch out where you want walls, rooms, and utilities. Measure the space accurately.
Check for Moisture: Inspect for any signs of water damage or leaks. Use a moisture meter to check the levels. Fix any issues before starting.
Obtain Permits: Visit your local building department to understand what permits are needed. Submit your plans and get approval.
Gather Materials: Make a list of all tools and materials required. Purchase or rent items like drywall, insulation, paint, and power tools.
Set Up Workspace: Clear out the basement. Set up a workbench and organize tools. Ensure good lighting and ventilation.
Safety Gear: Wear safety goggles, gloves, and a dust mask. Keep a first aid kit nearby.
Electrical and Plumbing: Turn off power and water supply before working on electrical or plumbing tasks. Label wires and pipes for easy identification.
Framing and Insulation: Install framing for walls and ceilings. Add insulation to keep the basement warm and reduce noise.
Drywall Installation: Hang drywall sheets on the framed walls. Use screws to secure them. Tape and mud the seams for a smooth finish.
Flooring: Choose moisture-resistant flooring like vinyl or tile. Install according to manufacturer instructions.
Painting and Finishing: Prime and paint walls. Add trim, baseboards, and any other finishing touches.
Clean Up: Dispose of debris properly. Clean tools and store them safely. Ensure the basement is tidy and ready for use.
Essential Materials and Tools
- Measuring Tape: Used to measure dimensions of the basement accurately.
- Utility Knife: Essential for cutting drywall, insulation, and other materials.
- Hammer: Needed for nailing studs, framing, and other tasks.
- Screwdriver Set: Useful for assembling and disassembling fixtures.
- Power Drill: Speeds up the process of drilling holes and driving screws.
- Drywall: Used to create walls and ceilings.
- Drywall Screws: Secure drywall to studs.
- Stud Finder: Helps locate studs behind walls.
- Level: Ensures surfaces are even and straight.
- Saw: Cuts wood, drywall, and other materials.
- Insulation: Keeps the basement warm and energy-efficient.
- Caulk and Caulk Gun: Seals gaps and cracks to prevent drafts.
- Paint and Brushes/Rollers: Adds color and finishes to walls and ceilings.
- Flooring Material: Options include carpet, laminate, or tile.
- Lighting Fixtures: Brightens up the space.
- Electrical Tape: Insulates electrical wires.
- Plumbing Supplies: Needed if adding a bathroom or sink.
- Safety Gear: Includes gloves, goggles, and masks for protection.
- Shop Vacuum: Cleans up debris and dust.
- Plastic Sheeting: Protects floors and furniture from dust and paint.
Required Skills and Time Commitment
Skill Level: Advanced
Time Required: 4-6 weeks
- Planning and Permits: 1-2 weeks
- Framing and Insulation: 3-5 days
- Electrical and Plumbing: 1 week
- Drywall Installation: 3-4 days
- Flooring and Painting: 1 week
- Finishing Touches: 3-5 days
Detailed Steps for Remodeling
Plan Your Layout
- Measure the basement.
- Sketch a floor plan.
- Decide on room functions (e.g., bedroom, office, gym).
Check for Moisture
- Inspect walls and floors for dampness.
- Use a dehumidifier if needed.
- Seal any cracks with waterproof sealant.
Obtain Permits
- Contact local building authority.
- Submit your plans.
- Get necessary permits before starting work.
Clear the Space
- Remove any stored items.
- Clean the area thoroughly.
- Dispose of any debris.
Frame the Walls
- Use 2x4 lumber for framing.
- Secure frames to the floor and ceiling.
- Add insulation between studs.
Install Electrical Wiring
- Plan outlets and light switches.
- Run wiring through wall studs.
- Hire a licensed electrician for connections.
Add Plumbing (if needed)
- Plan for bathroom or wet bar.
- Install pipes before closing walls.
- Hire a plumber for complex work.
Insulate Walls and Ceiling
- Use fiberglass or foam insulation.
- Place insulation between studs.
- Cover with vapor barrier.
Drywall Installation
- Cut drywall sheets to fit.
- Screw drywall to wall studs.
- Tape and mud seams.
Paint Walls and Ceiling
- Apply primer first.
- Use two coats of paint.
- Choose light colors to brighten space.
Install Flooring
- Choose durable flooring (e.g., vinyl, carpet).
- Lay underlayment if needed.
- Install flooring according to manufacturer instructions.
Add Finishing Touches
- Install baseboards and trim.
- Add light fixtures and outlet covers.
- Furnish and decorate the space.
Helpful Tips and Tricks
Plan your layout before starting. Measure everything twice. Use a moisture barrier on walls and floors to prevent dampness. Install proper insulation to keep the space warm. Choose light colors for walls to make the area feel larger. Add plenty of lighting, including overhead and task lights. Use a dehumidifier to control moisture levels.
Common mistakes to avoid: Skipping the moisture barrier can lead to mold. Not planning the layout can result in wasted space. Ignoring permits can cause legal issues. Using dark colors can make the basement feel cramped. Forgetting about ventilation can lead to poor air quality.
Material alternatives: Instead of drywall, consider using moisture-resistant panels. Opt for vinyl flooring instead of carpet to avoid mold. Use LED lights instead of incandescent bulbs for energy efficiency. Consider modular furniture for flexibility.
Estimating the Cost
Drywall: $10 per sheet. You might need 20 sheets, totaling $200.
Insulation: $0.50 per square foot. For a 500-square-foot basement, expect $250.
Flooring: $2 per square foot for laminate. For 500 square feet, that's $1,000.
Paint: $30 per gallon. You might need 5 gallons, costing $150.
Lighting: $50 per fixture. If you install 10 fixtures, that's $500.
Electrical Wiring: $100 for basic supplies.
Plumbing: $200 for basic supplies if adding a bathroom.
Tools: Basic tools like a saw, drill, and hammer might cost $200 if you don't already own them.
Total Cost: Around $2,600.
Budget-Friendly Alternatives:
- Use recycled materials for drywall and insulation.
- Opt for vinyl flooring at $1 per square foot, reducing flooring costs to $500.
- Buy second-hand tools to save on tool expenses.
Creative Variations and Customizations
Flooring: Use vinyl planks for a modern look, or carpet tiles for a cozy feel. Stained concrete can give an industrial vibe, while laminate offers a budget-friendly option.
Walls: Paint with light colors to make the space feel larger. Add wainscoting for a classic touch or use reclaimed wood for a rustic style. Wallpaper can add patterns and textures.
Ceiling: Install drop ceilings for easy access to pipes and wires. Exposed beams can create a loft-like atmosphere. Painted ceilings in dark colors can make the room feel more intimate.
Lighting: Use recessed lighting for a clean look. Pendant lights can add character, while track lighting offers flexibility. LED strips under shelves or along the ceiling can add a modern touch.
Storage: Build custom shelves to fit your needs. Use floating shelves for a sleek look or built-in cabinets for more storage. Storage benches can double as seating.
Furniture: Choose modular furniture for flexibility. Sectional sofas can fit different layouts. Bean bags or floor cushions add a casual feel.
Decor: Add area rugs to define spaces. Mirrors can make the room feel larger. Artwork and family photos personalize the space.
Windows: Install egress windows for safety and natural light. Use window wells with clear covers to keep debris out. Curtains or blinds can add privacy and style.
Heating and Cooling: Use radiant floor heating for comfort. Mini-split systems provide efficient heating and cooling. Ceiling fans can help circulate air.
Soundproofing: Add acoustic panels to reduce noise. Use thick carpets or rugs to absorb sound. Insulated walls can keep the basement quieter.
Bathroom: Install a compact shower to save space. Use floating vanities for a modern look. Tile floors and walls can add durability and style.
Bar Area: Build a custom bar with reclaimed wood. Use bar stools for seating. Add a mini-fridge and shelves for drinks and glasses.
Home Theater: Use dark paint for walls to reduce glare. Install reclining seats for comfort. Add soundproof curtains and carpet for better acoustics.
Gym: Use rubber flooring for durability. Install mirrors to check form. Add storage racks for equipment.
Playroom: Use bright colors for walls. Add soft mats for safety. Install storage bins for toys.
Office: Use neutral colors for walls. Add a large desk and comfortable chair. Install shelves for books and supplies.
Eco-Friendly Remodeling Tips
Reclaimed wood can be used for flooring or wall accents. It adds character and reduces waste. Bamboo flooring is another great option. Bamboo grows quickly, making it a renewable resource.
Recycled glass tiles work well for backsplashes or countertops. They come in various colors and patterns. Cork flooring is soft underfoot and provides good insulation. Cork is harvested from the bark of cork oak trees, which regrows, making it sustainable.
Low-VOC paints are better for indoor air quality. VOCs, or volatile organic compounds, can be harmful. Look for paints labeled low or zero VOC.
Insulation made from recycled materials like denim or cellulose is eco-friendly. Denim insulation is made from recycled jeans, while cellulose insulation comes from recycled paper.
LED lighting uses less energy and lasts longer than traditional bulbs. This reduces electricity use and the need for frequent replacements.
Salvaged fixtures like sinks, doors, or light fixtures can be found at salvage yards or online marketplaces. Reusing these items gives them a second life and reduces the demand for new products.
Natural fiber rugs made from materials like jute, sisal, or wool are biodegradable and often produced with fewer chemicals.
Water-based sealants and adhesives are less toxic than their solvent-based counterparts. They are better for both health and the environment.
Energy-efficient windows help maintain temperature, reducing heating and cooling costs. Look for windows with a good energy rating.
Composting toilets or low-flow fixtures can reduce water use. These options are especially useful if you plan to add a bathroom to your basement.
Solar panels can be installed to power your basement remodel. They reduce reliance on non-renewable energy sources.
Reuse existing materials whenever possible. For example, if you have old furniture, consider refurbishing it instead of buying new. This saves money and reduces waste.
Your Basement Awaits
You've got the tools, the knowledge, and the drive to transform your basement into something amazing. Whether it's a cozy family room, a sleek home office, or a fun game space, your basement can become whatever you dream. Remember to plan carefully, measure twice, and don't rush. Mistakes happen, but they're part of learning. Keep safety in mind, especially with electrical and plumbing work. Don't hesitate to ask for help when needed. Your hard work will pay off, and you'll have a space that's uniquely yours. So grab your tools, roll up your sleeves, and get started. Your dream basement is just a few steps away. Happy remodeling!
How do I start a basement remodel?
First, assess your basement's condition. Check for moisture issues, cracks, and pests. Then, plan your layout. Decide on rooms, storage, and lighting. Finally, gather your tools and materials.
What tools will I need?
You'll need a hammer, screwdriver, drill, saw, measuring tape, level, and safety gear like gloves and goggles. For more advanced tasks, consider renting a nail gun or tile cutter.
How do I handle moisture problems?
First, seal any cracks with concrete filler. Install a dehumidifier to keep the air dry. If water is seeping in, consider installing a sump pump or French drain.
What kind of flooring is best for basements?
Vinyl and tile are great because they're water-resistant. Carpet can work if you use a moisture barrier underneath. Avoid hardwood as it can warp.
How do I improve basement lighting?
Use recessed lighting for a clean look. Add floor lamps and table lamps for extra light. Consider light-colored paint to reflect more light.
Can I add a bathroom in my basement?
Yes, but you'll need to check local codes. You'll likely need a plumber to install pipes and a sewage ejector pump. Plan for ventilation to avoid moisture buildup.
How do I insulate my basement?
Use foam board insulation on the walls. Seal gaps with spray foam. For the ceiling, consider fiberglass batts. Insulation helps keep the basement warm and energy-efficient.