
Home>Home & Furniture>Doors & Windows>DIY Barn Door Baby Gate Guide
Doors & Windows
DIY Barn Door Baby Gate Guide
Published: September 6, 2024
Learn how to create a stylish and functional DIY barn door baby gate with our step-by-step guide. Perfect for keeping your little ones safe while adding rustic charm to your home.
(Many of the links in this article redirect to a specific reviewed product. Your purchase of these products through affiliate links helps to generate commission for Twigandthistle.com, at no extra cost. Learn more)
Keeping your little ones safe while adding a touch of rustic charm to your home can be easier than you think. Building a barn door baby gate is a fun and practical DIY project. It not only keeps your child secure but also adds character to your living space. This guide will walk you through the steps, materials, and tools needed to create your own custom baby gate. Whether you're a seasoned DIY enthusiast or a beginner, this project is manageable and rewarding. Ready to get started on a stylish and functional addition to your home? Let’s dive in!
Getting Ready for Your Project
Measure the Space: Use a tape measure to get the exact width and height of the doorway or area where the gate will go. Write these measurements down.
Gather Materials: Collect all necessary materials like wood planks, screws, hinges, a latch, and paint or stain. Make sure to have a saw, drill, screwdriver, measuring tape, and sandpaper.
Safety Gear: Wear safety goggles, gloves, and a dust mask to protect yourself while cutting and sanding wood.
Clear the Workspace: Ensure your workspace is clean and free of clutter. This will help prevent accidents and make it easier to find tools and materials.
Cut the Wood: Based on your measurements, cut the wood planks to the required size. Sand the edges to smooth out any rough spots.
Pre-drill Holes: Pre-drill holes for the screws to prevent the wood from splitting. This step makes assembly easier and more precise.
Assemble the Gate: Lay out the wood pieces and start screwing them together. Make sure everything is aligned properly.
Paint or Stain: Apply paint or stain to the assembled gate. Let it dry completely before moving on to the next step.
Attach Hinges and Latch: Secure the hinges to one side of the gate and the doorway. Attach the latch to the opposite side to ensure the gate stays closed.
Test the Gate: Open and close the gate several times to make sure it swings smoothly and the latch works properly. Make any necessary adjustments.
What You Need: Materials and Tools
Materials:
- Wood Planks: Used to build the frame and panels of the gate.
- Wood Screws: Secure the wood pieces together.
- Wood Glue: Provides extra strength to the joints.
- Sandpaper: Smooths out rough edges and surfaces.
- Paint or Stain: Adds color and protects the wood.
- Hinges: Allows the gate to swing open and closed.
- Latch: Keeps the gate securely closed.
- Measuring Tape: Ensures accurate measurements.
- Pencil: Marks cutting lines and screw placements.
Tools:
- Saw: Cuts the wood planks to the required sizes.
- Drill: Makes holes for screws and hinges.
- Screwdriver: Tightens screws into place.
- Paintbrush: Applies paint or stain to the wood.
- Clamps: Holds wood pieces together while the glue dries.
- Level: Ensures the gate is installed straight.
- Safety Goggles: Protects eyes while cutting and drilling.
- Work Gloves: Protects hands during construction.
Skill Level and Time Commitment
Skill Level: Intermediate
Time Required: 4-6 hours
- Measure and Cut Wood: 1 hour
- Assemble Frame: 1 hour
- Attach Hardware: 1 hour
- Sand and Paint: 1-2 hours
- Install Gate: 1 hour
How to Build It: Step-by-Step Guide
Gather Materials and Tools
- Wooden boards (for the door)
- Screws and nails
- Hinges
- Sliding barn door hardware kit
- Sandpaper
- Paint or stain
- Measuring tape
- Saw
- Drill
- Screwdriver
- Level
Measure the Space
- Measure the width and height of the doorway.
- Add a few inches to the width for overlap.
Cut the Wood
- Cut boards to the desired length and width.
- Sand edges to smooth any rough spots.
Assemble the Door
- Lay boards side by side.
- Attach horizontal boards across the top, middle, and bottom using screws.
- Ensure the door is square by measuring diagonally.
Paint or Stain
- Apply paint or stain to the door.
- Let it dry completely.
Install Sliding Hardware
- Follow instructions in the hardware kit.
- Attach the track above the doorway.
- Ensure the track is level.
Attach the Door
- Hang the door on the track.
- Test to make sure it slides smoothly.
Install a Latch
- Attach a latch to keep the door closed.
- Ensure it is easy to operate but secure.
Test the Gate
- Open and close the gate several times.
- Make adjustments if needed.
Safety Check
- Ensure there are no sharp edges.
- Confirm the gate is sturdy and secure.
Helpful Tips and Tricks
Measure Twice, Cut Once: Always double-check measurements before cutting wood. This saves time and materials.
Use Quality Wood: Opt for hardwood or sturdy pine. Avoid warped or knotty pieces.
Pre-drill Holes: Prevent wood from splitting by pre-drilling holes for screws.
Sand Edges Smooth: Sand all edges to avoid splinters, making it safer for babies.
Sturdy Hinges: Choose heavy-duty hinges to support the weight of the door.
Latch Placement: Install the latch high enough so children can't reach it.
Level the Gate: Use a level to ensure the gate hangs straight. An uneven gate won't close properly.
Paint or Stain: Protect the wood with paint or stain. Choose non-toxic options safe for kids.
Common Mistakes to Avoid:
Incorrect Measurements: Misjudging dimensions can lead to ill-fitting gates.
Weak Fasteners: Using small screws or nails can result in a flimsy gate.
Ignoring Wall Studs: Always anchor screws into wall studs for maximum stability.
Skipping Sanding: Rough edges can cause injuries. Sand thoroughly.
Alternatives for Materials or Methods:
Reclaimed Wood: Use reclaimed wood for a rustic look and eco-friendly option.
Sliding Mechanism: Instead of hinges, consider a sliding barn door track for a unique touch.
PVC or Metal: For a modern twist, use PVC pipes or metal bars instead of wood.
Magnetic Latch: Use a magnetic latch instead of a traditional one for easier operation.
Estimating the Cost
Materials:
- Wood: $30-$50 (depends on type and size)
- Barn Door Hardware Kit: $40-$70
- Screws and Nails: $5-$10
- Wood Stain or Paint: $10-$20
- Sandpaper: $5
Tools:
- Drill: $30-$50 (if you don't already have one)
- Saw: $20-$40 (hand saw) or $50-$100 (electric saw)
- Measuring Tape: $5-$10
- Paintbrushes: $5-$10
- Level: $10-$15
Total Cost Estimate: $160-$285
Budget-Friendly Alternatives:
- Reclaimed Wood: Often free or very cheap
- Basic Hardware Kit: $20-$30
- Borrow Tools: Ask friends or family
- DIY Paint: Mix leftover paints
Total Cost with Alternatives: $80-$150
Different Ways to Customize
Materials: Instead of traditional wood, try reclaimed wood for a rustic look or plywood for a budget-friendly option. Metal can add an industrial touch.
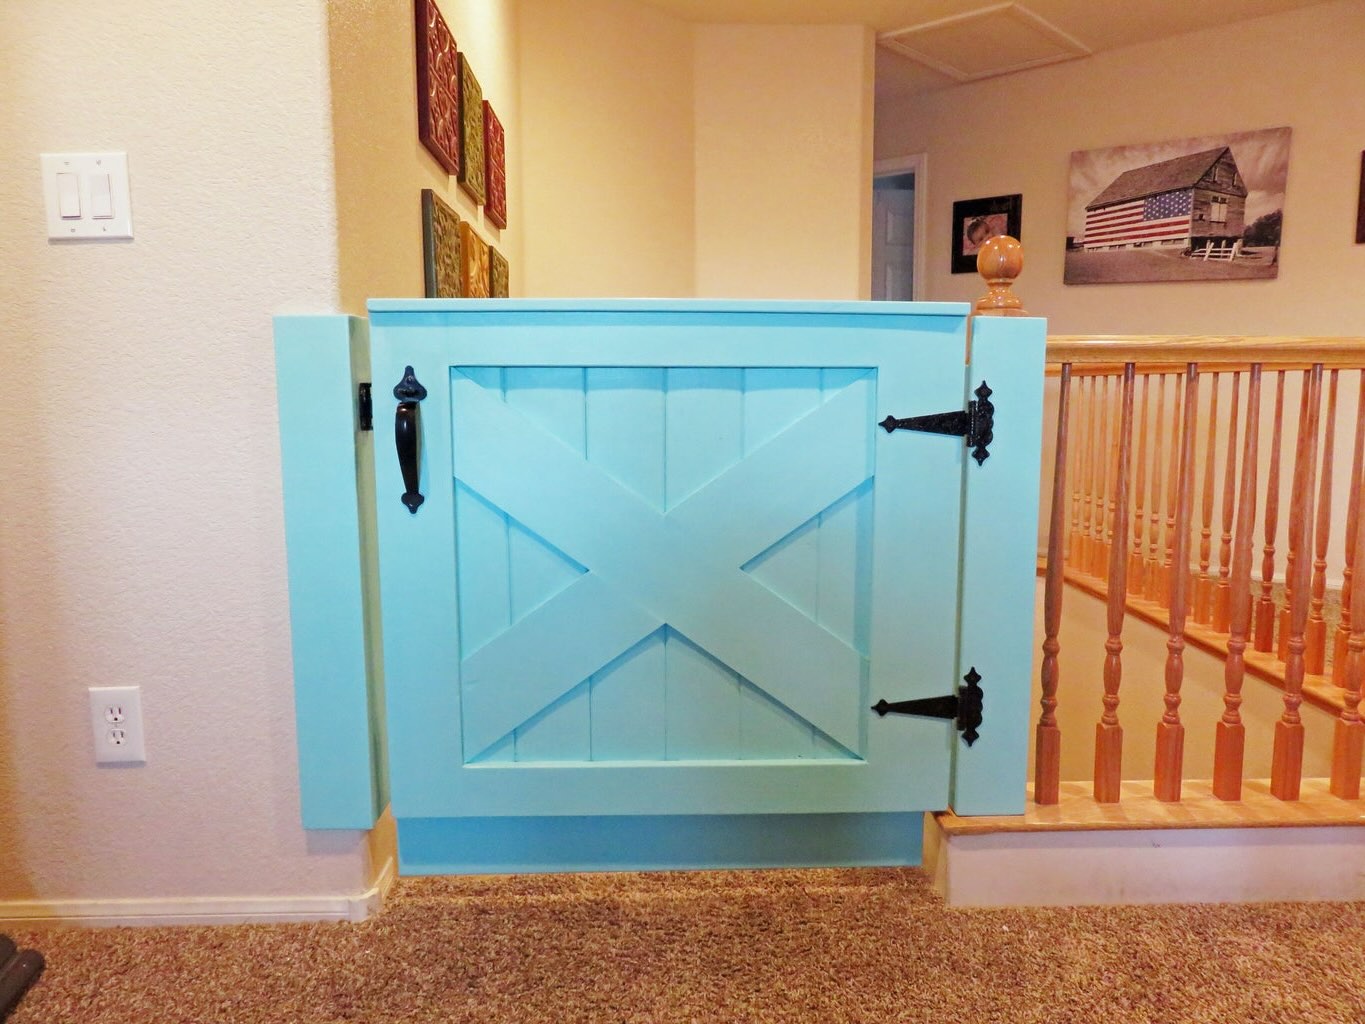
Colors: Paint the gate in bright colors like teal or yellow for a playful vibe. Use stains to highlight the natural wood grain. Chalk paint can give a vintage feel.
Styles: Add decorative hardware like wrought iron handles or hinges. Use barn door rollers for a classic sliding mechanism. Incorporate cut-out shapes or patterns for a unique design.
Finishes: Apply a matte finish for a modern look or a glossy finish for a polished appearance. Use distressing techniques to create an aged effect.
Safety Features: Install a soft-close mechanism to prevent slamming. Add a locking latch for extra security. Use rounded edges to avoid sharp corners.
Height and Width: Customize the gate's dimensions to fit your space. Make it taller for added security or wider to cover larger openings.
Accessories: Attach a chalkboard panel for notes and drawings. Add hooks for hanging baby essentials. Install a small window to peek through.
Eco-Friendly Tips
Reclaimed wood makes an excellent choice for a barn door baby gate. It’s sturdy and gives a rustic look. Look for old pallets, fences, or barn wood. Sand it down to remove splinters.
Eco-friendly paint or stain can be used to finish the wood. Choose low-VOC or water-based options to keep the air clean.
Recycled hardware like hinges and handles can be found at thrift stores or salvage yards. These pieces add character and reduce waste.
Natural fibers like jute or hemp can be used for any decorative elements. They’re biodegradable and sustainable.
Upcycled materials can be used for additional features. For example, old belts can serve as latches or straps.
Non-toxic sealants ensure the gate is safe for babies. Look for products labeled as baby-safe or food-safe.
Energy-efficient tools like hand tools or battery-operated ones reduce electricity use. Hand saws, screwdrivers, and sanders can often do the job just as well.
Reusable templates or guides help minimize waste. Create patterns from cardboard or scrap paper that can be used multiple times.
Local sourcing of materials reduces the carbon footprint. Check local lumber yards, hardware stores, or online community groups for supplies.
Minimal packaging when buying new materials helps reduce waste. Choose items with little to no plastic wrapping.
Your Barn Door Baby Gate Awaits
Building a barn door baby gate isn't just about safety; it's a fun project that adds charm to your home. You've got the materials, the tools, and the know-how. Measure your space, cut your wood, and assemble your pieces. Don't forget to sand everything smooth to avoid splinters. Attach the hardware, and make sure it swings easily. A coat of paint or stain can give it that final touch.
Once installed, test it out. Make sure it's sturdy and secure. This gate will keep your little one safe while adding a rustic touch to your decor. Plus, you get the satisfaction of knowing you built it yourself. So grab those tools, and get started. Your barn door baby gate is just a few steps away from becoming a reality. Happy building!
How do I measure for a barn door baby gate?
Measure the width of the doorway or space you want to block. Add a few inches on each side for overlap. Also, measure the height to ensure the gate is tall enough to keep your little one safe.
What materials do I need?
You'll need wood planks, screws, hinges, a latch, and a barn door track kit. Sandpaper, paint or stain, and a drill will also come in handy.
How do I install the barn door track?
First, find the studs in your wall. Attach the track to the studs using screws. Make sure it's level so the door slides smoothly.
Can I customize the design?
Absolutely! Paint or stain the wood to match your decor. You can even add decorative hardware for a unique touch.
Is it easy to open and close?
Yes, barn door baby gates slide open and closed effortlessly. Just make sure the track is installed correctly and kept clean.
How do I ensure it's safe?
Double-check all screws and hardware are secure. Test the gate to make sure it doesn't wobble or come off the track. Always supervise your child around the gate.
What if I have uneven floors?
Use a level to make sure the track is straight. You might need to shim the bottom of the gate to keep it from dragging.