
Home>Create & Decorate>Weddings>DIY Wedding Arch: Create Your Dream Ceremony Backdrop
Weddings
DIY Wedding Arch: Create Your Dream Ceremony Backdrop
Published: February 22, 2024

Senior Editor in Create & Decorate, Kathryn combines traditional craftsmanship with contemporary trends. Her background in textile design and commitment to sustainable crafts inspire both content and community.
Create a stunning DIY wedding arch for your dream ceremony backdrop. Get inspired and find ideas for your weddings.
(Many of the links in this article redirect to a specific reviewed product. Your purchase of these products through affiliate links helps to generate commission for Twigandthistle.com, at no extra cost. Learn more)
Introduction
Your wedding day is a celebration of love, commitment, and the beautiful journey that lies ahead. As you envision this special day, you may have a clear picture of the perfect setting for your ceremony. One element that can truly elevate the ambiance and create a stunning focal point is a wedding arch. A DIY wedding arch not only adds a touch of personalization to your ceremony backdrop but also serves as a symbol of the union between you and your partner.
Crafting your own wedding arch allows you to infuse your personality and style into every detail, creating a unique and memorable centerpiece for your ceremony. Whether you envision a rustic, bohemian, modern, or traditional theme, a DIY wedding arch provides the perfect canvas to bring your vision to life. From selecting the ideal location for your wedding arch to choosing the materials and decorations that reflect your style, every step of the process offers an opportunity for creativity and personal expression.
In this comprehensive guide, we will explore the essential aspects of creating a DIY wedding arch that perfectly complements your dream ceremony. From choosing the right location and materials to providing step-by-step instructions for construction and tips for seamless setup on your big day, this guide will equip you with the knowledge and inspiration needed to embark on this exciting DIY project. Whether you are a seasoned crafter or a first-time DIY enthusiast, this guide will empower you to craft a stunning wedding arch that embodies the essence of your love story and sets the stage for a truly magical celebration.
Choosing the Right Location for Your Wedding Arch
Selecting the perfect location for your wedding arch is a crucial step in creating a captivating backdrop for your ceremony. The chosen spot not only frames the exchange of vows but also sets the tone for the entire event. When considering the location, it's essential to envision how the wedding arch will harmonize with the surrounding environment and enhance the overall aesthetic of your ceremony.
Outdoor Settings
If you have opted for an outdoor wedding, there are various enchanting locations where you can position your wedding arch. A picturesque garden offers a romantic backdrop, with blooming flowers and lush greenery adding a touch of natural beauty to your ceremony. Alternatively, a serene lakeside setting can provide a tranquil ambiance, with the shimmering water serving as a captivating backdrop for your wedding arch. Consider the natural elements and features of the outdoor space, such as majestic trees, rolling hills, or a breathtaking sunset view, as these can further enhance the visual appeal of your wedding arch.
Indoor Venues
For indoor weddings, the location of your wedding arch can significantly impact the atmosphere of the ceremony. Many indoor venues offer versatile spaces where you can position the wedding arch to create a striking focal point. Whether it's a grand ballroom, a cozy chapel, or a contemporary loft, consider the layout and architectural features of the venue when selecting the ideal spot for your wedding arch. Positioning the arch against a backdrop of elegant drapery, ornate windows, or intricate architectural details can add a touch of sophistication and charm to your ceremony.
Consider the Flow of the Ceremony
When choosing the location for your wedding arch, it's important to consider the flow of the ceremony. Ensure that the arch is strategically placed to allow for a seamless procession and create a natural focal point for the exchange of vows. Additionally, consider the positioning of seating arrangements and the overall layout of the ceremony space to ensure that the wedding arch complements the flow of the event.
By carefully selecting the location for your wedding arch, you can create a captivating backdrop that not only reflects your style and vision but also enhances the beauty of your ceremony. Whether you opt for an outdoor setting surrounded by nature's splendor or an indoor venue with architectural elegance, the right location will set the stage for a truly unforgettable celebration.
Selecting the Perfect Materials for Your DIY Wedding Arch
When it comes to crafting a DIY wedding arch, selecting the right materials is essential to bring your vision to life. The choice of materials not only determines the overall look and feel of the arch but also influences its durability and stability. Whether you prefer a rustic, elegant, or whimsical design, the materials you select will play a pivotal role in creating a stunning centerpiece for your ceremony.
Wood
Wood is a versatile and popular choice for crafting a DIY wedding arch. It exudes a natural, rustic charm and can be easily customized to suit your desired aesthetic. Cedar, pine, or birch are commonly used for their durability and aesthetic appeal. You can opt for raw, untreated wood for a more organic look, or stained and polished wood for a refined finish. Consider the dimensions and shape of the wood pieces based on the arch design you envision, whether it's a classic arched structure or a contemporary geometric frame.
Metal
For a touch of elegance and modern flair, metal is an excellent choice for a DIY wedding arch. Steel or wrought iron can lend a sleek and sophisticated look to the arch, complementing a variety of wedding themes. Metal tubing or rods can be used to create intricate designs and decorative elements, adding a sense of refinement to the structure. Consider the weight and stability of the metal components to ensure that the arch stands securely during the ceremony.
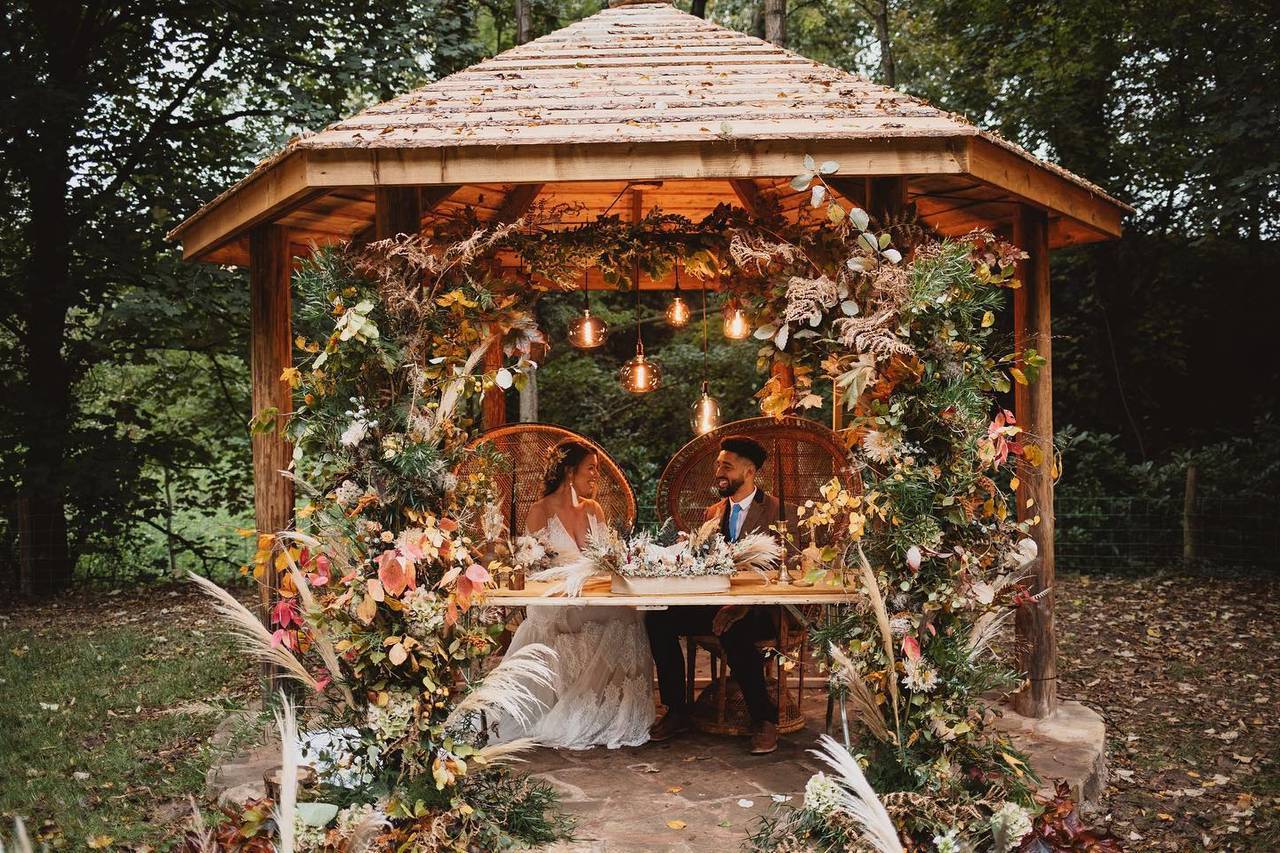
Drapery and Floral Accents
Incorporating drapery and floral elements can elevate the visual impact of your wedding arch. Sheer fabrics such as chiffon or tulle can create a soft, romantic backdrop, while lush greenery and blooms can add a touch of natural beauty. Consider the color palette and texture of the fabrics and florals to harmonize with your overall wedding theme. Whether you opt for cascading vines, delicate blooms, or billowing fabric, these accents can infuse a sense of enchantment and romance into your DIY wedding arch.
Decorative Embellishments
Adding decorative embellishments such as ribbons, lace, or ornamental details can further enhance the aesthetic appeal of your wedding arch. These embellishments can be tailored to reflect your personal style and the overall theme of your wedding. Whether you prefer a minimalist, bohemian, or opulent look, the right decorative elements can add a touch of individuality and charm to the arch.
By carefully selecting the materials for your DIY wedding arch, you can bring your creative vision to fruition and craft a stunning centerpiece for your ceremony. Whether you opt for the warmth of wood, the sophistication of metal, or the softness of drapery and florals, each material choice contributes to the overall beauty and ambiance of your wedding arch.
Step-by-Step Instructions for Building Your Wedding Arch
Building your own wedding arch can be a deeply rewarding and creative endeavor. With careful planning and attention to detail, you can construct a stunning centerpiece that reflects your unique style and vision. Here are step-by-step instructions to guide you through the process of bringing your DIY wedding arch to life:
1. Design Planning
Begin by sketching or visualizing the design of your wedding arch. Consider the dimensions, shape, and style that align with your overall wedding theme. Whether you envision a classic arched structure, a modern geometric frame, or a whimsical bohemian design, having a clear plan will serve as a roadmap for the construction process.
2. Gather Materials
Once you have finalized the design, gather the necessary materials based on your chosen design. If you opt for a wooden arch, ensure that you have the appropriate lumber, fasteners, and tools. For a metal arch, gather the steel or wrought iron components, along with any welding equipment if needed. Additionally, collect the drapery, floral accents, and decorative embellishments that will adorn the arch.
3. Prepare the Workspace
Set up a designated workspace that allows ample room for assembly and construction. Ensure that the area is well-ventilated and equipped with the necessary tools, such as saws, drills, and measuring instruments. Having a clean and organized workspace will streamline the construction process and ensure safety.
4. Construction
Follow your design plan and begin constructing the main frame of the wedding arch. Whether you are working with wood or metal, take precise measurements and use appropriate techniques to assemble the structure. Pay close attention to stability and structural integrity, especially if the arch will be positioned outdoors.
5. Adding Decorative Elements
Once the main frame is constructed, it's time to add the decorative elements that will enhance the visual appeal of the wedding arch. Whether it's draping sheer fabrics, attaching floral arrangements, or incorporating decorative embellishments, carefully integrate these elements to achieve the desired aesthetic.
6. Finishing Touches
After the decorative elements are in place, take a step back to assess the overall look of the wedding arch. Make any necessary adjustments and ensure that every detail aligns with your vision. Consider applying a protective finish to wooden components or metal coatings to enhance durability and longevity.
7. Final Inspection
Before the big day, conduct a thorough inspection of the wedding arch to ensure that it meets your expectations. Test its stability and make any final adjustments to guarantee that it is ready to serve as the captivating backdrop for your ceremony.
By following these step-by-step instructions, you can embark on the rewarding journey of building your own wedding arch. Each stage of the process offers an opportunity for creativity and personalization, allowing you to craft a centerpiece that symbolizes the beauty and uniqueness of your love story.
Decorating Your Wedding Arch to Match Your Theme
Decorating your wedding arch is a transformative process that allows you to infuse your personal style and theme into every detail. Whether you envision a romantic, rustic, modern, or whimsical ambiance for your ceremony, the decorations on your wedding arch serve as a captivating expression of your love story. Here are insightful tips for adorning your wedding arch to harmonize with your chosen theme:
Embrace Floral Elegance
For a romantic and timeless theme, floral accents can add an enchanting touch to your wedding arch. Consider incorporating lush blooms such as roses, peonies, or hydrangeas to create a dreamy and ethereal atmosphere. Whether you opt for a full floral garland draped along the arch or clusters of blooms strategically placed at key points, the natural beauty of flowers can evoke a sense of romance and elegance.
Rustic Charm with Greenery
If your wedding theme leans towards rustic or bohemian, greenery can play a pivotal role in adorning your wedding arch. Delicate vines, eucalyptus branches, or cascading ferns can create a whimsical and organic aesthetic, infusing a sense of natural charm into the arch. Consider intertwining the greenery with soft, billowing fabrics to achieve a harmonious blend of rustic and romantic elements.
Personalized Details
Infusing personalized elements into the decoration of your wedding arch can add a unique and sentimental touch to the ceremony backdrop. Consider incorporating monogrammed initials, meaningful quotes, or symbolic ornaments that hold significance to you and your partner. These personalized details not only reflect your love story but also create a heartfelt connection with your guests.
Drapery and Fabric Accents
For a theme that exudes elegance and sophistication, drapery and fabric accents can elevate the visual impact of your wedding arch. Sheer, flowing fabrics such as chiffon or tulle can create a soft and romantic backdrop, especially when gently billowing in the breeze. Consider incorporating fabric in your chosen color palette to complement the overall theme and create a sense of ethereal beauty.
Lighting and Ambiance
Incorporating subtle lighting elements into the decoration of your wedding arch can enhance the ambiance and create a captivating focal point. Twinkling fairy lights, soft candlelight, or delicate lanterns can add a touch of warmth and intimacy to the arch, especially for evening ceremonies. The gentle glow of light can accentuate the romantic atmosphere and create a mesmerizing backdrop for your vows.
By embracing these creative ideas and thoughtful details, you can adorn your wedding arch to perfectly match your chosen theme, creating a captivating centerpiece that sets the stage for a truly magical celebration. Each decorative element serves as a reflection of your love story, infusing the ceremony with beauty, sentiment, and personalization.
Tips for Setting Up Your Wedding Arch on the Big Day
Setting up your wedding arch on the big day is a pivotal moment that requires careful planning and execution to ensure a seamless and captivating ceremony backdrop. Here are essential tips to guide you through the process of preparing and positioning your DIY wedding arch for the momentous occasion:
-
Early Preparation: Begin by coordinating with your wedding venue or event planner to determine the designated setup time for the wedding arch. Ensure that you have access to the ceremony space well in advance to allow ample time for assembly and decoration. Early preparation is key to minimizing last-minute stress and ensuring that the setup process unfolds smoothly.
-
Enlist Support: Enlist the help of trusted friends, family members, or your wedding party to assist with the setup of the wedding arch. Designate specific tasks such as assembling the main frame, attaching decorative elements, and ensuring the arch is securely positioned. Having a supportive team can streamline the setup process and alleviate any potential challenges.
-
Weather Contingency Plan: If your ceremony is outdoors, be mindful of potential weather conditions and have a contingency plan in place. Prepare for inclement weather by having protective coverings or alternative setup options available. Additionally, consider the positioning of the arch in relation to the sun's glare or strong winds to ensure optimal visibility and stability.
-
Trial Run: Prior to the big day, consider conducting a trial run of the arch setup at the venue or a similar location. This allows you to familiarize yourself with the assembly process, identify any potential logistical issues, and make necessary adjustments. A trial run provides valuable insights that can contribute to a more efficient and polished setup on the actual wedding day.
-
Secure Anchoring: Whether your wedding arch is positioned indoors or outdoors, ensure that it is securely anchored to prevent any unexpected movement or instability. Utilize heavy-duty stakes, sandbags, or weighted bases to anchor the arch, especially in outdoor settings where wind or uneven terrain may pose challenges.
-
Final Inspection: Once the wedding arch is fully assembled and adorned, conduct a final inspection to ensure that every detail is in place. Check for any loose components, ensure that decorative elements are secure, and confirm that the arch aligns with your vision. Taking the time for a thorough inspection contributes to a flawless presentation on the day of your ceremony.
-
Photography Considerations: Collaborate with your photographer to discuss the positioning of the wedding arch in relation to the ceremony space. Consider the optimal angles and lighting conditions for capturing stunning photographs of the arch, ensuring that it serves as a captivating backdrop for your cherished moments.
By implementing these tips, you can navigate the setup of your wedding arch with confidence and precision, creating a breathtaking centerpiece that symbolizes the beauty and significance of your special day. The careful planning and execution of the arch setup contribute to a memorable and enchanting ceremony, leaving a lasting impression on you, your partner, and your cherished guests.
Conclusion
Crafting a DIY wedding arch is a labor of love that allows you to infuse your ceremony with personalization, creativity, and heartfelt symbolism. As you embark on this journey, the process of choosing the right location, selecting materials, constructing the arch, adorning it with decorative elements, and setting it up for the big day becomes a testament to your commitment and vision for a truly memorable celebration.
The DIY approach to creating a wedding arch offers a profound sense of fulfillment, as every step reflects your unique style and narrative. Whether you opt for a natural outdoor setting adorned with blooming flowers or an indoor venue with architectural elegance, the location you choose becomes the canvas for your love story. It sets the stage for a captivating ceremony backdrop that harmonizes with the surrounding environment and encapsulates the essence of your union.
Selecting the perfect materials for your DIY wedding arch is a pivotal decision that shapes the overall aesthetic and durability of the structure. Whether you gravitate towards the warmth of wood, the sophistication of metal, or the softness of drapery and florals, each material choice contributes to the visual impact and emotional resonance of the arch.
The step-by-step process of building your wedding arch is a transformative experience that unfolds with meticulous planning, creative expression, and hands-on craftsmanship. From the initial design planning to the final inspection, every stage offers an opportunity to infuse the arch with your personal touch, culminating in a stunning centerpiece that embodies the beauty and uniqueness of your love story.
Adorning your wedding arch with decorative elements that match your theme is a captivating journey of creativity and expression. Whether you embrace floral elegance, rustic charm, personalized details, or fabric accents, each decorative element becomes a reflection of your love story, infusing the ceremony with beauty, sentiment, and personalization.
Setting up your wedding arch on the big day is a culmination of careful preparation, teamwork, and attention to detail. From early preparation and enlisting support to securing anchoring and conducting a final inspection, the setup process ensures that the arch serves as a captivating backdrop for your cherished moments.
In conclusion, crafting a DIY wedding arch is a profound and rewarding endeavor that allows you to create a centerpiece that symbolizes the beauty and significance of your special day. The love, dedication, and creativity infused into every aspect of the arch culminate in a captivating and unforgettable ceremony backdrop, setting the stage for a celebration that reflects your unique love story.