
Home>Create & Decorate>DIY & Crafts>How To Make A Window Sill
DIY & Crafts
How To Make A Window Sill
Published: April 19, 2024

Content Creator specializing in woodworking and interior transformations. Caegan's guides motivate readers to undertake their own projects, while his custom furniture adds a personal touch.
Learn how to make a window sill with this DIY & Crafts guide. Create a beautiful and functional window feature with our step-by-step instructions.
(Many of the links in this article redirect to a specific reviewed product. Your purchase of these products through affiliate links helps to generate commission for Twigandthistle.com, at no extra cost. Learn more)
Introduction
So, you've decided to spruce up your windows by adding a window sill. A window sill not only adds a decorative touch to your windows but also provides a functional surface for placing plants, ornaments, or simply enjoying the view. In this guide, we'll walk you through the step-by-step process of creating and installing your own window sill. Whether you're a seasoned DIY enthusiast or a beginner looking to take on a new project, making a window sill is a rewarding and achievable task that can enhance the overall look and feel of your home. Let's dive in and get started!
Materials Needed
To get started on making your own window sill, you'll need to gather the following materials:
-
Wood: Choose a high-quality wood such as pine, oak, or maple for your window sill. The wood should be at least 1 inch thick and wide enough to extend beyond the window frame to accommodate the desired overhang.
-
Measuring Tape: A reliable measuring tape will be essential for accurately measuring the dimensions of your window and the required length of the sill.
-
Saw: A saw, such as a circular saw or a miter saw, will be necessary for cutting the wood to the precise dimensions needed for your window sill.
-
Sandpaper: You'll need sandpaper or a sanding block to smooth out any rough edges and surfaces on the wood.
-
Wood Stain or Paint: Depending on your preference, you can choose to stain or paint the window sill to match your interior decor.
-
Wood Sealer: Applying a wood sealer will help protect the window sill from moisture and potential damage, especially if it will be exposed to the elements.
-
Wood Glue: This will be used to secure any joints or connections in the window sill.
-
Screws or Nails: Depending on your preference and the type of wood you're using, you'll need either screws or nails to secure the window sill in place.
-
Safety Gear: Don't forget to prioritize safety by wearing protective gear such as goggles and gloves when working with wood and power tools.
With these materials in hand, you'll be well-equipped to start creating your own custom window sill.
Measuring and Cutting the Sill
Once you have gathered all the necessary materials, it's time to move on to the crucial step of measuring and cutting the window sill. Follow these steps to ensure precision and accuracy in creating your custom window sill:
-
Measure the Window: Begin by measuring the width of the window opening where the sill will be placed. Take accurate measurements to ensure a perfect fit for your window sill.
-
Determine the Sill Length: Decide on the desired overhang length for your window sill. Typically, a 1 to 1.5-inch overhang is recommended for both aesthetic appeal and functionality.
-
Mark the Wood: Using a pencil and a straight edge, mark the wood according to the measurements taken. Double-check the markings to avoid any errors before cutting.
-
Cut the Wood: With the marked measurements in place, use a saw to carefully cut the wood along the lines. If you're using a circular saw, ensure that the blade is set to the appropriate depth to achieve a clean and precise cut.
-
Test the Fit: Once the wood is cut, test the fit of the sill in the window opening. Make any necessary adjustments to ensure a snug and accurate fit.
By following these steps, you'll be able to create a perfectly measured and cut window sill that fits seamlessly into your window space. Accuracy and attention to detail during this stage will contribute to the overall success of your window sill project.
Sanding and Finishing
After the window sill has been accurately measured, cut, and fitted, the next crucial step is sanding and finishing the wood to achieve a smooth and polished surface. Follow these steps to ensure your window sill is beautifully finished and ready for installation:
-
Sand the Surface: Use medium-grit sandpaper to smooth out any rough edges, uneven surfaces, or imperfections on the wood. Sand in the direction of the wood grain to achieve a consistent and uniform finish.
-
Transition to Fine-grit Sandpaper: Once the initial sanding is complete, switch to fine-grit sandpaper to further refine the surface of the window sill. This finer sandpaper will help achieve a silky-smooth texture and prepare the wood for finishing.
-
Remove Dust: After sanding, use a clean, dry cloth or a tack cloth to remove any dust or debris from the surface of the wood. This step is essential to ensure a clean and flawless finish.
-
Apply Wood Finish: Depending on your preference, choose a wood stain or paint to enhance the appearance of the window sill. Apply the chosen finish evenly, following the manufacturer's instructions. If you opt for a natural wood look, consider using a clear wood sealer to protect the wood while preserving its natural beauty.
-
Allow for Drying Time: After applying the wood finish, allow the window sill to dry completely before proceeding to the installation phase. This drying time will ensure that the finish sets properly and provides long-lasting protection for the wood.
By meticulously sanding and finishing the window sill, you'll not only achieve a visually appealing result but also protect the wood from wear and tear. This step adds the final touch to your custom window sill, preparing it for installation and long-term enjoyment.
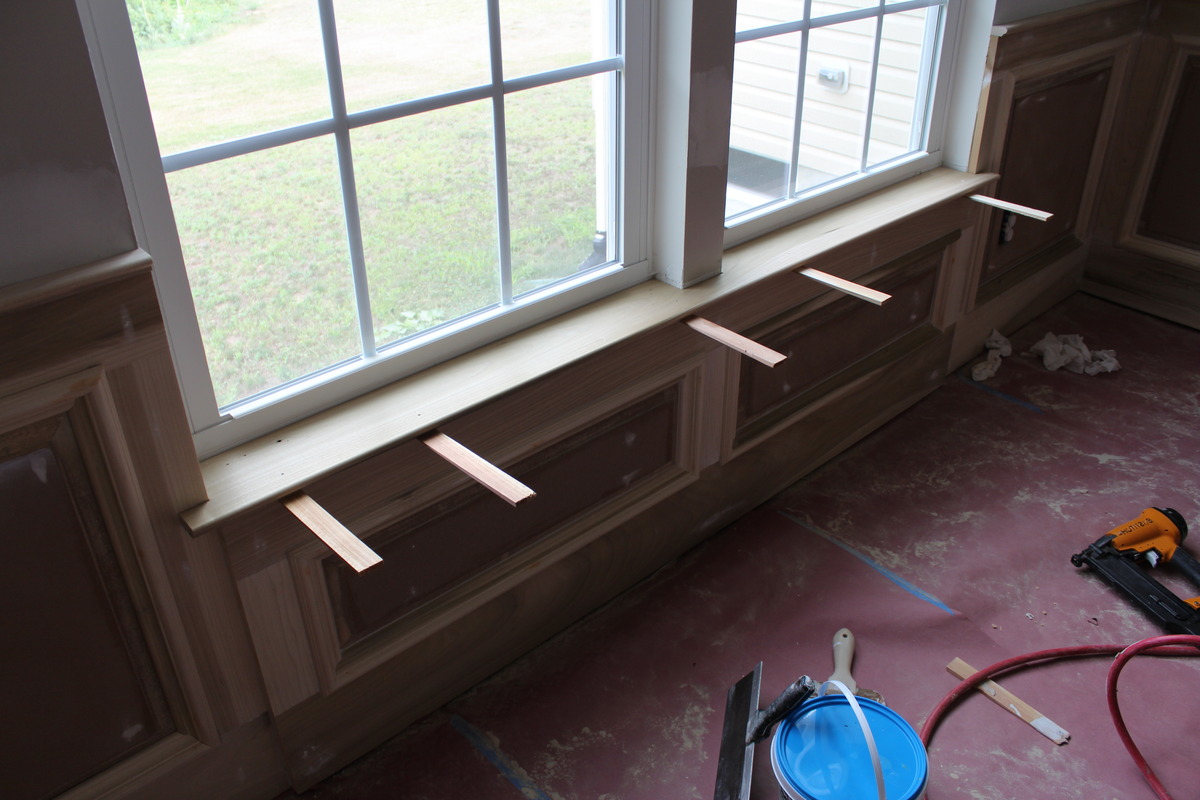
Installing the Sill
With the window sill accurately measured, cut, sanded, and finished, it's time to proceed with the installation process. Follow these steps to ensure a secure and professional installation of your custom window sill:
-
Prepare the Window Opening: Begin by cleaning the window opening to remove any dust, debris, or old caulking. A clean and smooth surface will provide a better foundation for the new window sill.
-
Apply Wood Glue: Apply a generous amount of wood glue to the bottom of the window sill. This will help secure the sill in place and prevent any potential shifting or movement over time.
-
Position the Sill: Carefully place the window sill into the prepared opening, ensuring that it fits snugly and aligns with the edges of the window frame. Press down gently to ensure good contact with the adhesive.
-
Secure with Screws or Nails: Depending on your preference and the type of wood used, you can further secure the window sill by driving screws or nails through the sill and into the window frame. This additional reinforcement will provide extra stability and support.
-
Check for Level: Use a level to ensure that the window sill is perfectly horizontal. Adjust the positioning if necessary to achieve a level surface, which is essential for both functionality and aesthetics.
-
Fill Gaps with Caulk: If there are any gaps between the window sill and the window frame, use a high-quality caulk to fill in the spaces. This will help prevent drafts, moisture, and insects from entering the gaps.
-
Allow for Drying Time: Once the window sill is securely in place, allow any wood glue, caulk, or sealant to dry completely before placing any items on the sill or applying additional finishing touches.
By following these steps, you'll be able to install your custom window sill with confidence, knowing that it is securely positioned and ready to enhance the beauty and functionality of your windows.
Maintenance and Care Tips
Proper maintenance and care are essential for preserving the beauty and functionality of your newly installed window sill. By following these maintenance tips, you can ensure that your window sill remains in top condition for years to come:
-
Regular Cleaning: Keep your window sill clean by regularly dusting or wiping it with a damp cloth. This will help prevent the buildup of dirt, dust, and grime, maintaining its appearance and preventing potential damage.
-
Avoid Water Damage: Be mindful of water exposure, especially if your window sill is located in a kitchen or bathroom. Wipe up any spills or splashes promptly to prevent water damage and warping of the wood.
-
Inspect for Damage: Periodically inspect the window sill for any signs of damage, such as cracks, peeling finish, or discoloration. Addressing these issues early can prevent further deterioration.
-
Reapply Finish as Needed: Depending on the type of finish applied to your window sill, you may need to reapply it periodically to maintain its protective properties and aesthetic appeal.
-
Protect from Sunlight: If your window receives direct sunlight, consider using curtains or blinds to protect the window sill from prolonged exposure to UV rays, which can cause fading and deterioration.
-
Address Moisture Issues: Ensure that the area around the window sill is properly sealed and insulated to prevent moisture infiltration, which can lead to rot and mold growth.
-
Trim Nearby Foliage: If there are plants or trees near the window, regularly trim them to prevent branches or leaves from rubbing against the window sill, which can cause scratches or damage.
-
Repair Promptly: If you notice any damage or wear, such as loose joints or chipped paint, address it promptly to prevent further deterioration and maintain the integrity of the window sill.
By incorporating these maintenance and care tips into your routine, you can prolong the lifespan of your window sill and continue to enjoy its aesthetic and functional benefits for years to come.