
Home>Create & Decorate>DIY & Crafts>How To Build Pantry Shelves
DIY & Crafts
How To Build Pantry Shelves
Published: February 29, 2024

Senior Editor in Create & Decorate, Kathryn combines traditional craftsmanship with contemporary trends. Her background in textile design and commitment to sustainable crafts inspire both content and community.
Learn how to build pantry shelves with our easy DIY & Crafts guide. Organize your kitchen with custom shelves that fit your space perfectly.
(Many of the links in this article redirect to a specific reviewed product. Your purchase of these products through affiliate links helps to generate commission for Twigandthistle.com, at no extra cost. Learn more)
Introduction
Building pantry shelves is a fantastic way to optimize space and create a more organized and functional kitchen. Whether you're a seasoned DIY enthusiast or a novice looking to embark on a new project, constructing pantry shelves can be a rewarding and practical endeavor. By customizing the shelves to fit your specific needs, you can maximize storage capacity and ensure that everything in your pantry is easily accessible.
Pantry shelves are essential for keeping your kitchen tidy and efficient. They provide a designated space for storing canned goods, dry ingredients, small appliances, and other kitchen essentials. With well-organized shelves, you can easily locate items, keep track of inventory, and prevent clutter from accumulating in your kitchen.
In this comprehensive guide, we will walk you through the step-by-step process of building pantry shelves. From measuring the space and selecting the right materials to cutting the shelves to size, installing them, and finally organizing and stocking the shelves, we've got you covered. By the end of this journey, you'll have a beautifully organized pantry that not only meets your storage needs but also adds a touch of charm to your kitchen.
So, roll up your sleeves, gather your tools, and let's dive into the exciting world of DIY pantry shelf construction. Whether you're aiming for a rustic farmhouse look or a sleek modern design, this guide will equip you with the knowledge and confidence to bring your vision to life. Let's get started on this fulfilling and practical DIY project!
Step 1: Measure the Space
The first and most crucial step in building pantry shelves is to accurately measure the space where the shelves will be installed. This step sets the foundation for the entire project and ensures that the shelves will fit seamlessly into the designated area.
Start by clearing out the pantry and removing any existing shelves or storage units. This will provide a clear and unobstructed view of the space, allowing for precise measurements. Use a tape measure to determine the height, width, and depth of the area where the shelves will be installed. It's essential to measure not only the overall dimensions of the space but also any potential obstacles such as pipes, electrical outlets, or uneven walls that may impact the shelf installation.
When measuring the height of the space, take into account any molding or trim that may affect the placement of the shelves. For the width and depth measurements, be sure to consider the clearance needed for accessing items and maneuvering within the pantry comfortably.
Once you have recorded the measurements, it's advisable to double-check them to ensure accuracy. Remember the old adage, "measure twice, cut once." This extra attention to detail will prevent errors and save time in the long run.
Additionally, consider the specific storage needs and items that will be housed on the shelves. If you plan to store tall items such as cereal boxes or small appliances, factor in the necessary shelf height and spacing between shelves. This tailored approach will result in shelves that are perfectly suited to accommodate your pantry essentials.
By meticulously measuring the space and taking into account all relevant factors, you'll lay the groundwork for a successful pantry shelf installation. This careful planning will pave the way for the subsequent steps of selecting materials, cutting the shelves to size, and ultimately creating a well-organized and functional pantry space.
Step 2: Choose the Right Materials
Selecting the right materials for your pantry shelves is crucial to ensure durability, functionality, and aesthetic appeal. When choosing materials, it's essential to consider factors such as the weight of the items to be stored, the overall design of your kitchen, and your personal preferences. Here's a detailed look at the key considerations for choosing the right materials for your pantry shelves:
1. Wood Selection:
Wood is a popular choice for pantry shelves due to its strength, versatility, and timeless appeal. When selecting wood for your shelves, consider the weight-bearing capacity required for your storage needs. Hardwoods such as oak, maple, or cherry are excellent choices for heavy-duty shelving, while softwoods like pine or cedar offer a more economical option for lighter storage requirements. Additionally, consider the aesthetic qualities of the wood, such as grain pattern and color, to complement the overall style of your kitchen.
2. Shelving Options:
Depending on your design preferences and budget, you can choose between solid wood shelves, plywood, or melamine-coated particleboard. Solid wood shelves provide a classic and sturdy option, while plywood offers strength and stability with a more uniform appearance. Melamine-coated particleboard is a cost-effective choice that provides a smooth, easy-to-clean surface ideal for pantry use.
3. Shelf Supports:
The choice of shelf supports is equally important in ensuring the stability and load-bearing capacity of your pantry shelves. Options such as metal brackets, adjustable shelf standards, or built-in wooden supports offer varying degrees of strength and adjustability. Consider the weight of the items to be stored and the flexibility needed for reconfiguring shelf heights when selecting the appropriate support system.
4. Finishing Touches:
Once the shelves are installed, consider applying a protective finish to the wood to enhance its durability and resistance to moisture and stains. Options such as polyurethane, varnish, or paint can provide a protective layer while adding a touch of style to the shelves.
By carefully considering these factors and selecting the right materials for your pantry shelves, you can create a storage solution that not only meets your practical needs but also enhances the visual appeal of your kitchen. The choice of materials plays a significant role in the overall success and longevity of your DIY pantry shelf project.
Step 3: Cut the Shelves to Size
With the measurements in hand and the materials selected, the next critical step in building pantry shelves is cutting the shelves to the precise size required for installation. This step demands precision and attention to detail to ensure that the shelves fit seamlessly into the designated space and provide optimal storage capacity.
Begin by marking the measurements on the selected wood or shelving material using a straight edge and a pencil. Double-check the measurements to avoid errors before making any cuts. For solid wood shelves, a circular saw or a table saw can be used to achieve clean and accurate cuts. If you're working with plywood or melamine-coated particleboard, a fine-toothed blade on a circular saw or a table saw equipped with a plywood blade is ideal for achieving smooth edges.
When cutting the shelves, it's essential to account for any obstructions or irregularities in the walls of the pantry. Use a jigsaw or a coping saw to notch out areas for pipes, electrical outlets, or any other obstacles that may impact the fit of the shelves. This meticulous approach ensures that the shelves will sit flush against the walls and provide a seamless and professional-looking installation.
In addition to cutting the main shelves to size, consider incorporating any additional features such as trim pieces, edge banding, or decorative molding to enhance the appearance of the shelves. These finishing touches can add a touch of elegance and refinement to the overall look of the pantry shelves.
As you proceed with cutting the shelves, prioritize safety by using appropriate personal protective equipment, such as safety goggles and hearing protection. Always follow the manufacturer's guidelines for operating power tools and ensure that the work area is well-ventilated and free from clutter.
By carefully cutting the shelves to the precise measurements and incorporating any necessary adjustments for wall obstructions, you'll be one step closer to bringing your custom pantry shelves to life. This meticulous attention to detail during the cutting process will set the stage for a seamless and professional installation, ensuring that your pantry shelves not only meet your storage needs but also elevate the aesthetic appeal of your kitchen space.
Step 4: Install the Shelves
With the shelves cut to the precise measurements and all necessary materials and tools at the ready, it's time to embark on the exciting phase of installing the pantry shelves. This step marks the culmination of meticulous planning and preparation, bringing your vision of a well-organized and functional pantry to fruition.
1. Preparing the Space:
Before installing the shelves, ensure that the pantry area is clean and free of any debris or obstructions. If the walls require painting or touch-ups, it's advisable to address these tasks beforehand to avoid any disruptions once the shelves are in place. Additionally, check that the walls are structurally sound and capable of supporting the weight of the shelves and their contents.
2. Marking the Placement:
Using a level and a pencil, carefully mark the placement of the shelves on the walls of the pantry. It's essential to ensure that the shelves are level and evenly spaced to create a visually appealing and functional storage solution. Take into account any adjustments needed for uneven walls or irregularities in the space.
3. Installing the Shelf Supports:
Depending on the chosen support system, whether it's metal brackets, adjustable shelf standards, or built-in wooden supports, follow the manufacturer's guidelines for secure installation. Use a stud finder to locate and anchor the supports to the wall studs, ensuring maximum stability and weight-bearing capacity. For adjustable shelf standards, carefully position and secure them to accommodate the planned shelf heights.
4. Placing the Shelves:
With the supports in place, carefully position the shelves onto the supports, ensuring a snug and secure fit. Double-check the levelness and alignment of each shelf before securing them in position. For solid wood shelves, use wood screws to attach the shelves to the supports, ensuring a strong and stable connection.
5. Finishing Touches:
Once the shelves are securely installed, take a moment to admire your handiwork. Consider adding decorative trim or molding to the front edges of the shelves for a polished and refined look. Additionally, apply any desired finishes or protective coatings to the shelves to enhance their durability and visual appeal.
By following these steps with precision and care, you'll successfully install custom pantry shelves that not only meet your storage needs but also elevate the functionality and aesthetic of your kitchen space. With the shelves in place, you're now ready to move on to the final step of organizing and stocking the shelves, bringing order and efficiency to your newly constructed pantry storage solution.
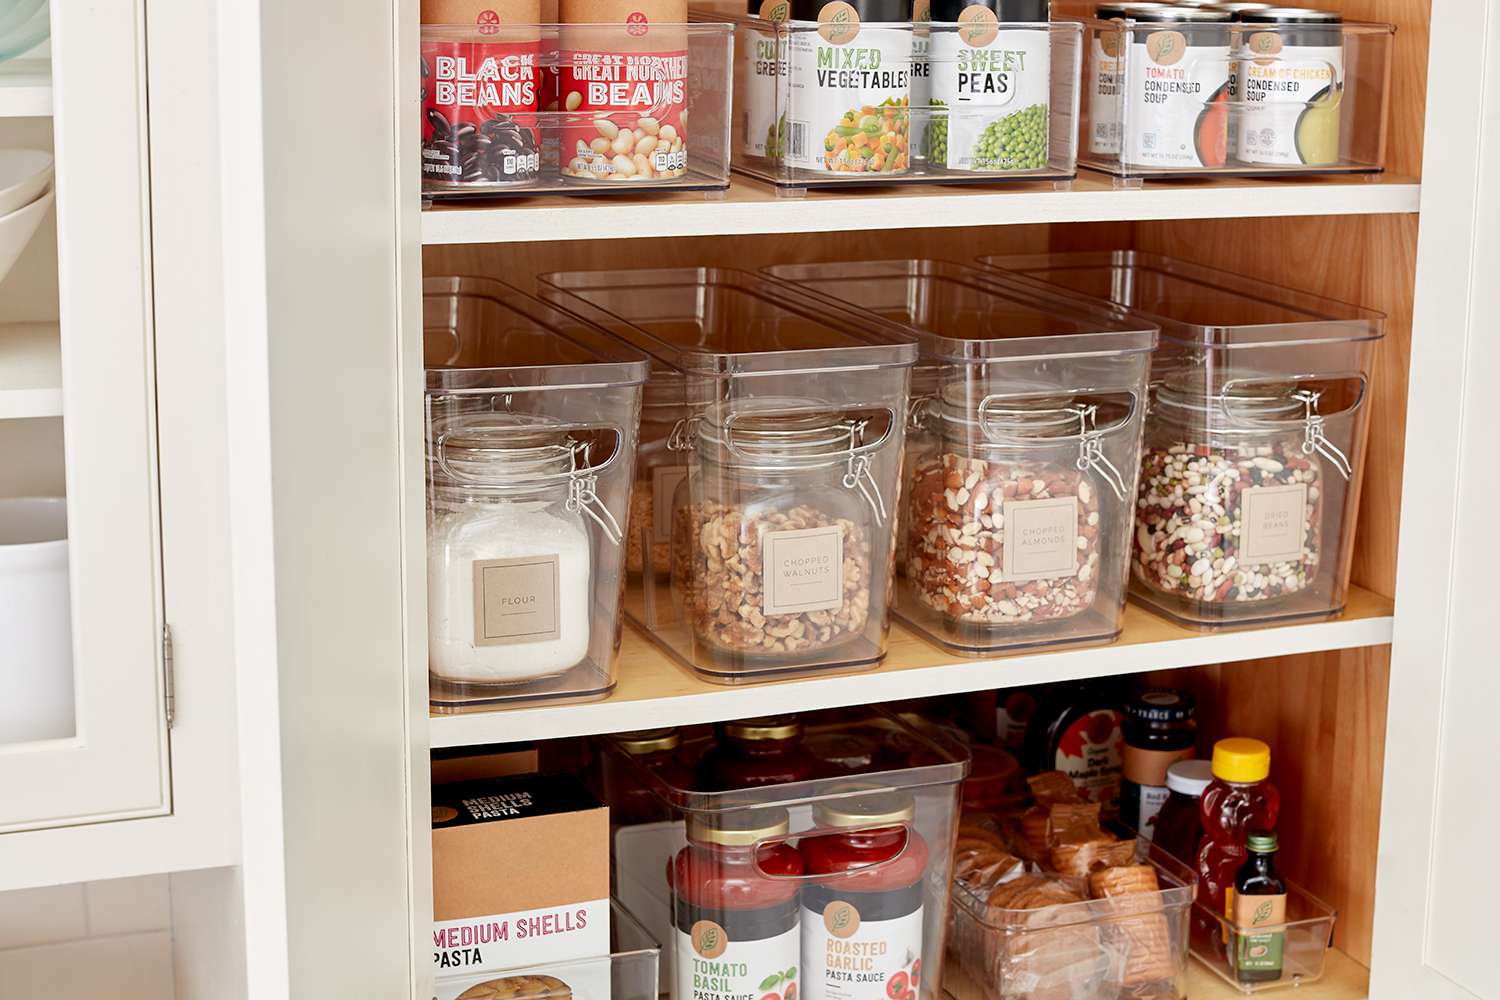
Step 5: Organize and Stock the Shelves
With the custom pantry shelves expertly installed, it's time to bring order and functionality to the newly created storage space. Organizing and stocking the shelves is a gratifying process that allows you to optimize the layout for easy access and efficient storage of pantry essentials.
1. Categorize and Prioritize:
Begin by categorizing the items to be stored on the shelves. Group similar items together, such as canned goods, dry ingredients, spices, small appliances, and non-perishable snacks. Prioritize frequently used items for easy accessibility, placing them within arm's reach on the most accessible shelves.
2. Utilize Storage Solutions:
Maximize the storage capacity of the shelves by incorporating organizational solutions such as stackable bins, wire baskets, or clear storage containers. These solutions not only optimize space but also enhance visibility, making it easier to locate and retrieve items.
3. Labeling and Inventory:
Consider labeling the shelves or storage containers to streamline the organization process. Clear labels help maintain order and facilitate inventory management, allowing you to keep track of stock levels and expiration dates effortlessly.
4. Optimize Vertical Space:
Make use of vertical space by incorporating adjustable shelving or installing additional shelving units if the ceiling height allows. This approach maximizes storage capacity and provides a versatile solution for accommodating items of varying heights.
5. Aesthetic Arrangement:
While functionality is paramount, don't overlook the aesthetic aspect of organizing the shelves. Arrange items in an aesthetically pleasing manner, considering color coordination and visual balance to create an inviting and visually appealing pantry display.
6. Maintenance and Upkeep:
Establish a routine for maintaining the organized shelves, periodically reviewing and rearranging items as needed. Regularly check for expired or unused items, ensuring that the pantry remains clutter-free and efficiently organized.
By meticulously organizing and stocking the shelves, you'll transform your pantry into a well-structured and efficient storage space. This final step completes the journey of building custom pantry shelves, culminating in a practical and visually appealing storage solution that enhances the functionality and charm of your kitchen.
Conclusion
In conclusion, the process of building pantry shelves is a fulfilling endeavor that combines practicality with creativity, resulting in a well-organized and visually appealing storage solution for your kitchen. By following the step-by-step guide outlined in this comprehensive DIY project, you have embarked on a journey that not only enhances the functionality of your pantry but also adds a personalized touch to your living space.
From the initial step of meticulously measuring the space to the careful selection of materials and the precise cutting and installation of the shelves, every aspect of this project has been a testament to your dedication and craftsmanship. The attention to detail in customizing the shelves to fit your specific storage needs ensures that your pantry will be a tailored and efficient space for housing a variety of kitchen essentials.
As you organize and stock the shelves, you have the opportunity to optimize the layout, prioritize frequently used items, and incorporate storage solutions that maximize space and enhance accessibility. This thoughtful approach to organizing not only streamlines your daily routines but also contributes to the overall aesthetic appeal of your pantry.
The completion of this DIY project marks a significant achievement, showcasing your ability to transform raw materials into a functional and visually striking addition to your home. The custom pantry shelves you have constructed are a reflection of your craftsmanship and attention to detail, serving as a testament to your dedication to creating a well-organized and inviting kitchen space.
As you stand back and admire the finished result, take pride in the fact that you have not only built pantry shelves but have also created a space that embodies your unique style and caters to the practical needs of your household. The sense of accomplishment that comes with completing this project is a reminder of the value of hands-on craftsmanship and the satisfaction of bringing your vision to life.
In the end, the journey of building pantry shelves goes beyond the physical construction; it is a testament to your creativity, resourcefulness, and commitment to enhancing your living environment. Your newly constructed pantry shelves are a reflection of your dedication to creating a space that is both functional and aesthetically pleasing, adding a touch of charm and organization to your kitchen.
Congratulations on completing this rewarding DIY project, and may your custom pantry shelves bring joy and efficiency to your daily kitchen activities for years to come.