
Home>Create & Decorate>DIY & Crafts>DIY RV Deck: How To Create A Portable Outdoor Living Space For Your Camper
DIY & Crafts
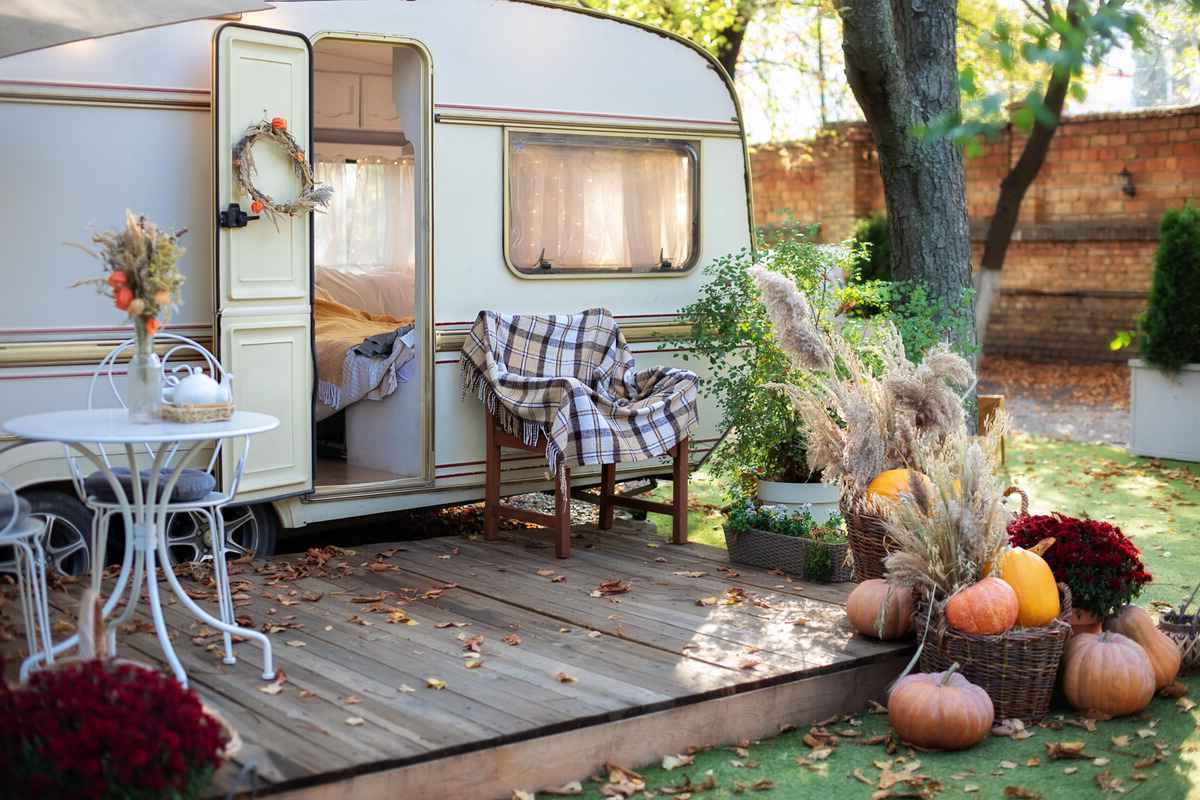
DIY RV Deck: How To Create A Portable Outdoor Living Space For Your Camper
Published: February 28, 2024

Senior Editor in Create & Decorate, Kathryn combines traditional craftsmanship with contemporary trends. Her background in textile design and commitment to sustainable crafts inspire both content and community.
Learn how to build a DIY RV deck to enhance your outdoor living space. Get step-by-step instructions for creating a portable deck for your camper. Perfect for DIY & Crafts enthusiasts!
(Many of the links in this article redirect to a specific reviewed product. Your purchase of these products through affiliate links helps to generate commission for Twigandthistle.com, at no extra cost. Learn more)
Introduction
Creating a DIY RV deck can transform your camping experience by providing a comfortable and inviting outdoor living space right next to your camper. Whether you're a full-time RVer or enjoy weekend getaways, having a portable deck offers a myriad of benefits, from expanding your living area to enhancing relaxation and entertainment options.
Imagine stepping out of your RV onto a beautifully crafted deck, complete with seating, a grill, and perhaps even a small dining area. This extension of your living space allows you to fully embrace the great outdoors while maintaining the comforts of home. Additionally, a well-designed RV deck can increase the value of your camper and create a welcoming atmosphere for socializing with fellow campers.
In this comprehensive guide, we will walk you through the step-by-step process of creating your own DIY RV deck. From planning and gathering materials to building the frame, adding decking boards, installing railing and steps, and adding finishing touches, you'll gain the knowledge and confidence to embark on this rewarding project. With the right tools, materials, and a bit of creativity, you can customize your RV deck to suit your preferences and lifestyle, making it a true reflection of your outdoor retreat.
So, whether you're seeking a cozy space to enjoy your morning coffee, a spot to unwind with a good book, or a gathering place for evening campfires, a DIY RV deck can fulfill these desires and more. Let's embark on this journey together and bring your vision of a portable outdoor living space to life.
Step 1: Planning Your DIY RV Deck
Before diving into the construction of your DIY RV deck, meticulous planning is essential to ensure a successful and functional outdoor living space. Consider the following key aspects as you embark on this exciting project:
1. Determine Deck Size and Layout
Begin by assessing the available space around your RV. Consider the dimensions of your camper, slide-outs, and any other obstructions that may impact the deck's placement. Take into account the terrain and ensure the chosen location provides a level surface for stability. Additionally, think about how you intend to use the deck – whether for lounging, dining, or hosting gatherings – to determine the ideal size and layout.
2. Research Local Regulations
Check local campground or RV park regulations regarding the construction of decks. Some locations may have specific guidelines or restrictions on deck size, height, and materials. Adhering to these regulations is crucial to avoid any issues during your travels and ensure compliance with campground rules.
3. Select Suitable Materials
Choose materials that are durable, weather-resistant, and lightweight for easy portability. Pressure-treated lumber, composite decking, or aluminum are popular choices for DIY RV decks due to their longevity and low maintenance requirements. Consider the weight of the materials, as well as their compatibility with the camper's weight capacity.
4. Sketch Your Design
Create a rough sketch or use a design software to visualize your deck layout. Include features such as seating areas, storage compartments, and any additional amenities you wish to incorporate. This step allows you to experiment with different configurations and make adjustments before finalizing your design.
5. Budget Considerations
Establish a budget for your DIY RV deck project, factoring in material costs, tools, and any professional assistance you may require. Research the prices of materials and compare options to ensure that your project remains within budget while meeting your desired specifications.
By thoroughly planning your DIY RV deck, you set the stage for a smooth and successful construction process. This thoughtful approach allows you to tailor the deck to your specific needs and preferences, ensuring that it becomes a cherished addition to your outdoor adventures.
Step 2: Gathering Materials and Tools
Gathering the necessary materials and tools is a crucial step in preparing for the construction of your DIY RV deck. By ensuring that you have all the essential components and equipment at your disposal, you can streamline the building process and minimize interruptions. Here's a comprehensive list of materials and tools you'll need to embark on this exciting project:
Materials:
-
Decking Materials: Select high-quality decking boards that are suitable for outdoor use. Pressure-treated lumber, composite decking, or aluminum are popular choices due to their durability and resistance to weathering.
-
Deck Frame Components: Acquire the necessary lumber for constructing the deck frame, including joists, beams, and posts. Opt for pressure-treated or rot-resistant wood to ensure longevity.
-
Railing and Balusters: If your design includes a railing system, obtain the appropriate railing posts, balusters, and railing caps. Consider the aesthetic appeal and functionality of the railing components.
-
Fasteners: Stock up on galvanized or stainless steel screws, nails, and other fasteners required for securing the deck components. Ensure that the fasteners are suitable for outdoor applications to prevent corrosion.
-
Concrete Footings or Blocks: Depending on the terrain and local regulations, you may need concrete footings or blocks to provide a stable foundation for the deck posts. Verify the specific requirements based on your chosen location.
-
Hardware and Connectors: Purchase metal hardware and connectors such as joist hangers, post anchors, and deck screws to reinforce the structural integrity of the deck.
-
Finishing Materials: Consider any finishing touches such as exterior wood stain, sealant, or paint to protect the deck from the elements and enhance its visual appeal.
-
Safety Equipment: Prioritize safety by obtaining personal protective equipment such as gloves, safety goggles, and a dust mask to safeguard yourself during construction.
Tools:
-
Power Tools: Essential power tools include a circular saw, drill/driver, impact driver, and a jigsaw for cutting and assembling the deck components efficiently.
-
Measuring and Layout Tools: Equip yourself with a tape measure, framing square, level, and chalk line to ensure accurate measurements and precise layout during construction.
-
Fastening Tools: A quality cordless screwdriver or impact driver, along with a hammer and nail gun, will expedite the fastening process and ensure secure connections.
-
Digging and Excavation Tools: Depending on the foundation requirements, you may need tools such as a post hole digger, shovel, and a level for excavating and leveling the ground.
-
Safety Gear: Prioritize safety by obtaining personal protective equipment such as gloves, safety goggles, and a dust mask to safeguard yourself during construction.
By gathering these materials and tools, you'll be well-equipped to commence the construction of your DIY RV deck with confidence and efficiency. This comprehensive preparation sets the stage for a smooth and enjoyable building process, bringing you one step closer to realizing your vision of a portable outdoor living space for your camper.
Step 3: Building the Deck Frame
Building the deck frame is a pivotal phase in the construction of your DIY RV deck, as it forms the structural foundation that supports the decking boards and ensures the stability and longevity of the entire structure. Follow these essential steps to construct a sturdy and reliable deck frame:
1. Marking the Layout
Begin by marking the layout of the deck frame on the ground, using stakes and string to outline the perimeter. Ensure that the layout aligns with your planned design and adheres to any local regulations or campground guidelines regarding deck dimensions and setbacks.
2. Excavation and Footings
If your design necessitates the use of concrete footings, proceed to excavate the designated areas for the footings according to the layout. Use a post hole digger or shovel to create holes of the appropriate depth, considering the soil composition and local building codes. Place the concrete footings in the excavated holes, ensuring they are level and properly aligned.
3. Installing Support Posts
Position and secure the support posts on top of the concrete footings, ensuring they are plumb and securely anchored. Utilize post anchors or adjustable post bases to connect the posts to the footings, providing a solid connection that withstands the weight and load of the deck.
4. Attaching Beams and Joists
With the support posts in place, attach the beams perpendicular to the posts, forming the outer frame of the deck. Subsequently, install the joists between the beams, ensuring they are evenly spaced and properly secured. Utilize joist hangers to reinforce the connections and maintain structural integrity.
5. Verifying Level and Square
Utilize a level and framing square to verify that the deck frame is level and square, making any necessary adjustments to ensure uniformity and precision. This step is crucial in guaranteeing the stability and balance of the deck, preventing issues such as sloping or uneven surfaces.
6. Adding Cross Bracing (If Applicable)
Incorporate cross bracing between the support posts to enhance the rigidity and stability of the deck frame, particularly for larger or elevated decks. Cross bracing helps distribute the load and minimizes lateral movement, contributing to the overall strength of the structure.
By meticulously following these steps, you'll successfully construct a robust and well-engineered deck frame that forms the backbone of your DIY RV deck. This foundational framework sets the stage for the next phase of the construction process, bringing you closer to the realization of your portable outdoor living space.
Step 4: Adding Decking Boards
With the deck frame securely in place, the next pivotal step in constructing your DIY RV deck is adding the decking boards. This phase not only enhances the visual appeal of the deck but also provides a functional and comfortable surface for outdoor activities. Follow these essential guidelines to seamlessly install the decking boards and bring your outdoor living space one step closer to completion.
1. Selecting High-Quality Decking Materials
Prioritize the selection of high-quality decking materials that align with your aesthetic preferences and functional requirements. Whether you opt for traditional pressure-treated lumber, low-maintenance composite decking, or lightweight aluminum boards, ensure that the chosen materials are well-suited for outdoor use and can withstand varying weather conditions.
2. Planning the Layout
Before commencing the installation, carefully plan the layout of the decking boards to optimize their placement and achieve a visually appealing result. Consider factors such as board orientation, pattern variations, and any specific design elements you wish to incorporate. This planning phase allows you to create a cohesive and harmonious deck surface.
3. Ensuring Proper Spacing and Alignment
Maintain consistent spacing between the decking boards to facilitate water drainage and airflow while preventing moisture buildup and potential issues such as warping or rot. Utilize spacers or specialized decking tools to achieve uniform gaps between the boards, ensuring a professional and polished finish. Additionally, verify that the boards are aligned parallel to the deck frame for a symmetrical and balanced appearance.
4. Securing the Decking Boards
Utilize appropriate fastening methods to securely attach the decking boards to the frame, considering the specific requirements of the chosen materials. While traditional lumber may require screws or nails for installation, composite decking often utilizes hidden fastening systems for a seamless and sleek surface. Follow the manufacturer's recommendations and best practices to ensure durable and reliable connections.
5. Incorporating Finishing Touches
Upon completing the installation of the decking boards, consider incorporating finishing touches such as beveled edges, decorative trim, or customized patterns to elevate the visual appeal of the deck. These subtle details add character and refinement to the outdoor living space, reflecting your personal style and attention to detail.
By meticulously following these steps and considerations, you'll successfully add the decking boards to your DIY RV deck, transforming the frame into a welcoming and functional outdoor retreat. This phase brings you closer to realizing your vision of a portable outdoor living space that enhances your camping experiences and fosters a deeper connection with the natural surroundings.
Step 5: Installing Railing and Steps
The installation of railing and steps is a pivotal phase in the construction of your DIY RV deck, as it enhances safety, accessibility, and visual appeal. By meticulously following the essential steps outlined below, you'll seamlessly incorporate these vital components, elevating your outdoor living space to new heights.
1. Selecting Railing Systems
Begin by selecting a suitable railing system that complements the overall design of your deck while prioritizing safety and durability. Options range from traditional wood railings to low-maintenance vinyl or aluminum systems, each offering unique aesthetic and functional benefits. Consider the height and style of the railing to ensure compliance with local building codes and campground regulations.
2. Planning the Railing Layout
Carefully plan the layout of the railing system, taking into account the deck's configuration and any specific areas that require enhanced safety measures. Determine the placement of corner and end posts, as well as the spacing of balusters or infill panels, to create a secure and visually appealing barrier. This planning phase allows you to optimize the functionality and aesthetics of the railing while ensuring seamless integration with the deck structure.
3. Installing Railing Posts
Position and secure the railing posts at designated intervals along the perimeter of the deck, ensuring they are securely anchored to the deck frame. Utilize post anchors or surface-mounted post brackets to establish a robust connection, providing stability and support for the railing system. Verify that the posts are plumb and aligned to facilitate the straightforward installation of the railing components.
4. Attaching Railing Components
Once the posts are in place, proceed to attach the railing components, whether balusters, infill panels, or pre-assembled railing sections, to create a secure enclosure. Utilize appropriate fastening methods and hardware to ensure that the railing components are firmly affixed to the posts, with no compromise on structural integrity. Pay close attention to spacing and alignment to achieve a uniform and aesthetically pleasing result.
5. Incorporating Handrails and Cap Rails
If your design includes handrails or cap rails, carefully install these components to provide additional support and a polished finishing touch to the railing system. Secure the handrails to the designated posts, ensuring a comfortable grip and consistent height throughout the deck perimeter. Similarly, attach cap rails to enhance the visual appeal and weather resistance of the railing, contributing to the overall longevity of the structure.
6. Constructing and Installing Steps
Incorporate steps to facilitate easy access to and from the deck, prioritizing safety and convenience. Construct the steps using pressure-treated lumber or composite materials, ensuring a sturdy and slip-resistant surface. Install the steps securely, verifying that they are level and aligned with the deck entrance, providing a seamless transition between the RV and the outdoor living space.
By meticulously following these steps, you'll successfully install the railing and steps, enhancing the safety, functionality, and aesthetic appeal of your DIY RV deck. This phase brings you one step closer to realizing your vision of a portable outdoor living space that elevates your camping experiences and fosters a deeper connection with the natural surroundings.
Step 6: Adding Finishing Touches
As you near the completion of your DIY RV deck, the addition of finishing touches serves as the final flourish, elevating the overall aesthetics, functionality, and ambiance of your outdoor living space. This phase allows you to infuse personalized details and practical enhancements, transforming the deck into a welcoming retreat that reflects your unique style and preferences.
1. Outdoor Lighting
Incorporating outdoor lighting not only extends the functionality of your deck into the evening hours but also creates a captivating ambiance. Consider installing solar-powered or low-voltage LED lights along the perimeter, stair risers, and strategic areas to illuminate the space and enhance safety. String lights, lanterns, or wall-mounted fixtures can add a warm and inviting glow, fostering a cozy atmosphere for relaxation and socializing.
2. Seating and Comfort
Integrate comfortable seating options such as outdoor lounge chairs, Adirondack chairs, or weather-resistant cushions to create inviting relaxation zones. Consider incorporating built-in benches or storage benches to optimize space and provide versatile seating arrangements. Adding outdoor pillows, throw blankets, and rugs infuses a cozy and homey feel, encouraging leisurely enjoyment of the outdoor retreat.
3. Decorative Accents
Personalize the deck with decorative accents such as potted plants, hanging baskets, or vertical gardens to introduce natural elements and vibrant colors. Adorn the space with outdoor artwork, decorative screens, or wind chimes to infuse character and visual interest. Additionally, consider incorporating a portable fire pit, tabletop fountain, or outdoor speaker system to enhance the ambiance and entertainment options.
4. Storage Solutions
Maximize the functionality of the deck by integrating storage solutions such as deck boxes, under-seat storage compartments, or shelving units. These additions provide convenient storage for outdoor essentials, including grilling utensils, outdoor games, and camping gear, while maintaining a clutter-free and organized environment.
5. Personalized Touches
Infuse the deck with personalized touches that reflect your individual style and interests. Consider incorporating a custom welcome mat, personalized signs, or DIY projects such as hand-painted furniture or a reclaimed wood accent wall. These unique elements add a sense of identity and warmth to the outdoor living space, creating a personal oasis for you and your fellow campers to enjoy.
By thoughtfully integrating these finishing touches, you'll elevate your DIY RV deck into a captivating and functional outdoor retreat. This phase allows you to tailor the space to your preferences, creating a seamless extension of your camper that enhances your camping experiences and fosters a deeper connection with the natural surroundings.
Conclusion
In conclusion, the journey of creating a DIY RV deck has been an exhilarating and rewarding endeavor, culminating in the transformation of a simple outdoor space into a versatile and inviting retreat. By embarking on this project, you have not only expanded the living area of your camper but also crafted a personalized oasis that harmoniously blends with the natural surroundings. The portable outdoor living space you have created serves as a testament to your creativity, resourcefulness, and dedication to enhancing your camping experiences.
Throughout the process, meticulous planning laid the foundation for a well-executed project, ensuring that the deck seamlessly integrates with your RV while adhering to local regulations and your specific preferences. The careful selection of materials and tools, coupled with thoughtful design considerations, has resulted in a functional and visually appealing outdoor extension that complements your lifestyle.
The construction journey, from building the sturdy frame to adding the finishing touches, has been a testament to your craftsmanship and attention to detail. Each step, whether securing the deck frame or installing the railing and steps, has contributed to the creation of a safe, durable, and aesthetically pleasing outdoor space that enhances your camping adventures.
As you incorporated the finishing touches, the deck has evolved into a personalized haven, reflecting your unique style and providing a welcoming environment for relaxation, socializing, and embracing the beauty of the great outdoors. The addition of lighting, comfortable seating, decorative accents, and storage solutions has elevated the functionality and ambiance of the deck, ensuring that it serves as a versatile and inviting space for various activities.
Ultimately, the completion of your DIY RV deck marks the beginning of countless memorable moments and experiences. Whether it's savoring a morning cup of coffee, hosting lively gatherings, or simply unwinding amidst nature's tranquility, your outdoor living space is poised to enrich your camping lifestyle and foster a deeper connection with the natural world.
As you embark on future adventures, your DIY RV deck stands as a testament to your ingenuity and passion for creating a home away from home. It is a space where cherished memories will be made, friendships will be nurtured, and the joy of outdoor living will be fully embraced. With each use, your DIY RV deck will continue to be a source of pride and a symbol of the endless possibilities that arise from blending creativity with the spirit of exploration.