
Home>Create & Decorate>DIY & Crafts>DIY Wagon: How To Build Your Own Customized Cart
DIY & Crafts
DIY Wagon: How To Build Your Own Customized Cart
Published: April 25, 2024

Content Creator specializing in woodworking and interior transformations. Caegan's guides motivate readers to undertake their own projects, while his custom furniture adds a personal touch.
Learn how to create your own personalized DIY wagon with our step-by-step guide. Perfect for DIY & Crafts enthusiasts looking for a fun and practical project. Start building today!
(Many of the links in this article redirect to a specific reviewed product. Your purchase of these products through affiliate links helps to generate commission for Twigandthistle.com, at no extra cost. Learn more)
Introduction
So, you're looking to build your very own DIY wagon. Whether it's for hauling gardening supplies, giving your kids a fun ride, or just adding a unique touch to your home, a customized cart can be a great addition to your DIY projects. But where do you start? How do you even begin to build a wagon that's both functional and stylish? Well, you've come to the right place! In this guide, we'll walk you through the step-by-step process of creating your very own customized wagon. From designing and gathering materials to assembling and customizing, we've got you covered. So, grab your tools and let's get started on this exciting DIY adventure!
Materials Needed
Before you dive into the nitty-gritty of building your DIY wagon, it's essential to gather all the necessary materials. Here's a comprehensive list of what you'll need to get started:
- Wood: Select sturdy and weather-resistant wood for the wagon's frame and panels. Cedar, redwood, or treated lumber are excellent choices.
- Wagon Wheels: You can either purchase pre-made wagon wheels or craft your own using wooden planks and a sturdy dowel for the axle.
- Axle: A metal or wooden rod that connects the wheels and allows them to rotate freely.
- Metal Braces and Screws: These will be used to reinforce the wagon's frame and ensure its durability.
- Handle: Opt for a durable and comfortable handle, such as a metal or wooden one, to pull the wagon.
- Paint and Sealant: Choose outdoor-friendly paint and sealant to protect the wood from the elements and add a pop of color to your wagon.
- Decorative Accents: Consider adding personal touches like decals, stencils, or even a custom nameplate to make your wagon uniquely yours.
With these materials in hand, you'll be well-equipped to embark on your DIY wagon-building journey.
Step 1: Designing Your Wagon
Designing your wagon is the crucial first step in creating a customized cart that meets your specific needs and preferences. Here's how to get started:
-
Purpose and Function: Determine the primary purpose of your wagon. Will it be used for transporting heavy items, carrying gardening supplies, or providing a fun ride for kids? Understanding its intended function will guide the design process.
-
Size and Dimensions: Consider the ideal size and dimensions for your wagon. Measure the space where you plan to use it and ensure that it can fit through doorways or gates if necessary. The size will also depend on what you intend to carry or transport with the wagon.
-
Frame and Panel Design: Sketch out the design for the wagon's frame and panels. Decide on the shape, whether it's a classic rectangular design or a more unique and customized shape. Consider the height of the sides and the overall structure to ensure it meets your requirements.
-
Handle Placement: Determine where the handle will be positioned. This is an essential aspect, as it will affect the maneuverability and ease of use of the wagon. Whether it's a single handle or dual handles, make sure it's ergonomically positioned for comfortable pulling.
-
Aesthetic Features: Think about any aesthetic features you'd like to incorporate. This could include decorative cutouts on the panels, a personalized nameplate, or even a themed design if the wagon is intended for a specific purpose, such as a beach cart or a rustic garden wagon.
By carefully considering these design elements, you'll be well on your way to creating a customized wagon that perfectly aligns with your vision and practical needs. Once you have a clear design plan in place, you can move on to the next steps of gathering materials and bringing your wagon to life.
Step 2: Gathering and Preparing Materials
Once you have finalized the design for your DIY wagon, the next step is to gather and prepare all the necessary materials. This phase is crucial in ensuring that you have everything you need to bring your wagon to life. Here's a detailed breakdown of the process:
-
Material Procurement: Begin by sourcing the required materials based on your design specifications. Visit your local hardware store or lumberyard to acquire the selected wood for the frame and panels, ensuring that it is sturdy and weather-resistant. Additionally, explore options for purchasing or crafting wagon wheels, selecting a suitable axle, and obtaining metal braces and screws for reinforcement.
-
Wood Preparation: Once you have the wood for the wagon's frame and panels, it's essential to prepare it for construction. This involves measuring and cutting the wood to the specified dimensions outlined in your design plan. Use a saw and measuring tools to ensure precision and accuracy in the cutting process.
-
Wheel and Axle Assembly: If you opt to craft your own wagon wheels, gather the necessary wooden planks and a sturdy dowel for the axle. Carefully construct the wheels, ensuring that they are securely attached to the axle and can rotate freely. If you have purchased pre-made wheels, inspect them to ensure they are suitable for your wagon design.
-
Handle Selection: Choose a durable and ergonomic handle for your wagon. Whether it's a metal or wooden handle, ensure that it is comfortable to grip and can withstand the weight of the loaded wagon. Consider the length and design of the handle to ensure it aligns with your initial design concept.
-
Paint and Sealant Acquisition: Select outdoor-friendly paint and sealant to protect the wood from the elements. Choose colors that complement your overall design aesthetic and ensure that the sealant provides adequate protection against moisture and UV exposure.
By meticulously gathering and preparing the materials for your DIY wagon, you set the stage for a smooth and efficient construction process. With all the components in place, you'll be ready to move on to the next exciting phase of assembling the frame and bringing your customized wagon to fruition.
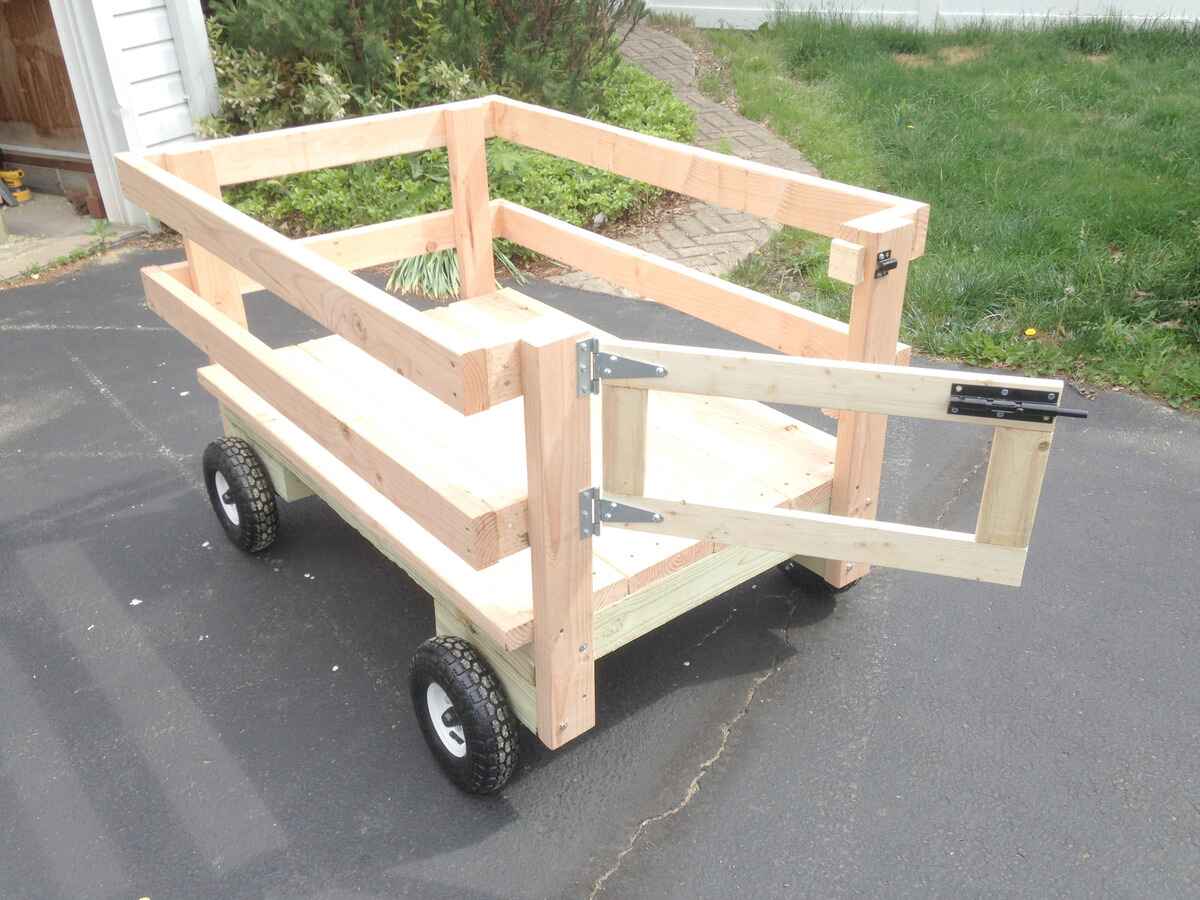
Step 3: Assembling the Frame
With all the materials gathered and prepared, it's time to roll up your sleeves and start assembling the frame of your DIY wagon. This step is pivotal in creating a sturdy and reliable foundation for your customized cart. Here's a detailed guide on how to tackle this crucial phase:
-
Frame Structure: Begin by laying out the prepared wood pieces according to your design plan. Whether it's a classic rectangular frame or a more intricate shape, ensure that the pieces fit together seamlessly. Use metal braces and screws to securely fasten the frame, providing reinforcement at the joints for added stability.
-
Panel Attachment: Once the frame is assembled, it's time to attach the panels to enclose the wagon's cargo area. Carefully position the panels and secure them to the frame using screws or nails. Ensure that the panels are aligned evenly and securely attached to create a robust enclosure for transporting items.
-
Handle Installation: Depending on your design, it's essential to install the handle at this stage. Whether it's a single handle positioned at the front or dual handles for added maneuverability, ensure that it is securely attached to the frame. The handle should be positioned ergonomically, allowing for comfortable pulling and steering of the wagon.
-
Reinforcement and Finishing Touches: Once the frame, panels, and handle are in place, inspect the structure for any areas that may require additional reinforcement. Add extra screws or braces as needed to fortify the frame. With the structural integrity ensured, it's time to add the finishing touches, such as sanding any rough edges and applying a protective sealant to the wood to safeguard it from the elements.
By meticulously following these steps, you'll successfully assemble a robust and well-structured frame for your DIY wagon. With the frame in place, you're now ready to move on to the next phase of adding wheels and axles, bringing your customized wagon one step closer to completion.
Step 4: Adding Wheels and Axles
Adding the wheels and axles is a pivotal step in bringing your DIY wagon to life. This phase not only contributes to the functionality of the cart but also adds a touch of authenticity to your creation. Here's a detailed guide on how to seamlessly incorporate the wheels and axles into your customized wagon:
-
Wheel Attachment: Begin by positioning the wagon wheels at the designated locations on the frame. Ensure that the wheels are evenly spaced and aligned to guarantee smooth and balanced movement. Depending on the design, you may need to drill holes for the axle to pass through, ensuring a secure and stable fit for the wheels.
-
Axle Installation: Once the wheels are in place, it's time to install the axle. Carefully insert the axle through the designated holes in the frame, allowing the wheels to rotate freely. Depending on the chosen material for the axle, whether it's metal or wood, ensure that it provides adequate support and stability for the wheels.
-
Securing the Axle: After inserting the axle, secure it in place using appropriate fasteners or locking mechanisms. This step is crucial in preventing the wheels from wobbling or becoming dislodged during use. Test the rotation of the wheels to ensure they move smoothly without any obstructions.
-
Wheel Reinforcement: Consider adding additional reinforcement to the wheel attachments and axle connections to fortify their stability. This may involve adding extra screws or braces to ensure that the wheels are firmly secured to the frame, with minimal risk of detachment or misalignment.
By meticulously following these steps, you'll successfully integrate the wheels and axles into your DIY wagon, culminating in a functional and visually appealing cart that's ready for the next phase of customization. With the wheels and axles in place, your customized wagon is one step closer to becoming a practical and eye-catching addition to your DIY projects.
Step 5: Customizing Your Wagon
Customizing your wagon is where you can truly let your creativity shine and add personal touches that make your DIY creation stand out. Whether you want to enhance its visual appeal, improve functionality, or tailor it to a specific theme, the customization phase allows you to infuse your wagon with unique character and charm. Here's a comprehensive guide on how to customize your wagon to align with your vision and preferences:
-
Paint and Finish: Choose a color scheme that resonates with your style and complements the intended use of the wagon. Apply outdoor-friendly paint to the frame and panels, ensuring even coverage and a smooth finish. Consider adding decorative accents, such as stripes, patterns, or stenciled designs, to infuse personality into your wagon.
-
Personalization: Add a personal touch to your wagon by incorporating a custom nameplate or engraving. Whether it's the family name, a witty slogan, or a whimsical moniker, this personalized detail can make your wagon feel uniquely yours.
-
Functional Additions: Enhance the functionality of your wagon by incorporating practical features. Install hooks or compartments for storing gardening tools, beverages, or other essentials. Consider adding a foldable canopy or umbrella holder to provide shade and protection from the elements.
-
Decorative Accents: Elevate the aesthetic appeal of your wagon by attaching decorative accents. This could include ornamental trims, faux flowers, or LED lighting for a touch of whimsy. Be mindful of the weight and balance of these additions to ensure they do not compromise the wagon's functionality.
-
Themed Customization: If your wagon is intended for a specific purpose, such as beach outings or seasonal decor, consider customizing it to align with a particular theme. Incorporate beach-themed decals, seashells, and a vibrant color palette for a coastal vibe. For seasonal use, adorn the wagon with festive decorations that capture the spirit of the occasion.
-
Safety Considerations: While customizing your wagon, prioritize safety by ensuring that any added elements do not pose hazards. Smooth out rough edges, secure all attachments firmly, and avoid sharp or protruding embellishments that could cause injury.
By embracing the customization phase, you can transform your DIY wagon into a functional and visually appealing masterpiece that reflects your individuality and creativity. Whether it's a practical utility cart or a whimsical garden accessory, your customized wagon is sure to make a statement and serve its intended purpose with flair.
Conclusion
Congratulations on completing the construction of your very own DIY wagon! By following the step-by-step process outlined in this guide, you've successfully designed, gathered materials, assembled the frame, added wheels and axles, and customized your wagon to align with your unique vision and practical needs. Your customized cart is now ready to serve a variety of purposes, whether it's transporting gardening supplies, providing a fun ride for kids, or adding a touch of charm to your home.
As you admire your handiwork, take pride in the fact that you've not only created a functional and stylish wagon but also honed your DIY skills along the way. The journey of building a customized wagon has allowed you to unleash your creativity, problem-solving abilities, and craftsmanship, resulting in a tangible and rewarding outcome.
Whether you've opted for a classic design, a themed wagon, or a versatile utility cart, your creation is a testament to your dedication and ingenuity. As you put your DIY wagon to use, whether it's for practical tasks or leisurely activities, may it bring joy and convenience to your daily life.
Now, as you embark on future DIY projects, remember the valuable skills and experiences gained from building your customized wagon. Your newfound expertise and confidence will undoubtedly fuel your passion for DIY and home improvement, inspiring you to take on even more ambitious and fulfilling projects in the future.
So, pat yourself on the back, take a well-deserved moment to admire your handiwork, and revel in the satisfaction of bringing your DIY wagon from a mere concept to a tangible reality. Your customized cart is not just a functional tool; it's a reflection of your creativity, resourcefulness, and the joy of hands-on craftsmanship. Cheers to your DIY success, and may your wagon accompany you on many memorable journeys ahead!