
Home>Create & Decorate>DIY & Crafts>DIY Lumber Rack: How To Build A Sturdy Storage Solution
DIY & Crafts
DIY Lumber Rack: How To Build A Sturdy Storage Solution
Published: June 10, 2024

Senior Editor in Create & Decorate, Kathryn combines traditional craftsmanship with contemporary trends. Her background in textile design and commitment to sustainable crafts inspire both content and community.
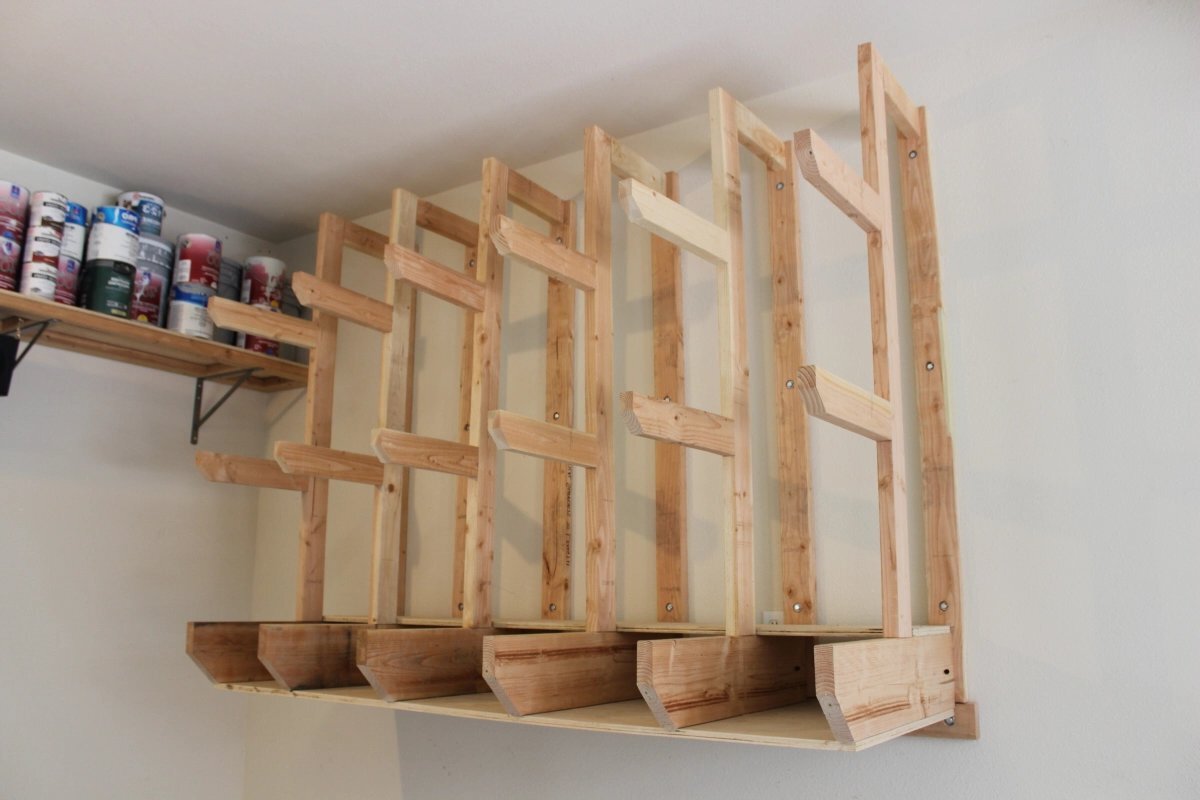
Learn how to build a sturdy DIY lumber rack for your workshop with our step-by-step guide. Perfect storage solution for DIY & Crafts enthusiasts!
(Many of the links in this article redirect to a specific reviewed product. Your purchase of these products through affiliate links helps to generate commission for Twigandthistle.com, at no extra cost. Learn more)
Introduction
Are you tired of having lumber and other long materials cluttering up your garage or workshop? Building a DIY lumber rack is a great way to organize and store your wood, pipes, and other lengthy items. Not only will it help you keep your space tidy, but it will also make it easier to find the materials you need for your next project. In this article, we will guide you through the process of building a sturdy and efficient lumber rack that will help you declutter your workspace and keep your materials organized. Let's get started!
Materials Needed
To build your DIY lumber rack, you will need the following materials:
- 2×4 lumber: You will need this to create the frame and shelves of the rack.
- Plywood: This will be used to make the shelves where you can store smaller pieces of wood and other materials.
- Wood screws: These will be essential for securing the various components of the rack together.
- Level: To ensure that your lumber rack is straight and properly aligned.
- Drill: You will need this to create pilot holes and drive the screws into the wood.
- Saw: A saw will be necessary for cutting the lumber and plywood to the required dimensions.
- Tape measure: This will help you accurately measure the wood and ensure that everything fits together properly.
- Stud finder: This tool will be essential for locating the wall studs to which you will secure the lumber rack.
- Safety equipment: This includes gloves and safety goggles to protect yourself during the construction process.
Gather these materials before you begin building your DIY lumber rack to ensure a smooth and efficient construction process.
Step 1: Measuring and Cutting the Wood
Before you start assembling your DIY lumber rack, it's crucial to measure and cut the wood to the appropriate dimensions. Here's how to do it:
-
Measure the Space: Begin by measuring the area where you plan to install the lumber rack. This will help you determine the length and height of the rack, ensuring that it fits perfectly in your chosen location.
-
Cut the 2×4 Lumber: Use a saw to cut the 2×4 lumber to the desired lengths for the frame and shelves of the rack. Remember to measure twice and cut once to avoid any unnecessary mistakes.
-
Cut the Plywood: Next, cut the plywood to create the shelves of the rack. The dimensions of the plywood shelves will depend on the size of the items you plan to store on them.
By accurately measuring and cutting the wood, you'll ensure that all the components of your lumber rack fit together seamlessly, setting the stage for a sturdy and well-organized storage solution.
Step 2: Assembling the Base
Once you have all the wood cut to the appropriate dimensions, it's time to start assembling the base of your DIY lumber rack. Follow these steps to create a sturdy foundation for your storage solution:
-
Lay Out the 2x4s: Begin by laying out the 2×4 lumber pieces on the ground to form the base of the rack. Use a level to ensure that the pieces are straight and aligned correctly.
-
Create the Frame: Use wood screws to attach the 2x4s together, forming a rectangular frame. Make sure to pre-drill pilot holes to prevent the wood from splitting when you drive in the screws.
-
Add Support Beams: To provide additional stability, insert support beams across the frame at regular intervals. These support beams will help distribute the weight of the stored materials evenly.
-
Check for Stability: Once the base is assembled, check for stability and make any necessary adjustments. It's essential that the base is solid and level to support the weight of the lumber and other materials.
By following these steps, you'll create a strong and durable base for your lumber rack, setting the stage for the next phase of the construction process.
Step 3: Adding the Uprights
With the base of your DIY lumber rack securely in place, it's time to add the uprights that will support the shelves and provide vertical storage space for your materials. Follow these steps to add the uprights to your lumber rack:
-
Measure and Mark: Using a tape measure, determine the desired height for your uprights. Mark the locations on the base where the uprights will be attached, ensuring that they are evenly spaced and aligned.
-
Attach the Uprights: Stand the 2×4 lumber pieces vertically at the marked locations on the base. Use wood screws to secure the uprights to the base, ensuring that they are firmly attached and straight. A level can be used to ensure that the uprights are perfectly vertical.
-
Add Cross Braces: For added stability, consider adding cross braces between the uprights. These braces will help prevent the rack from swaying and reinforce the overall structure.
-
Create Shelf Supports: Depending on the design of your lumber rack, you may need to add additional 2×4 pieces horizontally between the uprights to serve as supports for the shelves. These supports will provide a stable platform for the plywood shelves to rest on.
By adding the uprights to your lumber rack, you'll create a vertical storage space that maximizes the use of your available floor area and provides a secure and organized storage solution for your materials.
Step 4: Attaching the Shelves
Attaching the shelves is a crucial step in completing your DIY lumber rack. This is where you'll create the actual storage space for your materials. Here's how to go about it:
-
Position the Plywood: Place the pre-cut plywood pieces onto the frame of the lumber rack. Ensure that they fit snugly and align with the edges of the frame.
-
Secure the Shelves: Use wood screws to attach the plywood shelves to the frame and any horizontal supports you added between the uprights. Make sure to drive the screws in at regular intervals along the edges of the shelves to ensure they are firmly secured.
-
Consider Shelf Spacing: Depending on the types of materials you plan to store, you may want to leave varying amounts of space between the shelves. For larger items, such as long pieces of lumber, you'll want more vertical space, while smaller items may require closer shelf spacing.
-
Test the Stability: Once the shelves are attached, test the stability of the entire rack. Apply some pressure to the shelves to ensure they can support the weight of your materials without bowing or flexing excessively.
By following these steps, you'll successfully create a series of sturdy and reliable shelves for your lumber rack, providing ample storage space for all your materials.
Step 5: Securing the Rack to the Wall
Securing your DIY lumber rack to the wall is essential to ensure its stability and safety. Follow these steps to securely attach the rack to the wall:
-
Locate Wall Studs: Use a stud finder to locate the wall studs where you will anchor the lumber rack. Attaching the rack to the studs will provide the necessary support to bear the weight of the stored materials.
-
Position the Rack: With the help of a friend, position the assembled lumber rack against the wall at the desired location. Use a level to ensure that the rack is straight and aligned correctly.
-
Attach the Rack to the Wall: Once the rack is in position, use wood screws to secure the rack to the wall studs. Drive the screws through the back of the rack and into the wall studs, ensuring a firm and stable attachment.
-
Check for Stability: After securing the rack to the wall, check for stability by applying some pressure to the rack. Ensure that it is firmly anchored and does not wobble or shift.
-
Final Adjustments: Make any final adjustments to the rack's position and ensure that it is level and securely attached to the wall. This step is crucial for the safety and stability of the entire structure.
By following these steps, you'll effectively secure your DIY lumber rack to the wall, providing a reliable and durable storage solution for your materials.
Conclusion
Congratulations! You have successfully built a sturdy and efficient DIY lumber rack that will help you declutter your workspace and keep your materials organized. By following the step-by-step guide outlined in this article, you have created a reliable storage solution for your lumber, pipes, and other lengthy materials. Not only does your new lumber rack provide a designated space for your materials, but it also maximizes the use of your available floor area, making it easier to find and access the items you need for your next project. With the right tools, materials, and a little bit of effort, you've transformed your space into a well-organized and functional workshop or garage. Enjoy the benefits of your newly constructed lumber rack and take pride in your DIY accomplishment!