
Home>Create & Decorate>DIY & Crafts>DIY Clothesline: How To Make Your Own Eco-Friendly Laundry Solution
DIY & Crafts
DIY Clothesline: How To Make Your Own Eco-Friendly Laundry Solution
Published: June 12, 2024

Content Creator specializing in woodworking and interior transformations. Caegan's guides motivate readers to undertake their own projects, while his custom furniture adds a personal touch.
Learn how to create your own eco-friendly clothesline with our DIY guide. Discover a sustainable laundry solution with our easy DIY & Crafts project.
(Many of the links in this article redirect to a specific reviewed product. Your purchase of these products through affiliate links helps to generate commission for Twigandthistle.com, at no extra cost. Learn more)
Introduction
Are you looking for a cost-effective and eco-friendly way to dry your laundry? Creating your own DIY clothesline could be the perfect solution. Not only does it help reduce your carbon footprint, but it also saves you money on energy bills. In this article, we'll guide you through the process of making your very own clothesline, providing you with a sustainable alternative to using a dryer. Let's dive into the benefits of using a DIY clothesline for your laundry needs.
Benefits of Using a DIY Clothesline
-
Eco-Friendly: By using a DIY clothesline, you can significantly reduce your household's energy consumption. Traditional dryers consume a substantial amount of electricity, contributing to your carbon footprint. Opting for a clothesline allows you to harness the natural power of the sun and wind to dry your clothes, making it a sustainable and eco-friendly choice.
-
Cost-Effective: Creating your own clothesline is a budget-friendly alternative to purchasing a dryer or using a laundromat. Once installed, it requires minimal maintenance and no ongoing energy costs, helping you save money in the long run.
-
Preserves Fabric: Hanging your clothes to dry on a clothesline can help extend the lifespan of your garments. The gentle air-drying process reduces the wear and tear that often occurs in tumble dryers, preserving the quality and color of your clothing.
-
Fresh Outdoor Scent: Clothes dried on a line outdoors often have a fresh, natural scent that can't be replicated by a dryer. This can add a pleasant, natural fragrance to your laundry, making it a popular choice for those who enjoy the smell of sun-dried clothes.
-
Versatility: A DIY clothesline offers flexibility in drying various items, including delicate fabrics that may not be suitable for a dryer. It's also ideal for drying large items such as bed linens, comforters, and blankets, which can be challenging to dry thoroughly in a standard dryer.
-
Physical Activity: Hanging laundry on a clothesline can be a form of light exercise. It provides an opportunity to step outside, get some fresh air, and engage in a simple, physical task, contributing to a healthier lifestyle.
-
Reduces Static and Wrinkles: Air-dried clothes are less prone to static cling and wrinkles compared to those dried in a machine. This can save you time on ironing and reduce the need for chemical-laden fabric softeners.
By considering these benefits, you can see how a DIY clothesline is a practical and sustainable addition to your home, offering numerous advantages over traditional drying methods.
Materials Needed
To create your own DIY clothesline, you will need the following materials:
-
Clothesline Wire: This forms the core of your clothesline and should be strong enough to support the weight of wet laundry. Opt for a durable, weather-resistant wire to ensure longevity.
-
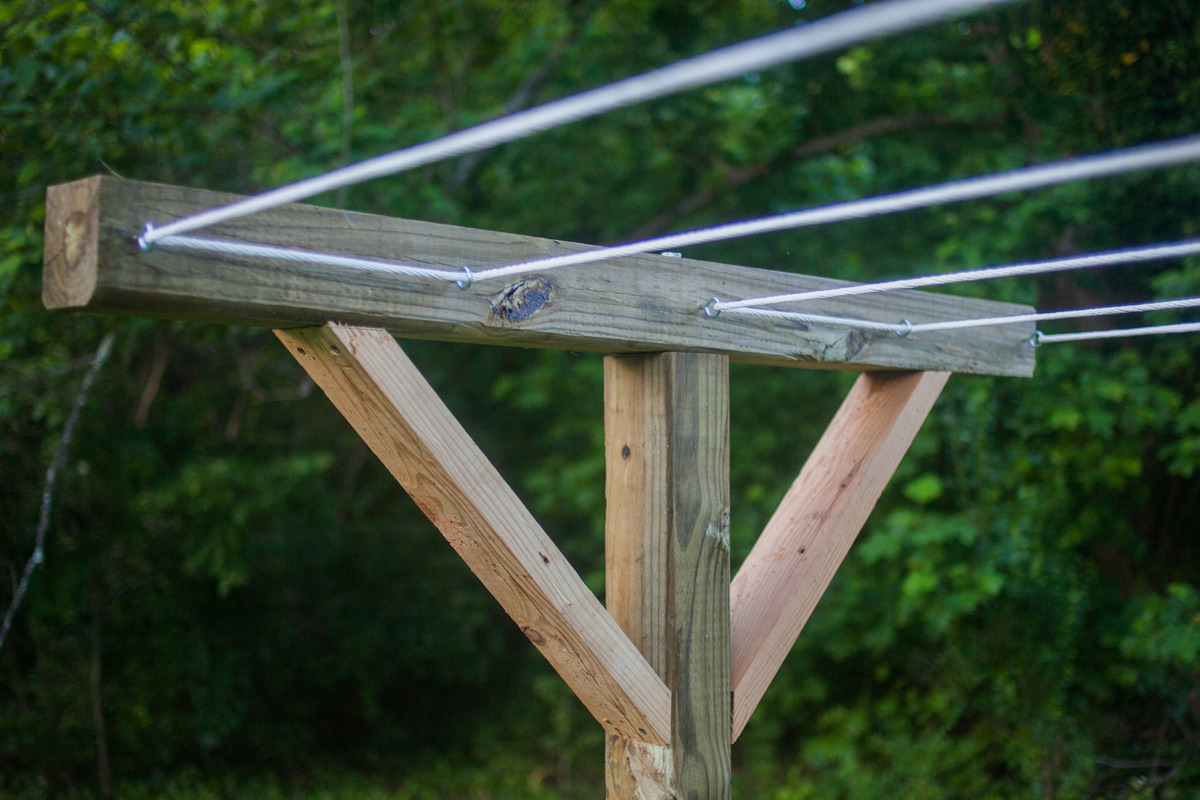
Poles or Posts: You'll need sturdy poles or posts to serve as the anchors for your clothesline. These can be wooden or metal, depending on your preference and the aesthetic of your outdoor space.
-
Concrete or Quick-Setting Cement: If you're using posts, you'll need concrete or quick-setting cement to secure them firmly into the ground. This ensures stability, especially in windy conditions.
-
Pulley System (Optional): If you prefer a retractable clothesline, a pulley system can be installed to allow for easy extension and retraction of the line.
-
Hooks or Eye Screws: These are used to attach the clothesline wire to the poles or posts securely.
-
Measuring Tape and Level: These tools are essential for ensuring that your clothesline is installed at the correct height and level.
-
Drill and Screws: If you're using eye screws, a drill and screws will be necessary for attaching them to the poles or posts.
-
Clothespins or Pegs: To secure your laundry to the clothesline, you'll need a supply of clothespins or pegs. Opt for rust-resistant options for durability.
-
Optional Accessories: Consider adding accessories such as a clothesline cover to protect your laundry from the elements, or a clothespin bag for convenient storage.
By gathering these materials, you'll have everything you need to embark on creating your very own DIY clothesline, providing an eco-friendly and cost-effective alternative for drying your laundry.
Step-by-Step Instructions
-
Select the Location: Choose a suitable location for your clothesline, ensuring it receives ample sunlight and has enough space for the line to be extended without obstruction.
-
Install the Poles or Posts: If you're using poles or posts, dig holes at least 2 feet deep for each post. Place the posts in the holes and fill them with concrete or quick-setting cement to secure them in place. Use a level to ensure the posts are perfectly upright.
-
Attach the Eye Screws: Screw the eye screws into the posts at the desired height, ensuring they are evenly spaced and aligned.
-
Thread the Clothesline Wire: Thread the clothesline wire through the eye screws, pulling it taut and allowing for some sag in the middle to prevent the line from snapping under the weight of wet laundry.
-
Secure the Wire: Fasten the ends of the wire securely to the eye screws, ensuring there is no slack in the line.
-
Optional: Install a Pulley System: If you opt for a retractable clothesline, install the pulley system according to the manufacturer's instructions, allowing for smooth extension and retraction of the line.
-
Test the Stability: Before use, ensure that the clothesline is stable and can support the weight of wet laundry without sagging excessively.
-
Hang Your Laundry: Once the clothesline is installed and stable, use clothespins or pegs to hang your laundry, ensuring that items are evenly spaced to allow for efficient drying.
-
Consider a Cover (Optional): If you live in an area prone to inclement weather, consider adding a clothesline cover to protect your laundry from rain or excessive sunlight.
-
Regular Maintenance: Periodically check the tension of the clothesline wire and the stability of the posts to ensure that your DIY clothesline remains in optimal condition.
By following these step-by-step instructions, you can create a functional and eco-friendly clothesline that provides a sustainable alternative for drying your laundry.
Tips for Maintaining Your DIY Clothesline
-
Regular Inspection: Periodically inspect the clothesline wire for signs of wear, such as fraying or corrosion. Replace any worn sections to prevent the line from snapping under the weight of your laundry.
-
Tension Adjustment: Over time, the clothesline wire may loosen due to weather conditions and frequent use. Adjust the tension as needed to ensure the line remains taut and capable of supporting your laundry.
-
Post Stability: Check the stability of the poles or posts that anchor your clothesline. Ensure they remain firmly secured in the ground and make any necessary adjustments to maintain their stability.
-
Weather Protection: If your DIY clothesline is exposed to the elements, consider applying a weather-resistant coating to the clothesline wire and inspecting the posts for signs of weather-related damage.
-
Rust Prevention: To prevent rust on the clothesline wire and any metal components, consider applying a rust-resistant coating or using stainless steel wire for increased durability.
-
Seasonal Adjustments: In colder climates, consider removing the clothesline wire during the winter months to prevent damage from ice and snow. Store it in a dry location and re-install it when the weather permits.
-
Clothespin Care: If you use clothespins or pegs, periodically check for signs of wear and replace any damaged or rusted pins to ensure they securely hold your laundry.
-
Trim Surrounding Foliage: If trees or bushes are near your clothesline, trim them regularly to prevent branches from rubbing against the line and causing damage.
-
Regular Cleaning: Clean the clothesline wire and posts to remove dirt, debris, and bird droppings, which can affect the cleanliness of your laundry and the longevity of the clothesline.
-
Educate Family Members: Ensure that everyone in your household is aware of the proper use and maintenance of the clothesline to prevent accidental damage and promote its longevity.
By implementing these maintenance tips, you can ensure that your DIY clothesline remains in optimal condition, providing a sustainable and efficient solution for drying your laundry.
Conclusion
In conclusion, creating your own DIY clothesline offers a multitude of benefits, including eco-friendliness, cost-effectiveness, and the preservation of your clothing. By harnessing the power of the sun and wind, you can reduce your carbon footprint while enjoying the fresh scent of air-dried laundry. With the step-by-step instructions and maintenance tips provided, you can embark on this sustainable home improvement project with confidence, knowing that you are contributing to a greener and more budget-friendly lifestyle. Embracing a DIY clothesline not only provides a practical solution for drying your laundry but also promotes a greater sense of self-sufficiency and environmental responsibility. So, gather your materials, find the perfect spot, and start reaping the rewards of your very own eco-friendly laundry solution.