
Home>Home & Furniture>Roof>How to Build a DIY Roof Top Tent Trailer
Roof
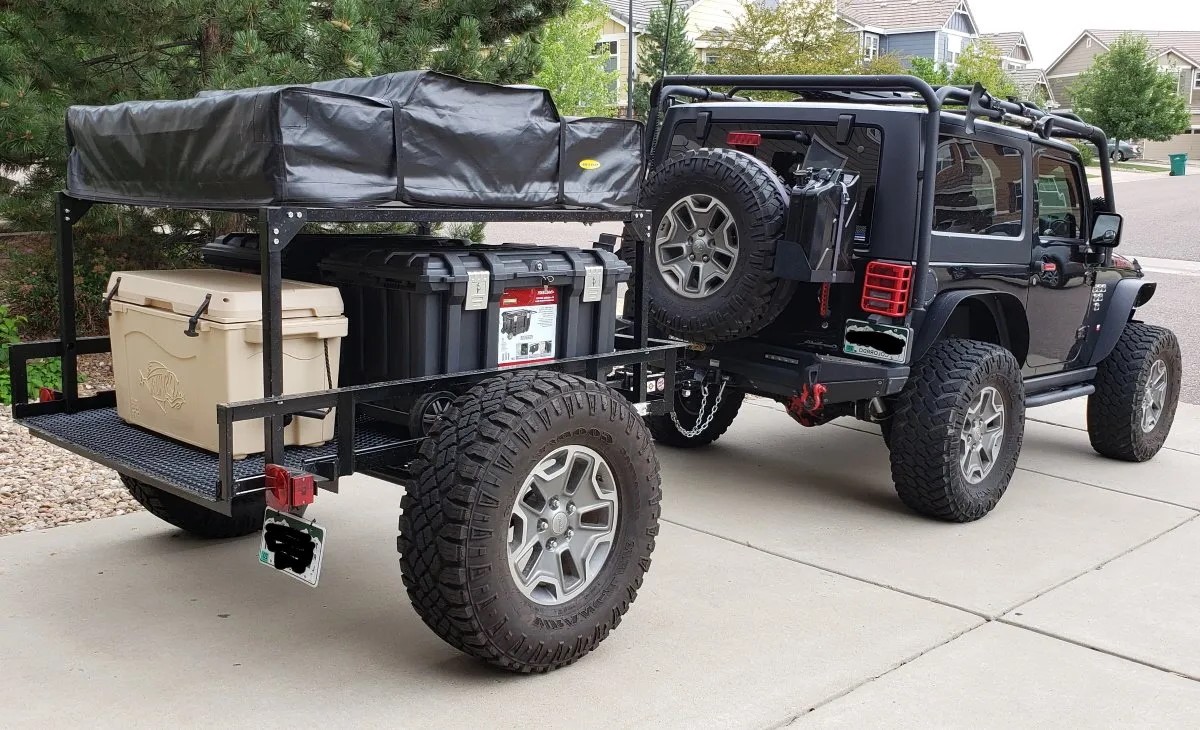
How to Build a DIY Roof Top Tent Trailer
Published: August 15, 2024
Learn how to build a DIY roof top tent trailer with our step-by-step guide. Perfect for camping enthusiasts looking to create a custom, mobile sleeping solution.
(Many of the links in this article redirect to a specific reviewed product. Your purchase of these products through affiliate links helps to generate commission for Twigandthistle.com, at no extra cost. Learn more)
Building a DIY roof top tent trailer combines the thrill of adventure with the satisfaction of crafting something with your hands. It's perfect for those who love camping but want the convenience of a ready-to-go setup. Creating your own allows customization to fit your specific needs and vehicle. This project may seem challenging, but with basic tools and a bit of patience, you can create a sturdy and reliable tent trailer. Plus, you'll save money compared to buying a pre-made one. Ready to start this fun project? Let’s jump right in!
Getting Ready for Your Project
Gather Materials and Tools: Collect all necessary materials like plywood, metal brackets, bolts, nuts, and the tent itself. Ensure you have tools like a drill, saw, measuring tape, and wrenches.
Safety Gear: Wear safety goggles, gloves, and a dust mask to protect yourself from debris and dust. Keep a first aid kit nearby.
Workspace Setup: Choose a flat, open area to work. Ensure good lighting and ventilation. Clear any clutter to avoid tripping hazards.
Measure and Cut: Measure the trailer frame and cut the plywood to fit. Double-check measurements to avoid mistakes.
Frame Assembly: Assemble the trailer frame using metal brackets and bolts. Tighten all connections securely.
Tent Mounting: Attach the tent to the trailer frame. Follow the tent’s instructions for proper installation.
Test Stability: Check the stability of the trailer and tent. Make sure everything is secure and balanced.
Weatherproofing: Apply a weatherproof sealant to protect the wood and metal from rain and moisture.
Electrical Setup: If adding lights or other electrical components, ensure proper wiring and insulation to prevent short circuits.
Final Inspection: Inspect the entire setup for any loose parts or potential issues. Make adjustments as needed.
Gathering Materials and Tools
- Trailer Frame: The base structure for your tent. Choose a sturdy, lightweight material like aluminum or steel.
- Roof Top Tent: The main component where you’ll sleep. Ensure it fits the trailer frame.
- Plywood Sheets: Used for flooring and support. Opt for weather-resistant types.
- Bolts, Nuts, and Screws: Essential for securing parts together. Stainless steel is best for durability.
- Metal Brackets: Provide additional support and stability to the frame.
- Weatherproof Sealant: Keeps moisture out, protecting the wood and metal.
- Paint or Protective Coating: Prevents rust and weather damage. Choose outdoor-grade options.
- Hinges: Allow for easy opening and closing of compartments.
- Latches and Locks: Secure your tent and belongings.
- Foam Padding: Adds comfort to the sleeping area.
- Canvas or Tarp: Provides extra weather protection.
- LED Lights: For illumination inside and outside the tent.
- Battery Pack: Powers the lights and any other electronic devices.
- Solar Panels: Optional, but useful for charging the battery pack.
Tools Needed:
- Drill: For making holes and driving screws.
- Saw: Cuts wood and metal to size. A circular saw works well.
- Wrench Set: Tightens bolts and nuts.
- Screwdriver Set: Essential for assembling parts.
- Measuring Tape: Ensures accurate measurements.
- Level: Keeps everything straight and even.
- Clamps: Hold materials in place while working.
- Hammer: Useful for various tasks, like securing nails.
- Pliers: Grip and manipulate small parts.
- Utility Knife: Cuts through canvas, tarp, and other materials.
- Paintbrushes or Rollers: Apply paint or protective coating.
- Safety Gear: Includes gloves, goggles, and ear protection.
Required Skills and Time Commitment
Skill Level: Advanced
Time Required: 40-60 hours
- Frame Construction: 10-15 hours
- Suspension and Axle Installation: 8-10 hours
- Electrical Wiring: 6-8 hours
- Tent Mounting: 4-6 hours
- Painting and Finishing: 6-8 hours
- Final Assembly and Testing: 6-8 hours
Instructions for Building Your Tent Trailer
Gather Materials and Tools
- Plywood sheets
- Steel tubing
- Roof top tent
- Trailer axle and wheels
- Bolts, nuts, and screws
- Drill, saw, and welding equipment
- Measuring tape and level
Design the Trailer Frame
- Sketch a basic design on paper.
- Measure dimensions for the frame based on the tent size.
Cut Steel Tubing
- Use a saw to cut steel tubing according to your design.
- Ensure all pieces are cut to the correct length.
Weld the Frame
- Weld the steel tubing pieces together to form the trailer frame.
- Double-check all welds for strength and stability.
Attach the Axle and Wheels
- Secure the trailer axle to the frame using bolts and nuts.
- Attach wheels to the axle.
Build the Base Platform
- Cut plywood sheets to fit the frame dimensions.
- Secure plywood to the frame using screws.
Install the Roof Top Tent
- Place the tent on the base platform.
- Secure the tent to the platform using bolts and nuts.
Add Finishing Touches
- Paint or coat the frame to prevent rust.
- Check all connections and fasteners for tightness.
Test the Trailer
- Attach the trailer to your vehicle.
- Test for stability and balance while driving.
Pack and Enjoy
- Load camping gear into the trailer.
- Enjoy your new roof top tent trailer on your next adventure!
Helpful Tips and Tricks
Plan your design carefully. Sketch out dimensions and features. Measure twice, cut once to avoid mistakes.
Use lightweight materials like aluminum for the frame. It’s strong but easy to handle. Marine plywood works well for the base because it resists water.
Install a sturdy roof rack. Make sure it can support the weight of the tent and people. Bolts and brackets should be high-quality to ensure safety.
Waterproof your tent. Use a waterproof sealant on seams and edges. Check for leaks before hitting the road.
Add storage compartments. Utilize space under the tent for gear. Sliding drawers can make access easier.
Include ventilation. Install vents or small windows to keep air flowing. Mosquito nets are a good idea to keep bugs out.
Test stability. Before using, make sure the trailer is balanced. Adjust the weight distribution if needed to prevent tipping.
Common mistakes to avoid:
- Overloading the trailer. Know the weight limits and stick to them.
- Ignoring local regulations. Check if you need permits or specific features.
- Skipping the waterproofing. This can lead to mold and damage.
Alternatives for materials or methods:
- Instead of aluminum, steel can be used for extra strength, though it’s heavier.
- For the base, composite boards can be a lighter alternative to marine plywood.
- If a roof rack is too expensive, DIY brackets made from metal can work, but ensure they’re strong enough.
Estimating the Cost
Trailer Frame: $500-$1,000. Look for a used trailer to save money.
Roof Top Tent: $800-$1,500. Budget options can be found for around $500.
Plywood: $50-$100.
Metal Brackets and Bolts: $30-$50.
Paint or Rust-Proof Coating: $20-$40.
Tools:
- Drill: $50-$100. Borrow one if possible.
- Saw: $30-$60. Hand saws are cheaper.
- Wrenches and Screwdrivers: $20-$40.
Miscellaneous: $50-$100. This includes things like sandpaper, brushes, and sealant.
Total Cost: $1,550-$2,990.
Budget-Friendly Alternatives:
- Used Trailer: $200-$500.
- Second-Hand Roof Top Tent: $300-$600.
- Borrow Tools: Free.
- Recycled Materials: Free or low cost.
Total Cost with Alternatives: $1,000-$1,800.
Different Ways to Customize
Alternative materials can change the look and durability of your trailer. Instead of using plywood for the base, consider aluminum for a lighter, rust-resistant option. For the tent fabric, canvas offers durability, while nylon is lightweight and water-resistant.
Colors can make your trailer stand out or blend in. Paint the trailer frame with bright colors like red or blue for visibility. Use earth tones like green or brown for a more natural look. The tent fabric can also be customized with different colors or patterns.
Styles can reflect your personal taste. For a rugged look, add diamond plate aluminum to the sides. For a sleek, modern style, use smooth, painted metal. You can also add wood paneling for a rustic feel.
Additional features can enhance functionality. Install solar panels on the roof for off-grid power. Add LED strip lights inside the tent for better visibility at night. Consider a fold-out table attached to the side for cooking or working.
Storage solutions can be customized. Build under-floor compartments for extra storage. Attach roof racks for carrying bikes or kayaks. Add side-mounted storage boxes for easy access to tools and gear.
Comfort upgrades can make your trips more enjoyable. Use a memory foam mattress instead of a standard one. Install insulation in the tent for better temperature control. Add ventilation fans to keep air circulating inside the tent.
Eco-Friendly Building Tips
Reclaimed wood can be used for the trailer frame. It’s strong and gives a rustic look. Recycled metal is great for the trailer’s base and support structures. It’s durable and eco-friendly. For the tent fabric, consider using organic cotton or recycled polyester. These materials are sustainable and weather-resistant.
Solar panels can power lights and small appliances. They reduce the need for non-renewable energy sources. Use LED lights for energy efficiency. They last longer and consume less power.
For insulation, try sheep wool or recycled denim. Both are natural and effective insulators. Bamboo flooring inside the trailer is another eco-friendly option. It’s renewable and sturdy.
When painting or sealing wood, choose low-VOC or VOC-free products. They’re better for your health and the environment. Rainwater collection systems can provide water for washing or cooking. This reduces the need for bottled water.
Lastly, repurpose old furniture for storage and seating. It saves money and reduces waste.
Your Adventure Awaits
Building a DIY roof top tent trailer is a rewarding project. You get to customize every detail, ensuring it fits your needs perfectly. From choosing the right materials to adding personal touches, the process is both challenging and fun. Plus, you save money compared to buying a pre-made one. Remember to double-check all measurements and connections for safety. Once finished, you'll have a unique trailer ready for countless adventures. So, gather your tools, follow the steps, and start building. Your next great outdoor experience is just around the corner. Happy camping!
What materials do I need to build a DIY roof top tent trailer?
You’ll need plywood, metal tubing, bolts, nuts, screws, hinges, tent fabric, and sealant. Don’t forget tools like a drill, saw, and wrench.
How long does it take to build one?
It usually takes a weekend or two, depending on your experience and how complex your design is. Plan for 20-30 hours of work.
Do I need any special skills?
Basic carpentry and metalworking skills help. If you can measure, cut, and assemble, you’re good to go. Watching a few tutorials can also be handy.
How much will it cost?
Costs vary, but expect to spend around $500-$1000 on materials. Reusing or recycling parts can save you some cash.
Can I customize the design?
Absolutely! You can add storage compartments, solar panels, or even a kitchen setup. Make it fit your needs and style.
Is it safe to use?
Yes, if you build it correctly. Ensure all joints are secure, and the tent is properly anchored. Regularly inspect for wear and tear.
What kind of vehicle can tow it?
Most SUVs and trucks can tow a roof top tent trailer. Check your vehicle’s towing capacity to be sure.