
Home>Create & Decorate>DIY & Crafts>DIY Flatbed: How To Build Your Own Flatbed For Trucks
DIY & Crafts
DIY Flatbed: How To Build Your Own Flatbed For Trucks
Published: June 7, 2024

Content Creator specializing in woodworking and interior transformations. Caegan's guides motivate readers to undertake their own projects, while his custom furniture adds a personal touch.
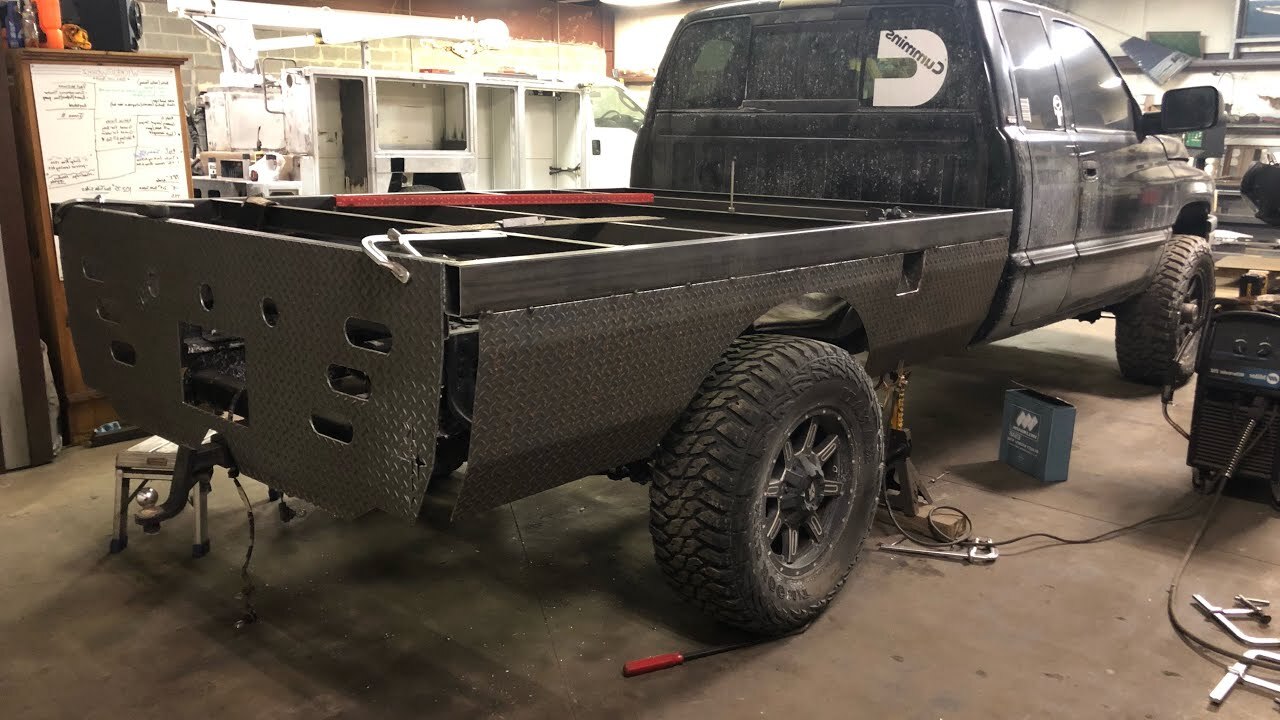
Learn how to build your own flatbed for trucks with our DIY guide. Get creative with our DIY & Crafts project and customize your truck's flatbed to suit your needs.
(Many of the links in this article redirect to a specific reviewed product. Your purchase of these products through affiliate links helps to generate commission for Twigandthistle.com, at no extra cost. Learn more)
Introduction
Are you looking to build your own flatbed for trucks but don't know where to start? Look no further! In this article, we will guide you through the process of creating your very own DIY flatbed. Whether you need a flatbed for hauling materials, transporting equipment, or simply for the rugged aesthetic, building your own flatbed can be a rewarding and cost-effective project. So, roll up your sleeves and get ready to dive into the world of DIY truck customization!
Materials Needed
Before you embark on your DIY flatbed project, it's essential to gather all the necessary materials. Here's a comprehensive list of what you'll need to get started:
- Steel or Aluminum Beams: These will form the structural framework of your flatbed. The size and quantity will depend on the dimensions of your truck and the weight capacity you require.
- Steel Sheets or Aluminum Plates: These will be used to create the deck of the flatbed. The thickness of the sheets should be chosen based on the intended use of the flatbed.
- Angle Iron: This will be used for bracing and reinforcing the frame of the flatbed.
- Welding Equipment: If you plan to weld the frame and deck together, you'll need a welding machine, welding rods, and safety gear.
- Cutting Tools: Depending on the materials you choose, you may need a cutting torch, angle grinder, or metal-cutting saw to shape the steel or aluminum.
- Measuring Tools: Accurate measurements are crucial, so make sure to have a tape measure, square, and level on hand.
- Fasteners: Bolts, nuts, and washers will be needed to secure the components of the flatbed together.
- Paint and Primer: Once the flatbed is constructed, you'll want to protect it from rust and corrosion with a coat of paint and primer.
- Safety Gear: Don't forget to prioritize safety! Gloves, goggles, and a welding helmet are essential for protecting yourself during the construction process.
By gathering these materials, you'll be well-prepared to tackle the construction of your DIY flatbed with confidence and efficiency.
Planning and Design
Before diving into the construction of your DIY flatbed, it's crucial to invest time in meticulous planning and thoughtful design. Here's a step-by-step guide to help you navigate this crucial phase:
-
Measure Your Truck: Begin by measuring the dimensions of your truck bed. Take accurate measurements of the length, width, and height of the truck bed to ensure that your DIY flatbed will be a perfect fit.
-
Determine Weight Capacity: Consider the maximum weight you intend to carry on the flatbed. This will influence the type and thickness of the materials you'll need to use for the frame and deck.
-
Sketch Your Design: With the measurements in hand, sketch out a design for your flatbed. Consider the placement of support beams, the layout of the deck, and any additional features you may want to incorporate, such as stake pockets or tie-down hooks.
-
Select Materials: Based on your design and weight capacity requirements, choose the appropriate steel or aluminum beams, sheets, and angle iron for the construction of the flatbed.
-
Consider Functionality: Think about how you will use the flatbed. Will you need access points for loading and unloading? Do you require removable sides or a hinged tailgate? These functional aspects should be integrated into your design.
-
Review and Revise: Once you have a preliminary design, review it carefully. Consider any potential improvements or modifications that could enhance the functionality and aesthetics of the flatbed.
By investing time in thorough planning and design, you'll set a solid foundation for the construction phase of your DIY flatbed project. This thoughtful approach will help ensure that the end result meets your needs and expectations.
Building the Frame
With the planning and design phase completed, it's time to roll up your sleeves and start building the frame of your DIY flatbed. This foundational step will establish the structural integrity of the flatbed, providing a sturdy base for the deck and ensuring the overall durability of the finished product.
-
Cutting the Beams: Begin by cutting the steel or aluminum beams to the appropriate lengths based on your design specifications. A metal-cutting saw or angle grinder equipped with a cutting wheel will be essential for this task. Ensure that the cuts are precise and that the ends of the beams are squared off for optimal fit and stability.
-
Assembling the Frame: Once the beams are cut, it's time to assemble the frame of the flatbed. Use the measurements and layout from your design to position the beams accordingly. Welding or bolting the beams together, depending on your chosen construction method, will create the primary framework of the flatbed. Be sure to double-check the alignment and squareness of the frame to prevent any structural issues down the line.
-
Reinforcement with Angle Iron: To reinforce the frame and enhance its load-bearing capacity, strategically place and attach angle iron along the length and width of the frame. This additional bracing will provide crucial support, especially in areas where heavy loads are expected to be concentrated.
-
Stake Pocket Installation: If your design includes stake pockets for securing cargo, this is the ideal stage to install them. Position the stake pockets at regular intervals along the perimeter of the frame, ensuring that they are securely welded or bolted in place. These pockets will serve as anchor points for tie-downs and can significantly enhance the versatility of your flatbed.
By meticulously constructing the frame of your DIY flatbed, you'll establish a solid and reliable foundation for the subsequent steps in the building process. Attention to detail and precision during this phase will contribute to the overall strength and functionality of the finished flatbed.
Adding the Deck
With the frame of the flatbed solidly in place, the next crucial step is adding the deck. The deck serves as the surface on which your cargo will rest, so it's essential to choose the appropriate material and ensure a secure installation.
-
Selecting the Deck Material: Depending on your preferences and the intended use of the flatbed, you can choose between steel sheets or aluminum plates for the deck. Consider the weight of the materials you typically transport and the level of durability required. Steel offers exceptional strength, while aluminum is known for its lightweight properties and resistance to corrosion.
-
Cutting and Shaping: Once you have the chosen material, it's time to cut it to fit the dimensions of the frame. Use a metal-cutting saw or angle grinder to precisely shape the sheets or plates, ensuring that they align perfectly with the edges of the frame. Take care to create smooth, straight cuts to achieve a professional finish.
-
Securing the Deck: With the deck pieces cut to size, it's time to secure them to the frame. Depending on your construction method, you can weld the deck to the frame for a seamless, integrated look, or use bolts and nuts for a removable deck option. Whichever method you choose, ensure that the deck is firmly attached to the frame, with no risk of shifting or detachment during transportation.
-
Adding Reinforcement: For heavy-duty applications, consider adding additional support to the underside of the deck. This can be achieved by welding cross beams or support braces beneath the deck, enhancing its load-bearing capacity and overall strength.
-
Drainage Considerations: If your flatbed will be exposed to the elements or used for transporting materials that may produce moisture, it's important to incorporate drainage channels or holes in the deck. This will prevent the accumulation of water, reducing the risk of corrosion and preserving the integrity of the flatbed over time.
By carefully attending to the process of adding the deck to your DIY flatbed, you'll create a reliable and functional surface for transporting a wide range of materials and equipment. The deck serves as the interface between your cargo and the flatbed, so ensuring its quality and durability is paramount to the success of your DIY project.
Installing the Flatbed
After constructing the frame and adding the deck, the next critical step is the installation of the flatbed onto your truck. This phase requires precision and attention to detail to ensure a secure and seamless fit.
-
Lifting and Positioning: With the assistance of a suitable lifting mechanism, carefully position the assembled flatbed onto the truck chassis. Ensure that the alignment is accurate, and the flatbed is centered on the truck bed.
-
Securing the Flatbed: Once the flatbed is in position, it's time to secure it to the truck chassis. Depending on your specific truck model and design, this may involve drilling mounting holes in the chassis and frame of the flatbed. Use high-strength bolts and nuts to firmly attach the flatbed to the truck, ensuring that it is stable and immovable.
-
Integration with the Truck: Pay attention to any electrical or mechanical components that may need to be integrated with the flatbed. This could include taillights, turn signals, or hydraulic systems for dump beds. Ensure that these components are seamlessly connected to the truck's existing systems for optimal functionality.
-
Reinforcement and Bracing: To further enhance the stability and load-bearing capacity of the flatbed, consider adding additional reinforcement and bracing where necessary. This could involve welding support beams or angle iron to strengthen specific areas of the flatbed, especially if it will be subjected to heavy loads or rugged terrain.
-
Final Adjustments: Once the flatbed is securely installed, perform a thorough inspection to check for any potential issues or misalignments. Make any necessary adjustments to ensure that the flatbed is level, securely attached, and fully integrated with the truck.
By meticulously following these steps, you'll successfully install the DIY flatbed onto your truck, creating a robust and functional cargo-carrying platform that meets your specific needs and requirements.
Finishing Touches
As you near the completion of your DIY flatbed project, it's time to focus on the finishing touches that will elevate the functionality, aesthetics, and longevity of your creation. These final steps will add polish and refinement to your flatbed, ensuring that it not only performs admirably but also looks professional and well-crafted.
-
Priming and Painting: Before putting your flatbed into regular use, it's essential to apply a coat of primer followed by a durable paint finish. This not only enhances the visual appeal of the flatbed but also provides crucial protection against rust and corrosion. Choose a high-quality paint that is formulated for use on metal surfaces, and consider a color that complements the overall look of your truck.
-
Sealing and Weatherproofing: If your flatbed will be exposed to the elements, consider applying a weatherproof sealant to the deck and frame. This will help prevent moisture infiltration, reducing the risk of rust and prolonging the lifespan of your flatbed. Additionally, sealing any exposed welds and joints will further fortify the flatbed against environmental wear and tear.
-
Adding Accessories: Depending on your specific needs, consider adding accessories such as tie-down hooks, toolboxes, or bed liners to enhance the functionality of your flatbed. These accessories can significantly increase the versatility and utility of the flatbed, allowing you to secure cargo effectively and organize tools and equipment for efficient transport.
-
Reflective Markings and Lighting: For enhanced safety, consider adding reflective markings or conspicuity tape to the perimeter of the flatbed. This will improve visibility, especially when driving at night or in low-light conditions. Additionally, ensure that all necessary lighting components, such as taillights and turn signals, are fully operational and integrated with the flatbed for compliance with road safety regulations.
-
Quality Assurance Inspection: Before putting your DIY flatbed into regular use, perform a comprehensive quality assurance inspection. Check all welds, fasteners, and structural components to ensure that everything is secure and in optimal condition. Test the functionality of any added accessories or integrated components to guarantee seamless operation.
By attending to these finishing touches, you'll elevate your DIY flatbed from a functional creation to a professional-grade addition to your truck. These details not only enhance the performance and durability of the flatbed but also contribute to a polished and refined final product that you can take pride in.
Conclusion
In conclusion, building your own flatbed for trucks through a DIY approach is a rewarding and practical endeavor. By following the comprehensive steps outlined in this guide, you can create a custom flatbed that perfectly suits your specific needs, whether it's for hauling heavy loads, transporting equipment, or adding a rugged aesthetic to your truck. From meticulous planning and design to the final finishing touches, each phase of the construction process contributes to the overall functionality, durability, and visual appeal of your DIY flatbed. Embrace the opportunity to unleash your creativity and craftsmanship, and enjoy the satisfaction of seeing your vision come to life as a robust and reliable addition to your truck. With the right materials, tools, and attention to detail, you can embark on this DIY journey with confidence, knowing that you have the knowledge and guidance to bring your flatbed project to successful fruition.