
Home>Home & Furniture>Roof>How to Build a DIY Flat Roofing System
Roof
How to Build a DIY Flat Roofing System
Published: August 15, 2024
Learn how to build a DIY flat roofing system with our step-by-step guide. Discover essential materials, tools, and techniques for a durable and efficient flat roof.
(Many of the links in this article redirect to a specific reviewed product. Your purchase of these products through affiliate links helps to generate commission for Twigandthistle.com, at no extra cost. Learn more)
Building your flat roof can be a rewarding project. This guide will walk through the basics, ensuring a sturdy, weather-resistant structure. Before starting, gather essential materials: roofing felt, adhesive, insulation, and tools. A flat roof offers simplicity and ease of maintenance compared to pitched roofs. However, proper installation is crucial to avoid water pooling and leaks. Safety should be a priority, so never work alone. With patience, attention to detail, and this guide's help, you’ll create a durable, efficient flat roof. Ready to learn how? Let’s get started!
Getting Ready for Your Project
Safety Gear: Wear gloves, safety goggles, and a hard hat. Ensure a first aid kit is nearby.
Workspace Setup: Clear the area around the roof. Remove any debris or obstacles. Set up a stable ladder and ensure it’s on firm ground.
Weather Check: Ensure the weather forecast is clear. Avoid working on the roof during rain or strong winds.
Materials and Tools: Gather all necessary materials like roofing felt, adhesive, nails, and sealant. Have tools like a hammer, utility knife, and measuring tape ready.
Surface Preparation: Clean the roof surface thoroughly. Remove old roofing materials and ensure the surface is dry and smooth.
Measure and Cut: Measure the roof dimensions accurately. Cut the roofing felt to fit, leaving a bit extra for adjustments.
Safety Precautions: Never work alone. Have someone nearby in case of emergencies. Ensure the ladder is secure before climbing.
Plan Layout: Plan the layout of the roofing felt. Start from the bottom edge and work upwards, overlapping each layer.
Check for Permits: Verify if any local permits are needed for roofing work. Obtain them if required.
Test Tools: Ensure all tools are in good working condition. Replace any faulty equipment before starting.
Emergency Plan: Have an emergency plan in place. Know the location of the nearest hospital and have a phone handy.
Hydration and Breaks: Keep water nearby. Take regular breaks to avoid fatigue.
Materials and Tools Checklist
- Plywood Sheets: Used as the base layer for the roof. They provide structural support.
- Roofing Felt: A waterproof layer placed over the plywood to prevent leaks.
- EPDM Rubber Membrane: A durable, weather-resistant material that covers the roofing felt.
- Roofing Adhesive: Used to secure the EPDM membrane to the roofing felt.
- Roofing Nails: Fasten the plywood sheets and roofing felt.
- Sealant: Applied around edges and seams to ensure a watertight seal.
- Flashing: Metal strips placed around edges and joints to prevent water infiltration.
- Utility Knife: Cuts the roofing felt and EPDM membrane to size.
- Hammer: Drives the roofing nails into place.
- Measuring Tape: Ensures accurate measurements for cutting materials.
- Chalk Line: Marks straight lines on the plywood for precise cuts.
- Roller: Smooths out the EPDM membrane and ensures proper adhesion.
- Ladder: Provides access to the roof.
- Safety Gear: Includes gloves, safety glasses, and a harness for protection.
Required Skills and Time Commitment
Skill Level: Advanced
Time Required: 3-5 days
- Preparation and Planning: 4-6 hours
- Removing Old Roofing: 6-8 hours
- Installing Roof Decking: 8-10 hours
- Applying Waterproof Membrane: 6-8 hours
- Installing Insulation: 4-6 hours
- Final Roofing Layer: 8-10 hours
Important Keywords: Advanced, 3-5 days, Preparation, Removing, Installing, Applying, Final
Detailed Building Instructions
Gather Materials:
- Plywood sheets
- Roofing felt
- Roofing adhesive
- Nails and screws
- Roofing shingles or membrane
- Sealant
Prepare the Roof Deck:
- Clear debris from the existing roof.
- Ensure the surface is smooth and even.
- Install plywood sheets over the roof frame, securing with nails or screws.
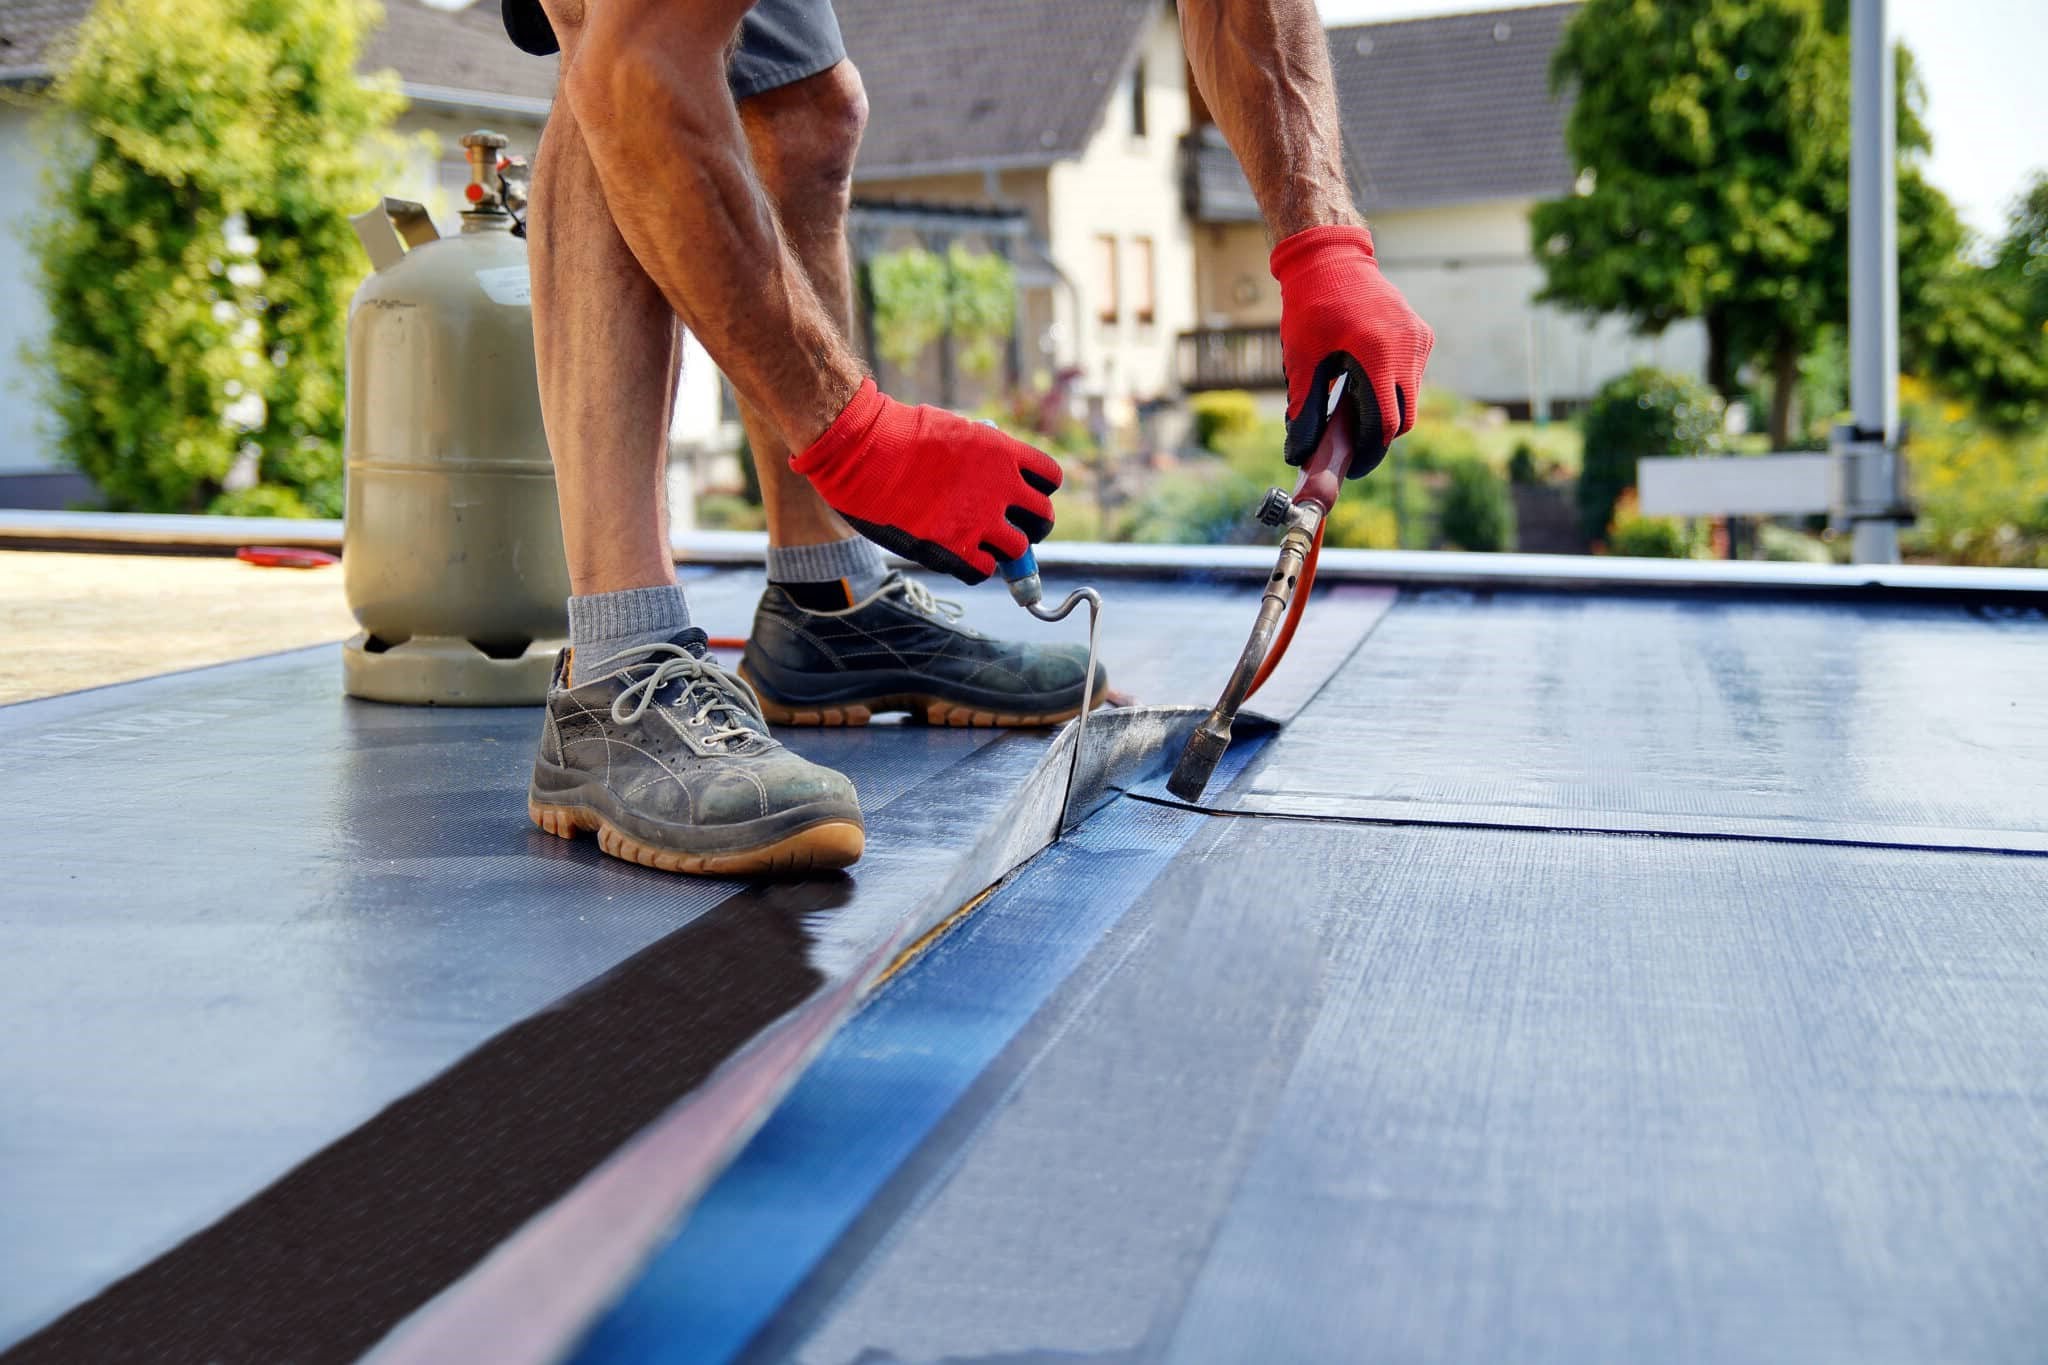
Install Roofing Felt:
- Roll out roofing felt over the plywood.
- Overlap each layer by at least 4 inches.
- Secure felt with roofing nails.
Apply Roofing Adhesive:
- Spread adhesive evenly over the felt.
- Use a trowel for smooth application.
Lay Roofing Membrane or Shingles:
- For membrane: Roll it out over the adhesive, pressing firmly.
- For shingles: Start at the bottom edge, overlapping each row.
- Secure with nails or screws.
Seal Edges and Seams:
- Apply sealant to all edges and seams.
- Ensure a watertight seal.
Inspect and Finish:
- Check for gaps or loose areas.
- Add extra sealant if needed.
- Clean up any excess materials.
Helpful Tips and Tricks
Measure twice, cut once. Always double-check your measurements before cutting materials. This saves time and reduces waste.
Use quality materials. Invest in good roofing materials like EPDM rubber or TPO. They last longer and provide better protection.
Ensure proper drainage. Flat roofs need a slight slope to prevent water pooling. Use tapered insulation or add a slight pitch to the roof structure.
Seal seams carefully. Use a high-quality seam tape or adhesive to seal all seams. This prevents leaks and extends the roof's lifespan.
Install a vapor barrier. A vapor barrier between the roof deck and insulation prevents moisture buildup, which can cause damage over time.
Common mistakes to avoid:
- Ignoring ventilation. Proper ventilation prevents moisture buildup and extends the roof's life.
- Skipping the underlayment. Always use an underlayment to protect the roof deck from moisture.
- Using incorrect fasteners. Use the right fasteners for your roofing material to ensure a secure installation.
Alternatives for materials or methods:
- Instead of traditional asphalt, consider EPDM rubber. It's durable and easy to install.
- Use TPO (Thermoplastic Olefin) for a more energy-efficient option. It reflects heat, reducing cooling costs.
- For insulation, try spray foam. It provides excellent coverage and seals gaps effectively.
Budgeting Your DIY Flat Roof
Plywood Sheets: $20 each. You will need around 10 sheets for a small roof, totaling $200.
Roofing Felt: $40 per roll. Two rolls should be enough, costing $80.
Roofing Nails: $10 per box. One box should suffice.
Roofing Adhesive: $15 per gallon. Two gallons will be $30.
Sealant: $10 per tube. Three tubes will cost $30.
Insulation Boards: $25 each. Four boards will be $100.
Drip Edge: $5 per 10-foot section. You will need about 8 sections, totaling $40.
Roofing Membrane: $100 per roll. One roll should be enough.
Tools: Hammer ($15), Utility Knife ($10), Measuring Tape ($10), Ladder ($50), Safety Gear ($30).
Total Cost: Around $705.
Budget-Friendly Alternatives:
- Use OSB Sheets instead of plywood: $10 each, saving $100.
- Opt for basic roofing felt: $30 per roll, saving $20.
- Borrow tools from friends or rent them, reducing costs by about $50.
Creative Variations and Customizations
Materials: Instead of traditional asphalt or gravel, consider using EPDM rubber or TPO membrane. These materials are durable and often easier to install. For a more eco-friendly option, try green roofing with plants or recycled rubber.
Colors: Standard roofing materials come in limited colors, but you can paint or coat your roof with reflective coatings. These coatings come in various colors and can help reduce heat absorption. White or light-colored coatings are great for reflecting sunlight.
Styles: Add a slight pitch to your flat roof to improve water drainage. This can be done by installing tapered insulation or creating a gentle slope with the roofing structure. For a modern look, consider a parapet wall around the edges. This not only adds style but also helps with water runoff.
Insulation: Use spray foam insulation for better energy efficiency. It fills gaps and provides a seamless barrier. Alternatively, rigid foam boards can be used for a more traditional approach.
Skylights: Incorporate skylights or solar tubes to bring natural light into the space below. This can make the area feel more open and reduce the need for artificial lighting.
Decking: Turn your flat roof into a rooftop deck by adding decking materials like wood or composite boards. Ensure proper waterproofing and drainage to protect the roof structure.
Green Roof: Create a green roof by adding a layer of soil and plants. This not only looks great but also helps with insulation and reduces rainwater runoff.
Solar Panels: Install solar panels to generate electricity. Flat roofs are ideal for solar installations because they can be easily angled to capture maximum sunlight.
Drainage: Improve drainage by installing scuppers or internal drains. These help direct water off the roof and prevent pooling.
Safety: Add guardrails or safety nets around the edges if the roof will be accessed frequently. This ensures safety while working or enjoying the space.
Lighting: Install LED strip lights or solar-powered lights around the perimeter for a stylish and functional touch. This can make the space usable at night and add a modern look.
Eco-Friendly Building Tips
Reclaimed wood can be used for the roof frame. This wood often comes from old barns or buildings. It’s strong and gives a rustic look. Recycled metal is another option for the frame. It’s durable and can be found at salvage yards.
For the roofing material, consider recycled rubber shingles. These shingles come from old tires and are very durable. Cool roofing materials like white or light-colored coatings reflect sunlight, reducing heat absorption. This helps keep your home cooler and saves energy.
Green roofs are another eco-friendly option. They involve planting vegetation on the roof. This provides insulation, reduces stormwater runoff, and improves air quality. Solar panels can also be installed on flat roofs. They generate renewable energy, reducing reliance on fossil fuels.
Use eco-friendly insulation like sheep’s wool or recycled denim. These materials are effective and have a lower environmental impact. Low-VOC sealants and adhesives are better for the environment and indoor air quality.
Rainwater harvesting systems can be added to flat roofs. They collect rainwater for gardening or other uses, reducing water waste. Proper ventilation is crucial to prevent moisture buildup and extend the roof’s lifespan.
When building, try to reuse or recycle as many materials as possible. This reduces waste and saves resources. For example, old pallets can be repurposed into roof decking. Local materials reduce transportation emissions and support local businesses.
Finally, consider energy-efficient lighting like LED lights for any rooftop structures. They use less energy and last longer than traditional bulbs.
Your Roof, Your Rules
Building a DIY flat roofing system isn't just about saving money. It's about learning, growing, and taking pride in your work. You've got the tools, the materials, and the know-how. Now, it's time to put it all together. Remember to measure twice, cut once. Always double-check your seals and flashing. Don't rush the curing process for the sealants. Your roof will protect your home from the elements, so take your time to do it right. If you hit a snag, don't hesitate to ask for help or look up more resources. You've got this. With a bit of patience and effort, you'll have a sturdy, reliable roof over your head. Happy building!
What materials do I need for a DIY flat roofing system?
You’ll need plywood, roofing felt, EPDM rubber, adhesive, seam tape, flashing, and drainage components. Don’t forget safety gear like gloves and goggles.
How do I prepare the roof surface?
First, clean the surface thoroughly. Remove any debris and old roofing material. Make sure the surface is dry and smooth before you start laying new materials.
How do I install the plywood base?
Lay the plywood sheets over the roof joists, ensuring they fit snugly. Secure them with screws or nails, making sure there are no gaps between the sheets.
What’s the best way to apply roofing felt?
Roll out the roofing felt over the plywood base. Start at one edge and work your way across, overlapping each layer by about 3 inches. Use a staple gun to secure it in place.
How do I install the EPDM rubber membrane?
Unroll the EPDM rubber and let it sit for about 30 minutes to relax. Apply the adhesive to the roof surface and the back of the rubber. Carefully lay the rubber onto the adhesive, smoothing out any bubbles or wrinkles.
How do I seal the seams?
Use seam tape to cover the joints between sheets of EPDM rubber. Press the tape firmly to ensure a watertight seal. Apply a layer of adhesive over the tape for extra protection.
How do I install flashing and drainage?
Install flashing around the edges and any roof penetrations like vents or chimneys. Make sure it overlaps the EPDM rubber. For drainage, install drainage components at the lowest points of the roof to ensure water flows off properly.