
Home>Home & Furniture>Kitchen>DIY: Step-by-step Guide to Removing Kitchen Faucet
Kitchen
DIY: Step-by-step Guide to Removing Kitchen Faucet
Published: August 2, 2024
Learn how to remove a kitchen faucet with our step-by-step DIY guide. Perfect for beginners, this comprehensive tutorial ensures a smooth and hassle-free faucet removal process.
(Many of the links in this article redirect to a specific reviewed product. Your purchase of these products through affiliate links helps to generate commission for Twigandthistle.com, at no extra cost. Learn more)
Removing a kitchen faucet might seem tricky, but with the right tools and steps, it becomes manageable. This guide walks you through the process, making it simple and straightforward. Whether replacing an old faucet or updating your kitchen's look, you can handle this task with confidence. No need to call a plumber when you can do it yourself. Gather your tools, clear the area, and follow along. By the end, you’ll have a new sense of accomplishment and a fresh look for your kitchen. Let’s get started on this DIY journey together!
Getting Ready for the Project
Gather Tools: You'll need a wrench, basin wrench, screwdriver, bucket, and towels.
Turn Off Water Supply: Locate the shut-off valves under the sink. Turn them clockwise to stop water flow.
Clear Under-Sink Area: Remove any items stored under the sink. This gives you space to work.
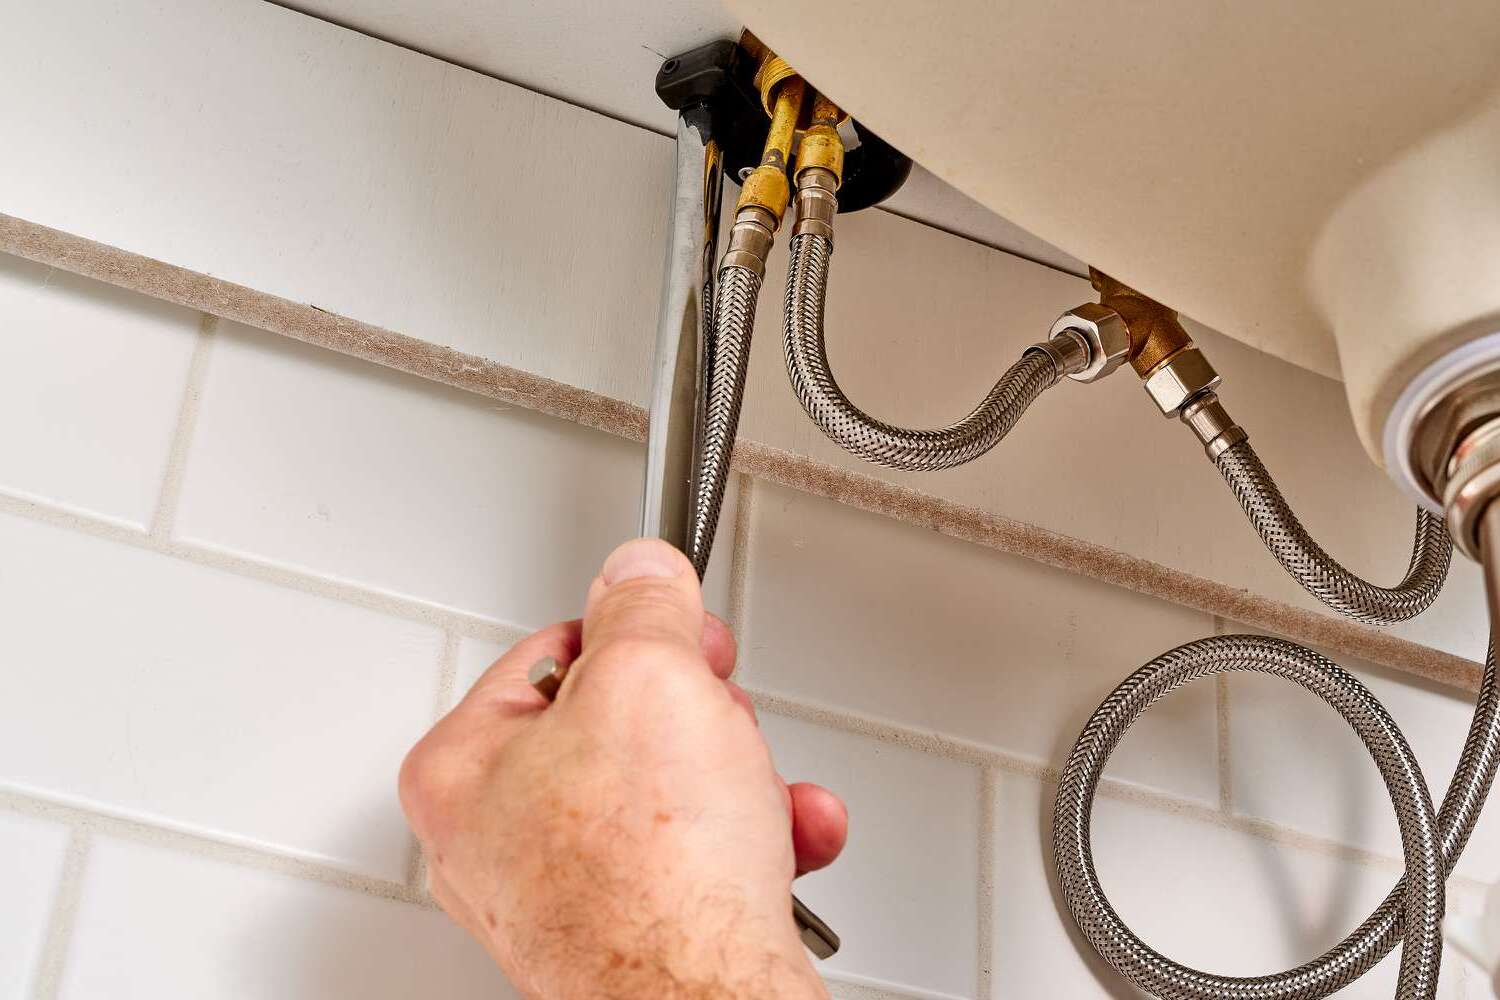
Disconnect Water Lines: Use the wrench to loosen the nuts connecting the water lines to the faucet. Have the bucket ready to catch any water.
Remove Faucet Mounting Nuts: Use the basin wrench to reach and loosen the nuts holding the faucet in place.
Lift Out Faucet: Once the nuts are removed, lift the faucet out from the top of the sink.
Clean Workspace: Wipe down the area where the faucet was installed. Ensure no debris or old sealant remains.
Safety Tips:
- Wear Gloves: Protect your hands from sharp edges and tools.
- Use Safety Glasses: Prevent debris from getting into your eyes.
- Check for Leaks: After turning off the water, ensure no leaks remain before starting.
What You Need for the Job
- Adjustable Wrench: Used to loosen and tighten nuts and bolts of various sizes.
- Basin Wrench: Specially designed for working in tight spaces under sinks.
- Bucket: Catches any water that might spill during the removal process.
- Towel or Rag: Helps clean up any water spills and keeps the area dry.
- Plumber's Tape: Ensures a tight seal on threaded pipe connections.
- Screwdriver: Removes screws that hold the faucet in place.
- Penetrating Oil: Loosens any rusted or stuck nuts and bolts.
- Flashlight: Provides better visibility in dark or hard-to-see areas under the sink.
- Pliers: Useful for gripping and turning small parts.
- Gloves: Protects hands from sharp edges and provides a better grip.
How Much Time and Skill You Need
Skill Level: Intermediate
Time Required: 1-2 hours
Steps:
- Gather Tools: Adjustable wrench, basin wrench, bucket, towel, and pliers.
- Turn Off Water Supply: Locate valves under the sink and turn them off.
- Disconnect Water Lines: Use the adjustable wrench to loosen nuts connecting water lines.
- Remove Mounting Nuts: Use the basin wrench to reach and remove nuts holding the faucet in place.
- Lift Out Faucet: Carefully lift the faucet out of the sink.
- Clean Area: Wipe down the sink area to remove any debris or old sealant.
Tips:
- Check for Leaks: After reinstallation, ensure no leaks are present.
- Have a Helper: An extra set of hands can make the process smoother.
Follow These Steps
Turn Off Water Supply
- Locate the shut-off valves under the sink.
- Turn both hot and cold valves clockwise to close.
Release Pressure
- Open the faucet to drain any remaining water.
- Leave the faucet open.
Disconnect Water Lines
- Use an adjustable wrench to loosen the nuts connecting the water lines to the faucet.
- Carefully remove the water lines.
Remove Mounting Nuts
- Look under the sink to find the mounting nuts holding the faucet in place.
- Use a basin wrench to loosen and remove these nuts.
Detach Faucet
- Gently lift the faucet from the top of the sink.
- If it’s stuck, use a putty knife to carefully break the seal.
Clean Area
- Remove any old plumber’s putty or sealant from the sink surface.
- Wipe the area clean with a damp cloth.
Inspect Parts
- Check the water lines and shut-off valves for any wear or damage.
- Replace if necessary before installing a new faucet.
Dispose of Old Faucet
- Properly dispose of the old faucet according to local regulations.
Helpful Tips and Tricks
Turn off the water supply before starting. Use a bucket to catch any water left in the pipes. Label the hot and cold water lines to avoid confusion later.
Use a basin wrench to reach tight spots under the sink. This tool makes it easier to loosen nuts holding the faucet in place. Apply penetrating oil to stubborn nuts and bolts to make them easier to remove.
Have a towel handy to wipe up any spills. Keep all parts organized by placing them in a small container. This helps when reassembling or if you need to take parts to the store.
Common mistakes include not turning off the water supply, which can lead to flooding. Forgetting to label water lines can cause confusion when installing the new faucet. Using the wrong tools can damage parts and make the job harder.
Alternatives for penetrating oil include vinegar or WD-40. If you don't have a basin wrench, pliers can work but may be less effective. Plastic bags can be used to keep parts organized if you don't have a container.
How Much Will It Cost?
Materials and Tools Needed:
- Adjustable Wrench: $10 - $20
- Basin Wrench: $10 - $15
- Plumber’s Putty: $3 - $5
- Bucket: $5 - $10
- Teflon Tape: $1 - $2
- Cleaning Supplies (Rags, Sponge, Cleaner): $5 - $10
Total Estimated Cost: $34 - $62
Budget-Friendly Alternatives:
- Adjustable Wrench: Borrow from a friend or neighbor.
- Basin Wrench: Rent from a local hardware store.
- Plumber’s Putty: Use silicone caulk if already available.
- Bucket: Repurpose an old container.
- Teflon Tape: Often included in faucet kits.
- Cleaning Supplies: Use old rags and household cleaner.
Total Estimated Cost with Alternatives: $10 - $20
Different Ways to Customize
Alternative Materials:
- Stainless Steel: Durable and rust-resistant.
- Brass: Adds a vintage look.
- Plastic: Budget-friendly and easy to handle.
Colors:
- Matte Black: Modern and sleek.
- Chrome: Shiny and classic.
- Brushed Nickel: Subtle and elegant.
Styles:
- Pull-Down: Flexible and convenient.
- Pull-Out: Compact and versatile.
- Touchless: High-tech and hygienic.
Handles:
- Single Handle: Simple and space-saving.
- Double Handle: Precise temperature control.
- Touch-Activated: Easy to use with messy hands.
Spray Patterns:
- Stream: Standard flow.
- Spray: Wider coverage.
- Pause: Temporarily stops water flow.
Spout Heights:
- High Arc: More space for large pots.
- Low Arc: Less splash, more compact.
Finishes:
- Oil-Rubbed Bronze: Rustic and warm.
- Polished Brass: Bright and bold.
- Satin Nickel: Smooth and understated.
Additional Features:
- Built-in Soap Dispenser: Keeps counters clutter-free.
- LED Temperature Indicator: Visual temperature cue.
- Magnetic Docking: Keeps spray head in place.
Eco-Friendly Tips
Step 1: Gather Tools and Materials
- Tools: Adjustable wrench, basin wrench, bucket, screwdriver, pliers.
- Materials: Eco-friendly cleaner, old towels or rags, reusable containers.
Step 2: Turn Off Water Supply
- Locate the shut-off valves under the sink.
- Turn them clockwise to stop water flow.
- Place a bucket under the faucet to catch any remaining water.
Step 3: Disconnect Water Lines
- Use an adjustable wrench to loosen the nuts connecting the water lines to the faucet.
- Carefully remove the lines and let any water drain into the bucket.
Step 4: Remove Mounting Nuts
- Use a basin wrench to reach the mounting nuts under the sink.
- Turn the nuts counterclockwise to loosen them.
- Keep these nuts for potential reuse in future projects.
Step 5: Detach Faucet
- Gently lift the faucet from the sink.
- Clean the area with an eco-friendly cleaner and old rags.
Step 6: Recycle or Reuse Old Faucet
- If the faucet is still functional, consider donating it.
- If not, take it to a recycling center for proper disposal.
Step 7: Clean and Prepare for New Faucet
- Use reusable containers to organize any small parts.
- Ensure the sink area is clean and dry before installing a new faucet.
By following these steps, you can remove a kitchen faucet while being mindful of the environment.
Your Faucet's Ready for Action
You've done it! Removing a kitchen faucet might've seemed tricky at first, but with the right tools and a bit of patience, you've nailed it. Remember, always turn off the water supply before starting. Keep those washers and nuts handy; they’re small but crucial. If you hit a snag, don’t hesitate to consult a video or a friend who’s done it before. Now, enjoy the satisfaction of a job well done. Your kitchen's one step closer to being the space you’ve always wanted. Next time something needs fixing, you’ll know you’ve got the skills to handle it. Happy DIY-ing!
How do I turn off the water supply before removing the kitchen faucet?
Look under the sink for shut-off valves. Turn them clockwise to stop the water flow. If there are no valves, turn off the main water supply.
What tools will I need for this project?
You'll need a wrench, pliers, a bucket, and possibly a basin wrench. A screwdriver might come in handy too.
How do I disconnect the water lines?
Use your wrench to loosen the nuts connecting the water lines to the faucet. Have a bucket ready to catch any water that might spill.
What if the faucet is stuck and won't come off?
Try using penetrating oil to loosen any rust or grime. If that doesn't work, a basin wrench can help reach tight spots.
How do I remove the mounting nuts?
Use your wrench or pliers to unscrew the mounting nuts holding the faucet in place. Sometimes, a basin wrench is needed for hard-to-reach nuts.
What should I do if I see leaks after installing the new faucet?
Check all connections to ensure they're tight. If leaks persist, you might need to use plumber's tape on the threads for a better seal.
Can I reuse the old water lines?
It's best to use new water lines to avoid any potential leaks or issues. Old lines might be worn out or damaged.