
Home>Home & Furniture>Kitchen>DIY Campervan Kitchen Ideas
Kitchen
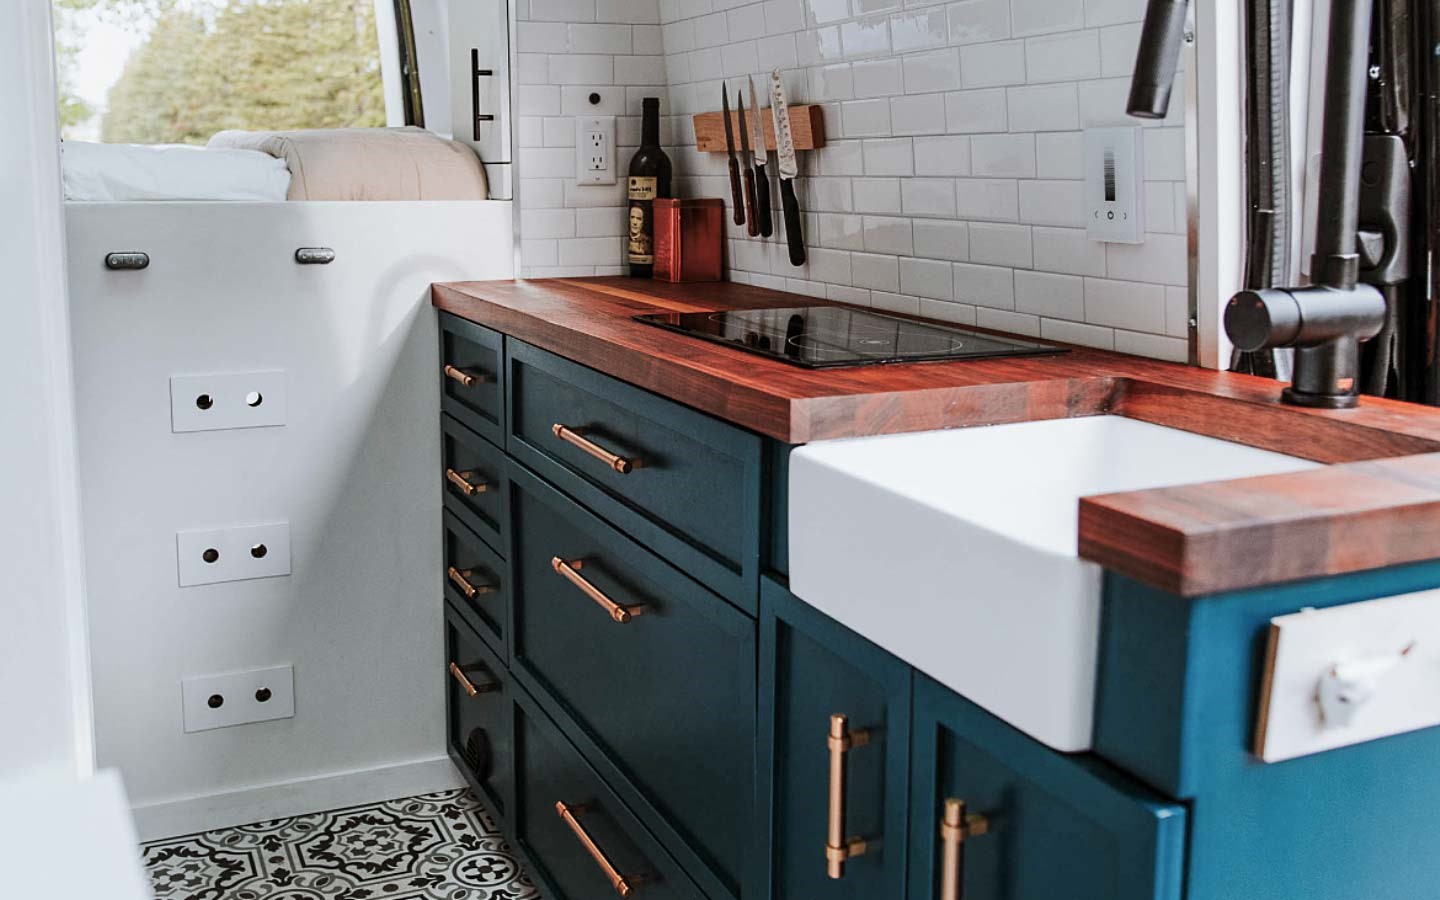
DIY Campervan Kitchen Ideas
Published: July 25, 2024
Discover creative and practical DIY campervan kitchen ideas to maximize space, enhance functionality, and bring the comforts of home on the road.
(Many of the links in this article redirect to a specific reviewed product. Your purchase of these products through affiliate links helps to generate commission for Twigandthistle.com, at no extra cost. Learn more)
Looking to hit the road with a cozy kitchen in your campervan? Creating your own campervan kitchen can be an exciting project. Whether you’re a weekend warrior or planning a longer adventure, having a functional kitchen on the go makes travels more enjoyable. From simple setups to more elaborate designs, there are countless ways to customize. Think about what you need most, like cooking space, storage, or maybe even a small fridge. With some basic tools and a bit of creativity, you can build a space that fits your needs perfectly. Ready to get started? Let’s dive into some ideas!
Getting Ready for Your Campervan Kitchen Project
Plan Your Layout: Sketch a rough design of where you want everything to go. Think about the sink, stove, storage, and counter space.
Measure Your Space: Use a tape measure to get the exact dimensions of your van. Write these down to ensure everything fits perfectly.
Gather Materials: Collect all necessary materials like wood, screws, brackets, and appliances. Make a checklist to avoid missing anything.
Set Up Workspace: Find a flat, open area to work. Lay down a tarp to protect the ground and keep tools organized.
Safety Gear: Wear safety glasses, gloves, and a dust mask. Keep a first aid kit nearby in case of minor injuries.
Cut and Prep Wood: Cut wood pieces according to your measurements. Sand edges to avoid splinters and ensure smooth surfaces.
Install Insulation: Add insulation to the van walls if not already done. This helps maintain temperature and reduces noise.
Pre-Drill Holes: Pre-drill holes in wood pieces to make assembly easier and prevent splitting.
Check Electrical Needs: Plan for any electrical outlets or lighting. Make sure you have the right wiring and tools.
Test Fit: Before final assembly, place all pieces in the van to ensure they fit correctly. Make adjustments as needed.
Secure Everything: Use brackets and screws to secure cabinets and counters. Ensure everything is stable and won't move while driving.
Ventilation: Plan for proper ventilation, especially if using a gas stove. Install vents or fans to keep air circulating.
Water Supply: Set up a water system with a tank, pump, and sink. Test for leaks before finalizing.
Final Touches: Add any finishing touches like paint, sealant, or decorative elements. Make sure everything is functional and looks good.
Essential Materials and Tools
- Plywood: Used for building cabinets, countertops, and storage units. It's sturdy and easy to cut.
- Screws and Nails: Essential for assembling the kitchen structure. They hold everything together securely.
- Hinges and Handles: Needed for cabinet doors. Hinges allow doors to open and close, while handles make them easy to use.
- Drawer Slides: Help drawers move smoothly in and out. They make accessing stored items easier.
- Sink and Faucet: Central to any kitchen. The sink is for washing dishes, and the faucet provides water.
- Water Tanks: One for fresh water and another for grey water. Fresh water is for drinking and cleaning, grey water collects waste water.
- Water Pump: Moves water from the tank to the faucet. It ensures a steady flow of water.
- Butane or Propane Stove: For cooking meals. These stoves are portable and efficient.
- Refrigerator or Cooler: Keeps food fresh. A small fridge or cooler fits well in a campervan.
- Insulation: Keeps the kitchen area warm or cool. It helps maintain a comfortable temperature.
- Electrical Wiring and Battery: Powers the lights, fridge, and water pump. A battery stores energy for use when needed.
- LED Lights: Provide bright, energy-efficient lighting. They are perfect for small spaces.
- Sealant and Caulk: Used to seal gaps and joints. They prevent leaks and keep the kitchen area clean.
- Paint or Stain: Adds color and protects the wood. It gives the kitchen a finished look.
- Measuring Tape: Ensures accurate measurements. It's crucial for cutting materials to the right size.
- Saw: Cuts wood and other materials. A jigsaw or circular saw works well for this.
- Drill: Makes holes for screws and bolts. It's a versatile tool for many tasks.
- Screwdriver: Tightens screws. Both manual and electric screwdrivers are useful.
- Sandpaper: Smooths rough edges. It prepares surfaces for painting or staining.
- Clamps: Hold pieces together while glue dries. They ensure strong, secure joints.
Required Skills and Time Commitment
Skill Level: Intermediate
Time Required:
- Planning and Design: 4-6 hours
- Gathering Materials: 2-3 hours
- Building Cabinets and Countertops: 8-12 hours
- Installing Appliances: 4-6 hours
- Plumbing and Electrical Work: 6-8 hours
- Finishing Touches: 2-4 hours
Total Time: 26-39 hours
Detailed Steps to Build Your Campervan Kitchen
Plan Your Layout
- Measure the available space in your campervan.
- Sketch a layout including the sink, stove, storage, and counter space.
- Decide on the placement of each component for easy access.
Gather Materials
- Plywood for cabinets and countertops.
- Screws, nails, and brackets for assembly.
- Sink, faucet, and water containers.
- Portable stove or built-in cooktop.
- Storage bins and organizers.
Build the Frame
- Cut plywood to the dimensions of your layout.
- Assemble the frame for cabinets using screws and brackets.
- Ensure the frame is sturdy and fits snugly in the campervan.
Install the Sink
- Cut a hole in the countertop for the sink.
- Place the sink in the hole and secure it with brackets.
- Connect the faucet to a water container using flexible tubing.
Add the Stove
- Decide if you want a portable stove or a built-in cooktop.
- For a built-in cooktop, cut a hole in the countertop and secure the stove.
- Ensure proper ventilation for safety.
Create Storage Solutions
- Install shelves and drawers inside the cabinets.
- Use storage bins and organizers to keep items tidy.
- Consider adding hooks or magnetic strips for utensils.
Finish the Countertop
- Sand the edges of the countertop for a smooth finish.
- Apply a sealant or laminate to protect the surface.
- Attach the countertop to the cabinet frame securely.
Install Lighting
- Add LED strip lights under cabinets for better visibility.
- Use battery-operated or solar-powered lights to save energy.
- Ensure all wiring is safely tucked away.
Test Everything
- Check the water flow from the faucet.
- Test the stove to ensure it works properly.
- Make sure all storage solutions are secure and accessible.
Personalize Your Space
- Add decorative touches like curtains or a backsplash.
- Use non-slip mats to keep items in place while driving.
- Organize your kitchen tools and supplies for easy access.
Helpful Tips and Tricks
Plan your layout carefully. Measure your space and sketch a design. Use lightweight materials like plywood or aluminum to keep the van's weight down. Install a foldable table to save space when not in use. Opt for a portable stove instead of a built-in one for flexibility. Use stackable containers for storage to maximize space. Install a water pump for easy access to water. Consider a small fridge or cooler to keep food fresh. Use magnetic strips to hold utensils and knives securely. Install LED lights for energy-efficient lighting. Add a backsplash to protect walls from splashes.
Common mistakes include overloading the van with heavy materials, which can affect fuel efficiency. Ignoring ventilation can lead to cooking odors and moisture buildup. Not securing items properly can cause them to shift while driving. Forgetting about insulation can make cooking uncomfortable in extreme temperatures.
Alternatives for materials or methods include using bamboo for a sustainable option, Velcro straps instead of screws for securing items, and solar panels for powering appliances. Consider a camping stove with a propane tank as an alternative to electric stoves. Use collapsible sinks to save space. Try peel-and-stick tiles for an easy backsplash solution.
Estimating the Cost
Cabinets and Storage: Pre-made cabinets cost around $200-$500. Building your own with plywood and basic hardware might cost $100-$200.
Countertop: Laminate countertops cost $50-$100. Butcher block or solid wood can range from $100-$300.
Sink and Faucet: Basic RV sinks cost $30-$60. Faucets range from $20-$50. A combo set might cost $70-$100.
Water System: A 12V water pump costs $30-$60. Fresh and grey water tanks cost $20-$50 each. Plumbing fittings and hoses might add another $20-$40.
Stove: Portable camping stoves cost $30-$100. Built-in propane stoves range from $100-$300.
Refrigerator: Small 12V fridges cost $150-$300. Cooler-style fridges range from $50-$150.
Electrical System: A basic setup with a 100Ah battery, inverter, and wiring might cost $200-$400.
Lighting: LED strip lights cost $10-$30. Additional wiring and switches might add $10-$20.
Tools: Basic tools like a drill, saw, and screwdrivers might cost $100-$200 if you don't already own them.
Budget-Friendly Alternatives:
- Use second-hand cabinets or repurpose old furniture.
- Opt for a portable sink with a manual pump.
- Choose a cooler instead of a fridge.
- Use battery-operated lights instead of wired ones.
Total estimated cost: $700-$2,000.
Creative Variations and Customizations
Alternative Materials: Use bamboo for countertops instead of traditional wood. It's eco-friendly and lightweight. For cabinets, consider aluminum or plastic to reduce weight and increase durability. Instead of a standard sink, try a collapsible silicone sink to save space.
Colors: Brighten up the space with pastel colors like mint green or baby blue. For a more rustic look, use earth tones like browns and greens. If you prefer a modern feel, go with monochrome shades like black, white, and gray.
Styles: For a minimalist design, keep surfaces clean and clutter-free, using hidden storage solutions. A bohemian style can be achieved with colorful tiles and eclectic decor. If you like a vintage look, incorporate retro appliances and checkered patterns.
Storage Solutions: Install magnetic strips for knives and metal utensils. Use hanging baskets for fruits and vegetables. Add pull-out shelves to maximize cabinet space.
Lighting: Use LED strip lights under cabinets for better visibility. Install a skylight or solar-powered lights to save energy. For a cozy atmosphere, add fairy lights around the kitchen area.
Appliances: Opt for a portable stove that can be stored away when not in use. Use a mini-fridge or a cooler with ice packs to keep food fresh. Consider a foldable table for extra prep space.
Water System: Install a foot pump for the sink to save water. Use collapsible water containers for easy storage. Add a water filter to ensure clean drinking water.
Ventilation: Add a small fan or vent to keep the kitchen area cool. Use window screens to allow fresh air in while keeping bugs out. Consider a roof vent for better airflow.
Eco-Friendly Ideas for Your Campervan Kitchen
Bamboo is a great choice for countertops and shelves. It's strong, lightweight, and grows quickly, making it a sustainable option.
Reclaimed wood can be used for cabinets and drawers. Old pallets or barn wood give a rustic look while reducing waste.
Recycled metal can be used for handles, knobs, and even backsplash. It adds a modern touch and is durable.
Cork flooring is another eco-friendly option. Cork is renewable, soft underfoot, and provides good insulation.
Solar panels can power your kitchen appliances. They reduce reliance on non-renewable energy sources.
LED lights are energy-efficient and last longer than traditional bulbs. Use them for under-cabinet lighting.
Natural fabrics like cotton or linen can be used for curtains and seat covers. They are biodegradable and often more durable.
Mason jars or other glass containers can store food and spices. They are reusable and reduce plastic waste.
Composting toilets can be a sustainable choice for waste management. They turn waste into compost, reducing water usage.
Greywater systems can recycle water from sinks for other uses like flushing toilets or watering plants. This conserves water and reduces your environmental footprint.
Your Campervan Kitchen Awaits
Building a campervan kitchen is a rewarding project. You've got the freedom to design a space that fits your needs perfectly. Whether you go for a simple setup with a portable stove and cooler or a full-blown kitchen with a sink, fridge, and cabinets, the key is to plan well and use your space wisely. Don't forget to consider ventilation, water supply, and storage solutions. With some creativity and elbow grease, you'll have a functional, cozy kitchen on wheels. Now, grab those tools, gather your materials, and start building the campervan kitchen of your dreams. Happy travels and happy cooking!
How do I start planning my campervan kitchen?
Begin by measuring the available space in your campervan. Sketch a layout that includes essential items like a sink, stove, and storage. Think about how you'll use the space daily.
What materials should I use for countertops?
Opt for lightweight, durable materials like plywood or laminate. These are easy to clean and won't add too much weight to your van.
How can I maximize storage in a small kitchen?
Use vertical space with hanging racks and shelves. Install drawers under benches and use collapsible or stackable containers for food and utensils.
Is it possible to have a fridge in a campervan kitchen?
Yes, you can install a small 12V fridge. These are energy-efficient and can run off your van's battery or a solar setup.
What type of stove is best for a campervan?
Portable propane stoves are popular because they're easy to use and don't require a permanent installation. You can also consider a built-in two-burner stove if you have the space.
How do I ensure proper ventilation?
Install a roof vent or fan to keep air circulating. Cooking can produce steam and odors, so good ventilation is crucial.
Can I have running water in my campervan kitchen?
Yes, you can set up a simple water system with a freshwater tank, a greywater tank, and a small electric pump. This allows you to have a functional sink for washing dishes and hands.