
Home>Create & Decorate>DIY & Crafts>DIY A-Frame Cabin: Building Your Own Cozy Retreat
DIY & Crafts
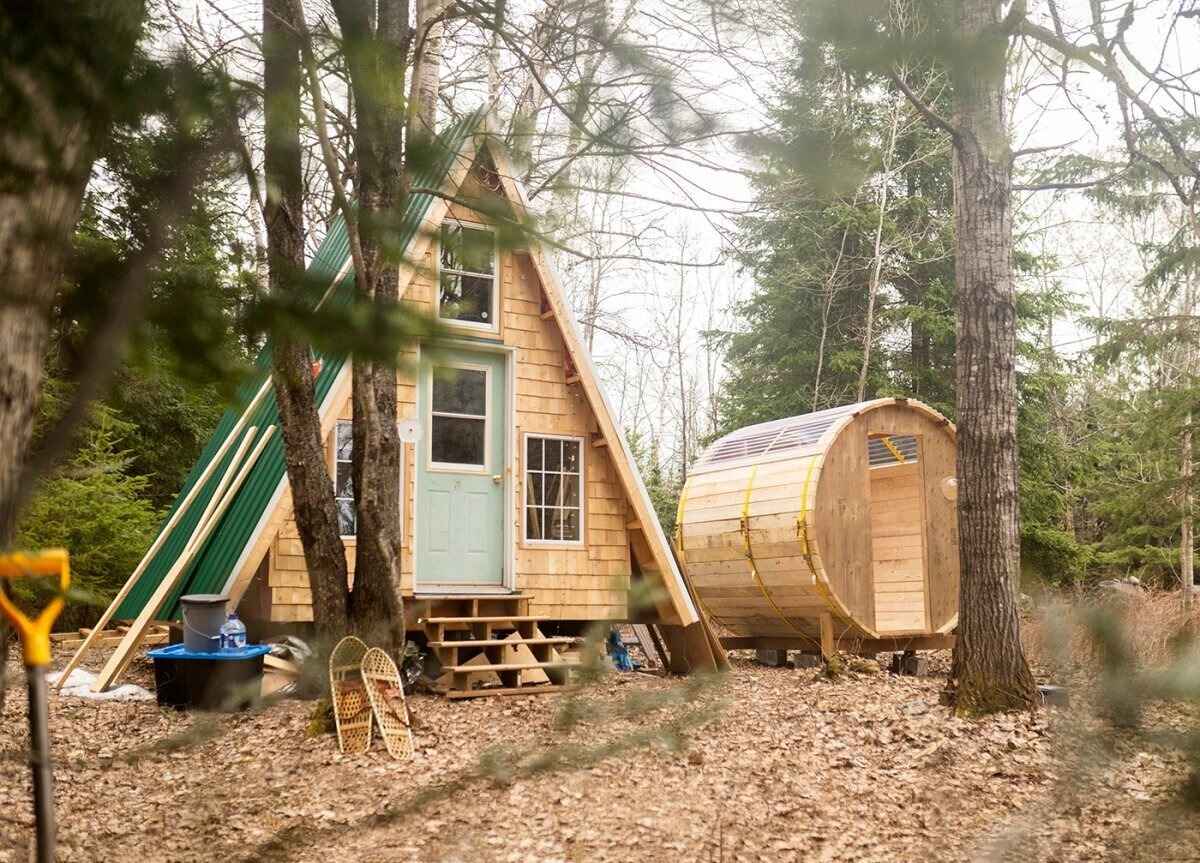
DIY A-Frame Cabin: Building Your Own Cozy Retreat
Published: May 23, 2024

Content Creator specializing in woodworking and interior transformations. Caegan's guides motivate readers to undertake their own projects, while his custom furniture adds a personal touch.
Discover how to build your own cozy A-frame cabin with our DIY & Crafts guide. Create your perfect retreat with step-by-step instructions and expert tips. Start your project today!
(Many of the links in this article redirect to a specific reviewed product. Your purchase of these products through affiliate links helps to generate commission for Twigandthistle.com, at no extra cost. Learn more)
Introduction
So, you've been dreaming of having your own cozy retreat, a place where you can escape the hustle and bustle of everyday life. What if I told you that you can make that dream a reality by building your very own A-Frame Cabin? Yes, you heard that right! With some DIY skills, determination, and a bit of creativity, you can construct a charming A-Frame cabin that will be the envy of all your friends. In this guide, we'll take you through the step-by-step process of building your own A-Frame cabin, from choosing the right location to adding the finishing touches. Let's dive in and make your dream retreat a reality!
Choosing the Right Location
When it comes to building your A-Frame cabin, the location is key. Here are some factors to consider when choosing the perfect spot for your cozy retreat:
-
Scenic Views: Look for a location with breathtaking views, whether it's nestled in the woods, overlooking a lake, or perched on a mountainside. The goal is to create a serene and picturesque setting for your A-Frame cabin.
-
Accessibility: Consider how easily accessible the location is. You'll want to ensure that it's convenient to reach, especially if you plan on spending weekends or holidays at your cabin.
-
Local Building Codes: Check the local building codes and regulations in the area where you plan to build. Make sure that you can obtain the necessary permits and that your A-Frame cabin complies with any zoning restrictions.
-
Sunlight and Wind Exposure: Take note of the sun's path throughout the day and the direction of prevailing winds. Positioning your cabin to maximize natural light and minimize exposure to harsh winds will enhance the comfort and energy efficiency of your retreat.
-
Utility Access: Consider the availability of utilities such as water, electricity, and sewage. If these services are not readily available, you'll need to plan for alternative off-grid solutions.
-
Environmental Impact: Be mindful of the environmental impact of your construction. Choose a location where the natural landscape can accommodate your cabin without causing significant disruption to the ecosystem.
By carefully considering these factors, you can select a location that not only complements the aesthetic appeal of your A-Frame cabin but also provides the practicality and comfort you desire for your retreat.
Designing Your A-Frame Cabin
Designing your A-Frame cabin is where the magic begins. This is your opportunity to unleash your creativity and personalize your retreat to suit your preferences. Here are some essential aspects to consider when designing your A-Frame cabin:
1. Layout and Floor Plan
The layout of your A-Frame cabin will determine the flow and functionality of the space. Consider how you intend to use the cabin – whether it's for relaxation, entertaining guests, or as a workspace. Maximize the efficient use of space while maintaining an open and airy feel that is characteristic of A-Frame structures.
2. Structural Considerations
The distinctive A-Frame design offers both challenges and opportunities. Take into account the structural requirements of the cabin, including the roof pitch, load-bearing walls, and support beams. Ensure that the design adheres to safety standards and building codes while embracing the unique architectural appeal of the A-Frame.
3. Material Selection
Choose materials that align with your vision for the cabin. Whether you prefer a rustic, natural look or a more modern aesthetic, the selection of materials such as wood, metal, and glass will contribute to the overall ambiance of your retreat.
4. Functional Features
Integrate functional features into the design, such as storage solutions, built-in furniture, and multi-purpose areas. A well-thought-out design will optimize the use of space and enhance the comfort and convenience of your A-Frame cabin.
5. Exterior Finishes
Consider the exterior finishes that will complement the surrounding landscape and withstand the elements. From natural wood siding to durable composite materials, the choice of exterior finishes will contribute to the visual appeal and longevity of your cabin.
6. Interior Décor
The interior design of your A-Frame cabin sets the tone for the ambiance and comfort of the space. Select furnishings, color schemes, and décor that reflect your personal style and create a welcoming atmosphere for relaxation and enjoyment.
By carefully considering these design elements, you can create a unique and inviting A-Frame cabin that perfectly aligns with your vision for a cozy retreat.
Gathering Materials and Tools
Gathering the right materials and tools is a crucial step in the process of building your A-Frame cabin. Here's a comprehensive list to ensure you have everything you need to kick-start your DIY project:
Materials
-
Lumber: Purchase high-quality lumber for the frame, decking, and interior finishes. Consider the dimensions and grades required for structural integrity and aesthetic appeal.
-
Fasteners: Stock up on nails, screws, and bolts of various sizes to secure the frame, sheathing, and other components.
-
Roofing Materials: Depending on your preference and local climate, choose roofing materials such as shingles, metal panels, or cedar shakes.
-
Insulation: Select insulation materials suitable for the walls, roof, and floor to regulate temperature and enhance energy efficiency.
-
Windows and Doors: Invest in durable, energy-efficient windows and doors that complement the design of your A-Frame cabin.
-
Siding and Finishes: Whether you opt for natural wood, composite materials, or other finishes, ensure you have sufficient quantities to cover the exterior surfaces.
-
Interior Finishes: Plan for interior finishes such as drywall, paneling, flooring, and trim to complete the interior spaces of your cabin.
-
Utilities: If your location requires off-grid solutions, gather materials for alternative energy sources, water storage, and waste management.
Tools
-
Power Tools: Essential power tools include a circular saw, drill/driver, jigsaw, and a nail gun for efficient and precise construction.
-
Hand Tools: Stock up on a variety of hand tools such as hammers, screwdrivers, wrenches, levels, and tape measures for detailed work and assembly.
-
Safety Gear: Prioritize safety with protective gear including goggles, gloves, hard hats, and dust masks to safeguard yourself during construction.
-
Lifting and Support Equipment: Consider renting or purchasing equipment like ladders, scaffolding, and a hoist to facilitate safe and efficient assembly of the A-Frame structure.
-
Finishing Tools: Plan for tools to aid in finishing touches, such as paint brushes, rollers, and sanders for interior and exterior surfaces.
-
Site Preparation Equipment: If necessary, acquire equipment for site preparation, such as a compact excavator, to clear and level the ground for the foundation.
By ensuring you have all the necessary materials and tools at the outset, you can streamline the construction process and minimize delays, bringing you one step closer to enjoying your own handcrafted A-Frame cabin retreat.
Preparing the Foundation
The foundation serves as the anchor for your A-Frame cabin, providing stability and support for the entire structure. Proper preparation of the foundation is essential to ensure the longevity and structural integrity of your retreat. Here's a detailed guide on how to prepare the foundation for your A-Frame cabin:
-
Site Clearing: Begin by clearing the site of any vegetation, rocks, and debris. Use a compact excavator or manual tools to level the ground and create a smooth, even surface for the foundation.
-
Marking the Layout: With the site cleared, mark the layout of the foundation using stakes and string. Ensure that the dimensions and angles align with the design and floor plan of your A-Frame cabin.
-
Excavation: Excavate the marked area to the required depth for the foundation. The depth will depend on the type of foundation you choose, whether it's a concrete slab, pier foundation, or full basement. Use a level and measuring tools to achieve uniform depth throughout the site.
-
Soil Compaction: Compact the soil at the bottom of the excavated area using a plate compactor or hand tamper. This step is crucial for creating a stable base that can withstand the weight of the cabin.
-
Formwork: If you're opting for a concrete foundation, construct formwork to contain the concrete and shape the foundation. Use sturdy, straight lumber and ensure that the formwork is level and securely braced to prevent shifting during the pouring of concrete.
-
Reinforcement and Drainage: Depending on the foundation type, install reinforcement such as rebar or wire mesh to enhance the strength of the concrete. Additionally, incorporate provisions for drainage to prevent water accumulation around the foundation.
-
Pouring Concrete: Once the formwork and reinforcement are in place, it's time to pour the concrete. Work methodically to fill the formwork, ensuring that the concrete is evenly distributed and free of air pockets. Use a screed and float to level and smooth the surface of the concrete.
-
Curing and Drying: Allow the concrete to cure and dry according to the manufacturer's recommendations. This process is critical for the concrete to achieve its full strength and durability.
-
Inspecting and Backfilling: After the foundation has cured, inspect it for any imperfections or cracks. Once satisfied with the quality of the foundation, backfill the surrounding area to further stabilize the site and prepare it for the next phase of construction.
By meticulously preparing the foundation, you establish a solid base for the construction of your A-Frame cabin, setting the stage for the realization of your cozy retreat.
Building the Frame
Building the frame of your A-Frame cabin is a pivotal stage that brings the structure to life. Here's a detailed breakdown of the process to guide you through constructing the frame of your cozy retreat:
-
Laying the Groundwork: Begin by laying out the foundation for the frame, ensuring that it aligns with the predetermined dimensions and angles specified in your cabin's design. Use precise measurements and markings to establish the positions for the frame components.
-
Assembling the Ridge Beam: The ridge beam forms the peak of the A-Frame structure and provides crucial support for the roof. Carefully position and secure the ridge beam in place, ensuring that it is level and properly aligned with the foundation.
-
Installing the Rafters: With the ridge beam in place, proceed to install the rafters that will form the distinctive A-Frame shape of your cabin. Ensure that the rafters are evenly spaced and securely attached to the ridge beam and the foundation, providing the framework for the roof and the overall structural integrity of the cabin.
-
Bracing and Reinforcement: Implement bracing and reinforcement to fortify the frame and enhance its stability. Diagonal bracing and additional support elements will help distribute the structural loads and withstand external forces, such as wind and snow loads, ensuring the resilience of your A-Frame cabin.
-
Sheathing and Subflooring: Apply sheathing to the exterior of the frame to enclose the structure and provide a base for the exterior finishes. Simultaneously, install the subflooring to establish a solid foundation for the interior spaces of the cabin, ensuring a level and secure platform for the subsequent construction phases.
-
Window and Door Openings: Frame the openings for windows and doors, carefully considering their placement and dimensions to optimize natural light, ventilation, and access. Proper framing of these openings is essential for the seamless integration of windows and doors into the A-Frame cabin's design.
-
Quality Assurance and Adjustments: Thoroughly inspect the frame for any discrepancies or misalignments, making necessary adjustments to ensure the precision and integrity of the structure. Attention to detail during this phase will contribute to the overall quality and longevity of your A-Frame cabin.
By meticulously following these steps, you will successfully build the frame of your A-Frame cabin, bringing you one step closer to realizing your dream retreat.
Installing Windows and Doors
Installing windows and doors in your A-Frame cabin is a crucial step that contributes to the functionality, aesthetics, and comfort of the retreat. Here's a detailed guide on how to effectively install windows and doors in your cabin:
-
Window Placement: Begin by determining the optimal placement of windows to maximize natural light and scenic views. Consider the orientation of the cabin and the surrounding landscape to strategically position the windows for both visual appeal and practicality.
-
Door Selection: Choose doors that complement the design and scale of your A-Frame cabin. Whether it's a traditional hinged door, sliding glass doors, or a charming Dutch door, select options that align with the architectural style and functional requirements of your retreat.
-
Preparation: Prepare the openings for the windows and doors by ensuring that the framing is structurally sound and properly sized to accommodate the selected fixtures. Make any necessary adjustments to the framing to ensure a snug and secure fit for the windows and doors.
-
Weatherproofing: Prioritize weatherproofing measures to seal the window and door openings against moisture infiltration and air leakage. Install flashing, caulking, and weatherstripping to create a tight seal that enhances energy efficiency and protects the interior of the cabin from the elements.
-
Installation: Carefully install the windows and doors according to the manufacturer's guidelines, ensuring that they are level, plumb, and securely anchored. Use shims and fasteners to achieve a precise fit and prevent any potential movement or drafts.
-
Hardware and Locks: Complete the installation by attaching the necessary hardware and locks to the windows and doors. Test the functionality of the hardware to ensure smooth operation and secure closure, providing peace of mind and convenience for the occupants of the cabin.
-
Finishing Touches: Once the windows and doors are installed, apply trim and casing to create a polished and cohesive look. The trim not only enhances the visual appeal but also conceals any gaps and provides a finished appearance to the window and door openings.
By following these steps, you can effectively install windows and doors in your A-Frame cabin, enhancing its charm, functionality, and livability.
Roofing and Insulation
The roofing and insulation of your A-Frame cabin play a critical role in ensuring its durability, energy efficiency, and overall comfort. Here's a comprehensive guide to effectively address the roofing and insulation aspects of your cozy retreat:
Roofing Materials Selection
Selecting the right roofing materials is essential to protect your A-Frame cabin from the elements and contribute to its visual appeal. Consider options such as asphalt shingles, metal roofing, or cedar shakes, taking into account factors such as durability, weather resistance, and compatibility with the cabin's design. Ensure that the chosen roofing materials align with the local climate and building codes to provide long-lasting protection and aesthetic enhancement.
Roofing Installation
Begin the roofing process by preparing the sheathing and underlayment to create a solid foundation for the roofing materials. Install the chosen roofing materials according to the manufacturer's guidelines, paying attention to proper fastening, overlapping, and flashing to prevent water infiltration. Whether it's laying shingles, securing metal panels, or arranging cedar shakes, meticulous installation is crucial to ensure a watertight and visually appealing roof for your A-Frame cabin.
Insulation Planning
Effective insulation is key to maintaining a comfortable and energy-efficient interior environment in your cabin. Evaluate insulation options for the walls, roof, and floor, considering factors such as R-value, moisture resistance, and environmental impact. Whether it's fiberglass batts, spray foam, or rigid foam boards, choose insulation materials that align with the specific requirements of your A-Frame cabin and the local climate conditions.
Insulation Installation
Install the selected insulation materials with precision and attention to detail. Ensure that the insulation is properly fitted within the wall and roof cavities, leaving no gaps or compression that could compromise its effectiveness. Additionally, implement vapor barriers and air sealing measures to control moisture and prevent drafts, contributing to enhanced thermal performance and indoor comfort within your cabin.
Ventilation Considerations
Incorporate ventilation strategies to complement the insulation and roofing system, promoting air circulation and moisture control. Install soffit and ridge vents to facilitate the movement of air within the attic space, preventing the buildup of heat and moisture that could compromise the roofing materials and insulation. Proper ventilation contributes to the longevity of the roof and insulation while maintaining a healthy indoor environment.
Energy Efficiency Enhancement
By prioritizing effective insulation and roofing practices, you can enhance the energy efficiency of your A-Frame cabin, reducing heating and cooling demands and creating a sustainable and comfortable living space. The combination of quality roofing and insulation contributes to a well-protected and thermally efficient retreat that you can enjoy for years to come.
By following these guidelines, you can effectively address the roofing and insulation aspects of your A-Frame cabin, ensuring its resilience, energy efficiency, and interior comfort.
Interior Design and Furnishing
Designing the interior of your A-Frame cabin is an opportunity to infuse personality and charm into your retreat. Here's a detailed guide to help you create a welcoming and functional interior space:
1. Space Planning
Begin by envisioning how you intend to utilize the interior space. Consider the layout of the cabin and allocate areas for living, dining, sleeping, and any additional functional zones. Maximize the efficient use of space while maintaining an open and airy feel that complements the A-Frame design.
2. Natural Elements
Embrace the natural elements of the A-Frame cabin by incorporating wood accents, stone features, and other organic materials. Exposed wooden beams, hardwood floors, and stone fireplaces can add warmth and character to the interior, creating a cozy and inviting atmosphere.
3. Functional Furnishings
Select furnishings that balance comfort and functionality. Opt for versatile pieces that can serve multiple purposes, such as storage ottomans, convertible sofas, and extendable dining tables. Consider the scale of the furniture to ensure it complements the proportions of the A-Frame space.
4. Cozy Textiles
Introduce soft textiles such as plush area rugs, throw blankets, and accent pillows to add texture and comfort to the interior. Choose fabrics in earthy tones and natural patterns to harmonize with the rustic ambiance of the cabin.
5. Lighting Design
Illuminate the interior with a thoughtful lighting design that encompasses ambient, task, and accent lighting. Incorporate natural light through strategically placed windows and skylights, and complement it with warm, inviting artificial lighting to create a cozy ambiance, especially during the evenings.
6. Personal Touches
Infuse the interior with personal touches that reflect your interests and experiences. Display artwork, photographs, and mementos that hold sentimental value, and incorporate elements that showcase your hobbies and passions, adding a sense of individuality to the space.
7. Efficient Storage
Maximize storage solutions to keep the interior organized and clutter-free. Utilize built-in shelving, under-bed storage, and multifunctional furniture to optimize space and maintain a tidy environment within the cabin.
8. Seasonal Adaptability
Consider the adaptability of the interior design to accommodate seasonal changes. Incorporate features such as a wood-burning stove for winter warmth, ceiling fans for summer cooling, and versatile decor that can transition seamlessly between different seasons.
9. Sustainable Practices
Embrace sustainable design practices by selecting eco-friendly materials, energy-efficient appliances, and incorporating elements of nature into the interior. Consider the environmental impact of your design choices to create a harmonious and sustainable living space.
10. Comfortable Retreat
Ultimately, aim to create an interior that serves as a comfortable and inviting retreat. Whether it's a cozy reading nook, a spacious dining area for gatherings, or a tranquil bedroom for relaxation, the interior design should cater to your needs and provide a serene escape within your A-Frame cabin.
By carefully considering these aspects of interior design and furnishing, you can create a personalized and inviting interior space within your A-Frame cabin, enhancing the overall appeal and comfort of your retreat.
Adding Finishing Touches
As you near the completion of your A-Frame cabin, adding the finishing touches will elevate the overall aesthetic and functionality of your retreat. Here are the essential steps to consider when adding those final details:
1. Exterior Landscaping
Enhance the exterior of your cabin with thoughtful landscaping. Plant native trees, shrubs, and flowers to blend the cabin seamlessly with its natural surroundings. Create pathways, outdoor seating areas, and a fire pit to encourage outdoor enjoyment.
2. Deck and Patio
Construct a deck or patio space that extends the living area of your cabin. Choose durable and weather-resistant materials for the flooring and consider adding comfortable outdoor furniture, a dining area, and a grill for al fresco dining and relaxation.
3. Exterior Lighting
Illuminate the exterior of your cabin with strategic lighting. Install pathway lights, sconces, and overhead fixtures to enhance safety, security, and ambiance during the evening hours. Consider incorporating solar-powered lighting for eco-friendly illumination.
4. Cozy Fire Feature
Integrate a fire feature, such as a stone fireplace or a fire pit, to create a focal point for outdoor gatherings. The warmth and ambiance of a crackling fire will extend the usability of your outdoor space, especially during cooler seasons.
5. Personalized Signage
Add a personalized touch to your cabin's exterior with a custom sign or plaque. Whether it bears the cabin's name, a welcoming message, or a family monogram, the signage will impart a sense of identity and charm to your retreat.
6. Interior Accents
Incorporate interior accents such as decorative wall art, cozy throw blankets, and accent pillows to infuse personality and warmth into the living spaces. Choose decor that reflects your style and interests, creating a welcoming and visually appealing interior.
7. Functional Storage Solutions
Optimize storage within the cabin by integrating built-in shelving, under-stair storage, and versatile furniture with hidden compartments. Efficient storage solutions will maintain a clutter-free environment and contribute to the overall organization of the space.
8. Thoughtful Accessories
Select and display thoughtful accessories such as vintage finds, handmade crafts, and cherished heirlooms to add character and nostalgia to the interior. These unique touches will tell a story and create a sense of history within your cabin.
9. Sustainable Practices
Embrace sustainable practices by incorporating eco-friendly cleaning products, energy-efficient appliances, and reusable or upcycled decor items. Consider the environmental impact of your finishing touches to align with the eco-conscious ethos of your A-Frame cabin.
10. Personal Retreat Space
Designate a personal retreat space within the cabin, whether it's a reading nook, a meditation corner, or a hobby area. Tailor this space to cater to your individual interests and provide a tranquil sanctuary within your cozy retreat.
By attending to these finishing touches, you will infuse your A-Frame cabin with character, functionality, and personalization, creating a welcoming and harmonious environment that reflects your vision for the ultimate cozy retreat.
Conclusion
Congratulations on embarking on the journey of building your own A-Frame cabin! As you reach the conclusion of this DIY project, you have not only created a cozy retreat but also a space filled with memories waiting to be made. Your dedication, creativity, and attention to detail have culminated in the realization of a dream retreat that reflects your unique vision and personality.
As you step back and admire the craftsmanship and beauty of your A-Frame cabin, remember that this is more than just a structure – it's a testament to your determination and passion for creating a space that offers solace, inspiration, and joy. Whether it's a weekend getaway, a creative haven, or a place to connect with nature, your A-Frame cabin stands as a testament to the power of DIY ingenuity and the fulfillment of a dream.
As you move forward, may your A-Frame cabin be a source of tranquility, creativity, and cherished moments with loved ones. Embrace the serenity of the natural surroundings, the warmth of the crackling fire, and the comfort of a space that you have meticulously crafted with your own hands.
From choosing the perfect location to adding the finishing touches, every step of this journey has been a testament to your dedication and creativity. Your A-Frame cabin is not just a retreat – it's a reflection of your passion for DIY and home improvement, and a testament to the joy of creating something truly special.
So, as you open the door to your A-Frame cabin and step inside, may you be greeted with a sense of pride and accomplishment, knowing that you have transformed a vision into a reality. Your A-Frame cabin is more than just a structure – it's a haven, a sanctuary, and a place where memories will be made for years to come.