
Home>Create & Decorate>DIY & Crafts>DIY Basement Bar: How To Create Your Own Stylish And Functional Entertainment Space
DIY & Crafts
DIY Basement Bar: How To Create Your Own Stylish And Functional Entertainment Space
Published: May 27, 2024

Content Creator specializing in woodworking and interior transformations. Caegan's guides motivate readers to undertake their own projects, while his custom furniture adds a personal touch.
Learn how to design and build a stylish and functional DIY basement bar with our expert tips and ideas. Create your own entertainment space with our DIY & Crafts guide.
(Many of the links in this article redirect to a specific reviewed product. Your purchase of these products through affiliate links helps to generate commission for Twigandthistle.com, at no extra cost. Learn more)
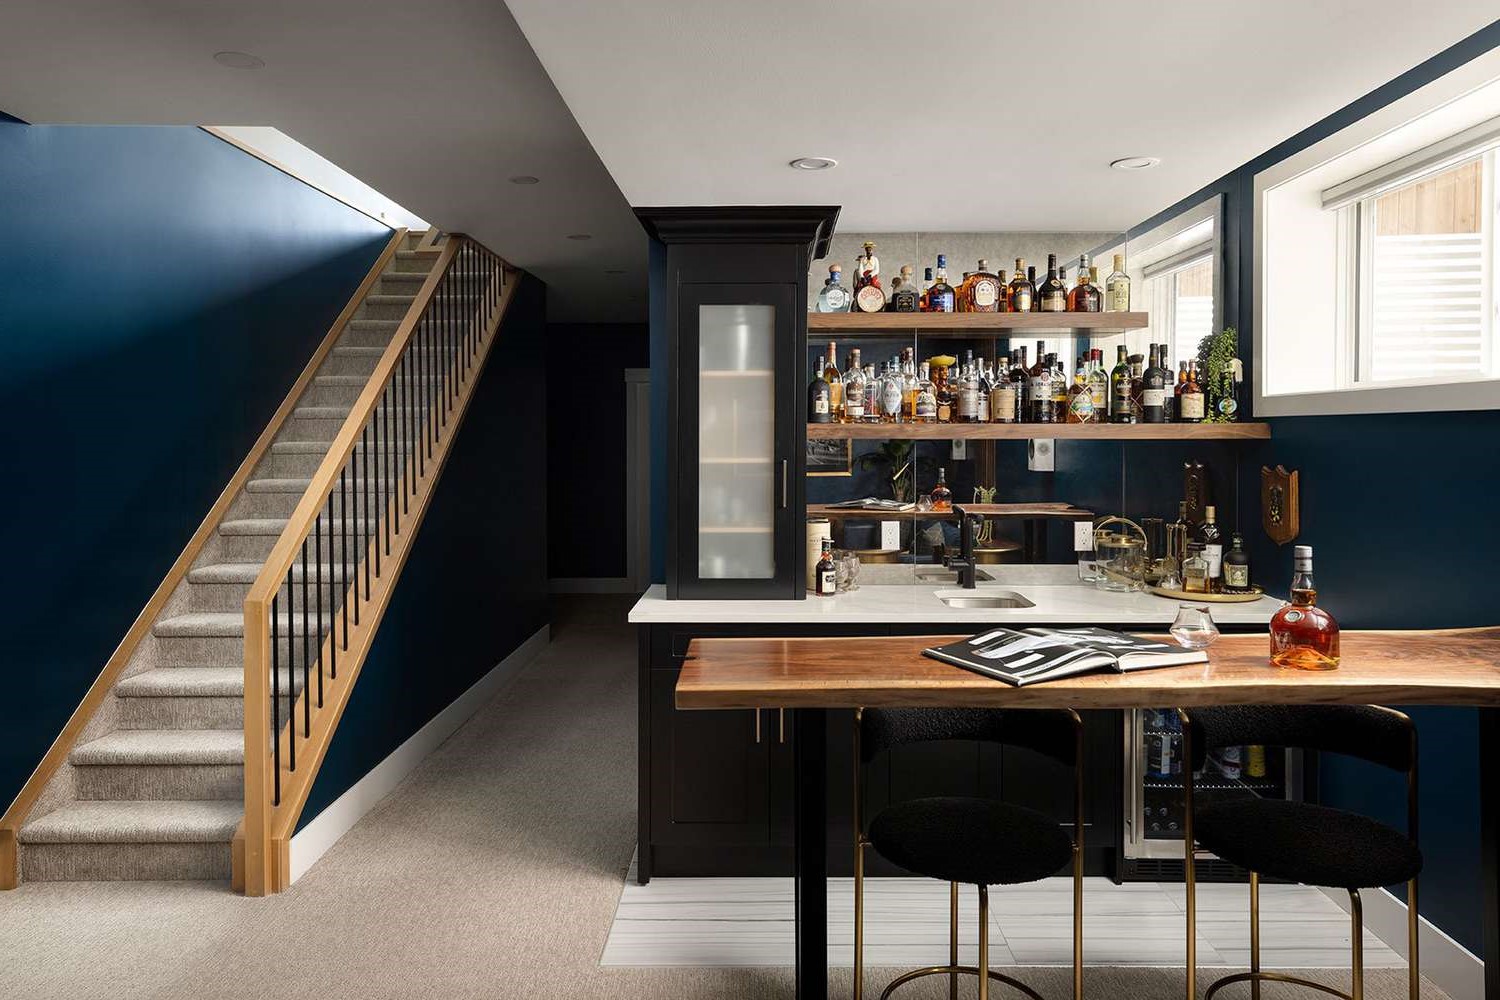
Planning Your Basement Bar Design
When it comes to creating your own DIY basement bar, the first step is to plan out the design. Consider the overall theme and style you want to achieve. Do you envision a sleek and modern bar, or are you leaning towards a more rustic and cozy vibe? Take into account the available space in your basement and how you want the bar to flow with the rest of the room. It's essential to measure the area where you plan to build the bar to ensure that it fits seamlessly into the space.
Next, think about the functionality of your bar. Will it primarily serve as a place for mixing drinks and entertaining guests, or do you also want to incorporate features like a sink, refrigerator, or storage for glassware and bottles? Determining the intended use of your bar will help guide the design process and ensure that it meets your specific needs.
Consider the layout of the bar as well. Will it have a straight design, an L-shape, or a custom configuration to fit the unique dimensions of your basement? Think about how you want to utilize the bar top – will it be a place for guests to sit and socialize, or will it primarily serve as a serving area for drinks and snacks? These considerations will help you create a design that not only looks great but also functions well for your entertaining needs.
Lastly, take inspiration from various sources such as home improvement magazines, online platforms like Pinterest, or even by visiting local bars and gathering ideas. Creating a mood board or collage of design elements that appeal to you can help you visualize the overall look and feel of your basement bar. Remember, the planning stage is crucial for setting the foundation of your project and ensuring that the end result is a stylish and functional addition to your home.
Choosing the Right Materials and Tools
When embarking on your DIY basement bar project, selecting the right materials and tools is crucial to ensure a sturdy and visually appealing result. Here's a detailed guide to help you make the best choices:
1. Bar Top Materials
- Wood: Opt for durable and visually appealing wood such as oak, maple, or walnut for a classic look. Consider sealing the wood with a waterproof finish to protect it from spills and moisture.
- Stone or Quartz: For a more upscale and low-maintenance option, consider using stone or quartz for the bar top. These materials are resistant to stains and provide a sleek, modern aesthetic.
2. Bar Frame and Supports
- Lumber: Choose high-quality, sturdy lumber for the frame and supports of the bar. Pressure-treated wood is an excellent option for areas prone to moisture.
- Metal Brackets: Consider using metal brackets for additional support, especially if you're building a larger or L-shaped bar.
3. Decorative Finishes
- Stain or Paint: Depending on the style you're aiming for, select a stain or paint that complements the overall design of your basement. Dark stains can create a rich, traditional look, while bright paint colors can add a pop of personality.
- Hardware: Choose stylish and durable hardware such as drawer pulls, handles, and foot railings to enhance the visual appeal of your bar.
4. Essential Tools
- Circular Saw: A versatile tool for cutting lumber and plywood to the desired dimensions.
- Power Drill: Essential for assembling the bar frame, attaching the bar top, and installing hardware.
- Level: Ensure that your bar is perfectly straight and level during the construction process.
- Clamps: Useful for holding pieces together while you secure them with screws or nails.
- Sander: Smooth out rough edges and surfaces for a polished finish.
By carefully selecting the right materials and tools, you can ensure that your DIY basement bar not only looks fantastic but also stands the test of time. Remember to prioritize quality and durability when making these choices, as they will contribute to the overall success of your project.
Building the Bar Structure
When it comes to building the structure of your DIY basement bar, it's essential to follow a systematic approach to ensure a sturdy and well-constructed result. Here's a step-by-step guide to help you through the process:
-
Frame Construction: Begin by constructing the frame of the bar using high-quality lumber. Measure and cut the pieces according to your design plan, ensuring that the dimensions are accurate. Assemble the frame using screws and wood glue for added stability. If your bar has a unique shape, consider using metal brackets for additional support at the corners and joints.
-
Bar Top Installation: Once the frame is in place, it's time to install the bar top. Whether you've chosen wood, stone, or quartz, ensure that it is securely attached to the frame. Use appropriate fasteners and adhesives to prevent any movement or instability. Take precise measurements to ensure that the bar top aligns perfectly with the frame and overhangs as intended.
-
Adding Foot Rail: If you desire a professional and polished look for your bar, consider adding a foot rail. This not only provides a comfortable place for guests to rest their feet but also adds a touch of elegance to the design. Secure the foot rail to the base of the bar using brackets or specialized hardware, ensuring that it is level and securely attached.
-
Finishing Touches: Once the basic structure is in place, attend to the finishing touches. Sand down any rough edges, fill in any gaps or holes, and apply the chosen stain or paint to achieve the desired aesthetic. Install any additional hardware such as drawer pulls, handles, or decorative elements to enhance the overall look of the bar.
By following these steps and paying attention to detail during the construction process, you can ensure that the structure of your basement bar is not only visually appealing but also built to withstand regular use and enjoyment. Remember to take your time and double-check measurements and alignments to achieve a professional result.
Adding Functional Features: Sinks, Refrigerators, and Storage
Incorporating functional features into your DIY basement bar can elevate its convenience and appeal. Here's a detailed guide on adding sinks, refrigerators, and storage to make your entertainment space both stylish and practical:
1. Sinks
Including a sink in your basement bar can streamline the drink preparation process and make cleanup more convenient. When choosing a sink, consider the available space and the overall design of your bar. Opt for a stainless steel or composite sink that complements the aesthetic of your bar. Ensure that the plumbing is properly installed, and the sink is securely attached to the bar structure. Additionally, consider the installation of a garbage disposal unit to simplify waste management.
2. Refrigerators
A refrigerator in your basement bar allows for easy access to chilled beverages and perishable ingredients. Depending on the available space and your needs, you can opt for an under-counter refrigerator, a mini-fridge, or a beverage cooler. Ensure that the refrigerator is properly ventilated and has easy access for maintenance. Additionally, consider the installation of a small freezer compartment if you plan to store ice or frozen ingredients for cocktails.
3. Storage
Ample storage is essential for organizing glassware, bottles, mixers, and bar accessories. Incorporate open shelving, cabinets, or a combination of both to accommodate your storage needs. Consider adjustable shelves to accommodate items of various sizes. Additionally, include a designated space for hanging stemware to keep wine glasses and cocktail glasses easily accessible and on display. Utilize drawer organizers and dividers to keep smaller items such as bottle openers, corkscrews, and bar tools neatly arranged.
By integrating these functional features into your basement bar, you can create a space that not only looks impressive but also enhances the overall entertaining experience for you and your guests. Remember to carefully plan the placement of these features to ensure they complement the design and flow of your bar while maximizing functionality.
Styling and Decorating Your Basement Bar
When it comes to styling and decorating your basement bar, the goal is to create a space that reflects your personal taste and enhances the overall ambiance of the room. Here are some tips to help you infuse style and personality into your DIY basement bar:
1. Lighting
The right lighting can set the mood and highlight the design elements of your bar. Consider installing pendant lights above the bar area to provide focused illumination for drink preparation and socializing. Additionally, incorporating LED strip lighting under the bar top or along the shelves can add a touch of ambiance and create a visually appealing effect.
2. Bar Stools and Seating
Selecting the right bar stools or seating is essential for both comfort and style. Choose stools that complement the design of your bar and provide a comfortable seating experience for guests. Consider factors such as height, material, and backrest options to ensure that the stools align with the overall aesthetic of the space.
3. Backsplash and Accent Wall
Incorporating a stylish backsplash or creating an accent wall behind the bar can add visual interest and personality to the space. Consider using materials such as subway tile, mosaic tile, reclaimed wood, or even a bold paint color to create a focal point that enhances the overall design.
4. Artwork and Decor
Adding artwork, decorative mirrors, or a gallery wall can infuse character and charm into your basement bar. Consider displaying vintage signs, framed prints, or personalized artwork that reflects your interests and adds a unique touch to the space. Additionally, incorporating decorative elements such as plants, candles, or themed decor can further enhance the ambiance.
5. Theme and Color Scheme
Establishing a cohesive theme and color scheme can tie the design elements of your bar together. Whether you opt for a classic pub-style bar, a modern industrial look, or a tropical tiki theme, ensure that the decor, colors, and accessories align with your chosen theme to create a cohesive and visually appealing space.
6. Personal Touches
Lastly, don't forget to incorporate personal touches that make the space uniquely yours. Displaying memorabilia, framed photos, or a collection of your favorite spirits can add a personal and inviting touch to the bar, making it a reflection of your personality and interests.
By paying attention to these styling and decorating aspects, you can transform your DIY basement bar into a stylish and inviting entertainment space that is sure to impress your guests and provide a welcoming atmosphere for gatherings and celebrations.
Tips for Creating a Cozy and Inviting Entertainment Space
Creating a cozy and inviting entertainment space in your basement bar involves thoughtful design choices and attention to detail. Here are some tips to help you achieve a warm and welcoming atmosphere:
-
Comfortable Seating: Incorporate comfortable seating options such as plush sofas, upholstered chairs, or cozy lounge furniture to encourage relaxation and conversation. Consider adding throw pillows and soft blankets to create a cozy and inviting ambiance.
-
Warm Color Palette: Choose warm and inviting colors for the walls, furniture, and decor. Earthy tones, rich neutrals, and warm hues like deep reds, golden yellows, and soothing greens can create a cozy and intimate feel in the space.
-
Soft Lighting: Opt for soft, ambient lighting to create a warm and inviting atmosphere. Use dimmer switches to control the brightness of overhead lights and consider adding table lamps or floor lamps to provide gentle illumination.
-
Layered Textures: Incorporate a variety of textures such as plush rugs, soft upholstery, and tactile fabrics to add depth and warmth to the space. Mixing textures can create a cozy and inviting sensory experience for you and your guests.
-
Fireplace or Faux Fireplace: If space and budget allow, consider adding a fireplace or a faux fireplace feature to the basement bar. The presence of a flickering flame can instantly create a cozy and inviting focal point in the room.
-
Personal Touches: Infuse the space with personal touches such as family photos, heirlooms, or sentimental decor items. These personal touches can make the space feel warm and inviting, reflecting your unique personality and style.
-
Entertainment Options: Incorporate entertainment options such as a TV, sound system, or gaming area to provide diverse entertainment choices for you and your guests. Creating a space for various activities can enhance the overall appeal and comfort of the entertainment area.
By implementing these tips, you can transform your basement bar into a cozy and inviting entertainment space that is perfect for hosting gatherings, enjoying leisure time, and creating lasting memories with family and friends.