
Home>Home & Furniture>Kitchen>DIY Breakfast Nook Bench Build Guide
Kitchen
DIY Breakfast Nook Bench Build Guide
Published: July 31, 2024
Create a cozy breakfast nook with our DIY bench build guide! Step-by-step instructions, tools, and tips to transform your kitchen space. Perfect for beginners and pros alike.
(Many of the links in this article redirect to a specific reviewed product. Your purchase of these products through affiliate links helps to generate commission for Twigandthistle.com, at no extra cost. Learn more)
Building your own breakfast nook bench can be a fun and rewarding project. Imagine having a cozy corner in your home where you can sip coffee, read a book, or share meals with family. Creating something with your hands not only gives a sense of accomplishment but also saves money compared to buying new furniture. This guide will walk you through the basics of making a simple, sturdy bench that fits perfectly in your space. Gather your tools, and let's get started on this DIY adventure!
Getting Ready for Your Project
Gather Materials: Collect all necessary materials like wood, screws, nails, a saw, a drill, sandpaper, and paint or stain.
Measure the Space: Use a tape measure to get accurate dimensions of the area where the bench will go. This ensures a perfect fit.
Design the Bench: Sketch a simple design or find a blueprint online. Decide on the height, width, and depth of the bench.
Safety Gear: Wear safety goggles, gloves, and a dust mask to protect yourself from sawdust and debris.
Clear the Workspace: Ensure your workspace is clean and free of clutter. This helps prevent accidents and makes it easier to find tools.
Cut the Wood: Measure and mark the wood pieces according to your design. Use a saw to cut them to size.
Sand the Edges: Smooth out rough edges with sandpaper to avoid splinters and ensure a polished look.
Pre-Drill Holes: Pre-drill holes for screws to prevent the wood from splitting when assembling the bench.
Assemble the Frame: Start by assembling the frame of the bench. Use screws and a drill to secure the pieces together.
Attach the Seat and Backrest: Once the frame is sturdy, attach the seat and backrest. Ensure everything is level and secure.
Paint or Stain: Apply paint or stain to the bench. This not only makes it look good but also protects the wood.
Let it Dry: Allow the paint or stain to dry completely before using the bench. This usually takes about 24 hours.
Final Check: Inspect the bench for any loose screws or rough spots. Make any necessary adjustments.
Clean Up: Put away tools and clean up the workspace. Dispose of any sawdust and wood scraps safely.
Gathering Materials and Tools
Materials Needed:
- Plywood: Forms the main structure of the bench. Choose a sturdy type like birch or oak.
- 2x4 Lumber: Used for framing and support. Provides strength to the bench.
- Wood Screws: Fastens the pieces together. Ensure they are long enough to penetrate both pieces of wood.
- Wood Glue: Adds extra strength to joints. Helps keep pieces securely bonded.
- Sandpaper: Smooths rough edges. Prepares wood for painting or staining.
- Paint or Stain: Adds color and protection. Choose based on desired finish.
- Foam Cushion: Provides comfort. Cut to fit the bench seat.
- Fabric: Covers the foam cushion. Choose a durable, easy-to-clean material.
Tools Needed:
- Tape Measure: Ensures accurate measurements. Essential for cutting wood to the right size.
- Circular Saw: Cuts plywood and lumber. Provides straight, clean cuts.
- Drill: Makes holes for screws. Also used to drive screws into wood.
- Screwdriver: Tightens screws. Can be manual or electric.
- Clamps: Holds pieces together while glue dries. Keeps everything in place.
- Sander: Smooths wood surfaces. Makes sanding faster and easier.
- Paintbrush or Roller: Applies paint or stain. Choose based on the size of the surface.
- Staple Gun: Attaches fabric to foam cushion. Ensures a tight, secure fit.
Skill Level and Time Commitment
Skill Level: Intermediate
Time Required: 1-2 weekends
- Measuring and Planning: 2-3 hours
- Cutting Wood: 3-4 hours
- Assembling Frame: 4-5 hours
- Sanding and Finishing: 3-4 hours
- Painting or Staining: 2-3 hours
- Cushioning and Upholstery (optional): 2-3 hours
Detailed Steps to Build Your Bench
Gather Materials and Tools
- Plywood sheets
- 2x4 lumber
- Screws
- Wood glue
- Sandpaper
- Paint or stain
- Measuring tape
- Saw
- Drill
- Screwdriver
Measure and Cut Wood
- Measure the space for the bench.
- Cut plywood for the seat, backrest, and sides.
- Cut 2x4s for the frame.
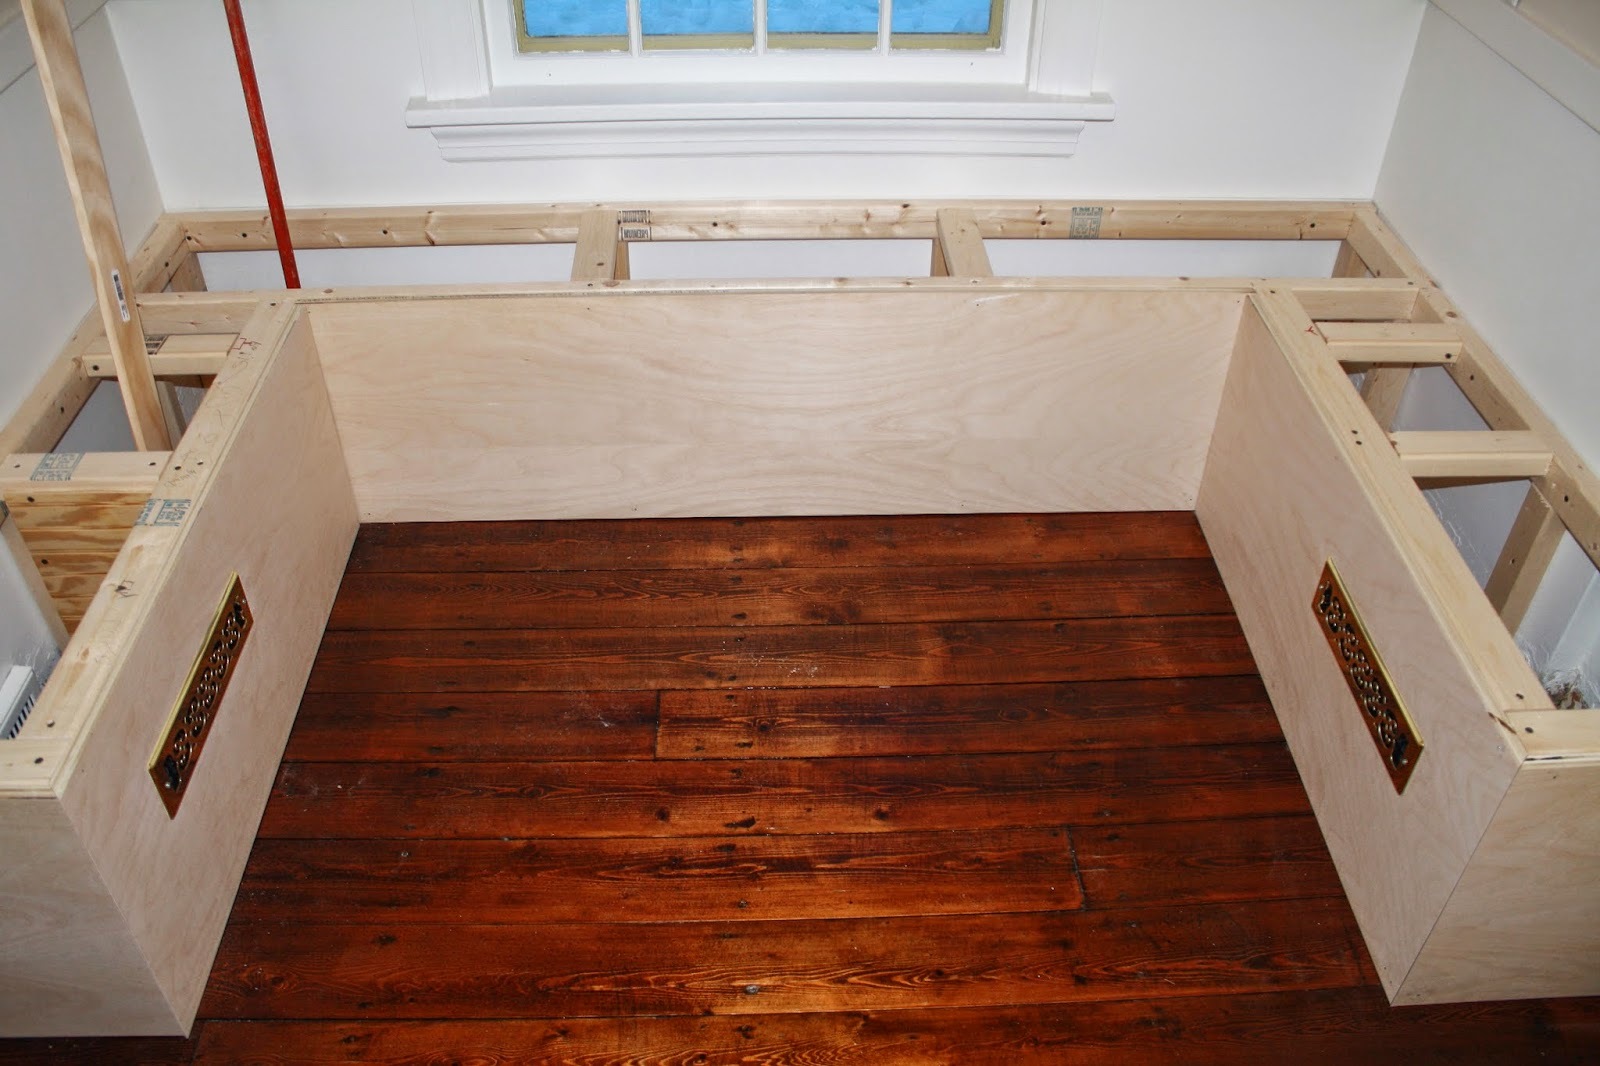
Build the Frame
- Assemble the base using 2x4s.
- Attach vertical supports to the base.
- Secure the top frame to the vertical supports.
Attach Plywood Panels
- Screw the seat panel onto the top frame.
- Attach the backrest to the vertical supports.
- Secure side panels to the frame.
Add Storage (Optional)
- Cut and attach a front panel with hinges for a storage compartment.
- Ensure the lid fits snugly and opens easily.
Sand and Finish
- Sand all surfaces to remove rough edges.
- Apply paint or stain as desired.
- Allow to dry completely.
Install Bench
- Place the bench in the desired nook.
- Secure to the wall if needed for stability.
Add Cushions and Decor
- Place cushions on the seat for comfort.
- Add decorative pillows or throws.
Helpful Tips for Success
Measure Twice, Cut Once: Always double-check measurements before cutting wood. Mistakes here can lead to wasted materials and frustration.
Use Quality Wood: Opt for sturdy wood like pine or oak. These types last longer and look better.
Pre-Drill Holes: Prevent wood from splitting by pre-drilling holes before inserting screws.
Level Surface: Ensure the floor where the bench will sit is level. Use shims if necessary to balance.
Comfort First: Add cushions or padding to the bench for extra comfort. Foam and fabric can be easily stapled to the wood.
Paint or Stain: Protect the wood and enhance its look by painting or staining. Use a primer before painting for better adhesion.
Storage Space: Consider adding storage under the bench seat. Hinged lids or pull-out drawers can be very useful.
Common Mistakes to Avoid:
Rushing: Take your time. Rushing can lead to mistakes and poor craftsmanship.
Ignoring Weight Limits: Ensure the bench can support the weight it will hold. Use strong joints and supports.
Skipping Sanding: Sand all surfaces to avoid splinters and ensure a smooth finish.
Alternatives for Materials or Methods:
Plywood: If solid wood is too expensive, use high-quality plywood. It’s cheaper and still durable.
Pocket Hole Jigs: Use pocket hole jigs for strong, hidden joints. These tools make assembly easier.
Ready-Made Cushions: Instead of making your own cushions, buy ready-made ones. They save time and often fit standard bench sizes.
Budgeting for Your Breakfast Nook Bench
Lumber: $100 - $150. This includes plywood for the bench seat and 2x4s for the frame.
Screws and Nails: $10 - $20. Essential for securing the structure.
Wood Glue: $5 - $10. Helps reinforce joints.
Sandpaper: $5 - $10. Smooths rough edges.
Paint or Stain: $20 - $40. Adds color and protection.
Paintbrushes or Rollers: $5 - $15. Needed for applying paint or stain.
Cushions or Foam: $30 - $60. Provides comfort for the seating area.
Fabric for Upholstery: $20 - $40. Covers the cushions.
Tools: If you don't already have them, consider:
- Drill: $50 - $100.
- Saw: $50 - $150.
- Tape Measure: $5 - $15.
- Level: $10 - $20.
Budget-Friendly Alternatives:
- Reclaimed Wood: Often free or very cheap. Check local listings or construction sites.
- Second-Hand Tools: Look for deals at garage sales or online marketplaces.
- Old Cushions: Repurpose cushions from old furniture.
- Discount Fabric Stores: Find cheaper upholstery fabric.
Total estimated cost: $260 - $630, depending on materials and tools you already own.
Personalizing Your Bench
Materials: Instead of using standard plywood, consider reclaimed wood for a rustic look. Bamboo can give a modern, eco-friendly touch. For a more luxurious feel, use hardwood like oak or walnut.
Colors: Paint the bench in bright colors like teal or mustard for a pop of color. For a more classic look, go with neutral tones like white, gray, or beige. If you prefer a natural look, use a wood stain to enhance the wood grain.
Styles: Add cushions or upholstery for extra comfort and style. Choose fabrics that match your kitchen decor. For a farmhouse style, add shiplap to the backrest. For a modern look, go with clean lines and minimalist design.
Storage: Incorporate built-in storage under the seats. Use hinged lids for easy access or pull-out drawers for more organized storage. Add shelves on the sides for books or decorative items.
Shape: Customize the shape to fit your space. Create an L-shaped bench for a corner nook or a U-shaped bench for a more enclosed feel. If space is limited, a straight bench might be the best option.
Legs: Use hairpin legs for a mid-century modern look. For a more traditional style, go with turned wooden legs. If you want a floating effect, use hidden supports.
Backrest: Add a high backrest for more support or keep it low for a sleek look. Consider a tufted backrest for added elegance. For a unique touch, use woven materials like rattan or cane.
Accents: Add decorative trim or molding to the edges for a more finished look. Use metal accents like brass or copper for a touch of industrial style. Incorporate LED lighting under the bench for a modern, functional feature.
Eco-Friendly Building Tips
Reclaimed Wood: Use old barn wood, pallets, or wood from deconstructed furniture. It adds character and reduces waste.
Eco-Friendly Paints: Choose low-VOC or zero-VOC paints. These paints have fewer harmful chemicals, making them safer for you and the environment.
Natural Finishes: Opt for finishes like beeswax, linseed oil, or tung oil. They protect the wood without releasing toxic fumes.
Recycled Metal: If your design includes metal parts, look for recycled metal options. They are just as strong and reduce the need for new mining.
Bamboo: Consider bamboo for parts of the bench. It grows quickly and is a renewable resource.
Cork: Use cork for seat padding. It’s sustainable, comfortable, and adds a unique look.
Recycled Fabric: For cushions, find fabric made from recycled materials. Old clothes or curtains can also be repurposed.
Natural Adhesives: Choose glues made from natural ingredients. They are less harmful to the environment.
Solar-Powered Tools: If possible, use tools powered by solar energy. This reduces your carbon footprint.
Local Materials: Source materials locally to cut down on transportation emissions. Local wood, fabric, and metal can often be found at salvage yards or local suppliers.
Upcycled Furniture: Transform old furniture into your breakfast nook bench. This saves money and keeps items out of landfills.
Compostable Materials: Use materials that can be composted at the end of their life. This ensures they return to the earth without causing harm.
Energy-Efficient Lighting: If your nook includes lighting, choose LED bulbs. They use less energy and last longer.
Water-Based Sealants: Opt for water-based sealants over oil-based ones. They are less toxic and easier to clean up.
Minimalist Design: Keep the design simple. Fewer materials mean less waste and a cleaner look.
Your Cozy Corner Awaits
Building a breakfast nook bench isn't just about adding furniture; it's about creating a cozy spot for morning coffee, family chats, or quiet reading. With some basic tools, a bit of patience, and this guide, you've got everything needed to make it happen. Remember, measure twice, cut once. Sanding smooths out rough edges, making your bench comfy and safe. Don't rush the painting or staining process; let each coat dry thoroughly for a polished look. Adding cushions or pillows can make your nook even more inviting. You've put in the effort, now enjoy the fruits of your labor. This bench will be a testament to your DIY skills and a cherished part of your home. Happy building!
How much time will it take to build a breakfast nook bench?
Building a breakfast nook bench typically takes about a weekend. If you’re experienced with DIY projects, you might finish faster. Beginners might need a bit more time.
What materials do I need for this project?
You’ll need wood (like plywood or pine), screws, wood glue, sandpaper, paint or stain, and cushions for comfort. A saw, drill, and measuring tape are also essential tools.
Can I customize the size of the bench?
Absolutely! Measure your space first. Then, adjust the dimensions of your bench to fit perfectly. Customizing ensures it suits your kitchen or dining area.
Is it necessary to have advanced woodworking skills?
Not really. Basic woodworking skills are enough. If you can measure, cut, and screw pieces together, you’re good to go. Just follow the steps carefully.
How do I make the bench comfortable?
Add cushions or upholstered seats. You can buy ready-made cushions or make your own. Soft padding makes the bench cozy for long breakfasts.
What’s the best way to finish the bench?
Sand the wood smooth, then apply paint or stain. Staining shows off the wood grain, while paint can match your kitchen decor. Seal with a clear coat for durability.
Can I add storage to my breakfast nook bench?
Yes! Incorporate hinged seats or drawers underneath. This provides extra storage for kitchen items, making your bench functional and stylish.