
Home>Home & Furniture>Garage & Basement>DIY Golf Simulator for Your Garage
Garage & Basement
DIY Golf Simulator for Your Garage
Published: September 25, 2024
Transform your garage into a golfer's paradise with our DIY golf simulator guide. Learn how to set up, optimize, and enjoy your own indoor golf experience year-round!
(Many of the links in this article redirect to a specific reviewed product. Your purchase of these products through affiliate links helps to generate commission for Twigandthistle.com, at no extra cost. Learn more)
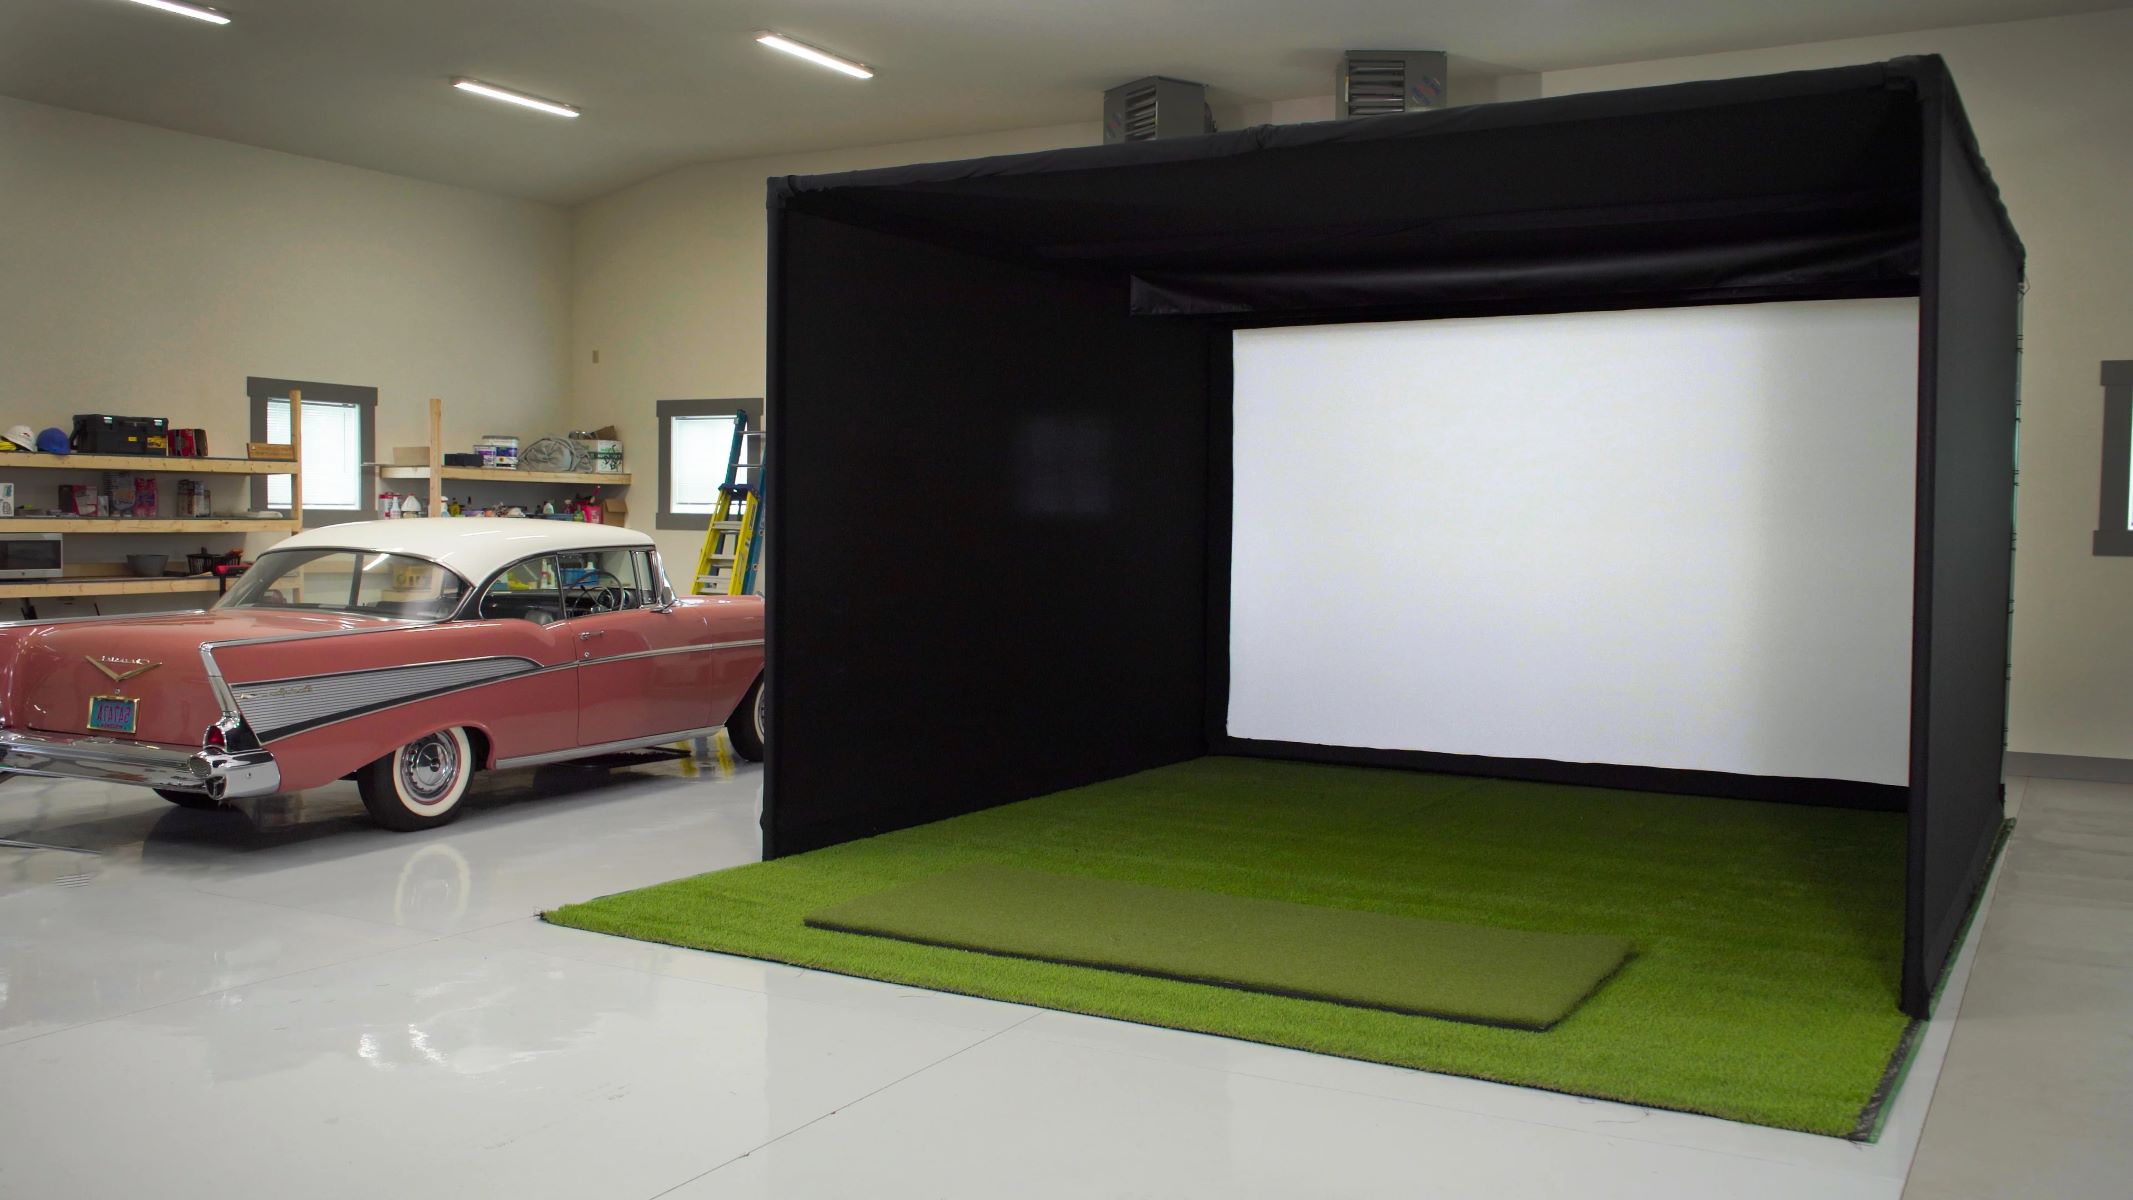
Ever thought about turning your garage into a mini golf course? A DIY golf simulator can make that happen! You'll no longer need to visit the driving range or wait for sunny days. Setting up a golf simulator in your garage can be a fun project, giving you the chance to practice your swing whenever you want. It’s not as hard as it sounds; with some basic tools, a bit of space, and some creativity, you can create your own indoor golf haven. Ready to get started on this exciting project? Let’s dive into the details!
Getting Ready for Your Project
Measure Your Space: Ensure your garage has enough room for a golf simulator. Measure the height, width, and depth. You need at least 10 feet of ceiling height, 15 feet of width, and 20 feet of depth.
Clear the Area: Remove any clutter or obstacles. A clean, open space will make setup easier and safer.
Check Electrical Outlets: Ensure you have enough power outlets for your equipment. Extension cords can be a tripping hazard.
Set Up Lighting: Good lighting is crucial. Avoid shadows and glare. Use LED lights for a bright, even spread.
Install a Hitting Mat: Place a high-quality hitting mat where you will stand. This protects your floor and gives a realistic feel.
Mount the Screen: Securely mount your impact screen. Make sure it’s taut to avoid wrinkles, which can affect the ball's trajectory.
Position the Projector: Place the projector at the correct distance and angle. Follow the manufacturer’s guidelines for optimal image quality.
Set Up the Computer: Connect your computer to the projector and simulator sensors. Ensure all software is installed and updated.
Safety Gear: Wear safety glasses to protect your eyes from stray balls. Keep a first aid kit nearby.
Test Everything: Run a few test swings to make sure all equipment works correctly. Adjust as needed for the best experience.
What You Need to Get Started
- Projector: Displays the virtual golf course on a screen or wall.
- Impact Screen: Catches golf balls and displays the projected image.
- Golf Mat: Provides a realistic surface to hit from.
- Golf Net: Adds extra safety by catching stray balls.
- Launch Monitor: Tracks ball speed, spin, and other data.
- Computer or Tablet: Runs the golf simulation software.
- Golf Simulation Software: Creates the virtual golf experience.
- HDMI Cable: Connects the computer or tablet to the projector.
- Mounting Brackets: Secures the projector and impact screen.
- Measuring Tape: Ensures accurate placement of all components.
- Screwdriver: Used for assembling and mounting equipment.
- Golf Clubs and Balls: Essential for playing the game.
- Lighting: Ensures the projector image is clear and bright.
- Extension Cords: Provides power to all electronic components.
- Safety Glasses: Protects eyes during installation and use.
How Much Time and Skill You Need
Skill Level: Intermediate
Time Required: 10-15 hours
- Planning and Measuring: 1-2 hours
- Setting Up the Frame: 2-3 hours
- Installing the Screen and Net: 2-3 hours
- Mounting the Projector: 1-2 hours
- Connecting the Simulator Software: 2-3 hours
- Testing and Adjustments: 1-2 hours
Follow These Steps to Build It
Choose a Space:
- Find a spot in your garage with enough room for a full swing.
- Ensure the ceiling is high enough to avoid hitting it with your club.
Gather Materials:
- Golf Mat: A sturdy mat to hit from.
- Net or Impact Screen: To catch the ball.
- Projector: For displaying the virtual course.
- Computer or Tablet: To run the simulator software.
- Simulator Software: Choose one that fits your budget and needs.
- Clubs and Balls: Use real golf equipment.
Set Up the Mat:
- Place the golf mat in the center of your chosen space.
- Ensure it is flat and stable.
Install the Net or Impact Screen:
- Hang the net or screen a few feet in front of the mat.
- Secure it tightly to prevent balls from escaping.
Position the Projector:
- Mount the projector on the ceiling or place it on a stand.
- Align it so the image projects onto the net or screen.
Connect the Computer or Tablet:
- Set up the computer or tablet near the mat.
- Connect it to the projector using an HDMI cable.
Install and Configure the Software:
- Download and install the simulator software.
- Follow the instructions to calibrate it with your projector and mat.
Test the Setup:
- Hit a few practice shots to ensure everything works correctly.
- Adjust the projector or net if needed.
Add Finishing Touches:
- Place a few chairs or a small table nearby for convenience.
- Add any additional accessories like a ball tray or club rack.
Enjoy Your Simulator:
- Start playing virtual golf courses.
- Practice your swing and improve your game.
Helpful Hints for Success
Measure your space carefully. Ensure there's enough room for your swing and the simulator setup.
Use a projector with high lumens for a clear image, even in daylight.
Choose a durable impact screen to withstand repeated hits.
Install proper lighting to avoid shadows on the screen.
Invest in quality turf for a realistic feel underfoot.
Secure your netting well to prevent balls from escaping.
Calibrate your sensors accurately for precise tracking.
Common mistakes to avoid:
Skipping measurements can lead to cramped spaces.
Using low-quality screens might result in quick wear and tear.
Ignoring lighting can cause poor visibility.
Not securing netting can lead to damage or injury.
Alternatives:
Use a TV instead of a projector if space is limited.
Opt for foam balls if worried about damage.
Consider DIY turf using carpet remnants for a budget-friendly option.
How Much Will It Cost?
Projector: $300-$500. Look for a 1080p model for clear visuals. Budget-friendly option: used or refurbished projectors for around $150.
Impact Screen: $200-$400. A high-quality screen ensures durability. Budget-friendly option: heavy-duty white tarps for $50-$100.
Golf Mat: $100-$300. A good-quality mat protects your clubs. Budget-friendly option: used mats or artificial turf for $50.
Netting: $100-$200. Essential for safety. Budget-friendly option: DIY netting from hardware stores for $50.
Launch Monitor: $500-$2,000. Tracks your swing and ball flight. Budget-friendly option: entry-level models like OptiShot for $300.
Computer or Tablet: $500-$1,000. Needed for software. Budget-friendly option: used or refurbished devices for $300.
Software: $100-$500. Provides virtual courses and analytics. Budget-friendly option: free or low-cost apps.
Miscellaneous: $50-$100. Includes cables, mounts, and lighting. Budget-friendly option: shop sales or discount stores.
Total estimated cost: $1,850-$5,000. Budget-friendly total: $1,100-$1,500.
Ways to Make It Your Own
Screen Material: Instead of a professional impact screen, use a heavy-duty white tarp or blackout cloth. Both options are durable and can handle golf ball impacts.
Projector: If a high-end projector is too costly, consider a short-throw projector. It provides a clear image without needing much space.
Mat: Use a thick carpet remnant or exercise mat as a hitting surface. These materials are softer on your joints and still provide a realistic feel.
Netting: Replace professional netting with heavy-duty fishing nets or baseball nets. Both can catch golf balls effectively.
Frame: Build the frame using PVC pipes instead of metal. PVC is lightweight, easy to assemble, and less expensive.
Software: Opt for free or low-cost golf simulator software. Some apps offer basic features that are perfect for casual practice.
Lighting: Use LED strip lights to illuminate the area. They are energy-efficient and provide consistent lighting.
Decor: Paint the walls in green or blue to mimic a golf course. Add posters of famous golf courses for a more immersive experience.
Storage: Install wall-mounted shelves or cabinets to store clubs, balls, and other equipment. This keeps the area organized and clutter-free.
Soundproofing: Use acoustic panels or foam tiles to reduce noise. This is especially useful if you share the garage with others.
Flooring: Consider interlocking foam tiles for the floor. They are easy to install, provide cushioning, and can be replaced individually if damaged.
Seating: Add a comfortable chair or bean bag for breaks. This makes the space more inviting and comfortable.
Ventilation: Use a portable fan or small air conditioner to keep the area cool. Proper ventilation ensures a comfortable practice environment.
Customization: Personalize the simulator with custom logos or decals. This adds a unique touch and makes the space truly yours.
Eco-Friendly Ideas for Your Build
Reusing old carpet or turf for the flooring can save money and reduce waste. Repurpose an old projector instead of buying a new one. Build the frame using reclaimed wood from pallets or leftover construction materials. Use recycled PVC pipes for the structure. Opt for LED lights to save energy. Create a screen from an old bedsheet or canvas. Collect used golf balls from driving ranges. Install a net made from recycled fishing nets. Choose eco-friendly paint for any decorations. Consider second-hand electronics for the simulator software.
Ready to Tee Off
Building a DIY golf simulator in your garage is totally doable. With some basic tools, a bit of technical know-how, and a sprinkle of patience, you can create a space that lets you practice your swing anytime. Start with a solid frame and impact screen, then add a projector and sensors to track your shots. Don't forget to set up a comfortable hitting mat and netting for safety. Once everything's in place, you'll have a personal golf haven right at home. Enjoy the convenience and fun of playing golf without leaving your garage. Happy golfing!
How much space do I need for a golf simulator in my garage?
You’ll need at least 10 feet of width, 15 feet of length, and 10 feet of height. This gives you enough room to swing freely without hitting walls or the ceiling.
What equipment is essential for setting up a golf simulator?
You’ll need a projector, impact screen, golf mat, net, and a launch monitor. These items help track your shots and display them on the screen.
Can I use my existing golf clubs and balls?
Absolutely! Your regular clubs and balls work just fine. Just make sure your balls are clean to avoid damaging the screen.
How much does it cost to set up a golf simulator in my garage?
Costs can vary, but a basic setup might run you around $1,000 to $5,000. High-end setups can go much higher, depending on the quality of the equipment.
Is it difficult to install a golf simulator by myself?
Not really. If you’re handy with tools, you can follow online tutorials and guides. Some setups are more plug-and-play, making them easier to install.
Do I need special software for my golf simulator?
Yes, you’ll need simulation software to track your shots and display them on the screen. Some popular options include E6 Golf, TGC 2019, and SkyTrak.
Can I use my golf simulator for other sports or activities?
Definitely! Many simulators offer multi-sport options like soccer, baseball, or even zombie dodgeball. Just check if your software supports these features.