
Home>Home & Furniture>Garage & Basement>DIY Garage Parking Aid Guide
Garage & Basement
DIY Garage Parking Aid Guide
Published: September 25, 2024
Discover the ultimate DIY garage parking aid guide! Learn how to create and install effective parking solutions to protect your car and maximize garage space.
(Many of the links in this article redirect to a specific reviewed product. Your purchase of these products through affiliate links helps to generate commission for Twigandthistle.com, at no extra cost. Learn more)
Parking in a garage can be tricky. Sometimes it seems like there's not enough room, and you risk bumping into walls or stuff. Making a DIY garage parking aid can help save you lots of stress. You don’t need to spend big bucks; simple materials can help you park perfectly every time. This guide will teach you how to create a parking aid using basic tools and items. Whether you are a DIY expert or just starting out, this project is simple and useful. Get ready to make parking a lot easier.
Getting Ready for Your Project
Gather Materials: Collect items like a tennis ball, string, hook, measuring tape, and a drill.
Choose a Spot: Decide where the car should stop. Mark this spot on the garage floor.
Measure and Mark: Measure the distance from the ceiling to the car's windshield. Mark this spot on the ceiling.
Install the Hook: Drill a hole in the marked spot on the ceiling. Screw in the hook securely.
Attach the String: Tie one end of the string to the tennis ball. Attach the other end to the hook, adjusting the length so the ball touches the car's windshield when parked correctly.
Test the Setup: Park the car and check if the tennis ball touches the windshield at the marked spot. Adjust the string length if needed.
Safety Tips: Wear safety goggles while drilling. Ensure the hook is firmly attached to avoid falling objects. Keep the workspace clear of clutter to prevent tripping.
Workspace Setup: Clear the garage area where the car will park. Ensure good lighting to see markings and measurements clearly.
Materials and Tools Needed
- Tennis Ball: Acts as a visual marker to indicate when to stop your car.
- String or Fishing Line: Used to suspend the tennis ball from the ceiling.
- Eye Hook: Secures the string to the ceiling.
- Tape Measure: Ensures accurate measurements for positioning the tennis ball.
- Scissors: Cuts the string to the desired length.
- Ladder: Helps you reach the ceiling to install the eye hook.
- Marker or Pen: Marks the spot on the ceiling where the eye hook will go.
- Drill: Makes a hole in the ceiling for the eye hook.
- Screwdriver: Tightens the eye hook into the ceiling.
Each item plays a crucial role in setting up a simple yet effective parking aid in your garage.
Skill Level and Time Required
Skill Level: Beginner
Time Required: 1-2 hours
- Gather Materials: 10 minutes
- Measure and Mark: 20 minutes
- Install Parking Aid: 30-60 minutes
- Test and Adjust: 10-20 minutes
Step-by-Step Instructions
Gather Materials:
- Tennis ball
- String or fishing line
- Hook or eyelet screw
- Tape measure
- Scissors
- Ladder
Measure Distance:
- Park the car in the desired spot.
- Measure the distance from the ceiling to the car's windshield.
Cut String:
- Cut a piece of string equal to the measured distance plus a few extra inches.
Attach Hook:
- Screw the hook or eyelet into the ceiling directly above the car's windshield.
Tie Tennis Ball:
- Poke a hole through the tennis ball.
- Thread the string through the hole.
- Tie a knot to secure the ball.
Hang Tennis Ball:
- Tie the other end of the string to the hook or eyelet.
- Adjust the length so the ball touches the windshield when the car is parked correctly.
Test Parking Aid:
- Move the car out and back in.
- Ensure the tennis ball touches the windshield at the correct spot.
Adjust if Necessary:
- If the ball doesn't touch the right spot, adjust the string length.
Secure String:
- Once adjusted, double-knot the string to ensure it stays in place.
Final Check:
- Park the car again to confirm the tennis ball touches the windshield correctly.
Helpful Tips and Tricks
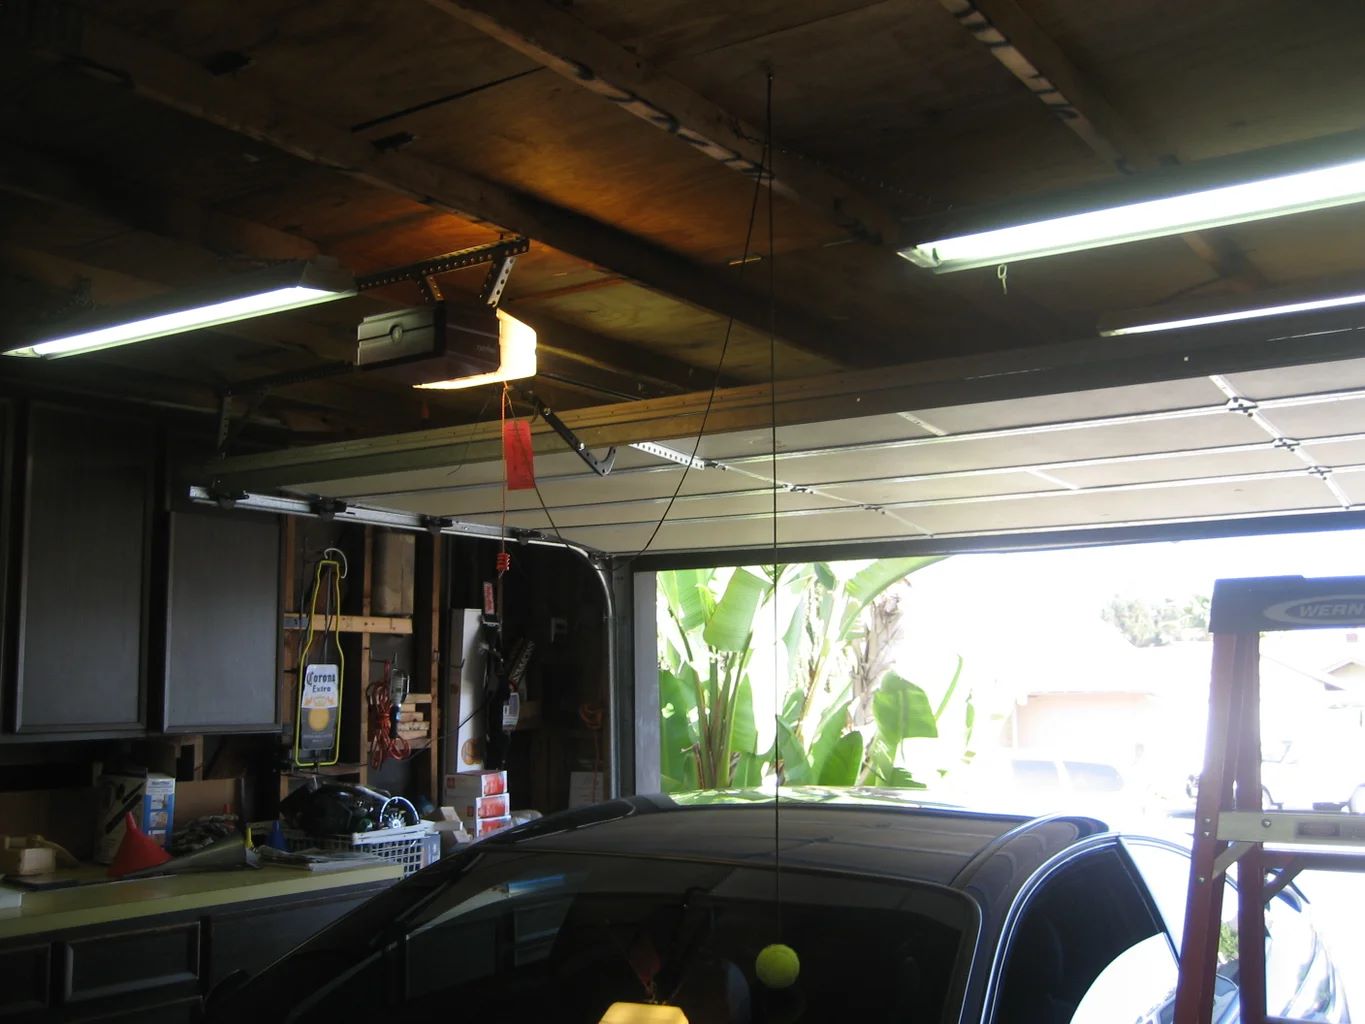
Use a Tennis Ball: Hang a tennis ball from the ceiling. When it touches your windshield, you know you're in the right spot.
Laser Parking Guide: Install a laser guide. When the laser hits a specific spot on your dashboard, stop the car.
Parking Mats: Place parking mats on the garage floor. They have a bump that tells you when to stop.
Reflective Tape: Put reflective tape on the garage wall. Align it with your car's side mirrors for perfect parking.
Foam Pool Noodles: Attach foam pool noodles to walls. They protect your car doors from dings.
Smartphone Apps: Use parking aid apps. They provide visual and audio cues to help you park.
Common Mistakes to Avoid:
- Ignoring Measurements: Measure your garage and car. Ensure enough space to park without hitting anything.
- Overcomplicating: Simple solutions often work best. Don't overthink your parking aid.
- Poor Installation: Securely install aids. Loose items can fall and damage your car.
- Neglecting Maintenance: Regularly check your aids. Replace worn-out or damaged items.
Material Alternatives:
- Instead of Tennis Balls: Use small foam balls. They are softer and less likely to scratch.
- Instead of Laser Guides: Use LED lights. They can be just as effective and are often cheaper.
- Instead of Parking Mats: Use rubber doorstops. They can serve the same purpose at a lower cost.
Estimating the Cost
Materials:
- Tennis ball: $2
- String: $3
- Hook: $1
- Tape: $2
Tools:
- Drill: $30 (or borrow)
- Scissors: $5
Total Cost: $43
Budget-Friendly Alternatives:
- Use a recycled tennis ball: $0
- Use twine or yarn instead of string: $0 (if available at home)
- Use a thumbtack instead of a hook: $0 (if available at home)
- Use existing tape: $0
New Total Cost: $35
Different Variations and Customizations
Materials: Instead of using a tennis ball, try a foam ball or a soft rubber ball. These materials are gentler on your car's windshield. For the string, consider using nylon cord or paracord for added durability.
Colors: Bright colors like neon green or orange make the parking aid more visible. You can also paint the ball with glow-in-the-dark paint for better visibility at night.
Styles: Attach a small LED light to the ball for a high-tech look. Another option is to use a laser pointer mounted on the ceiling, creating a light spot on your dashboard when parked correctly.
Mounting Options: Instead of hanging the ball from the ceiling, use a telescoping rod that can be adjusted to different lengths. This makes it easier to set up and adjust.
Additional Features: Add a small bell or buzzer to the ball so it makes a sound when touched, providing an audible cue. Another idea is to use a spring-loaded mechanism that retracts the ball when not in use, keeping the garage space clear.
Eco-Friendly Tips
Use recycled cardboard to create a simple parking aid. Cut a piece into a small ramp or stopper. Place it where your car's front tires should stop.
Repurpose an old tennis ball. Hang it from the ceiling using a piece of reused string. Position it to touch your windshield when parked correctly.
Utilize scrap wood for a more durable solution. Cut and sand it into a block or wedge. Paint it with leftover paint to make it visible.
Convert an old broomstick into a guide. Attach it vertically to the wall where your car's bumper should stop.
Use reclaimed rubber from old tires. Cut it into strips and attach it to the floor as a tactile guide.
Repurpose plastic bottles. Fill them with sand or water, then place them as markers.
Opt for solar-powered lights to illuminate your parking spot. They charge during the day and provide light at night without extra electricity.
Choose biodegradable tape to mark the floor. It’s eco-friendly and easy to replace.
Use recycled metal to create a durable parking aid. Bend it into a shape that fits your needs.
Consider natural materials like stones or bricks. Place them strategically to guide your parking.
Your Garage Parking Aid Awaits
Building your own garage parking aid is a rewarding project. With just a few materials and some basic tools, you can create a custom solution that fits your needs. Whether you choose a simple tennis ball on a string or a more advanced laser guide, the satisfaction of knowing you did it yourself is priceless. Plus, you'll save some money and maybe even have a little fun along the way. So, grab those tools, follow the steps, and enjoy your new parking aid. Happy DIY-ing!
How can I make a simple parking aid for my garage?
Use a tennis ball and some string. Hang the ball from the ceiling so it touches your windshield when your car is parked correctly.
What tools will I need for this project?
You'll need a drill, screws, string, and a tennis ball. A measuring tape helps too.
How do I measure where to hang the tennis ball?
Park your car where you want it. Measure from the ceiling to the spot on the windshield where the ball should touch.
Can I use something other than a tennis ball?
Sure! A foam ball or even a small stuffed toy works. Just make sure it's soft to avoid damage.
How do I attach the string to the ceiling?
Drill a small hole in the ceiling, insert a hook or screw, and tie the string to it. Make sure it's secure.
Is there a way to make this more high-tech?
Yes, you can use laser parking aids. They project a laser beam onto your car, showing you where to stop.
How do I adjust the parking aid if I get a new car?
Re-measure the distance from the ceiling to the new car's windshield. Adjust the string length accordingly.