
Home>Home & Furniture>Doors & Windows>DIY Window Plant Hanger Guide
Doors & Windows
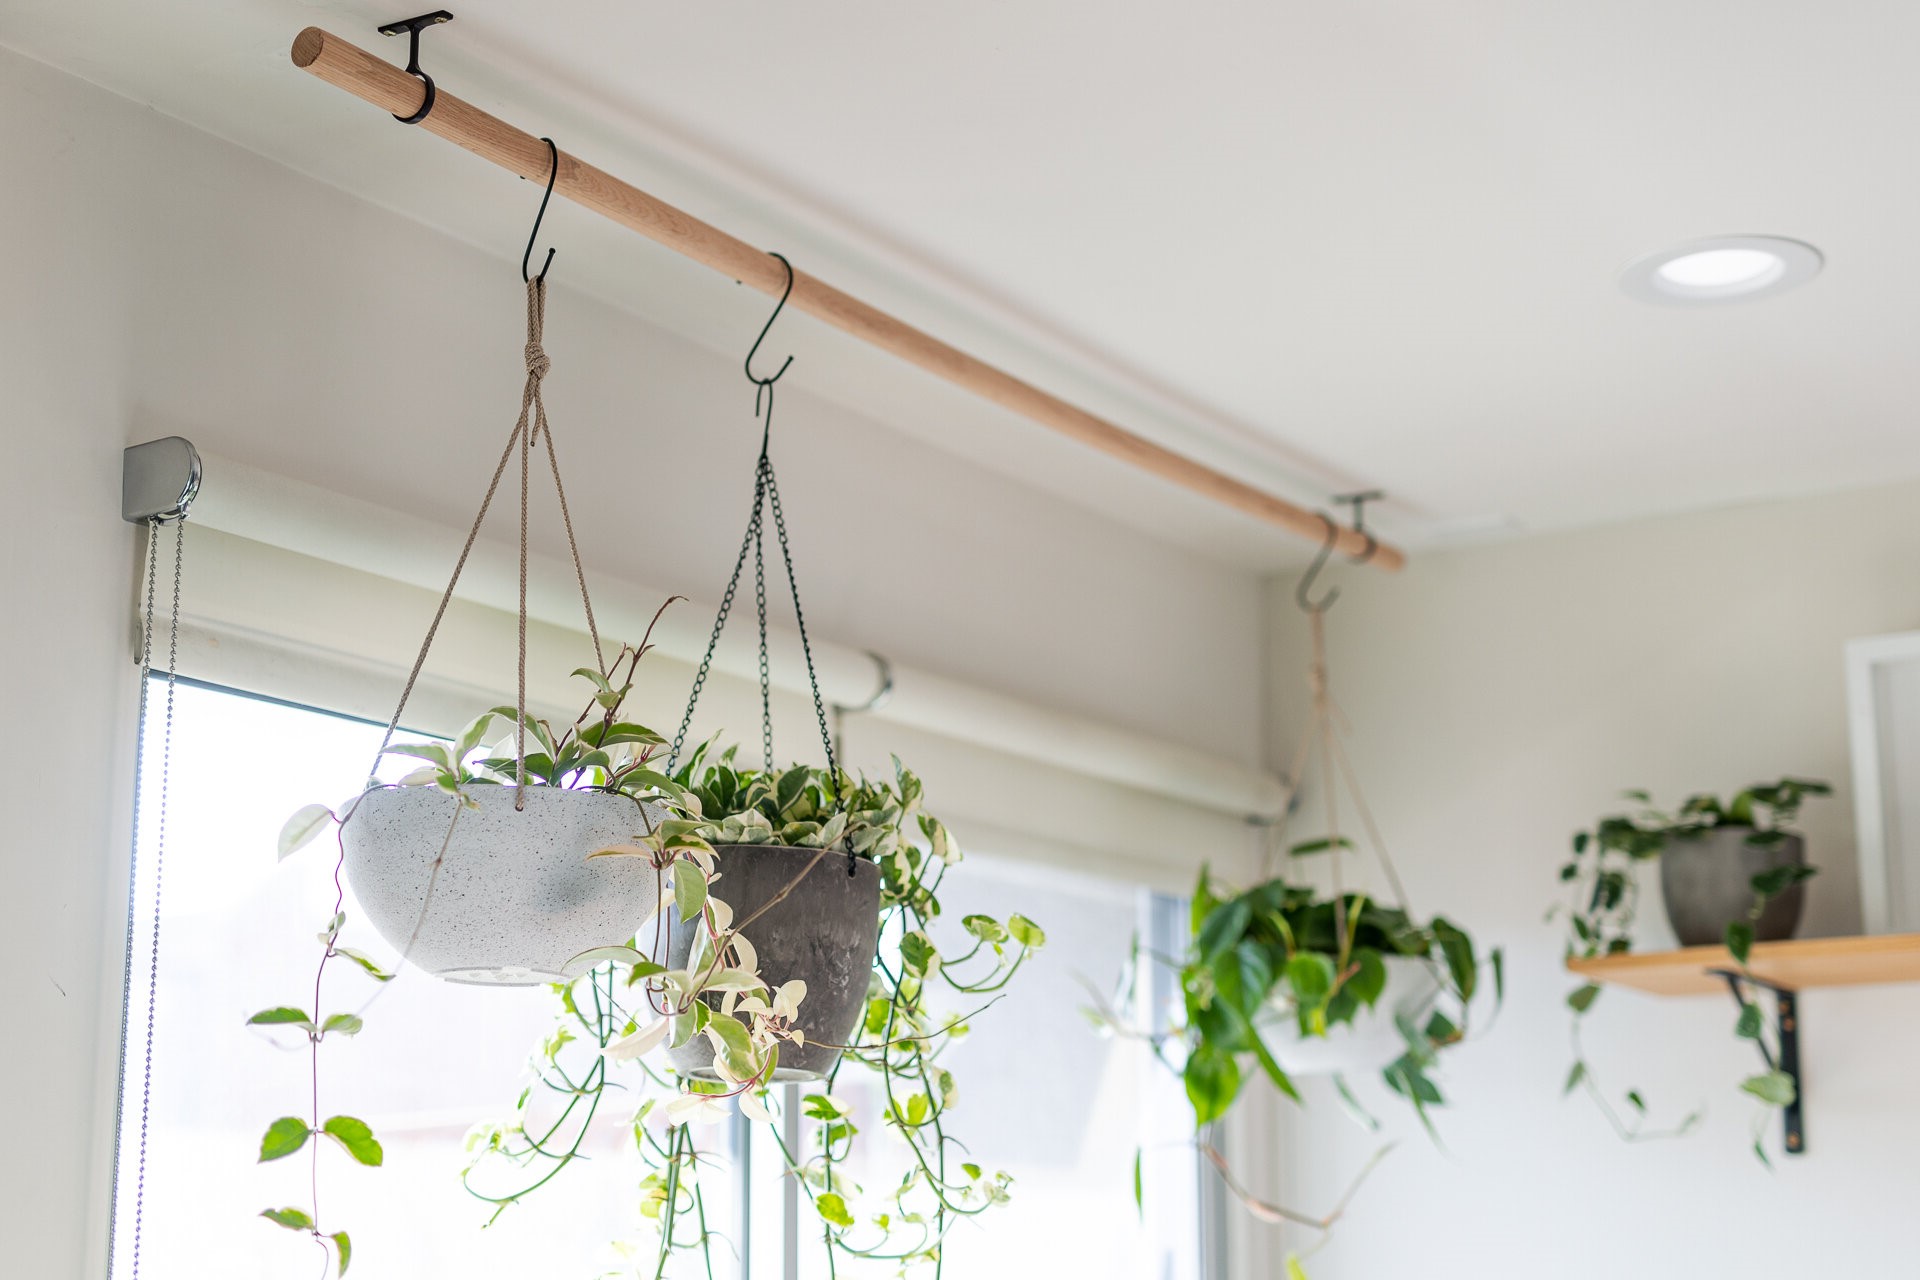
DIY Window Plant Hanger Guide
Published: August 15, 2024
Create a stunning DIY window plant hanger with our step-by-step guide. Perfect for adding greenery to your home. Easy, affordable, and beginner-friendly!
(Many of the links in this article redirect to a specific reviewed product. Your purchase of these products through affiliate links helps to generate commission for Twigandthistle.com, at no extra cost. Learn more)
Looking for a simple way to add some greenery to your space without taking up table or floor space? Making a DIY window plant hanger could be the perfect solution. This project not only brings life to your windows but also maximizes your living space. With just a few materials and basic tools, you can create a beautiful and functional plant hanger. Whether you're an experienced crafter or a beginner, this guide will help you through each step. Ready to get started? Let’s dive into the world of DIY window plant hangers together.
Getting Ready for Your Project
Gather Materials: Collect all necessary items like rope, hooks, a wooden dowel, and potted plants. Ensure you have a measuring tape, scissors, and a drill.
Choose a Location: Find a window with enough sunlight for your plants. Make sure there's enough space for the hanger to fit without obstructing the window.
Measure and Mark: Measure the window width and mark where you want to place the hooks. Ensure they are evenly spaced for balance.
Drill Holes: Carefully drill holes where you marked. Use a drill bit slightly smaller than the hooks to ensure a snug fit.
Install Hooks: Screw the hooks into the drilled holes. Make sure they are secure and can support the weight of the plants.
Cut Rope: Measure and cut the rope to the desired length. You’ll need two pieces of equal length for each plant hanger.
Tie Knots: Tie knots at the ends of the ropes to create loops. These loops will hang on the hooks.
Attach Dowel: Thread the ropes through the wooden dowel, spacing them evenly. Tie secure knots to keep the dowel in place.
Hang Plants: Place the potted plants on the dowel. Adjust the ropes to ensure the plants are level.
Safety Tips: Wear safety goggles while drilling. Ensure the hooks and ropes can support the weight of the plants to prevent accidents.
Gather Your Materials and Tools
- Wooden Dowel: Acts as the main support for hanging plants. Choose a sturdy one.
- Rope or Twine: Used to hang the dowel and secure the plants. Opt for a strong, durable type.
- Hooks: Attach to the window frame or ceiling to hold the dowel. Ensure they can bear the weight.
- S-Hooks: Hang the plant pots from the dowel. These make it easy to rearrange plants.
- Plant Pots: Hold the plants. Make sure they have drainage holes.
- Drill: Create holes for the hooks. A cordless drill is convenient.
- Screws: Secure the hooks in place. Choose ones that fit your hooks.
- Measuring Tape: Measure distances accurately. Helps ensure even spacing.
- Pencil: Mark spots for drilling. Use a light touch for easy erasing.
- Level: Ensure the dowel hangs straight. A small, handheld level works well.
- Scissors: Cut rope or twine to the desired length. Sharp scissors make clean cuts.
- Sandpaper: Smooth any rough edges on the dowel. Prevents splinters.
- Plants: Choose indoor plants that thrive in indirect light. Examples include pothos, spider plants, or ferns.
Skill Level and Time Commitment
Skill Level: Beginner
Time Required: 1-2 hours
- Gather Materials: 10 minutes
- Measure and Cut Rope: 20 minutes
- Knotting and Braiding: 30 minutes
- Attach to Window Frame: 20 minutes
- Place Plants: 10 minutes
How to Make a Window Plant Hanger
Gather Materials:
- Wooden Dowel (length depends on window width)
- Rope or Twine
- Hooks (screw-in type)
- Potted Plants (small to medium size)
- Scissors
- Measuring Tape
- Drill (optional, for hooks)
Measure and Cut Rope:
- Measure the height from the window top to the desired hanger length.
- Cut two equal pieces of rope, adding extra for knots.
Attach Hooks:
- Mark spots on the window frame where hooks will go.
- Screw hooks into marked spots. Use a drill if needed.
Prepare Wooden Dowel:
- Sand any rough edges on the dowel.
- Optionally, paint or stain the dowel for a finished look.
Tie Rope to Dowel:
- Tie one end of each rope piece to the dowel ends using a secure knot.
- Ensure knots are tight and even.
Hang Dowel:
- Loop the other rope ends over the hooks.
- Adjust rope length so the dowel hangs level.
Add Plants:
- Place potted plants on the dowel.
- Ensure plants are balanced and secure.
Final Adjustments:
- Check stability of the hanger.
- Adjust rope length or knots if needed.
Enjoy your new window plant hanger!
Helpful Tips and Tricks
Use sturdy materials like thick rope or heavy-duty twine to ensure your plant hanger can support the weight of your pots. Measure twice, cut once to avoid wasting materials and ensure your hanger fits your window perfectly. Pre-drill holes in wooden parts to prevent splitting when you screw them together. Use a level to make sure your hanger is straight and even.
Common mistakes to avoid include using weak materials that can break under the weight of the plants. Not measuring properly can result in a hanger that doesn’t fit your window or holds your plants unevenly. Skipping the pre-drilling step can cause wood to split, ruining your project. Ignoring the level can lead to a crooked hanger, making your plants look lopsided.
Alternatives for materials or methods include using macramé instead of rope for a decorative touch. Repurpose old belts or fabric strips for a unique look. Use tension rods instead of drilling into your window frame if you’re renting or don’t want permanent fixtures. Try suction cup hooks for lightweight plants if you want a non-permanent solution.
Estimating the Cost
Materials:
- Wooden dowels: $10
- Rope or twine: $5
- Hooks or brackets: $8
- Screws and nails: $3
- Sandpaper: $2
- Wood stain or paint: $7
- Pots: $15
Tools:
- Drill: $30 (if you don't have one)
- Saw: $20 (if you don't have one)
- Measuring tape: $5
- Paintbrush: $2
Total Estimated Cost: $107
Budget-Friendly Alternatives:
- Use recycled wood instead of buying dowels: Free
- Old shoelaces or string instead of new rope: Free
- Repurpose old hooks or brackets: Free
- Borrow tools from a friend or neighbor: Free
- Use leftover paint from other projects: Free
- Upcycle old containers as pots: Free
Total Estimated Cost with Alternatives: $25
Different Ways to Customize
Materials: Instead of using rope, try macramé cord for a more intricate design. Leather straps can add a rustic touch. Chain links provide an industrial look.
Colors: Paint the hanger in bright colors like turquoise or yellow for a cheerful vibe. Use metallic paints like gold or silver for a modern touch. Natural wood stains give a classic feel.
Styles: For a boho look, add beads or feathers to the hanger. A minimalist style can be achieved with simple lines and neutral colors. Vintage styles can incorporate antique hooks or distressed wood.
Alternative Plants: Use succulents for low maintenance. Herbs like basil or mint can be practical for cooking. Trailing plants like ivy or string of pearls create a cascading effect.
Mounting Options: Instead of hanging from a curtain rod, use adhesive hooks on the window frame. Suction cups can be used for a temporary setup. Magnetic hooks work well on metal window frames.
Additional Features: Add a small shelf to the hanger for extra plants or decor. Incorporate LED lights for a glowing effect at night. Attach small pots directly to the hanger for a compact design.
Eco-Friendly Ideas
Reclaimed wood can be used to create a sturdy base for the hanger. Old pallets or leftover wood from other projects work well. Natural fibers like jute or hemp make excellent ropes for hanging. These materials are biodegradable and strong. Recycled glass jars or bottles can serve as plant containers. They add a rustic touch and reduce waste. Upcycled fabric scraps can be braided or woven into decorative elements. This adds color and texture without buying new materials. Metal hooks from old curtain rods or other fixtures can be repurposed to hang the planter securely. Non-toxic paint or sealants can be used to finish the wood, ensuring it’s safe for plants and the environment. Compostable pots made from coconut coir or other natural materials can be used inside the glass jars. This makes it easy to transplant plants later.
Your Green Oasis Awaits
You've got all the steps to make a DIY window plant hanger. Gather your materials, follow the instructions, and soon you'll have a beautiful, functional piece. This project not only adds a touch of nature to your space but also gives you a sense of accomplishment. Plus, it's a great way to reuse materials you might already have lying around.
Remember, the key is to take your time and enjoy the process. If something doesn't go as planned, don't stress. Adjust and keep going. Your unique touch makes it special. Once your plants are hanging, you'll see how much they brighten up your room. So, roll up your sleeves, get crafting, and enjoy your new green oasis. Happy DIY-ing!
How do I choose the right materials for my window plant hanger?
Pick sturdy materials like wood, metal, or strong rope. Make sure they can hold the weight of your plants and pots.
What tools will I need to make a window plant hanger?
You'll need a drill, screws, a measuring tape, and possibly a saw if you're cutting wood. A level helps to keep things straight.
How do I measure for the perfect fit?
Measure the width of your window and decide how long you want the hanger to be. Make sure to leave enough space for your plants to grow.
Can I use recycled materials?
Absolutely! Old wooden planks, metal rods, or even sturdy fabric can be repurposed into a unique hanger.
How do I ensure my plants get enough light?
Position the hanger where it gets plenty of sunlight. South-facing windows usually get the most light.
What kind of plants work best in a window hanger?
Choose small to medium plants like herbs, succulents, or vines. They thrive in the sunlight and don't get too heavy.
How do I make sure the hanger is secure?
Use anchors if you're drilling into drywall. For wood or metal frames, make sure the screws are tight and the materials are sturdy.