
Home>Home & Furniture>Doors & Windows>DIY Christmas Classroom Door Decorations
Doors & Windows
DIY Christmas Classroom Door Decorations
Published: September 12, 2024
Discover creative and easy DIY Christmas classroom door decorations to bring festive cheer to your school. Step-by-step guides and tips for a merry classroom transformation!
(Many of the links in this article redirect to a specific reviewed product. Your purchase of these products through affiliate links helps to generate commission for Twigandthistle.com, at no extra cost. Learn more)
Want to bring festive cheer to your classroom this holiday season? DIY Christmas door decorations can transform any space into a winter wonderland. Not only do they brighten the room, but they also create excitement for students. Whether you prefer classic holiday themes or something more creative, there are endless possibilities to explore. With some basic materials, a little creativity, and some help from students, you can craft something truly special. Plus, decorating together can build a sense of community and teamwork. Ready to get started? Let's make your classroom door the talk of the school!
Getting Ready for the Project
Gather Materials: Collect all necessary items like construction paper, scissors, glue, tape, markers, and any decorative elements like ribbons, glitter, or stickers.
Plan Your Design: Sketch out your decoration ideas on paper. Decide on a theme, such as Santa's workshop, a winter wonderland, or a Christmas tree.
Measure the Door: Use a measuring tape to get the dimensions of the classroom door. This ensures your decorations fit perfectly.
Cut and Prepare: Cut out shapes and elements for your design. For example, if making a snowman, cut out circles for the body and smaller shapes for the eyes, nose, and buttons.
Set Up Workspace: Clear a large table or floor space to lay out all materials. Ensure good lighting and have a trash bin nearby for scraps.
Safety First: Use safety scissors if kids are involved. Keep hot glue guns and other sharp tools out of children's reach.
Test Placement: Before gluing or taping, place all elements on the door to see how they look. Adjust as needed.
Attach Decorations: Use tape or glue to attach your decorations to the door. Start from the top and work your way down to avoid overlapping issues.
Final Touches: Add any final details like glitter, stickers, or ribbons. Make sure everything is securely attached.
Clean Up: Tidy up your workspace, putting away all materials and disposing of any waste.
Supplies and Tools Checklist
- Construction Paper: Used for creating various shapes and designs like snowflakes, trees, and ornaments.
- Scissors: Essential for cutting out shapes and designs from paper.
- Glue: Helps stick paper decorations onto the door.
- Tape: Useful for securing larger decorations or adding extra support.
- Markers and Crayons: For adding details, colors, and personal touches to decorations.
- Ribbons: Adds a festive touch and can be used to create bows or hang decorations.
- Stapler: Useful for attaching heavier decorations securely.
- Stickers: Quick and easy way to add festive elements like stars, snowflakes, or Santa faces.
- Wrapping Paper: Can be used as a background to cover the entire door, giving it a festive look.
- Glitter: Adds sparkle and shine to decorations, making them stand out.
- Cotton Balls: Perfect for creating snow effects or Santa’s beard.
- String Lights: Adds a magical glow to the door, especially if the classroom allows for it.
- Cardboard: Provides a sturdy base for larger decorations like wreaths or large cutouts.
- Hot Glue Gun: For attaching heavier items or ensuring decorations stay in place.
- Paint: Useful for adding bold colors and designs that markers or crayons can’t achieve.
- Pencils: For sketching out designs before cutting or coloring.
- Hole Punch: Helps create holes for hanging decorations with ribbon or string.
- Measuring Tape: Ensures decorations fit perfectly on the door.
- Craft Foam: Adds dimension to decorations and is easy to cut and glue.
- Buttons: Can be used as eyes, noses, or other small details on decorations.
Required Skills and Time Commitment
Skill Level: Beginner
Time Required: 2-4 hours
- Gather Materials: 30 minutes
- Plan Design: 15 minutes
- Cut and Assemble Decorations: 1-2 hours
- Attach Decorations to Door: 30 minutes
- Final Touches: 15 minutes
How to Decorate Your Classroom Door
Gather Materials:
- Wrapping paper or butcher paper
- Scissors
- Tape
- Glue
- Construction paper
- Markers or paint
- Ribbons, bows, and other decorations
- Stapler (optional)
Measure the Door:
- Use a measuring tape to find the height and width of the door.
- Cut the wrapping paper or butcher paper to fit the door size.
Cover the Door:
- Attach the paper to the door using tape. Start at the top and work your way down, smoothing out any wrinkles.
Create a Design:
- Decide on a theme (e.g., Santa's Workshop, Winter Wonderland, Christmas Tree).
- Sketch your design on construction paper.
Cut Out Shapes:
- Cut out the shapes for your design (e.g., trees, snowflakes, presents).
- Use different colors to make the design pop.
Assemble the Design:
- Arrange the cut-out shapes on the door.
- Use glue or tape to attach them.
Add Details:
- Use markers or paint to add details like faces, patterns, or text.
- Add ribbons, bows, or other decorations for extra flair.
Secure Everything:
- Make sure all pieces are securely attached.
- Use a stapler for heavier items if needed.
Final Touches:
- Step back and check for any gaps or loose pieces.
- Adjust as necessary to ensure everything looks neat.
Clean Up:
- Dispose of any scraps.
- Store leftover materials for future projects.
Helpful Hints for Success
Use wrapping paper as a base. It's cheap, colorful, and easy to work with. Secure it with double-sided tape for a clean look.
Stencils can help create neat shapes and letters. Use cardboard or plastic ones for durability.
LED string lights add a festive touch without needing an outlet. Battery-operated ones are safer for classrooms.
Reusable materials like felt or fabric can be stored and used again next year. They’re also more durable than paper.
Hot glue guns work well for attaching heavier items like ornaments or bows. Just be careful not to burn yourself.
Magnets can be used to attach decorations to metal doors without damaging the surface. They’re easy to move around.
Common mistakes to avoid:
Don’t use heavy items that could fall and hurt someone. Stick to lightweight decorations.
Avoid messy glues that can drip or leave stains. Double-sided tape or glue dots are cleaner options.
Don’t cover door handles or locks. Make sure the door can still function properly.
Alternatives for materials or methods:
Instead of wrapping paper, use fabric for a more durable base. It’s less likely to tear.
If you don’t have stencils, print out templates from the internet and trace them onto your materials.
For a more eco-friendly option, use recycled materials like old magazines or newspapers to create decorations.
Budgeting for Your Decorations
Construction paper: $5 for a pack of assorted colors.
Scissors: $3 for a basic pair.
Glue sticks: $2 for a pack of four.
Markers: $4 for a set of ten.
Tape: $2 for a roll.
Stickers: $3 for a holiday-themed pack.
Ribbon: $2 for a spool.
Foam sheets: $5 for a pack of ten.
Glitter: $3 for a small set of colors.
Total cost: Around $29.
Budget-friendly alternatives:
- Use old magazines for cutouts instead of buying construction paper.
- Borrow scissors and markers from the classroom.
- Make homemade glue with flour and water.
- Use recycled materials like cardboard for decorations.
Personalize Your Door Decorations
Materials: Instead of using traditional paper, try felt or fabric for a more textured look. Cardboard can add sturdiness, while wrapping paper brings festive patterns.
Colors: Go beyond red and green. Use blue and silver for a winter wonderland theme or gold and white for an elegant touch. Pastel colors can create a softer, more whimsical feel.
Styles: Create a rustic look with burlap and twine. For a modern twist, use geometric shapes and metallic accents. A vintage style can be achieved with old-fashioned ornaments and muted colors.
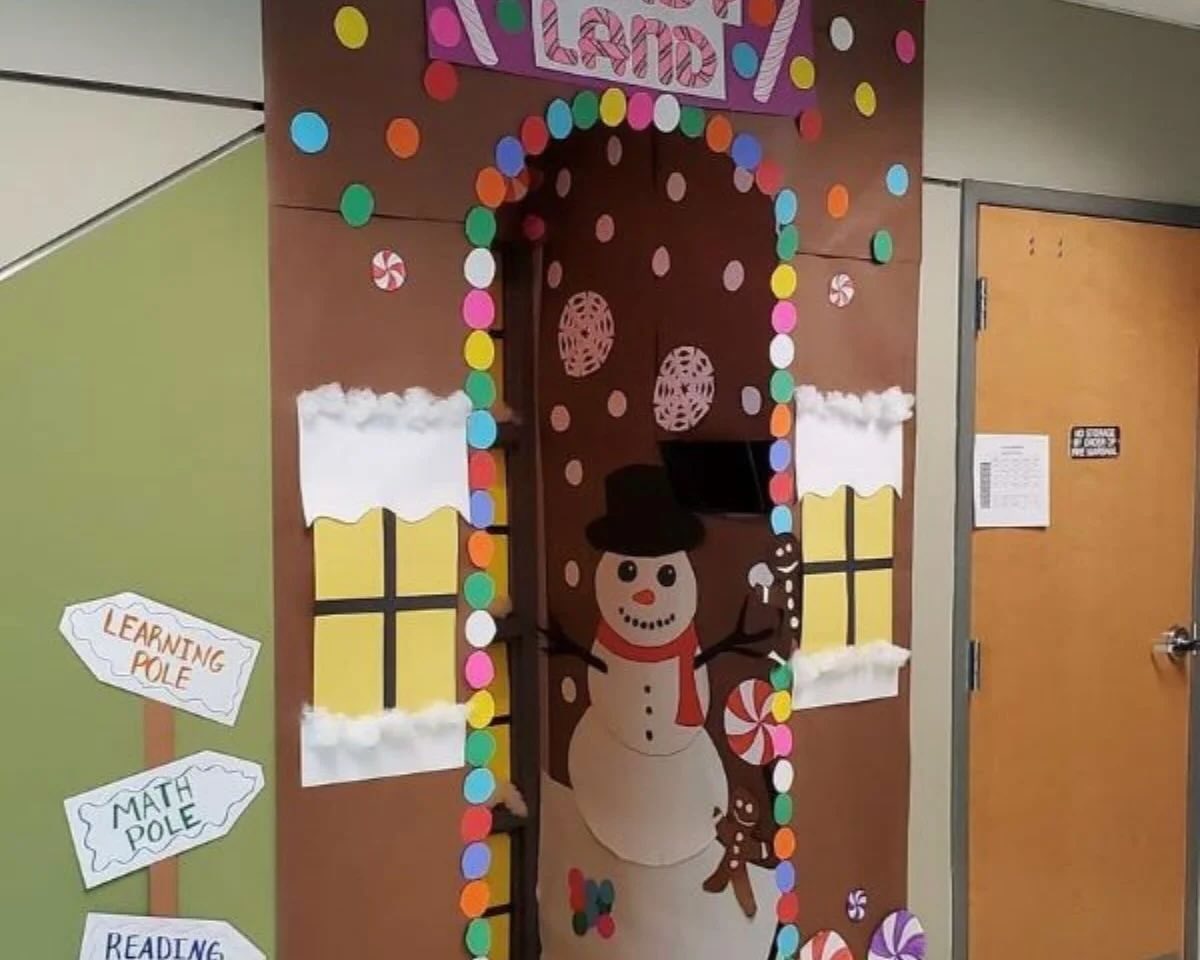
Themes: Choose a specific theme like Santa’s Workshop, Winter Wonderland, or Gingerbread House. Each theme can guide your choice of decorations and colors.
Alternative Decorations: Use LED lights for a sparkling effect. Pom-poms and ribbons can add a playful touch. Stickers and decals make for quick and easy decorating.
Personalization: Add students’ names on ornaments or stockings. Let students create their own mini decorations to contribute to the door. This makes the project more interactive and personal.
Eco-Friendly Options: Use recycled materials like old magazines or newspapers. Natural elements like pinecones, leaves, and twigs can add an earthy touch.
Interactive Elements: Incorporate a countdown calendar or pocket surprises that students can open each day. This adds an element of excitement and engagement.
3D Effects: Create a pop-out effect with layered paper or foam. Use cotton balls for snow or clouds to add depth and texture.
Cultural Inclusivity: Include decorations from different cultures to celebrate a diverse classroom. This can include symbols from Hanukkah, Kwanzaa, or other winter holidays.
Eco-Friendly Decoration Ideas
Recycled paper can be used to create snowflakes, stars, or other festive shapes. Old magazines or newspapers work well for this. Cardboard from cereal boxes or shipping packages can be cut into shapes and painted or wrapped in leftover gift wrap.
Fabric scraps from old clothes or linens can be turned into bows or garlands. Buttons and beads from broken jewelry can add sparkle to your decorations.
Natural materials like pinecones, twigs, and leaves can be collected and used to make wreaths or garlands. Dried orange slices or cinnamon sticks add a festive scent.
Reusable items like mason jars, tin cans, or glass bottles can be decorated and used as vases or candle holders. String lights can be wrapped around these items for a cozy glow.
Reusable adhesive like sticky tack or removable hooks can be used to hang decorations without damaging surfaces, making it easy to reuse them next year.
Old greeting cards can be cut into shapes or used as tags for gifts. Scrap paper can be used to make chains or other hanging decorations.
Leftover yarn or string can be used to create pom-poms, tassels, or garlands. Wine corks can be turned into mini Christmas trees or reindeer.
Upcycling is key. Look around your home for items that can be repurposed into festive decorations. This not only saves money but also reduces waste.
Bringing It All Together
Creating DIY Christmas classroom door decorations can be a fun, rewarding experience. By using simple materials like construction paper, glue, and paint, you can transform any classroom door into a festive masterpiece. Remember to involve the students in the process; it not only fosters creativity but also builds a sense of community. Whether you choose a classic Santa theme, a winter wonderland, or a reindeer motif, the key is to let your imagination run wild. Don't stress about perfection; the charm lies in the handmade touches. So gather your supplies, get the kids excited, and start decorating. Your classroom will soon be the talk of the school, spreading holiday cheer to everyone who passes by. Happy decorating!
How can I make a snowman door decoration?
Use white construction paper to cut out three circles of different sizes. Stack them from largest to smallest and glue them together. Add a carrot nose from orange paper, coal eyes and buttons from black paper, and a scarf from colored fabric or paper. Attach the snowman to the door with tape or sticky tack.
What's a simple way to create a Christmas tree door decoration?
Cut out a large triangle from green poster board. Decorate it with garland, ornaments, and a star on top using colored paper, glitter, or stickers. Attach the tree to the door and add a tree trunk using brown paper.
How do I make a Santa Claus door decoration?
Use red poster board to create Santa's body and hat. Add a white beard and mustache from cotton balls or white paper. Use black paper for his belt and boots. Draw or glue on eyes, a nose, and a mouth. Secure everything to the door with tape.
Can I use lights on my classroom door?
Yes, but make sure to use battery-operated lights for safety. String them around your decorations or create a border around the door. Secure the battery pack in a discreet spot.
What's a fun way to involve students in decorating?
Have each student create a mini ornament or gift from paper. They can decorate it however they like and write their name on it. Attach all the ornaments or gifts to a large paper tree or stack them to look like a pile of presents on the door.
How do I make a reindeer door decoration?
Cut out a large reindeer head from brown paper. Add antlers from darker brown paper, a red nose from red paper or a pom-pom, and eyes from black and white paper. Attach the reindeer to the door and add a festive collar with bells or ribbon.
What's a quick way to create a winter wonderland theme?
Cover the door with blue wrapping paper or poster board. Cut out snowflakes from white paper and scatter them all over the door. Add a few snowmen, penguins, or polar bears for extra fun.