
Home>Home & Furniture>Doors & Windows>DIY Car Louver Installation Guide
Doors & Windows
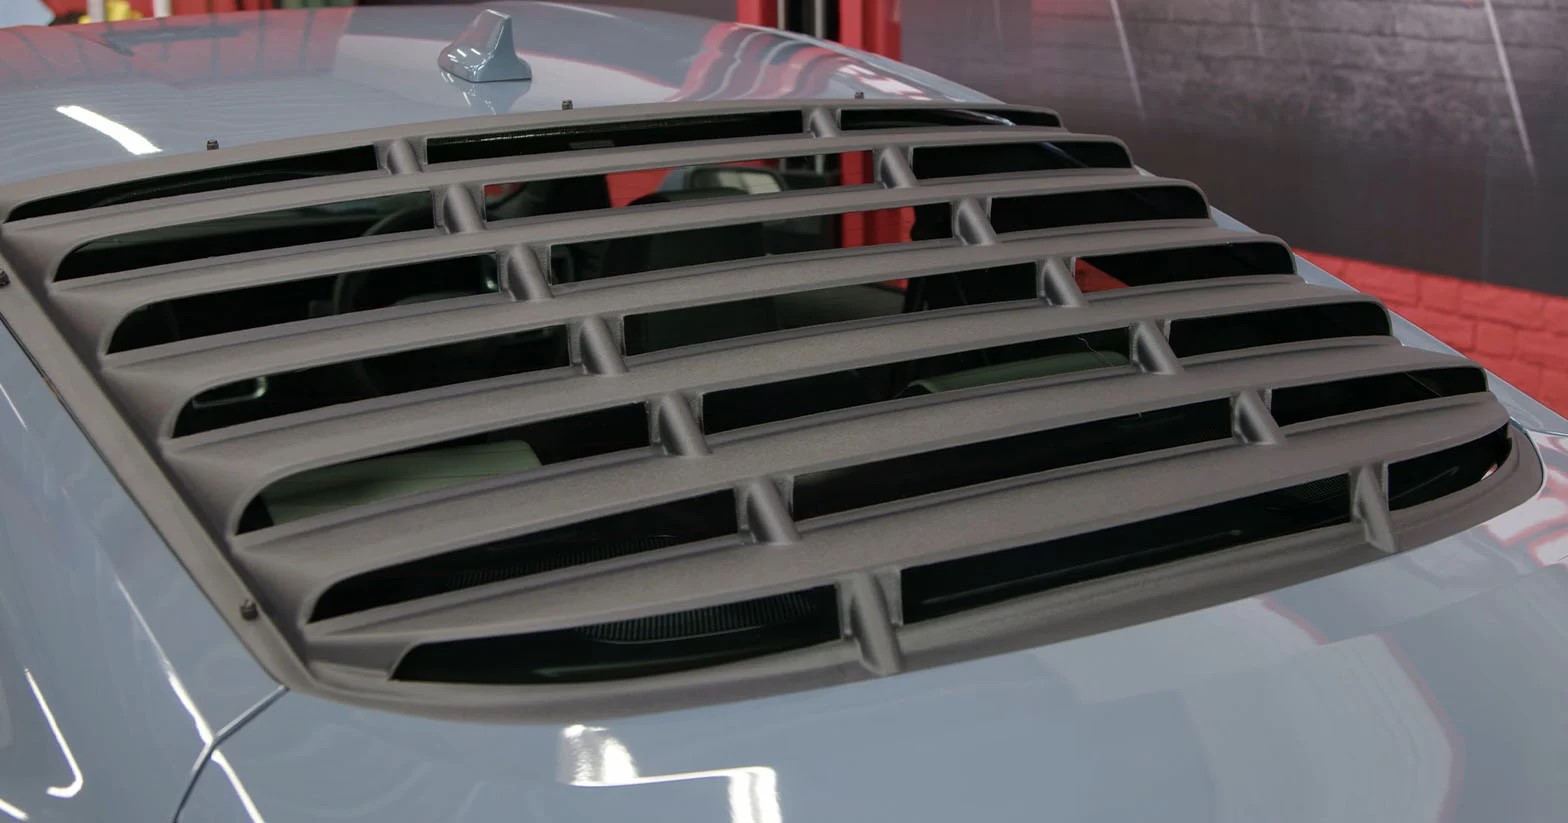
DIY Car Louver Installation Guide
Published: August 10, 2024
Learn how to install car louvers yourself with our step-by-step DIY guide. Enhance your vehicle's style and performance with ease. Perfect for car enthusiasts!
(Many of the links in this article redirect to a specific reviewed product. Your purchase of these products through affiliate links helps to generate commission for Twigandthistle.com, at no extra cost. Learn more)
Ready to give your car a sleek, sporty look? Installing louvers is a fantastic way to achieve that. While it might sound complicated, this guide will walk you through each step. Not only will you save money by doing it yourself, but you’ll also get the satisfaction of customizing your ride. Whether you're a seasoned DIY enthusiast or a beginner, these instructions aim to make the process straightforward and enjoyable. Gather your tools, roll up your sleeves, and let's get started on transforming your vehicle with some stylish louvers.
Getting Ready for the Project
Gather Tools and Materials: Collect a screwdriver, masking tape, cleaning cloth, rubbing alcohol, and the car louvers.
Safety First: Wear safety gloves and goggles to protect your hands and eyes.
Clean the Rear Window: Use a cleaning cloth and rubbing alcohol to remove dirt and grime from the window where the louvers will be installed.
Workspace Setup: Park your car in a well-lit, flat area. Ensure you have enough space to move around the vehicle.
Dry Fit the Louvers: Place the louvers on the rear window without attaching them to check for proper fit and alignment.
Mark the Positions: Use masking tape to mark the positions where the louvers will be attached. This helps ensure they are straight.
Prepare Adhesive Strips: If your louvers come with adhesive strips, peel off the backing and get them ready for application.
Check for Obstructions: Ensure there are no obstructions like antennas or wipers that might interfere with the louvers.
Read Instructions: Go through the manufacturer’s instructions for any specific steps or precautions.
Test Visibility: Sit inside the car to check if the louvers obstruct your rearview visibility. Adjust if necessary.
What You'll Need
Car Louvers: These are the main components you will install on your car's rear window. They provide shade and a sporty look.
Screwdriver Set: Essential for tightening screws and bolts. Make sure to have both flathead and Phillips screwdrivers.
Measuring Tape: Helps ensure precise placement of the louvers. Accurate measurements prevent misalignment.
Masking Tape: Used to mark positions on the car window without causing damage. It helps in aligning the louvers correctly.
Alcohol Wipes: Clean the surface of the car window to ensure proper adhesion of the louvers. Removes dirt and grease.
Adhesive Promoter: Enhances the bond between the louvers and the car window. Ensures the louvers stay in place.
Drill: Needed if the louvers require drilling holes for screws. Make sure to use the correct drill bit size.
Screws and Bolts: Secure the louvers to the car window. Usually provided with the louvers, but double-check to ensure you have enough.
Protective Gloves: Protect your hands from sharp edges and tools. Safety first.
Soft Cloth: Wipe down the louvers and car window after installation. Ensures a clean finish.
How Much Time and Skill You Need
Skill Level: Intermediate
Time Required: 2-3 hours
- Gather Tools and Materials: 15 minutes
- Clean and Prep Surface: 20 minutes
- Measure and Mark Placement: 30 minutes
- Attach Louvers: 1 hour
- Final Adjustments and Clean-Up: 30 minutes
Follow These Steps
Gather Materials:
- Car louvers
- Screwdriver
- Cleaning cloth
- Alcohol wipes
- Measuring tape
- Masking tape
- Drill (if needed)
- Screws or adhesive (depending on louver type)
Clean the Rear Window:
- Use alcohol wipes to clean the rear window thoroughly.
- Ensure no dirt or grease remains.
Measure and Mark:
- Use measuring tape to find the center of the rear window.
- Mark the center with masking tape.
Position the Louvers:
- Place the louvers on the rear window.
- Align them with the center mark.
- Ensure they are straight and level.
Secure the Louvers:
- If using adhesive, apply it to the louver edges.
- Press the louvers firmly onto the window.
- If using screws, mark the screw positions.
- Drill pilot holes carefully.
- Screw the louvers into place.
Check Alignment:
- Step back and check the alignment.
- Adjust if necessary before the adhesive sets or screws are fully tightened.
Final Touches:
- Wipe off any excess adhesive.
- Remove masking tape.
- Let adhesive cure as per manufacturer’s instructions.
Test Stability:
- Gently tug on the louvers to ensure they are secure.
- Make any final adjustments if needed.
Helpful Tips and Tricks
Measure Twice, Cut Once: Always double-check measurements before cutting or drilling. This ensures a precise fit.
Use Painter's Tape: Apply painter's tape around the area where you'll be working. This protects your car's paint from scratches.
Pre-Drill Holes: Pre-drill holes for screws to avoid cracking or damaging the louver material.
Use a Template: Create or use a template to mark where the louvers will be installed. This helps maintain alignment.
Clean the Surface: Ensure the surface is clean and dry before installation. Dirt or moisture can affect adhesive strength.
Heat the Adhesive: If using adhesive strips, slightly heat them with a hairdryer. This improves stickiness.
Secure with Clamps: Use clamps to hold the louvers in place while the adhesive sets. This ensures a strong bond.
Check for Obstructions: Make sure nothing obstructs the louver installation area, like antennae or trim pieces.
Test Fit: Before final installation, do a test fit to ensure everything aligns correctly.
Use Quality Materials: Invest in high-quality louvers and adhesive. Cheap materials may not last long.
Common Mistakes to Avoid:
Skipping Measurements: Not measuring properly can lead to misalignment.
Ignoring Surface Prep: Failing to clean the surface can weaken the adhesive bond.
Rushing the Process: Taking shortcuts can result in poor installation and potential damage.
Over-Tightening Screws: This can crack the louver material or damage your car.
Alternatives for Materials or Methods:
Magnetic Louvers: If you don't want to drill holes, consider magnetic louvers. They are easy to install and remove.
Velcro Strips: Use heavy-duty Velcro strips as an alternative to adhesive. They provide a strong hold and are easier to remove.
Snap-On Louvers: Some louvers snap into place without the need for screws or adhesive. These are convenient but may not be as secure.
Plastic Rivets: Instead of metal screws, use plastic rivets. They are less likely to damage the louver material.
How Much Will It Cost?
Louvers: $100 - $300 depending on the brand and material.
Screws and Bolts: $10 - $20 for a pack.
Drill: $30 - $100. If you already have one, no need to buy.
Measuring Tape: $5 - $15.
Masking Tape: $3 - $7.
Marker: $1 - $3.
Safety Glasses: $5 - $15.
Budget-Friendly Alternatives:
- Louvers: Look for used or discounted ones online.
- Drill: Borrow from a friend or rent from a local hardware store.
- Measuring Tape: Use a ruler if you have one at home.
Total estimated cost: $154 - $460.
Ways to Customize Your Louvers
Materials: Instead of traditional plastic, try aluminum for a more durable option. Carbon fiber can give a sporty look. Wood can add a vintage or custom feel.
Colors: Use matte black for a sleek, modern appearance. Glossy white can make the car look clean and fresh. Metallic silver adds a touch of luxury. Bright colors like red or blue can make the car stand out.
Styles: Choose horizontal slats for a classic look. Vertical slats can give a unique twist. Honeycomb patterns offer a futuristic vibe. Custom shapes like flames or geometric designs can make the car truly one-of-a-kind.
Finishes: Powder coating provides a durable, smooth finish. Chrome plating adds a shiny, reflective surface. Vinyl wrapping allows for easy color changes and patterns.
Installation Methods: Use adhesive strips for a no-drill option. Screws and bolts offer a more secure attachment. Magnetic mounts allow for easy removal and reattachment.
Additional Features: Add LED lights for a cool effect at night. Tinted louvers can provide extra privacy. Custom logos or decals can personalize the look even more.
Eco-Friendly Tips
Eco-friendly materials can make your car louver installation more sustainable. Bamboo is a great option for the louver slats. It's strong, lightweight, and grows quickly, making it a renewable resource. Reclaimed wood is another excellent choice. You can often find it at salvage yards or online marketplaces. Using reclaimed wood reduces waste and gives your project a unique look.
For the frame, consider using recycled aluminum. It's durable, lightweight, and has a lower environmental impact compared to new aluminum. You can find recycled aluminum at metal supply stores or recycling centers.
When it comes to fasteners, opt for stainless steel screws. They are long-lasting and can be recycled. Avoid plastic fasteners, which can break down over time and are not eco-friendly.
For finishing, use water-based paints or stains. They have fewer harmful chemicals compared to oil-based options. Look for products labeled as low-VOC (volatile organic compounds) to minimize air pollution.
Reusing materials from old projects can also be a great way to stay eco-friendly. If you have leftover wood, metal, or screws from previous DIY tasks, see if you can incorporate them into your louver installation. This reduces waste and saves money.
Lastly, consider using solar-powered tools for your project. They reduce electricity consumption and are often more portable. Solar chargers can keep your tools powered up without relying on the grid.
By choosing eco-friendly materials and methods, you can create a sustainable and stylish car louver installation.
Your Car's New Look
You've done it! Installing car louvers yourself isn't just a money-saver; it's a confidence booster. With a few tools, some patience, and a bit of elbow grease, you've transformed your ride. Remember to check the louvers periodically to ensure they're still secure and clean. If you ever need to remove them, just reverse the steps. Now, hit the road and enjoy the new look. Your car's got a fresh, stylish edge that stands out. Keep tackling those DIY projects, and who knows what you'll accomplish next? Happy driving!
What tools do I need to install car louvers?
You'll need a screwdriver, measuring tape, cleaning cloth, adhesive, and possibly a drill.
How long does it take to install car louvers?
It usually takes about 1-2 hours depending on your experience and the type of louvers.
Can I install car louvers by myself?
Absolutely! With the right tools and a bit of patience, you can install them yourself.
Do car louvers affect visibility?
They might slightly reduce visibility, but most designs are made to minimize this impact.
Are car louvers easy to remove?
Yes, they can be removed, but you might need some adhesive remover to clean up any residue.
Will car louvers fit any car model?
Not all louvers fit every car. Make sure to get ones specifically designed for your car model.
Do I need to clean the surface before installing louvers?
Yes, a clean surface ensures the adhesive sticks properly and the louvers stay in place.