
Home>Home & Furniture>Bathroom>How to Install Heated Bathroom Floor
Bathroom
How to Install Heated Bathroom Floor
Published: July 14, 2024
Learn how to install heated bathroom floors with our step-by-step guide. Enhance comfort and luxury in your bathroom with expert tips and detailed instructions.
(Many of the links in this article redirect to a specific reviewed product. Your purchase of these products through affiliate links helps to generate commission for Twigandthistle.com, at no extra cost. Learn more)
Imagine stepping onto a warm bathroom floor on a chilly morning. Sounds inviting, right? Installing a heated bathroom floor might seem like a big project, but with the right tools and steps, it's totally doable. This guide will walk you through the process, making it simpler than you might think. Whether you're a seasoned DIYer or just starting out, these steps will help you transform your bathroom into a cozy retreat. Get ready to add some comfort and value to your home with this practical and rewarding project.
Getting Ready for the Project
Gather Materials: Get all necessary tools and materials like heating mats, thermostat, tile adhesive, tiles, and a trowel.
Turn Off Power: Ensure the power to the bathroom is off to avoid electrical hazards.
Clean the Floor: Sweep and mop the floor to remove any dirt or debris.
Plan Layout: Measure the bathroom floor and plan the layout of the heating mats. Make sure they fit well without overlapping.
Check Subfloor: Inspect the subfloor for any damage. Repair any cracks or uneven areas to ensure a smooth surface.
Install Insulation: Lay down insulation boards if needed. This helps in retaining heat and improving efficiency.
Set Up Workspace: Organize your tools and materials within easy reach. Ensure good lighting and ventilation.
Wear Safety Gear: Put on safety gloves, goggles, and knee pads to protect yourself during the installation.
Read Instructions: Go through the manufacturer’s instructions for the heating mats and thermostat to understand the installation process.
Test Heating Mats: Before installing, test the heating mats to ensure they work properly.
What You Need to Get Started
- Heated Floor Mat: Provides the warmth under the tiles. Choose one that fits your bathroom size.
- Thermostat: Controls the temperature of the heated floor. Make sure it’s compatible with the heated mat.
- Tile: The surface material for your bathroom floor. Ceramic or porcelain tiles work best.
- Tile Adhesive: Secures the tiles to the floor. Use a thin-set mortar for best results.
- Grout: Fills the gaps between tiles. Choose a waterproof grout to prevent moisture issues.
- Backer Board: Provides a stable base for the tiles. Cement backer boards are ideal.
- Screws: Fasten the backer board to the subfloor. Use corrosion-resistant screws.
- Trowel: Spreads the tile adhesive evenly. A notched trowel works best.
- Tile Cutter: Cuts tiles to fit around edges and corners. A manual tile cutter or wet saw will do.
- Level: Ensures the floor is even. A bubble level or laser level can be used.
- Tape Measure: Measures the area and tiles. Accurate measurements are crucial.
- Utility Knife: Cuts the heated mat to size. Make sure not to cut the heating wires.
- Sponge: Cleans excess grout from tiles. A damp sponge works best.
- Bucket: Mixes grout and adhesive. A sturdy plastic bucket is ideal.
- Drill: Secures screws into the backer board. A power drill speeds up the process.
- Wire Strippers: Prepares electrical connections for the thermostat. Essential for safe wiring.
- Multimeter: Tests electrical connections. Ensures the heated mat is working properly.
- Safety Gear: Protects you during installation. Includes gloves, safety glasses, and knee pads.
How Much Time and Skill is Needed?
Skill Level: Advanced
Time Required: 2-3 days
- Preparation and Planning: 2-4 hours
- Removing Existing Flooring: 4-6 hours
- Laying Heating Mats or Cables: 3-5 hours
- Connecting Electrical Components: 2-3 hours
- Installing New Flooring: 6-8 hours
- Testing and Final Adjustments: 1-2 hours
Follow These Steps
Gather Materials and Tools
- Heated floor mat or cable
- Thermostat
- Tile adhesive
- Tiles
- Trowel
- Utility knife
- Measuring tape
- Electrical tester
- Multimeter
Turn Off Power
- Switch off power to the bathroom at the circuit breaker.
Prepare the Subfloor
- Clean the subfloor thoroughly.
- Ensure it is level and free of debris.
Plan the Layout
- Measure the bathroom floor.
- Plan where the heated mat or cable will go, avoiding fixtures.
Install Insulation Board (Optional)
- Lay down insulation board if desired.
- Secure it with adhesive or screws.
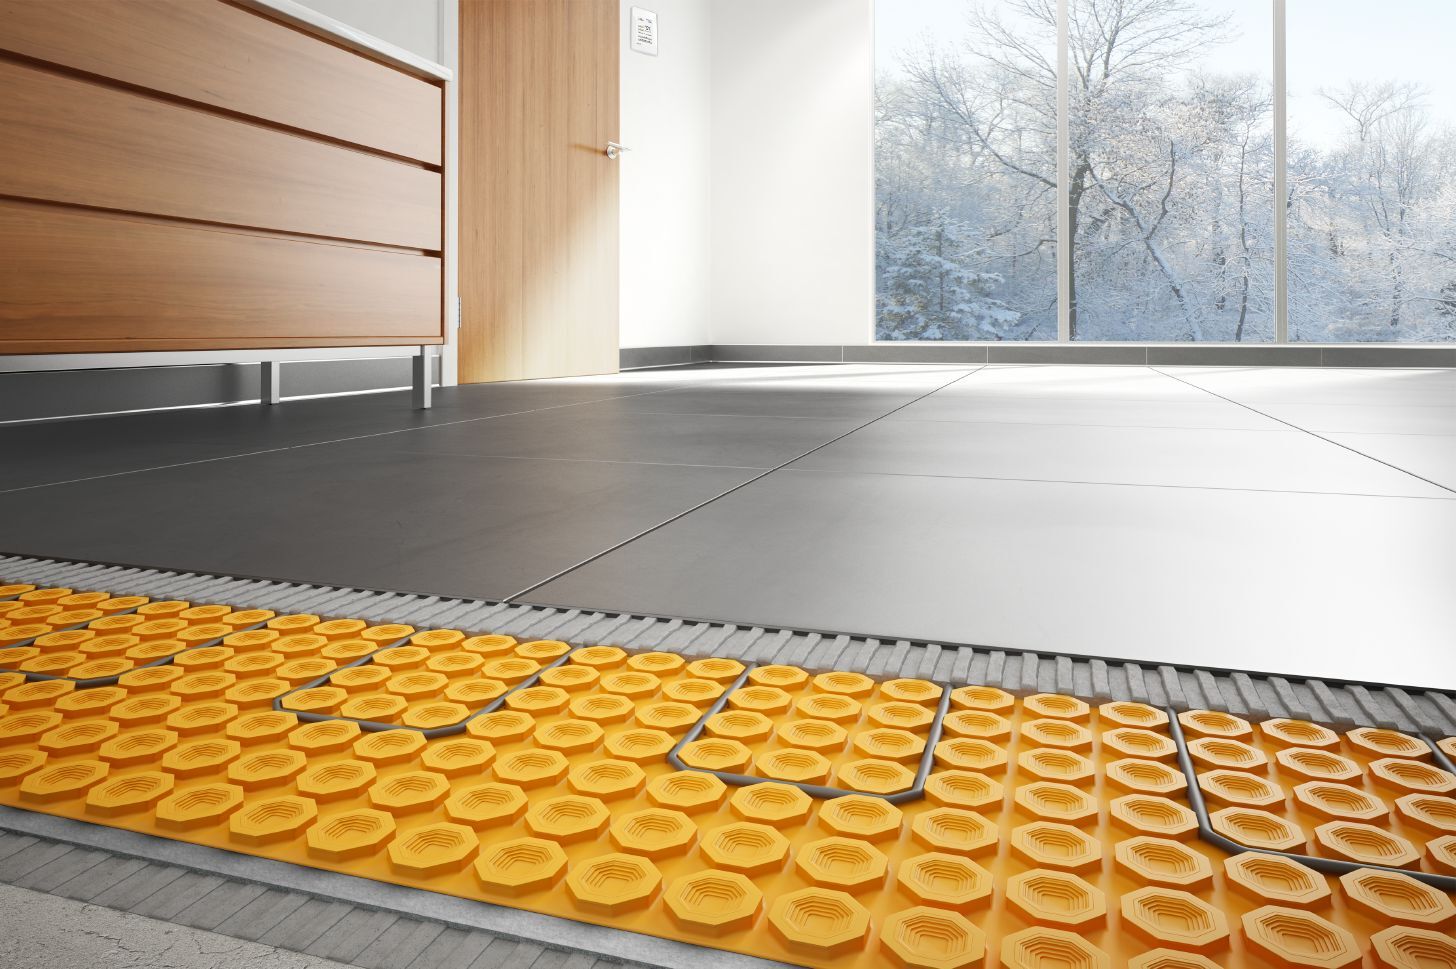
Lay Out the Heating Mat or Cable
- Roll out the heating mat or lay the cable according to your plan.
- Cut the mesh backing (not the wires) to fit around obstacles.
Secure the Heating Mat or Cable
- Use tape or adhesive to secure the mat or cable to the subfloor.
Install the Thermostat Sensor
- Place the sensor between two heating wires.
- Ensure it is not touching any wires.
Connect the Electrical Wiring
- Run the power leads to the thermostat location.
- Connect the wires according to the manufacturer’s instructions.
Test the System
- Use a multimeter to check the resistance of the heating mat or cable.
- Ensure it matches the manufacturer’s specifications.
Apply Tile Adhesive
- Spread tile adhesive over the heating mat or cable using a trowel.
- Ensure even coverage without air pockets.
Lay the Tiles
- Place tiles on the adhesive.
- Use spacers to maintain even gaps.
Allow Adhesive to Dry
- Let the adhesive cure according to the manufacturer’s instructions.
Grout the Tiles
- Apply grout between the tiles.
- Wipe off excess grout with a damp sponge.
Install the Thermostat
- Connect the thermostat to the power leads and sensor.
- Mount it on the wall.
Turn On the Power
- Switch the power back on at the circuit breaker.
- Set the thermostat to your desired temperature.
Test the Heated Floor
- Ensure the floor heats up evenly.
- Check for any cold spots or issues.
Helpful Tips for Success
Plan the Layout: Before starting, sketch the bathroom layout. This helps in knowing where to place the heating mats or cables.
Choose the Right System: Decide between electric mats or hydronic systems. Electric mats are easier for DIY projects, while hydronic systems are more complex but efficient for larger areas.
Prep the Subfloor: Ensure the subfloor is clean, dry, and level. Any debris or uneven spots can cause issues later.
Install Insulation Boards: Place insulation boards to improve efficiency. They help direct heat upwards, making the floor warm faster.
Test the Heating System: Before covering the heating elements, test them to ensure they work. Fixing issues later can be difficult.
Use a Thermostat: Install a programmable thermostat. It helps control the temperature and saves energy.
Apply Thinset Evenly: When laying tiles over the heating system, spread thinset evenly. Uneven application can lead to cold spots.
Allow Proper Curing Time: Let the thinset and grout cure properly before turning on the heat. Rushing this step can cause cracks.
Common Mistakes to Avoid:
Skipping the Layout Plan: Not planning can lead to inefficient heating or missed spots.
Ignoring Insulation: Without insulation boards, much heat gets lost, making the system less effective.
Not Testing the System: Skipping this step can result in discovering issues after the floor is finished, requiring costly repairs.
Alternatives:
Peel-and-Stick Mats: For an easier installation, consider peel-and-stick heating mats. They simplify the process and reduce installation time.
Radiant Heat Panels: If installing underfloor heating seems too complex, radiant heat panels can be mounted on walls or ceilings as an alternative.
How Much Will It Cost?
Heated floor mat: $200 - $300
Thermostat: $50 - $100
Insulation board: $50 - $100
Tile: $1 - $5 per sq. ft. (average bathroom 50 sq. ft. = $50 - $250)
Thinset mortar: $20 - $50
Grout: $10 - $30
Tile spacers: $5 - $10
Trowel: $10 - $20
Utility knife: $5 - $15
Tape measure: $10 - $20
Level: $10 - $30
Sponge: $2 - $5
Total cost: $422 - $935
Budget-friendly alternatives:
Heated floor mat: Consider a smaller mat for $100 - $150
Tile: Use vinyl tiles at $0.50 - $2 per sq. ft. (50 sq. ft. = $25 - $100)
Thermostat: Basic models for $30 - $50
Different Ways to Customize
Materials: Instead of traditional electric heating mats, consider using hydronic systems. These use heated water running through tubes under the floor, which can be more energy-efficient. For the floor itself, ceramic tiles are popular, but you could also use porcelain, stone, or even luxury vinyl tiles designed for heated floors.
Colors: Choose warm tones like beige, brown, or terracotta to enhance the cozy feel. For a modern look, go with cool tones like gray or slate. If you want something bold, consider vibrant colors like deep blue or emerald green.
Styles: For a classic look, use subway tiles or herringbone patterns. If you prefer something contemporary, opt for large-format tiles or geometric patterns. For a rustic feel, consider wood-look tiles that mimic the appearance of hardwood but are suitable for heated floors.
Thermostats: Upgrade to a smart thermostat that can be controlled via a smartphone app. This allows you to set schedules and adjust the temperature remotely, adding convenience and energy savings.
Installation Methods: If you're not comfortable with electrical work, consider hiring a professional for the wiring part while you handle the tiling. Alternatively, use snap-together tiles with built-in heating elements for a simpler DIY project.
Additional Features: Add a timer to your heating system so it only runs when needed, saving energy. Consider integrating the heated floor with a home automation system for seamless control.
Safety: Use anti-slip coatings on your tiles to prevent accidents, especially in a wet environment like a bathroom. Ensure the heating system has a ground fault circuit interrupter (GFCI) for added safety.
Eco-Friendly Ideas
Eco-friendly materials can make your heated bathroom floor project more sustainable. Cork flooring is a great option. It's renewable, biodegradable, and provides good insulation. Recycled tiles are another choice. They come in various styles and reduce waste.
For the heating system, consider electric radiant floor heating. It uses less energy than traditional heating methods. Hydronic systems use water heated by a boiler, which can be powered by renewable energy sources like solar panels.
Insulation is key to efficiency. Use recycled insulation materials to keep the heat from escaping. This reduces energy consumption.
When installing, use low-VOC adhesives and grouts. These products emit fewer harmful chemicals, improving indoor air quality.
Reuse existing materials when possible. If you’re replacing an old floor, see if any parts can be repurposed. This reduces waste and saves money.
Smart thermostats can help manage energy use. They allow you to set schedules and control the temperature remotely, ensuring the floor is only heated when needed.
By choosing eco-friendly options and reusing materials, you can create a warm, sustainable bathroom floor.
Your Cozy Bathroom Awaits
Installing a heated bathroom floor isn't as tough as it sounds. With the right tools, a bit of patience, and some elbow grease, you can transform your bathroom into a warm, inviting space. Remember to measure your floor area accurately, choose the right heating system, and follow the manufacturer's instructions closely. Don't rush the process; take your time to ensure everything is installed correctly. Once the floor is in place, you'll enjoy the comfort and luxury of a heated bathroom floor every day. So, roll up your sleeves, gather your materials, and get started. Your cozy bathroom awaits, and you'll be glad you took on this DIY project. Happy installing!
How do I choose the right heated floor system for my bathroom?
Look for electric or hydronic systems. Electric ones are easier to install and great for small spaces. Hydronic systems use hot water and are better for larger areas. Consider your budget, bathroom size, and installation complexity.
Can I install a heated bathroom floor myself?
Yes, you can! If you're comfortable with basic wiring and tile work, you can tackle this project. Just follow the manufacturer's instructions carefully. If you're unsure, hiring a professional might be a good idea.
How much will it cost to install a heated bathroom floor?
Costs vary based on the system type and bathroom size. Electric systems range from $5 to $12 per square foot, while hydronic systems can be $6 to $20 per square foot. Don't forget to factor in labor costs if you're not doing it yourself.
How long does it take to install a heated bathroom floor?
Installation time depends on your experience and bathroom size. For a small bathroom, it might take a weekend. Larger bathrooms or more complex systems could take several days.
Do heated bathroom floors increase energy bills?
They can, but not by much. Electric systems use about the same energy as a light bulb. Hydronic systems are more energy-efficient but require a boiler. Using a thermostat helps control energy use.
Are heated bathroom floors safe?
Yes, they're safe when installed correctly. Make sure to follow safety guidelines and use GFCI (Ground Fault Circuit Interrupter) outlets for electric systems. Regular maintenance ensures long-term safety.
Can I install heated floors under any type of flooring?
Most heated floor systems work well under tile, stone, and laminate. Some can even go under vinyl or carpet. Always check the manufacturer's recommendations for compatibility.