
Home>Home & Furniture>Bathroom>DIY Shower Wall Ideas: Creative Bathroom Decor
Bathroom
DIY Shower Wall Ideas: Creative Bathroom Decor
Published: July 17, 2024
Discover creative DIY shower wall ideas to transform your bathroom decor. Explore unique designs, materials, and tips to elevate your shower space effortlessly.
(Many of the links in this article redirect to a specific reviewed product. Your purchase of these products through affiliate links helps to generate commission for Twigandthistle.com, at no extra cost. Learn more)
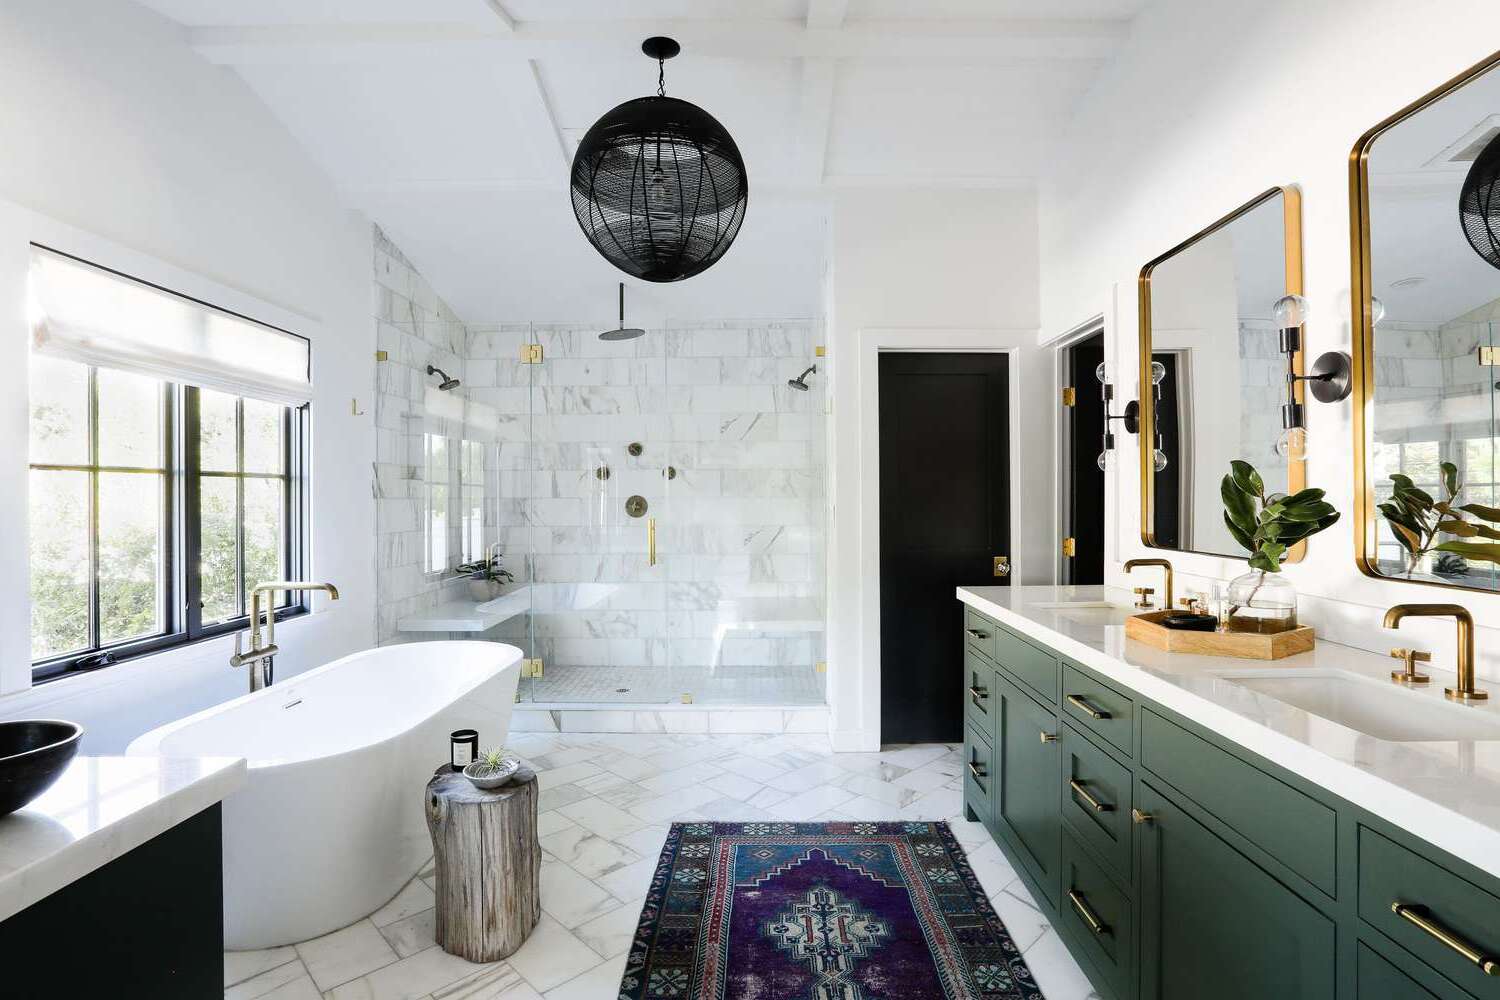
Updating your bathroom can be fun and rewarding. One easy way to refresh your shower space is by creating your own shower wall designs. DIY shower wall projects allow you to add a personal touch while sticking to a budget. From colorful tiles to rustic wood panels, there are many options to explore. You can mix and match materials, patterns, and textures for a unique look. Whether you prefer a modern, classic, or eclectic style, there's something for everyone. Transforming your shower walls will not only improve aesthetics but can also boost the value of your home.
Getting Ready for Your DIY Project
Gather Materials: Collect all necessary tools and materials like tiles, adhesive, grout, spacers, a trowel, and a level.
Safety Gear: Wear safety goggles, gloves, and a dust mask to protect yourself from debris and dust.
Clear the Area: Remove any items from the shower area. Ensure the workspace is clean and dry.
Turn Off Water: Shut off the water supply to avoid any leaks or accidents.
Measure and Plan: Measure the shower walls accurately. Plan the tile layout to avoid awkward cuts.
Prepare the Walls: Clean the walls thoroughly. Repair any damage and ensure the surface is smooth.
Set Up Workspace: Lay down a drop cloth to protect the floor. Arrange tools and materials within easy reach.
Mix Adhesive: Follow the instructions on the adhesive package. Mix only what you can use in a short time.
Mark Guidelines: Use a level and pencil to draw horizontal and vertical guidelines on the wall. This helps keep tiles straight.
Ventilation: Ensure the bathroom is well-ventilated. Open windows or use a fan to circulate air.
What You Need: Materials and Tools
Tiles: Choose from ceramic, porcelain, or glass tiles. These come in various colors and patterns to match your style.
Tile Adhesive: This sticky substance helps tiles stick to the wall. Make sure to get one suitable for bathroom use.
Grout: Fills the gaps between tiles. Available in different colors to complement your tiles.
Tile Spacers: Small plastic pieces that ensure even spacing between tiles.
Tile Cutter: A tool to cut tiles to fit around edges and corners.
Trowel: Used to spread tile adhesive on the wall.
Grout Float: Helps to apply grout smoothly between tiles.
Sponge: Cleans excess grout off tiles after application.
Level: Ensures tiles are straight and even.
Measuring Tape: Measures the area to ensure you buy enough tiles and materials.
Pencil: Marks cutting lines on tiles.
Safety Gear: Includes gloves and goggles to protect your hands and eyes while cutting tiles and applying adhesive.
Sealant: Applied after grouting to protect tiles and grout from water damage.
Bucket: Holds water for cleaning tools and mixing grout.
Drill with Mixing Paddle: Mixes grout and adhesive thoroughly.
Caulk and Caulk Gun: Seals edges where tiles meet the tub or shower base to prevent water seepage.
Skill Level and Time Commitment
Skill Level: Intermediate
Time Required: Approximately 1-2 days
- Planning and Measuring: 1-2 hours
- Gathering Materials: 1-2 hours
- Preparing the Surface: 2-3 hours
- Installing Tiles or Panels: 6-8 hours
- Grouting and Sealing: 2-3 hours
- Drying Time: 12-24 hours
How to Do It: Step-by-Step Guide
Choose Your Material:
- Tile: Ceramic, porcelain, or glass tiles.
- Acrylic Panels: Easy to install and maintain.
- Stone Veneer: Gives a natural look.
- Waterproof Wallpaper: For a unique design.
Measure the Area:
- Use a tape measure to get the height and width of the shower wall.
- Write down the measurements.
Prepare the Wall:
- Clean the wall with a mild detergent.
- Remove any old tiles or wallpaper.
- Repair any cracks or holes with spackle.
Cut the Material:
- Use a tile cutter or utility knife to cut the material to fit the measurements.
- Wear safety goggles and gloves.
Apply Adhesive:
- Spread tile adhesive or wall glue on the wall using a notched trowel.
- Work in small sections to prevent the adhesive from drying out.
Place the Material:
- Press the tiles or panels firmly onto the adhesive.
- Use tile spacers to ensure even gaps between tiles.
- For wallpaper, smooth out any bubbles with a squeegee.
Grout the Tiles (if using tiles):
- Mix the grout according to the package instructions.
- Apply grout with a rubber float, pressing it into the gaps.
- Wipe off excess grout with a damp sponge.
Seal the Edges:
- Use silicone caulk to seal the edges where the wall meets the tub or shower base.
- Smooth the caulk with a caulk smoothing tool or your finger.
Let It Dry:
- Allow the adhesive, grout, and caulk to dry for at least 24 hours.
- Avoid using the shower during this time.
Clean Up:
- Wipe down the new shower wall with a damp cloth.
- Remove any remaining adhesive or grout residue.
Enjoy Your New Shower Wall:
- Add any finishing touches like shelves or hooks.
- Step back and admire your work.
Helpful Tips and Tricks
Plan your design before starting. Sketch out your ideas to visualize the final look.
Use waterproof materials like tile, vinyl, or acrylic. These prevent water damage and mold growth.
Measure twice, cut once. Accurate measurements save time and materials.
Prep the surface. Clean walls thoroughly and repair any damage before applying new materials.
Use a level to ensure tiles or panels are straight. Crooked lines can ruin the look.
Seal all edges. Use waterproof sealant around edges and corners to prevent leaks.
Consider peel-and-stick tiles for an easy, mess-free option. They’re simple to install and remove.
Mix and match patterns. Combine different tile shapes or colors for a unique design.
Add storage. Install built-in shelves or niches for a functional and stylish touch.
Ventilation is key. Ensure your bathroom has proper ventilation to avoid moisture buildup.
Common mistakes to avoid:
Skipping waterproofing. Always use a waterproof membrane behind tiles or panels.
Ignoring grout lines. Uneven grout lines can make the wall look sloppy.
Using the wrong adhesive. Make sure to use adhesive designed for wet areas.
Rushing the job. Take your time to ensure everything is aligned and secure.
Alternatives for materials or methods:
Painted walls with waterproof paint can be a quick and cost-effective option.
Glass panels offer a sleek, modern look and are easy to clean.
Stone veneer adds a natural, rustic feel to your shower.
Recycled materials like reclaimed wood or metal can create a unique, eco-friendly design.
Budgeting Your DIY Shower Wall
Tiles: Basic ceramic tiles cost around $1-$5 per square foot. For a 100 square foot shower wall, expect to spend $100-$500.
Adhesive: Tile adhesive costs about $10-$20 per gallon. One gallon covers approximately 25 square feet, so you'll need 4 gallons, totaling $40-$80.
Grout: Grout costs around $10-$15 per 10-pound bag. One bag covers about 100 square feet, so you'll need one bag, costing $10-$15.
Waterproofing Membrane: A waterproofing membrane costs about $1.50-$2 per square foot. For 100 square feet, expect to spend $150-$200.
Tools: Basic tools include a tile cutter ($20-$50), notched trowel ($5-$10), grout float ($5-$10), and a sponge ($2-$5). Total for tools: $32-$75.
Sealant: Tile sealant costs around $15-$25 per quart. One quart should be enough, costing $15-$25.
Budget-Friendly Alternatives: Instead of ceramic tiles, consider peel-and-stick tiles, which cost about $1-$3 per square foot. For 100 square feet, this would be $100-$300. Reuse tools from previous projects or borrow from friends to save on costs.
Total estimated cost: $347-$895.
Personalize Your Bathroom Decor
Tile Patterns: Use subway tiles for a classic look, or go with hexagon tiles for a modern touch. Mix and match different shapes for a unique design.
Materials: Instead of traditional ceramic, try glass tiles for a sleek, shiny finish. Natural stone like marble or slate adds a luxurious feel. For a rustic vibe, consider wood-look tiles.
Colors: Brighten up the space with bold colors like teal or mustard. For a calming effect, use pastel shades such as mint green or soft pink. Monochrome black and white can create a timeless, elegant look.
Accent Walls: Create a focal point with an accent wall. Use mosaic tiles or a different color to make it stand out. Add a pattern like herringbone or chevron for extra flair.
Textures: Add depth with textured tiles. Choose 3D tiles for a modern, eye-catching design. Matte finishes can provide a more subtle, sophisticated look.
Grout Colors: Change the look by using contrasting grout. Dark grout with light tiles can make the pattern pop, while matching grout offers a seamless appearance.
Stencils and Decals: Use stencils to paint designs directly on the wall. Vinyl decals can add temporary patterns or images, perfect for renters.
Mixed Materials: Combine tiles with other materials like wood panels or metal accents. This can create a unique, eclectic style.
Shelving and Niches: Incorporate built-in shelves or niches for storage. Use the same tile or a contrasting material to highlight these areas.
Lighting: Install LED strips behind glass tiles for a glowing effect. Use recessed lighting to highlight specific areas or features.
Eco-Friendly Ideas for Your Project
Reclaimed Wood: Use old barn wood or pallets. Sand and seal them to make them water-resistant. This gives a rustic look and reuses materials that might otherwise go to waste.
Recycled Glass Tiles: These tiles come from old bottles and windows. They add a colorful, modern touch while reducing landfill waste.
Bamboo Panels: Bamboo grows quickly, making it a sustainable choice. It's also naturally water-resistant, perfect for shower walls.
Cork Tiles: Cork is renewable and has natural anti-microbial properties. Seal it properly to make it water-resistant.
Salvaged Metal Sheets: Old metal roofing or siding can be repurposed. Clean and treat them to prevent rust, giving an industrial vibe.
Eco-Friendly Paint: Choose low-VOC or zero-VOC paints. These reduce harmful emissions and are better for indoor air quality.
Recycled Plastic Panels: Made from recycled bottles, these panels are durable and waterproof. They come in various colors and patterns.
Natural Stone: Use stones from local quarries. This reduces transportation emissions and supports local businesses.
Upcycled Ceramic Tiles: Find old tiles at thrift stores or salvage yards. Mix and match for a unique, mosaic look.
Hempcrete Panels: Made from hemp fibers and lime, these panels are eco-friendly and mold-resistant. Seal them for use in wet areas.
Your Bathroom, Your Canvas
You've got all the tools and ideas to transform your shower walls into something special. Whether you go for tile, paint, or peel-and-stick options, each choice brings its own flair. Remember, the key is to match your style and needs. Don't be afraid to mix materials or try something new. A little creativity can turn a plain bathroom into a personal oasis. Plus, doing it yourself saves money and gives you a sense of accomplishment. So grab those tools, roll up your sleeves, and start creating a space that truly reflects you. Happy DIY-ing!
What materials can I use for DIY shower walls?
You can use tiles, acrylic panels, fiberglass, stone, or even waterproof wallpaper. Each has its own look and level of difficulty.
How do I waterproof my shower walls?
Apply a waterproof membrane or sealant before installing your chosen material. This prevents water from seeping through and causing damage.
Can I paint my shower walls?
Yes, but you need waterproof paint. Regular paint won't hold up against moisture. Make sure to prep the surface properly.
How do I clean DIY shower walls?
Use a mild cleaner and a soft cloth. Avoid harsh chemicals that can damage the material. Regular cleaning keeps mold and mildew at bay.
Are DIY shower walls expensive?
Costs vary based on materials. Tiles and stone can be pricey, while acrylic panels and waterproof wallpaper are more budget-friendly.
How long does it take to install DIY shower walls?
Depends on the material and your skill level. Tiles might take a few days, while acrylic panels can be done in a day.
Do I need special tools for DIY shower walls?
Basic tools like a measuring tape, level, utility knife, and adhesive are usually enough. Some materials might need specific tools, so check instructions.