
Home>Create & Decorate>DIY & Crafts>Plywood Barn Door: A DIY Guide To Crafting A Rustic And Functional Door
DIY & Crafts
Plywood Barn Door: A DIY Guide To Crafting A Rustic And Functional Door
Published: May 8, 2024

Content Creator specializing in woodworking and interior transformations. Caegan's guides motivate readers to undertake their own projects, while his custom furniture adds a personal touch.
Learn how to create a rustic and functional plywood barn door with our comprehensive DIY guide. Perfect for DIY & Crafts enthusiasts.
(Many of the links in this article redirect to a specific reviewed product. Your purchase of these products through affiliate links helps to generate commission for Twigandthistle.com, at no extra cost. Learn more)
Introduction
Are you looking to add a touch of rustic charm to your home? A plywood barn door could be the perfect addition to your interior. Not only does it bring a cozy, farmhouse feel to any room, but it also serves as a functional space-saving solution. In this DIY guide, we will walk you through the step-by-step process of crafting your very own plywood barn door. Whether you're a seasoned DIY enthusiast or a beginner looking for a rewarding project, this guide will help you create a beautiful and practical addition to your home. Let's roll up our sleeves and get started!
Materials Needed
To begin your plywood barn door project, you will need the following materials:
- Plywood: Choose a high-quality plywood that is sturdy and durable. The thickness of the plywood will depend on the size and weight of the door you want to create.
- Wood Boards: These will be used to construct the door frame. Opt for boards that are straight and free from knots for a polished look.
- Wood Glue: A strong wood glue will be essential for securing the joints and ensuring the door's stability.
- Screws: Select screws that are appropriate for woodworking, ensuring they are long enough to securely fasten the plywood and boards together.
- Barn Door Hardware Kit: This will include the necessary components such as the track, rollers, and handles for smooth sliding functionality.
- Sandpaper: To smooth out any rough edges and surfaces before finishing.
- Wood Stain or Paint: Choose a finish that complements your interior decor and provides protection for the wood.
- Sealer: Applying a sealer will help protect the wood from moisture and wear, extending the lifespan of your barn door.
- Safety Equipment: Don't forget safety goggles, gloves, and a dust mask to protect yourself during the construction process.
Gathering these materials will set you up for a successful and enjoyable plywood barn door project.
Tools Required
To bring your plywood barn door to life, you will need the following essential tools:
- Circular Saw: Ideal for making straight and precise cuts in the plywood and wood boards.
- Drill and Bits: Necessary for creating holes for screws and assembling various components of the door.
- Screwdriver: Both manual and electric screwdrivers will be handy for driving screws into place.
- Clamps: These will help hold the wood pieces together securely during assembly.
- Tape Measure: An indispensable tool for accurately measuring the dimensions of the door and ensuring precise cuts.
- Level: To ensure that your door is installed perfectly straight and plumb.
- Sanding Block or Orbital Sander: For smoothing out rough edges and achieving a polished finish on the wood.
- Paintbrush or Staining Cloth: Depending on your chosen finish, you'll need a paintbrush or staining cloth for applying the wood stain or paint.
- Rags: Useful for wiping away excess stain or paint and cleaning up any spills.
- Safety Equipment: In addition to the safety equipment mentioned in the materials section, having a first aid kit on hand is always a good idea for any DIY project.
Having these tools at your disposal will make the construction process smoother and more efficient, ensuring that you can tackle each step of the project with confidence.
Step 1: Measuring and Cutting the Plywood
The first crucial step in crafting your plywood barn door is to accurately measure and cut the plywood to the desired dimensions. Here's a detailed guide to help you through this process:
-
Measure the Door Opening: Begin by measuring the height and width of the door opening where the barn door will be installed. It's essential to take precise measurements to ensure that the door fits perfectly within the space.
-
Mark the Plywood: Using a straight edge and a pencil, mark the measurements on the plywood. Double-check the dimensions before making any cuts to avoid errors.
-
Cut the Plywood: With the help of a circular saw, carefully cut the plywood along the marked lines. It's recommended to use a saw guide to ensure straight and accurate cuts. Take your time and prioritize safety during this step.
-
Sand the Edges: After cutting the plywood, use sandpaper to smooth out any rough edges and ensure a clean finish. Pay attention to the corners and edges to prevent splinters and achieve a professional look.
By following these steps, you'll successfully complete the crucial task of measuring and cutting the plywood for your barn door, setting the foundation for the next stages of the project.
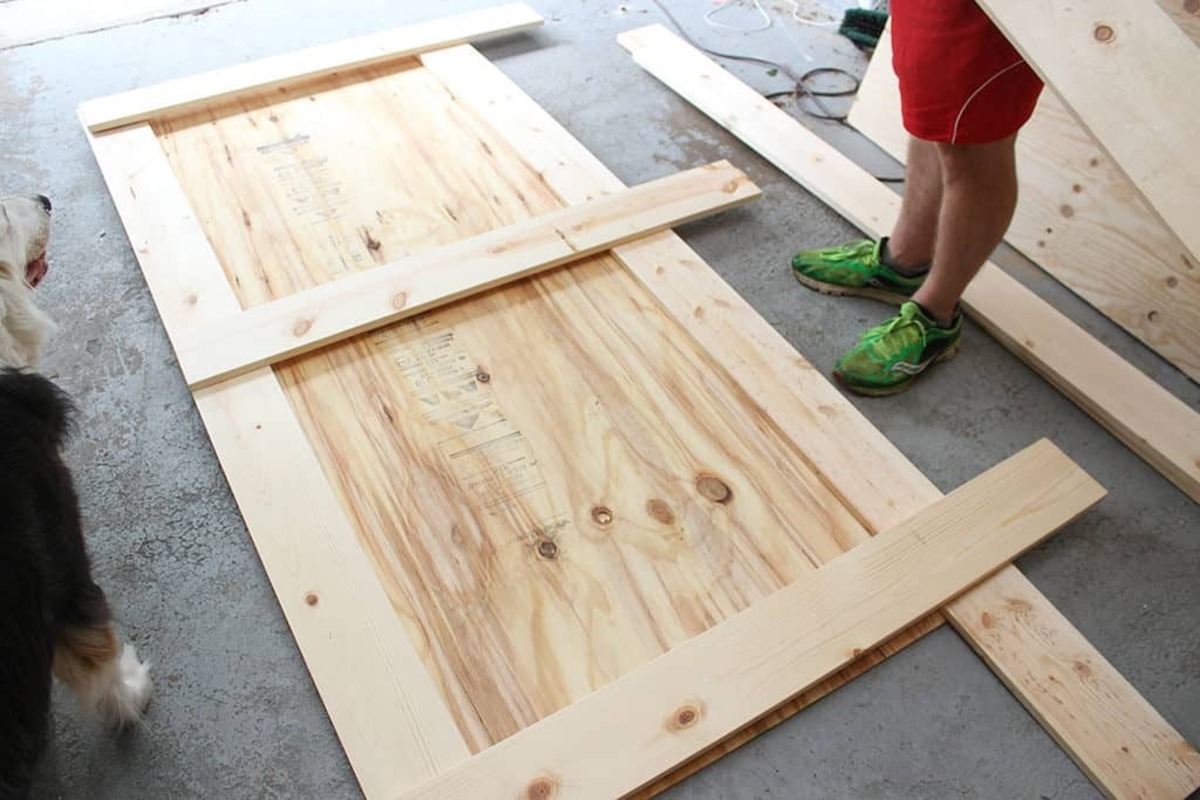
Step 2: Assembling the Door Frame
Once you have the plywood cut to the appropriate size, the next step is to assemble the door frame. This is where the structure of your barn door begins to take shape. Follow these detailed steps to ensure a sturdy and well-constructed door frame:
-
Prepare the Wood Boards: Lay out the wood boards that will form the frame of the door. Ensure that they are arranged according to the design you have in mind, with the appropriate orientation and spacing.
-
Apply Wood Glue: Using a high-quality wood glue, apply a generous amount to the joints where the wood boards will connect. This will create a strong bond and enhance the stability of the door frame.
-
Secure with Screws: Once the wood glue is applied, use screws to secure the joints and reinforce the connection between the wood boards. Pre-drilling pilot holes can help prevent the wood from splitting when driving in the screws.
-
Check for Squareness: As you assemble the door frame, periodically check for squareness using a carpenter's square. This will ensure that the frame is not skewed and will result in a properly aligned door.
-
Allow for Drying Time: After the frame is assembled, allow the wood glue to dry completely before proceeding to the next step. This will ensure that the joints are solid and the frame is ready for the addition of the plywood panels.
By following these steps, you will successfully assemble a sturdy and well-constructed door frame, laying the groundwork for the next phase of the plywood barn door project.
Step 3: Attaching the Plywood Panels
With the door frame securely assembled, the next crucial step is to attach the plywood panels to complete the rustic look of your barn door. Follow these detailed steps to ensure a seamless and polished finish:
-
Positioning the Panels: Place the cut plywood panels onto the assembled door frame, ensuring that they align evenly and symmetrically. Take the time to adjust the positioning to achieve a balanced and visually appealing arrangement.
-
Securing the Panels: Once the panels are positioned correctly, use wood glue to adhere them to the door frame. Apply a generous amount of wood glue along the edges of the frame where the plywood panels will make contact. This will create a strong bond between the panels and the frame.
-
Reinforcing with Screws: To further reinforce the attachment of the plywood panels, use screws to secure them to the door frame. Drive the screws through the plywood and into the frame, ensuring that they are evenly spaced and driven in securely. This step adds structural integrity to the door and prevents the panels from shifting over time.
-
Finishing Touches: After the plywood panels are securely attached, use sandpaper to smooth out any rough edges and ensure a uniform surface. Pay attention to the corners and edges to achieve a professional and polished look. This step prepares the door for the application of the chosen finish, whether it be paint or wood stain.
By following these steps, you will successfully attach the plywood panels to the door frame, bringing your plywood barn door one step closer to completion.
Step 4: Adding Hardware and Finishing Touches
The final step in completing your plywood barn door involves adding the necessary hardware and applying the finishing touches to enhance both its functionality and aesthetic appeal. Follow these detailed steps to ensure that your barn door is fully equipped and visually stunning:
-
Install Barn Door Hardware Kit: Begin by installing the barn door hardware kit, which typically includes a track, rollers, and handles. Follow the manufacturer's instructions to securely mount the track to the wall above the door opening. Then, attach the rollers to the top of the door and hang it on the track. Ensure that the rollers glide smoothly along the track for seamless operation.
-
Add Door Handles or Pulls: Depending on your preference, select and install door handles or pulls that complement the overall design of your barn door. Whether you opt for sleek modern handles or traditional rustic pulls, ensure that they are securely attached and easy to grip for effortless opening and closing.
-
Apply Wood Stain or Paint: Once the hardware is in place, it's time to apply the chosen finish to the barn door. Whether you prefer the natural beauty of wood grain enhanced by a stain or a pop of color with paint, ensure that the finish complements your interior decor. Apply the stain or paint evenly, following the manufacturer's recommendations for drying and curing times.
-
Seal the Wood: After the stain or paint has dried, consider applying a wood sealer to protect the surface of the door. A sealer will provide an additional layer of defense against moisture, dirt, and wear, prolonging the lifespan of your barn door and preserving its appearance over time.
-
Final Adjustments and Testing: Before considering the project complete, make any final adjustments to the hardware and ensure that the door operates smoothly. Test the door's sliding functionality, handles, and overall stability to confirm that everything is in perfect working order.
By following these steps, you will add the essential hardware and apply the finishing touches to your plywood barn door, transforming it into a stunning and functional feature of your home.
Conclusion
Congratulations! You have successfully completed the journey of crafting your very own plywood barn door. By following this DIY guide, you have not only added a touch of rustic charm to your home but also created a functional and space-saving solution. Your plywood barn door stands as a testament to your craftsmanship and dedication to enhancing your living space. As you admire the finished product, take pride in the fact that you have the skills and creativity to bring a unique and practical element to your home. Whether it's the smooth sliding functionality, the carefully chosen finish, or the sturdy construction, your plywood barn door is a reflection of your personal style and ingenuity. Now, step back and enjoy the rustic elegance and functionality that your new barn door brings to your home.