
Home>Create & Decorate>DIY & Crafts>Pinhole Camera DIY: Capture Moments With A Homemade Camera
DIY & Crafts
Pinhole Camera DIY: Capture Moments With A Homemade Camera
Published: May 27, 2024

Senior Editor in Create & Decorate, Kathryn combines traditional craftsmanship with contemporary trends. Her background in textile design and commitment to sustainable crafts inspire both content and community.
Discover how to create your own pinhole camera with our step-by-step DIY guide. Capture unforgettable moments with this fun and easy homemade camera project. Perfect for DIY & Crafts enthusiasts!
(Many of the links in this article redirect to a specific reviewed product. Your purchase of these products through affiliate links helps to generate commission for Twigandthistle.com, at no extra cost. Learn more)
Introduction
Are you looking for a fun and creative way to capture moments? Look no further than a pinhole camera DIY project! Building your own pinhole camera is not only a rewarding experience, but it also allows you to explore the basics of photography in a unique and hands-on way. In this article, we'll guide you through the process of creating your very own pinhole camera, from gathering the necessary materials to capturing stunning images. Get ready to embark on a journey of creativity and discovery as we delve into the world of DIY photography!
Materials Needed
To embark on your pinhole camera DIY project, you'll need a few basic materials that can be easily found around your home or purchased inexpensively. Here's what you'll need to get started:
-
Cardboard: Look for a sturdy piece of cardboard that will serve as the body of your pinhole camera. You can repurpose an old cereal box or purchase a sheet of cardboard from a craft store.
-
Aluminum Foil: This will be used to create the pinhole for your camera. Make sure to have a roll of aluminum foil on hand for this essential step.
-
Black Electrical Tape: To ensure that your pinhole camera is lightproof, black electrical tape will come in handy for sealing any seams or edges.
-
Scissors: A pair of scissors will be necessary for cutting the cardboard to the desired shape and size.
-
Needle or Pin: This will be used to create the pinhole in the aluminum foil. Make sure to use a small, sharp needle or pin for this delicate task.
-
Opaque Material: You'll need a piece of opaque material, such as black construction paper or fabric, to serve as the shutter for your pinhole camera.
-
Ruler and Pencil: These tools will be useful for measuring and marking the cardboard as you assemble your pinhole camera.
-
Photo Paper or Film: Finally, you'll need photo paper or film to capture the images taken with your homemade pinhole camera. You can easily find these materials at a photography supply store or online.
Gathering these materials is the first step in bringing your pinhole camera DIY project to life. Once you have everything you need, you'll be ready to start building your very own camera and capturing unique, vintage-style images.
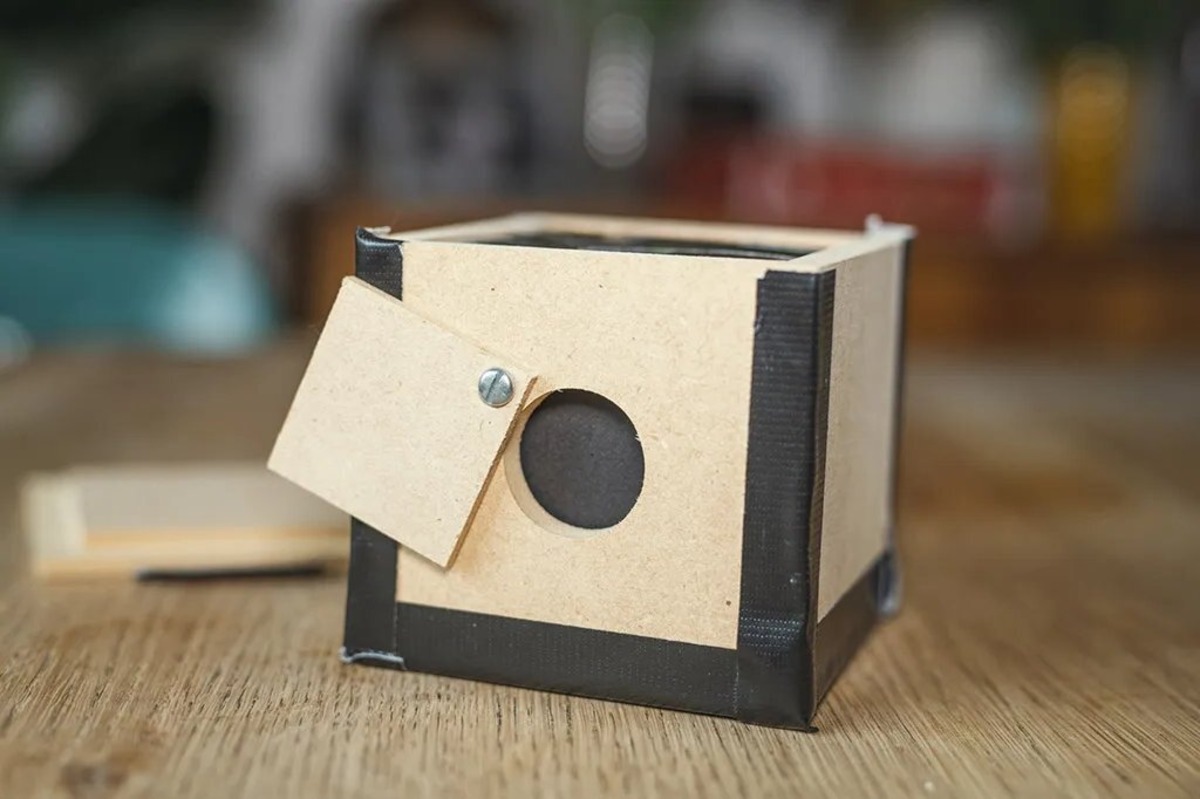
Building the Pinhole Camera
Now that you have gathered all the necessary materials, it's time to roll up your sleeves and start building your pinhole camera. Follow these steps to bring your DIY camera to life:
-
Prepare the Cardboard: Begin by cutting the cardboard into the desired shape for your pinhole camera. A classic design is a rectangular box shape, but feel free to get creative with different shapes and sizes. Use a ruler and pencil to mark where you will need to cut and fold the cardboard.
-
Create the Pinhole: Take a small piece of aluminum foil and carefully poke a tiny hole in the center using a needle or pin. This will serve as the aperture for your pinhole camera. Make sure the hole is as small and precise as possible to achieve sharp images.
-
Assemble the Camera Body: Use the black electrical tape to seal the edges and seams of the cardboard, ensuring that no light can enter the camera except through the pinhole. This step is crucial for the proper functioning of your pinhole camera.
-
Attach the Pinhole: Place the aluminum foil with the pinhole over an opening in the camera body. Secure it in place with more black electrical tape, ensuring that it is positioned precisely to allow light to enter the camera.
-
Add the Shutter: Cut a piece of opaque material to serve as the shutter for your pinhole camera. This can be attached to the camera body with a small hinge or simply held in place with tape. The shutter will allow you to control the exposure of the photo paper or film inside the camera.
-
Load the Camera: Once your pinhole camera is assembled, it's time to load it with photo paper or film. Make sure to do this in a dark room or under low light to avoid exposing the paper or film prematurely.
-
Seal the Camera: Close the camera securely and ensure that no light can enter except through the pinhole and when the shutter is open. Your pinhole camera is now ready to use!
By following these steps, you'll have your very own homemade pinhole camera that is ready to capture unique and captivating images. Get ready to explore the world of photography in a whole new light with your DIY creation.
Using the Pinhole Camera
Now that you have successfully built your pinhole camera, it's time to put it to use and start capturing some amazing images. Here's how you can make the most of your DIY camera:
-
Find the Right Lighting: When using a pinhole camera, lighting plays a crucial role in the quality of your images. Look for well-lit scenes with a good balance of light and shadow. Experiment with different lighting conditions to see how they affect the final outcome of your photos.
-
Set Up Your Shot: Position your pinhole camera on a stable surface or tripod to ensure that it remains steady during the exposure. Take your time to compose your shot and consider the framing and perspective before capturing the image.
-
Open the Shutter: When you're ready to take a photo, open the shutter of your pinhole camera to allow light to enter and expose the photo paper or film inside. The length of the exposure will depend on the lighting conditions and the effect you want to achieve. Experiment with different exposure times to see how they impact the final image.
-
Close the Shutter: Once the desired exposure time has elapsed, close the shutter to stop the light from entering the camera. This marks the end of the exposure and ensures that the image is properly captured on the photo paper or film.
-
Develop Your Images: After capturing your photos, it's time to develop them to reveal the unique, vintage-style images produced by your pinhole camera. If you're using photo paper, you can develop the images in a darkroom using traditional darkroom techniques. If you're using film, you can have it developed at a photography lab or explore the process of developing it yourself.
-
Experiment and Have Fun: One of the most exciting aspects of using a pinhole camera is the element of experimentation. Embrace the unpredictability and artistic nature of pinhole photography. Try capturing a variety of subjects, from landscapes to portraits, and see how the pinhole camera's unique characteristics translate into captivating images.
By following these steps and tips, you can fully explore the creative potential of your homemade pinhole camera and capture stunning, one-of-a-kind images that showcase the beauty of pinhole photography. Get ready to embark on a journey of artistic expression and discovery as you unleash the full potential of your DIY camera.
Tips for Capturing Great Photos
-
Embrace the Quirks: Embrace the unique quirks and imperfections of pinhole photography. The soft focus, vignetting, and extended exposure times can add a dreamy and ethereal quality to your images, so don't be afraid to experiment and push the boundaries of traditional photography.
-
Patience is Key: Patience is essential when working with a pinhole camera. Since the exposure times are longer compared to conventional cameras, it's important to remain patient and allow the camera to work its magic. The resulting images are well worth the wait.
-
Experiment with Composition: With a pinhole camera, you have the opportunity to experiment with unconventional compositions. Play with angles, perspectives, and framing to create visually captivating images that challenge the norms of traditional photography.
-
Explore Different Subjects: From sweeping landscapes to intimate portraits, a pinhole camera can capture a wide range of subjects with its unique charm. Experiment with different subjects and scenes to discover the diverse creative possibilities offered by your DIY camera.
-
Master the Art of Timing: Timing is crucial in pinhole photography. Pay attention to the movement of your subjects and how it translates into the final image. Experiment with capturing motion and stillness to create dynamic and engaging photographs.
-
Embrace Natural Light: Natural light can work wonders with a pinhole camera. Take advantage of the ever-changing natural light to create captivating images with unique atmospheres and moods. The interplay of light and shadow can add depth and drama to your photographs.
-
Capture the Essence of Time: Pinhole photography has a timeless quality that can evoke a sense of nostalgia and history. Use this characteristic to your advantage by capturing scenes that convey a sense of timelessness and evoke emotions and memories.
-
Celebrate Imperfections: Embrace the imperfections that come with pinhole photography. The subtle distortions, light leaks, and unexpected outcomes can add character and charm to your images, making each photograph a truly unique work of art.
By incorporating these tips into your pinhole photography practice, you can elevate your images and unlock the full creative potential of your homemade camera. Get ready to capture moments in a way that is truly one-of-a-kind and reflective of the artistry and ingenuity of pinhole photography.
Conclusion
In conclusion, embarking on a pinhole camera DIY project opens up a world of creative possibilities and hands-on exploration of photography. By gathering simple materials and following the steps to build your own pinhole camera, you can delve into the art of capturing unique, vintage-style images that showcase the charm and character of pinhole photography. With the tips provided, you can fully embrace the quirks and artistic potential of your DIY camera, allowing you to create captivating images that celebrate imperfections and evoke a timeless quality. Whether you're a photography enthusiast or simply looking for a fun and rewarding DIY project, building and using a pinhole camera is a truly enriching experience that brings the magic of photography to life in a whole new way. Get ready to capture moments in a way that is truly one-of-a-kind and reflective of the artistry and ingenuity of pinhole photography.